The Bold and Beautiful Layer Styles
Layer styles have an interesting history. Before the handy Layer Styles dialog box, through which you could instantaneously apply these lovely features, you had to do all this stuff manually. Time was, the arduous steps you took to get these effects was considered a right of passage marking the way of all longtime Photoshop users. Of course software engineers have to justify their salaries. So, I'm sure some bright spark must have opined, "If everyone in the industry is doing these things, why don't we bundle this stuff up and make the process a little easier?" And that's exactly what Adobe did.
While a purist may argue that the "old ways" required a level of technical and artistic sophistication now absent from the process, the fact is that creating these effects by hand was a slow, painstaking process that had very permanent effects on your pixels. These days, layer styles are fast, flexible, and totally nondestructive. Shadows, glows , beveled edges, strokes, and textures are only a small part of what layer styles can deliver.
First of all, a quick note on nomenclature . This book refers to these features ” drop shadows, glows, and whatnot ” as layer effects, but Photoshop refers to them as layer styles . Technically though, you use the Layer Style dialog box to add effects to a layer, which you then may save as a style to be called up later in the Styles palette.
The following are just a few of the many advantages to Photoshop's unique brand of layer effects:
-
They stick to the layer. Move or transform the layer and the effect tags along with it.
-
The effect is temporary. As long as you save the image in one of the four layered formats ” native Photoshop (PSD), TIFF, PDF, or PSB ” you can edit the shadows, glows, bevels, overlays, and strokes long into the future.
-
Layer effects are equally applicable to standard layers, shape layers , and editable text. This is unusual because both shape layers and editable text prohibit many kinds of changes.
-
Thanks to the Contour presets, layer effects enable you to create effects that would otherwise prove exceedingly difficult or even impossible .
-
You can combine multiple effects on a single layer.
-
You can copy an effect from one layer and paste it onto another.
-
You can save groups of effects for later use in the Styles palette.
-
The effects show up as items in the Layers palette. You can expand and collapse a list of effects, as well as temporarily disable and enable effects by clicking the familiar eyeball icons.
Enough talking in the abstract ” time to get your feet wet. The following sections cover the how, why, and what for of layer styles.
The basic varieties of layer effects
To apply a layer effect, start with an image on an independent layer. In Figure 7-8, a purple crown was created on an independent layer using the Shape tool. You can use any kind of layer you like: a shape layer, a text layer, or anything you created with the paint tools. Next , click the Add Layer Style icon at the bottom of the Layers palette ” the one that looks like a florin ( cursive f ) ” and choose any of the commands following Blending Options; or double-click anywhere on the layer thumbnail to display the Layer Style dialog box and then select an effect from the left-hand list. Use the check box to turn an effect on or off; highlight the effect name to edit its settings.
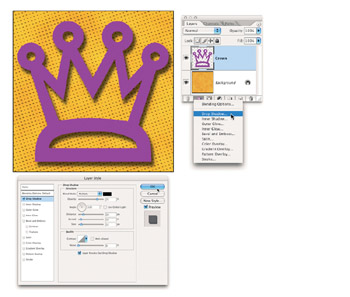
Figure 7-8: Starting with an independent layer, click the Add Layer Style icon at the bottom of the Layers palette and choose an effect (top). Then adjust the settings inside the sprawling but highly capable Layer Style dialog box (bottom).
You can select from one of the following effects:
-
Drop Shadow: The Drop Shadow command applies a common, everyday drop shadow, as seen in the first example in Figure 7-9. You specify the color , opacity, blend mode, position, size , and contour of the shadow, and Photoshop makes it pretty.
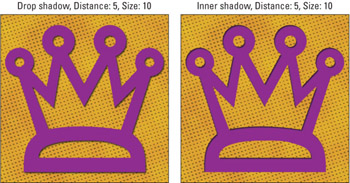
Figure 7-9: Drop shadows (left) make it look like the affected layer hovers above the layer behind it, and inner shadows (right) invert the illusion. -
Inner Shadow: This command applies a drop shadow inside the layer, as demonstrated in the second example in Figure 7-9. The command simulates the kind of shadow you'd get if the layer were punched out of the background ” that is, the background looks like it's in front, casting a shadow onto the layer. Figure 7-9 should give you an inkling of the fact that Inner Shadow is especially effective with type.
-
Outer Glow: The Outer Glow command creates a traditional halo, as seen in the first example in Figure 7-10.
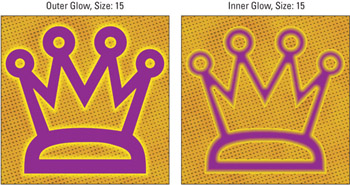
Figure 7-10: The two glow styles can make your layer glow with outer (left) or inner (right) beauty. -
Inner Glow: This command applies the glow effect inside the boundaries of the layer rather than outside, as demonstrated in the second example in Figure 7-10.
Tip To create a neon strip around the perimeter of a layer, apply both the Outer Glow and Inner Glow styles. Figure 7-11 shows one such example of a neon edge (top right), as well as a few other effects you can obtain by mixing and matching shadows and glows.
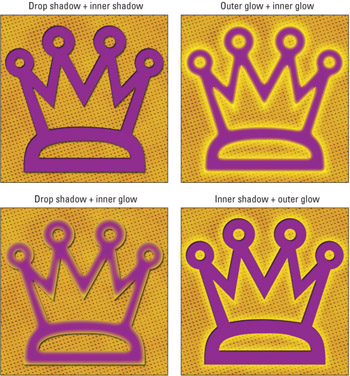
Figure 7-11: Even if you never venture beyond the Shadow and Glow styles, you can invent some intriguing combinations. -
Bevel and Emboss: The Bevel and Emboss option produces one of five distinct edge effects, as defined using the Style pop-up menu. The first four appear in Figure 7-12; the fifth one is exclusively applicable to stroked layers and requires the Stroke effect to be turned on. You can add a three-dimensional beveled edge around the outside of the layer, as in the first example in the figure. The Inner Bevel effect (top right) produces a beveled edge inside the layer. The Emboss effect (bottom left) combines inner and outer bevels. And the Pillow Emboss effect (bottom right) reverses the inner bevel so the image appears to sink in and then rise back up along the edge of the layer.
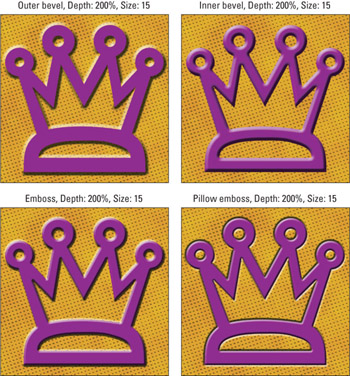
Figure 7-12: The examples above demonstrate four of the effects available when you choose Layer Layer Style Bevel and Emboss. -
Contour and Texture: The Contour and Texture options aren't actual effects, but rather modify the Bevel and Emboss effect. The Contour settings create waves in the surface of the layer that result in rippling lighting effects. Texture stamps a pattern into the surface of the layer, which creates a texture effect. Figure 7-13 illustrates these two options.
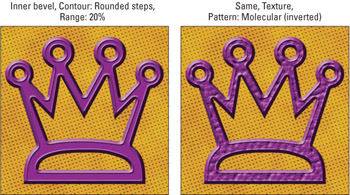
Figure 7-13: Available when using a Bevel and Emboss style, the Contour option enables you to sculpt around the boundary of a layer (left). Meanwhile, the Texture option applies a lighted surface texture to the shape (right). -
Satin: This option creates waves of repeating color that follow the outline of the layer, as seen in Figure 7-14. You define the behavior of the waves using the Contour options. One of the stranger effects, Satin can be difficult to predict. But as long as you keep the Preview check box turned on, you can see the results of your experimentation as you work.
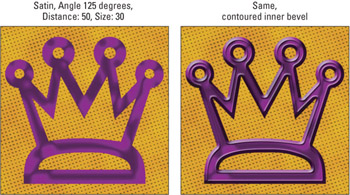
Figure 7-14: First the Satin option was applied (left) and then a contoured inner bevel to produce a more dramatic effect (right). -
Color, Gradient, and Pattern Overlay: These three options coat the layer with a solid color, a gradient, or a repeating pattern, respectively. They work almost identically to the three dynamic fills available to shape layers, as discussed in the section "Editing the stuff inside the shape" earlier in this chapter. All three can be quite useful when defining your own style presets, or when colorizing a flat layer like the crown symbol shown throughout this- section.
Figure 7-15 shows off the Gradient and Pattern Overlay effects. In the upper- left example, a black-to-transparent gradient was applied using the Multiply blend mode and an Opacity setting of 50 percent. In the upper-right example, the layer was filled with the Optical Checkerboard pattern. The figure goes on to show the two effects combined and then heaped on top of the previous inner bevel and satin effects. Then a purple Color Overlay effect was added in to produce the two permutations in Figure 7-16.
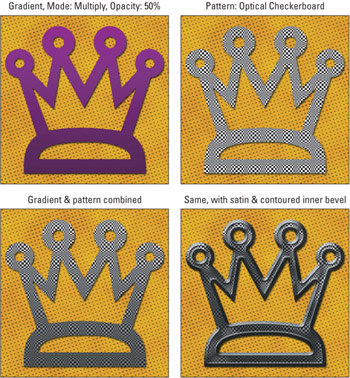
Figure 7-15: You can combine the Gradient Overlay (top left) and Pattern Overlay (top right) options to create the graduated effect (bottom-left). You can then add in the Satin and Inner Bevel effects (bottom-right).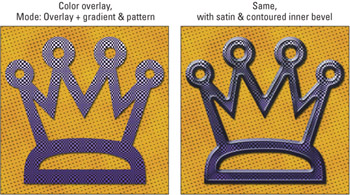
Figure 7-16: A blue Color Overlay effect as it appears when you add it to the final two examples from Figure 7-15. In each case, the blend mode is set to Overlay and the Opacity is 100 percent. -
Stroke: Use this option to trace a colored outline around a layer. The first example in Figure 7-17 features a dark blue stroke combined with a stroke emboss from the Bevel and Emboss effect category. The settings for the stroke emboss are a Depth of 200 percent, a Size of 20 pixels, and Gloss Contour set to Ring “ Double. The Stroke effect is often preferable to Edit Stroke because you can edit the effect long after applying it. By comparison, Edit Stroke recolors pixels.
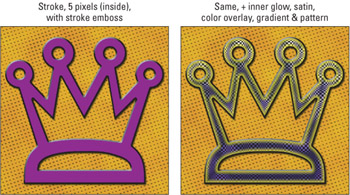
Figure 7-17: The Stroke effect is an editable alternative to the Edit Stroke command that you can use in combination with a stroke emboss (left) as well as other layer effects (right).Tip Like almost every interface element in this program, Photoshop has some handy keyboard shortcuts for navigating the Layer Styles dialog box. To switch between effects without turning them on or off, press Ctrl ( z on the Mac) plus a number key. Ctrl+1 ( z +1) highlights Drop Shadow, Ctrl+2 ( z +2) highlights Inner Shadow, Ctrl+3( z +3) highlights Outer Glow, and so on, all the way to Ctrl+0 ( z +0) for Stroke. Sadly, you cannot get to Blending Options, Contour, or Texture from the keyboard.
Inside the Layer Style dialog box
The Layer Style dialog box offers 13 panels containing more than 100 options. That may seem like a ridiculous number of settings, but in truth, every one of them serves a unique and often highly practical purpose. And thankfully, many of the options are familiar from other parts of the program. The Blend Mode pop-up menu provides access to the same modes discussed in Chapters 1 and 6. You make an effect translucent by entering a value in the Opacity option box.
Other options appear multiple times throughout the course of the dialog box. For example, all the options that appear in the Inner Shadow panel also appear in the Drop Shadow panel; the options from the Outer Glow panel appear in the Inner Glow panel; and so on. The imaginary dialog box in Figure 7-18 shows four representative effects panels ” Drop Shadow, Inner Glow, Bevel and Emboss, and Texture ” which together contain most of the options you'll encounter.
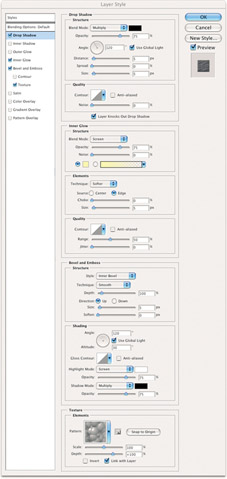
Figure 7-18: A modified snapshot of the Layer Style dialog box, featuring the Drop Shadow, Inner Glow, Bevel and Emboss, and Texture panels.
The following items explain the options in the order that they appear throughout the panels. Each option is explained only once, so if an option appears multiple times ” as so many do ” look for its first appearance in a panel to locate the corresponding discussion in the following list:
-
Blend Mode: This pop-up menu (as you may have guessed) controls the blend mode. But did you know you can use the Blend Mode menu to turn an effect upside down? Select a light color and apply the Screen mode to change a drop shadow into a directional halo. Or use a dark color with Multiply to change an outer glow into a shadow that evenly traces the edge of the layer. Figure 7-19 offers some examples.
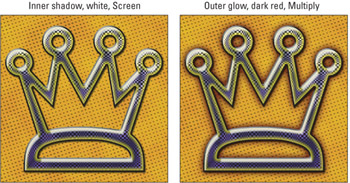
Figure 7-19: Starting with the last example in Figure 7-17, Photoshop added a white inner shadow (left) to create a soft glossy beveling effect and then surrounded the whole thing with a dark red outer glow (right). -
Color Swatch: To change the color of the shadow, glow, or beveled edge, click the color swatch. When the Color Picker is open , click in the image window to sample a color from the layered composition. When editing a glow, you can apply a gradient in place of a solid color. Click the gradient preview to create a custom gradation or select a preset from the pop-up palette.
-
Opacity: Use this option to make the effect translucent. Remember, a little bit of effect goes a long way. When in doubt, reduce the Opacity value.
-
Angle: Associated with shadows, bevels, the Satin effect, and gradients, this value controls the direction of the effect. In the case of shadows and bevels, the option controls the angle of the light source. With Satin, it controls the angle at which contour patterns overlap. And with a gradient, the Angle value represents the direction of the gradient.
Tip You can avoid the numerical Angle option and simply drag an effect inside the image window. When the Drop Shadow or Inner Shadow panel is visible, drag inside the image window to move the shadow with respect to the layer. You can also drag the contour effect when working in the Satin panel. Other draggable effects include Gradient Overlay and Pattern Overlay, although dragging affects positioning, not angle.
-
Use Global Light: In the real world, the sun casts all shadows in the same direction. One sun means one lightness and one darkness . By turning on the Use Global Light check box, you tell Photoshop to cast all direction-dependent effects ” drop shadows, inner shadows, and the five kinds of bevels ” in the same direction. If you change the angle of a drop shadow applied to Layer 1, Photoshop rotates the sun in its heaven and so changes the angle of the Pillow Emboss applied to Layer 9.
Conversely, if you turn off the check box, the directionality of your effects can be different from layer to layer.
Tip If you have established a consistent universe, you can edit the angle of the sun by choosing Layer Layer Style Global Light. Change the Angle value and all shadows and bevels created with Use Global Light turned on will move in unison . You can also set the Altitude for bevels ” the lower the number you enter, the longer the shadow cast by the layer content.
-
Distance: The Drop Shadow, Inner Shadow, and Satin panels feature a Distance value that determines the distance between the farthest edge of the effect and the corresponding edge of the layer. Like Angle, this value is affected when you drag in the image window.
-
Spread/Choke: Associated with the Drop Shadow and Outer Glow panels, the Spread option expands the point at which the effect begins outward from the perimeter of the layer. Spread changes to Choke in the Inner Shadow and Inner Glow panels, in which case it contracts the point at which the effect begins. Note that both Spread and Choke are measured as percentages of the Size value, explained next.
-
Size: One of the most ubiquitous settings, the Size value determines how far an effect expands or contracts from the perimeter of the layer. In the case of shadows and glows, the portion of the Size that is not devoted to Spread or Choke is given over to blurring. For example, if you set the Spread for Drop Shadow to 0 percent and the Size to 15 pixels, as in the top-left example in Figure 7-20, Photoshop blurs the shadow across 100 percent of the 15-pixel size. If you set the Spread to 100 percent as in the bottom-right example, 0 percent is left for blurring. The shadow expands 15 pixels out from the perimeter of the layer and has a sharp edge. Although this makes the effect seem larger, only the opaque portion of the effect has actually grown.
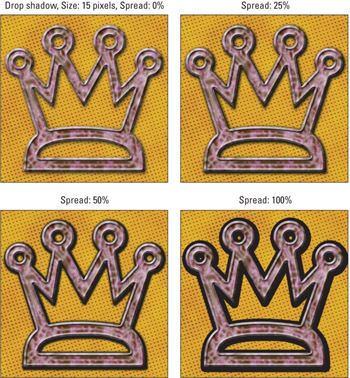
Figure 7-20: The effect of raising the Spread percentage value from 0 (top left) to 100 (bottom right) on the now-familiar crown. Note that for purposes of contrast, the color of the Satin effect was changed to white.Size and Depth observe a similar relationship in the Bevel and Emboss panel, with Depth taking the place of Spread or Choke. When adjusting a Satin effect, Size affects the length of the contoured wave pattern. And in Stroke, Size controls the thickness of the outline.
-
Contour: Photoshop creates most effects ” namely shadows, glows, bevels, and the Satin effect ” by fading a color from a specified Opacity value to transparent. The rate at which the fade occurs is determined by the Contour option. Click the down-pointing arrowhead to select from a palette of preset contours ; click the contour preview to design your own. If you think of the Contour preview as a graph, the top of the graph represents opacity and the bottom represents transparency. So a straight line from top to bottom shows a consistent fade. A spike in the graph shows the color hitting opacity and then fading away again. Figure 7-21 shows a few examples applied to a new layer.
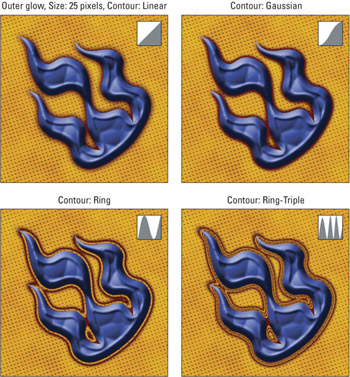
Figure 7-21: Four Contour presets combined with an Outer Glow effect. Note that the final Contour (Ring “ Triple) is available only if you bring up the menu off the Contour pop-up palette and choose the Contours library. The settings used throughout include the Screen blend mode, 100-percent Opacity, 15-percent Spread, and Softer Technique.The most challenging contours are associated with Bevel and Emboss. The Gloss Contour option controls how colors fade in and out inside the beveled edge, as if the edge were reflecting other colors around it. (Figure 7-27 offers a glimpse .) The indented Contour effect ” below Bevel and Emboss in the Layer Style list ” wrinkles the edge of the layer so that it casts different highlights and shadows.
-
Anti-aliased: If a Contour setting consists of sharp corners, you can soften them by turning this check box on. Most presets have rounded corners, making anti-aliasing unnecessary.
-
Noise: Associated strictly with shadows and glows, the Noise value randomizes the transparency of pixels. It's like using the Dissolve blend mode, except that you have control over how much randomization to apply. The Noise value does not change the color of pixels; that is the job of an option called Jitter.
-
Layer Knocks Out Drop Shadow: In the real world, if an object was translucent, you could see through it to its own shadow. However, this turns out to be an unpopular law of nature with most image editors, a lawless bunch if ever there was one. So when creating a drop shadow, Photoshop gives us the Layer Knocks Out Drop Shadow check box, which when selected makes the drop shadow invisible directly behind the layer. Turn the option off for a more natural effect.
-
Technique: Moving out of the Shadow panels and into Outer Glow, the first unique option is the Technique pop-up menu. Also available when creating bevel effects (see Figure 7-26), Technique controls how the contours of the effect are calculated. When a glow is set to Softer, as in all of the examples in Figure 7-21, Photoshop applies a modified Gaussian Blur to ensure optimal transitions between the glow and background elements. Your other option is Precise, which calculates the effect without the Gaussian adjustment, as in Figure 7-22. Mind you, the effect may remain blurry, but strictly as a function of the Spread and Contour settings. Precise may work better in tight corners, common around type and shape layers. Otherwise, stick with Softer.
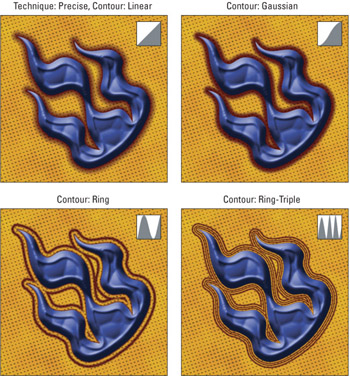
Figure 7-22: Using the examples from the previous figure, the Technique option has been set to Precise, which makes the effect hug the shape's corners a little better.The Bevel and Emboss panel doesn't provide the same kind of blurring functions that you get with shadow and glow effects, so the Technique option works a bit differently. The default setting, Smooth, averages and blurs pixels to achieve soft, rounded edges. The two Chisel settings remove the averaging to create saw-toothed abrasions into the sides of the layer. Chisel Hard results in thick cut marks; Chisel Soft averages the perimeter of the layer to create finer cuts. Increase the Soften value (described shortly) to blur the abrasions.
-
Source: When working in the Inner Glow panel, Photoshop wants to know where the glow starts. Should it glow inward from the perimeter of the layer (Edge) or outward from the middle (Center)? Figure 7-23 shows an example of each.
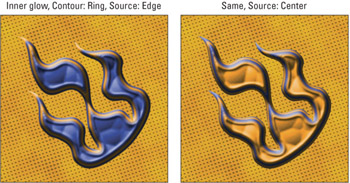
Figure 7-23: The two settings for the Source option in the Inner Glow panel. The other settings used in both examples are as follows ” Blend Mode : Screen, Opacity : 100 percent, Technique : Precise, Choke : 15 percent, and Size : 40 pixels. -
Range: The two Glow panels and the Contour panel (subordinate to Bevel and Emboss) use Range values to modify the Contour settings. This value sets the midpoint of the contour with respect to the middle of the size. As seen in the first example in Figure 7-24, values less than 50 percent move the midpoint away from the source, extending the effect. Values greater than 50 percent shrink the effect, as shown in the second example.
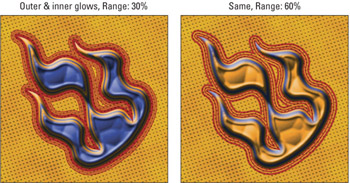
Figure 7-24: The Range setting at 30 percent (left) and 60 percent (right). The outer glow in both examples uses the Contour preset Ring “ Triple; the inner glow uses the Ring preset with the Source set to Center. -
Jitter: Where the Noise value randomizes the transparency of pixels, Jitter randomizes the colors. This option is operable only when creating gradient glows in which the gradation contains two or more colors (not a color and transparency).
-
Depth: The first unique Bevel and Emboss setting is Depth, which makes the sides of a bevel steeper or shallower. In most cases, this translates to increased contrast between highlights and shadows as you raise the Depth value. Figure 7-25 shows examples.
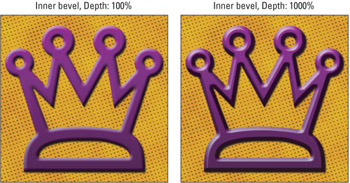
Figure 7-25: The return of the crown with an inner bevel Depth setting of 100 percent (left) and 1000 percent (right). In attendance are the Drop Shadow, Color Overlay, and Gradient Overlay effects.The Texture panel includes its own Depth setting. Here, Photoshop renders the pattern as a texture map, lighting the white areas of the pattern as high and the black areas as low. The Depth value determines the depth of the texture. The difference is you can enter a negative value, which inverts the texture. Meanwhile, you also have an additional Invert check box, which you can use to reverse the lights and darks in the pattern. So a positive Depth value with Invert turned on produces the same effect as a negative Depth value with Invert turned off.
-
Direction: When working in the Bevel and Emboss panel, you see two radio buttons : Up and Down. If the Angle value indicates the direction of the sun, Up positions the highlight along the edge near the sun and the shadow along the opposite edge. Down reverses things, so the shadow is near the light source. Presumably, this means the layer sinks into its background rather than protrudes out from it. But, in practice, the layer usually appears merely as though it's lit differently.
-
Soften: This value sets the amount of blur applied to the beveled highlights and shadows. Small changes make a big difference when the Technique option is set to one of the Chisel options. Figure 7-26 provides a hard look at this squishy option.

Figure 7-26: Two Soften values compared with two different Technique settings in the Pillow Emboss effect. Note that higher Soften values (bottom two examples) smooth out the otherwise jagged Technique settings without altogether getting rid of the sculpted edges. -
Altitude: The Bevel and Emboss panel includes two lighting controls: Angle and Altitude. The Angle value is just that: the angle of the sun with respect to the layer. The Altitude, demonstrated in Figure 7-27, is measured on a half circle drawn across the sky. A maximum value of 90 degrees puts the sun directly overhead (noon); 0 degrees puts it on the horizon ( sunrise ). Values in the medium range ” 30 to 60 degrees ” generally produce the best results. If you find the effect to be too sharp, you can temper it with the Soften setting, as shown in Figure 7-28.
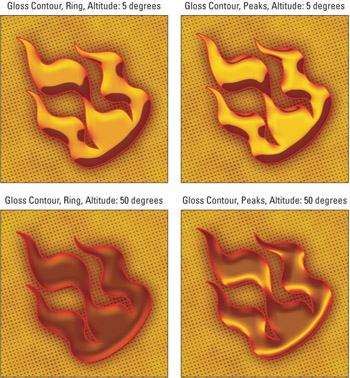
Figure 7-27: A couple of Gloss Contour presets with an Altitude setting of 5 degrees (top) and 30 degrees (bottom). Note that the higher setting brings out major differences between the two Gloss Contour presets.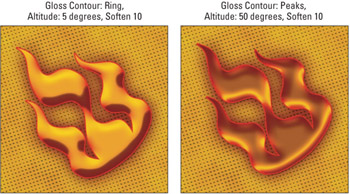
Figure 7-28: The first and last examples from Figure 7-27 with a touch of the Soften option. These two figures use an inner bevel angle of 125 degrees, a depth of 50 percent, and a size of 40 pixels. The drop shadow is using Photoshop's default settings. There's a dark red outer glow, a bright red inner glow, and an orange color overlay. -
Scale: The Texture and Pattern Overlay panels include Scale values, which scale the pattern tiles inside the layer. Values greater than 100 percent swell the pattern; values lower than 100 percent shrink it.
-
Link/Align with Layer: When turned on, this check box centers a gradient inside a layer. If you want to draw a gradient across many layers, turn the option off to center the gradient inside the canvas. When editing a pattern, this option links the pattern to the layer so the two move together.
-
Position: The final Layer Style option appears in the Stroke panel. The Position pop-up menu defines how the width of the stroke aligns with the perimeter of the layer. Photoshop can draw the stroke outside the edge of the layer, inside the edge, or center the stroke exactly on the edge. It's up to you.
EAN: 2147483647
Pages: 95