Dropping Out and Forcing Through
Found at the bottom of the Blending Options panel of the Layer Style dialog box, the Blend If sliders are among Photoshop's oldest and most powerful compositing features. Pictured in Figure 6-36, these options enable you to drop out pixels in the active layer and force through pixels from lower layers according to their brightness values. You can even use them in combination with the Knockout option. For example, if you set the Knockout to Deep, you force through pixels from the background layer instead of from the layer immediately below the active layer.
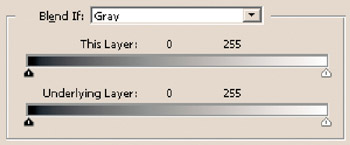
Figure 6-36: Use the This Layer sliders to drop pixels out of the active layer, and the Underlying Layer sliders to force pixels through from lower layers.
Here's how the Blend If options work:
-
Blend If: Select a color channel from the Blend If menu to apply the effects of the slider bars according to the contents of a single color channel. If you choose Gray, the default, Photoshop bases the changes on the grayscale composite. Each time you select a different Blend If option, the slider triangles change to the positions at which you last set them for that color channel. Regardless of how you set the sliders, Photoshop applies your changes evenly to all channels in the image; the selected channel is merely used for the calculation.
-
This Layer: This slider bar lets you exclude ranges of colors according to brightness values in the active layer. You exclude dark colors by dragging the black triangle to the right; you exclude light colors by dragging the white triangle to the left. In either case, the excluded colors disappear from view.
-
Underlying Layer: The second slider forces colors from the underlying layers to poke through the active layer. Any colors outside the range set by the black and white triangles are covered and are therefore visible regardless of the colors in the active layer.
-
Preview: Don't forget to select the Preview check box on the right side of the Layer Style dialog box so you can see the effects of your modifications in the image window every time you adjust a setting.
These options are far too complicated to fully explain in a bulleted list. So you are invited to learn more by reading the following sections.
Color range slider bars
The first Blend If slider bar, This Layer, hides pixels in the active layer according to their brightness values. You can abandon dark pixels by dragging the left slider triangle and abandon light pixels by dragging the right triangle. Returning to the composite image first introduced in Figure 6-6, Figure 6-37 shows examples of each of the Blend If options.
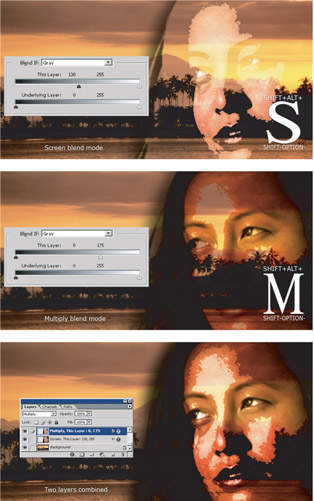
Figure 6-37: Examples of modifying the blend mode and This Layer settings inside the Layer Style dialog box. The final image shows the copy of the face set to Multiply layered in front of the copy set to Screen to get a high-contrast effect.
-
To create the first example in Figure 6-37, first set the blend mode to Screen. Then drag the black slider triangle until the value immediately to the right of the words This Layer read 130, thereby hiding all dark pixels whose brightness values are 130 or lower.
-
To create the second example, change the blend mode to Multiply. Reset the black slider triangle to 0 and drag the white slider triangle to 175, which hides those pixels with brightness values of 175 or higher.
-
The final image in the figure shows the second face layered in front of the first. With the help of the This Layer slider bar, you can combine the Screen and Multiply blend modes to produce an image that is both lighter and darker than its background.
Drag the triangles along the Underlying Layer slider bar to force pixels in the underlying layers to show through, again according to their brightness values. To force dark pixels in the underlying image to show through, drag the black slider triangle; to force light pixels to show through, drag the white slider triangle. Figure 6-38 gives you an idea of what happens when the same values and procedure are repeated using this slider.
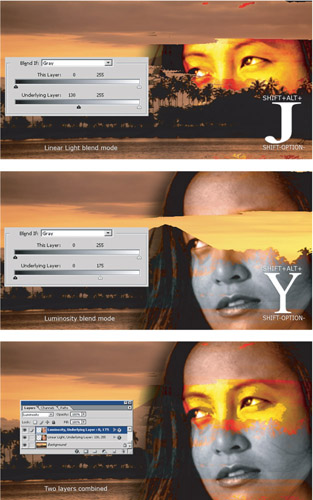
Figure 6-38: Here the Underlying Layer settings were changed to force through the darkest (top) and lightest (middle) pixels from the sculpted face and tranquil background layers. The third image shows the two effects combined.
Bear in mind, like every other adjustment made in the Layer Style dialog box, changes made to the Blend If slider bars are temporary. These options hide pixels; they don't delete them. As long as the layer remains intact, you can revisit the Blend If sliders and restore hidden pixels or hide new ones.
Fuzziness
The problem with hiding and forcing colors with the slider bars is that you achieve some pretty harsh color transitions. Although printed at high resolutions , both Figures 6-37 and 6-38 exhibit occasional jagged edges. Fortunately, you can soften the color transitions by dropping and forcing pixels gradually over a fuzziness range, which works much like the Fuzziness value in the Color Range dialog box, leaving some pixels opaque and tapering others off into transparency.
To taper the opacity of pixels in either the active layer or the underlying image, press the Alt key (or Option on the Mac) and drag one of the triangles in the appropriate slider bar. The triangle splits into two halves , and the corresponding value above the slider bar splits into two values separated by a slash.
The left half of the triangle represents the beginning of the fuzziness range ” that is, the brightness values at which the pixels begin to fade into or away from view. The right half represents the end of the range ” that is, the point at which the pixels are fully visible or invisible. Figure 6-39 shows a bit of fuzziness applied to the This Layer slider. Here are the specifics:
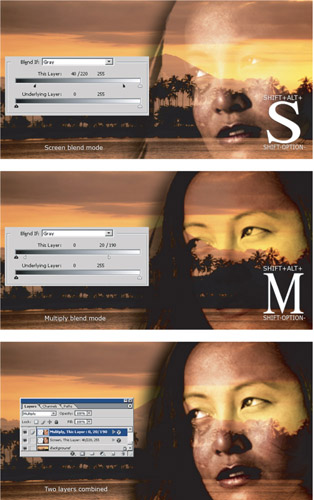
Figure 6-39: By Alt-dragging (Win) or Option-dragging (Mac) a This Layer slider triangle, you can create gradual transitions between the opaque and transparent portions of a layer.
-
In the top example, set the blend mode to Screen. After splitting the black slider triangle by Alt-dragging (Option-dragging on the Mac), set one half of the triangle to 40 and the other to 220. Colors with a brightness value of 40 or darker turn transparent, they fade into view from 41 to 219, and they become opaque from 220 on up.
-
In the second image, select the Multiply blend mode and restore both halves of the black triangle to 0. Then, Alt-drag (or Option-drag) the white triangle to split it. Move the left half of the split triangle to 20 and the right half to 190. The result is an extremely gradual drop-off. Those few pixels with brightness values from 0 to 20 are opaque, the pixels become gradually translucent from 21 to 189, and pixels of 190 and brighter are transparent.
-
Finally, combine both effects on separate layers, with the Multiply effect on top. As shown in the bottom example in Figure 6-39, the result is a perfect blending of Multiply and Screen, with the background images showing through in the midtones.
The Underlying Layer slider works best when you're trying to force through very bright or dark details, like highlights or shadows. It also helps to work with a foreground layer that has lots of flat areas of color for the background to show through. Keeping these little factoids in mind, here's how to create Figure 6-40:
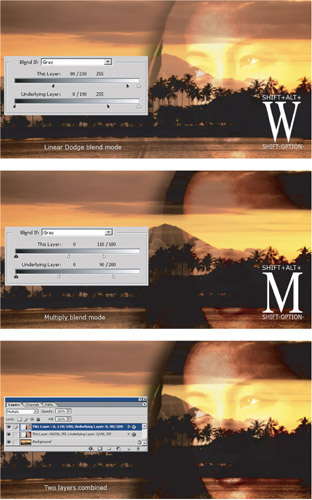
Figure 6-40: Combining the Linear Dodge and Multiply blend modes, you can use both the This Layer and Underlying Layer slider bars to drop out foreground colors and force through background colors.
-
For the top image, apply the Linear Dodge mode to the face layer. First drop out most of the dark colors by setting the halves of the black This Layer triangle to 80 and 230. Then split the black triangle for the Underlying Layer slider, leaving the left half at 0 and moving the right half to 190. This forces through virtually all of the darkest pixels from the rear layers, fading them out as they get lighter.
-
For the second image, duplicate the face layer and apply the Multiply mode. Set the black triangles of the This Layer sliders to 0, and set the white triangle halves to 110 and 180. Then move to the Underlying Layer sliders, setting the blacks to 0 also, and the white halves to 90 and 200.
-
Finally, combine the two face layers, with the Multiply effect on top. The result is a vibrant composition that contrasts elements of the palm-lined shore with the outline of the woman 's face.
EAN: 2147483647
Pages: 95