Retouching with the History Brush
The remainder of this chapter outlines a couple of fundamentally divergent but eminently practical history-based techniques. First, you learn how to use the History palette and its pal, the History brush, to expedite the process of retouching an old photo. After that, you turn palette and brush to the task of creating highly customized special effects. Throughout, you'll take advantage of several commands that are discussed in greater depth in later chapters, but that you'll be quite capable of using within the confines of this chapter, with the information imparted here. So don't worry ” you won't have to do a lot of time traveling through the pages of this book to keep up. There's plenty of information in the upcoming discussions to help you make sense of it all.
Sharpening and smoothing
Let's start with the task of editing a vintage photograph. The problem with old photos is that they're usually soft and grainy, such as the first example in Figure 3-6. This means you have to find some way to both sharpen the detail and smooth away the grain ” two contradictory operations. The solution is to perform both operationsup front and worry about which specific areas need sharpening and smoothing later. Photoshop's History brush lets you do precisely that. You can create one sharpened version of an image, another smooth version, and then brush the two into the original as needed. As the second example in Figure 3-6 demonstrates , the resulting image looks several times better than the original and yet demands relatively little time and talent to pull off. To sharpen and smooth a vintage picture, follow these general steps:
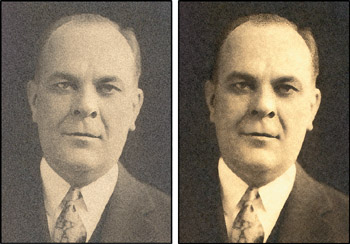
Figure 3-6: With the help of the History brush, you can transform a soft and grainy old photo (left) into a sharp and smooth vintage image (right).
-
To start, sharpen the focus of the image. Choosing Filter Sharpen Unsharp Mask. Because the sharpened state represents one extreme in this process, you want to apply the filter liberally. An Amount value of about 400 percent with a Radius of anywhere from 2.0 to 4.0 pixels is recommended, depending on the resolution of the image. Leave the Threshold set to 0; otherwise , you end up with harsh transitions between sharpened and soft areas. As it does with all operations, Photoshop automatically adds Unsharp Mask to the History palette. To keep the state from cycling off the History palette, you can save it as a snapshot by clicking on the little camera icon at the bottomof the palette, highlighted in Figure 3-7. You create a snapshot by holding down the Alt or Option key while clicking. This opens the New Snapshot dialog box. The snapshot remains available as long as the image is open .
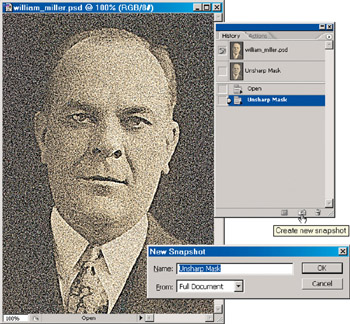
Figure 3-7: After sharpening an image, you can create a snapshot. -
Now click the state prior to Unsharp Mask in the History palette. (If Unsharp Mask was the first operation you applied after opening the image, you can click the default snapshot at the top of the palette.) This reverts the image back to its pre-Unsharp Mask appearance. The undone states turn gray, but because you saved the sharpened version of the image as a snapshot earlier, it remains available at the top of the palette.
-
Create a smooth version of the image. You can do this by choosing Filter Noise Median. Median smoothes out film grain by averaging the colors of neighboring pixels. Raise the Radius value until the grain disappears ” probably somewhere in the 4- to 8-pixel range. This will gum up the detail, but because the idea is to provide a smooth extreme, that's to be expected. Click OK to apply the filter.
-
If the result is a little too smooth for your taste, apply the Unsharp Mask. Choose Filter Sharpen Unsharp Mask with a relatively modest Amount setting, say 100 percent. The new operations become the final state in the History palette. You'll want to come back to this state, so save it as a snapshot by again clicking the camera icon at the bottom of the palette, as in Figure 3-8. Then undo the new operations by clicking the state preceding Median.
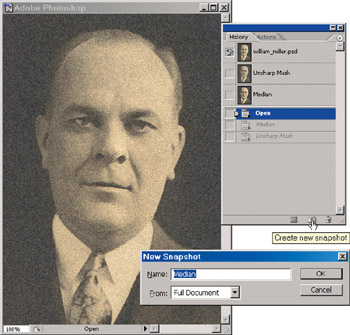
Figure 3-8: A snapshot of the image documents the retouching performed to this point. Give your Snapshot a name so that you know what you're recording.
Painting with the snapshots
You now have your original image onscreen with two snapshots ready and waiting in memory: one that's too sharp and another that's too smooth. With your History brush in hand, you're ready to paint the snapshots into the original and split the difference. Follow these steps:
-
Select the History brush (that's Y on your keyboard), and then click to the left of the sharp snapshot in the History palette. The brush icon appears in front of the snapshot, indicating that it's the source state for the History brush and other history operations.
-
Trace around the important details in the image to sharpen them. If you're retouching a face, for example, you should paint around the eyes, mouth, and other features to improve their clarity and focus, as in Figure 3-9. To enhance the effect, select a brush mode such as Hard Light or Overlay from the Options bar (I used Overlay). Don't worry if the effect seems too over-the-top; that's one of the reasons you have the Median snapshot around ” to temper any of the harshness of the sharpened state.

Figure 3-9: After making sharpened snapshot the source state for the History brush, paint around the important details in the image to sharpen them. -
After painting in all the sharpened areas, it's time to smooth away the film grain with the Median snapshot. Click in front of the Median snapshot in the History palette to make it the source state. You can take the edge off the sharpened details by covering the entire image with a translucent coat of Median. The easiest way to do this is to press Shift+Backspace (Win) or Shift- Delete (Mac) to bring up the Fill dialog box, and then set the Use pop-up menu to History and the Opacity value to 50 percent. After applying the Fill command, paint with the History brush set to 50 percent or lower to smooth out the film grain and other imperfections in the image. The result of my efforts appears in Figure 3-10.
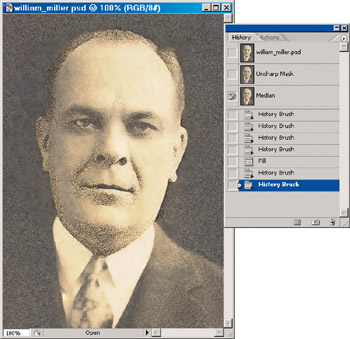
Figure 3-10: After switching the source state to the Median snapshot, the Fill command is used, set to History at 50 percent. Then the History brush, likewise set to lower Opacity values, paints away the grain. -
Refine your photo to you satisfaction . From here on, it's just a matter of painting back and forth between the Unsharp Mask snapshot and the Median snapshot. You'll definitely want to vary the brush size as you work. You may also want to experiment with the Opacity value and brush mode setting in the Options bar. The most effective brush modes tend to be Hard Light, Screen, Multiply, and Normal. In Figure 3-11, I wasn't happy with the overall tone, so I adjusted the brightness and contrast (Image Adjustments Brightness/Contrast).
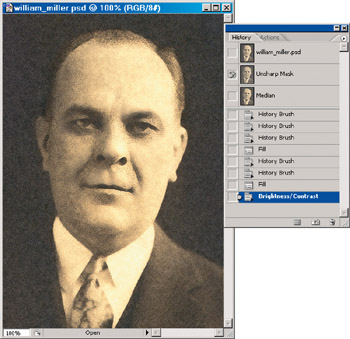
Figure 3-11: To punch up the tone of the image, some small increases in brightness and contrast were made.
EAN: 2147483647
Pages: 95
- Article 328 Medium-Voltage Cable Type MV
- Article 384 Strut-Type Channel Raceway
- Article 396 Messenger Supported Wiring
- Example No. D2(c) Optional Calculation for One-Family Dwelling with Heat Pump(Single-Phase, 240/120-Volt Service) (See 220.82)
- Example No. D9 Feeder Ampacity Determination for Generator Field Control