Understanding the Boot Process
| All x86-type computers, whether running processors from Intel or AMD no matter what operating system they have start up the same way. BIOS software that sits on a specialized chip activates all the circuitry on the motherboard, and occasionally other hardware connected to the motherboard, and then goes looking for a boot manager a piece of software code that starts an operating system. This boot manager code can sit on a hard drive (where it's called the Master Boot Record, or MBR), a floppy disk, a CD-ROM, or even on another computer if the system is using the network file system (NFS). This bootloader software tells the BIOS where the Linux kernel is located, how to load it into memory, and how to start it. Starting to Boot: BIOS to Boot ManagerIf all goes well in the hardware initialization, the BIOS locates a special hexadecimal value written to the volume, which makes the volume bootable. The order in which it looks for this is in the BIOS settings, which you can access by pressing a certain key or key combination while the BIOS is still in command. The traditional order was floppy disk, hard drive, some other place. In recent years, bootable CD-ROMs joined the BIOS options and now should be first on the list. Any modern BIOS should have considerable flexibility in the devices it searches for a bootable volume, but it always stops looking when it finds the first bootable volume. This is why it's a good idea to remove your SUSE Linux installation CD after adding new software to your system. If you don't, the next time you boot will be to the CD. This is presumably why the CD now has Boot from Hard Drive as the default option on its opening menu. Note Your BIOS will alert you with a series of beeps if it finds a hardware problem that makes your system unbootable. Each motherboard manufacturer has a different system of generating those beeps, so consult your motherboard manual to learn the code, or contact your PC vendor or manufacturer to try to fix the problem. When the BIOS finds the bootloader code, it then looks for the MBR, the first sector on the hard drive. This is the most important sector on the disk because the bootloader code (just 446 bytes) and the partition table (64 bytes) reside there. Having properly initialized the hardware, the BIOS can now place the bootloader code into memory and hand over the boot process to the bootloader. The bootloader code that sits in the MBR has one job to start the full bootloader program, GRUB by default, and load it into memory. Choosing a Boot Manager: GRUB Versus LILOYou may not realize it unless you are dual booting multiple operating systems, but after your BIOS starts firing up the fan, the microprocessor chip, and the power supply, a boot manager, or bootloader, takes over the process until the kernel starts up. Linux supports a variety of open-source and proprietary boot managers, but you can install only two with YaST: the Grand Unified Bootloader (GRUB) and the Linux Loader (LILO). GRUB has been the default bootloader for SUSE Linux since v8.2, but LILO still runs quite a few systems, and you may want to use it instead. LILO succeeded loadlin as the primary Linux bootloader and seems to be in the long process of being superseded by GRUB. LILO carries out its single task, booting to a file system, well. It is not quite as flexible nor as configurable as GRUB. Nonetheless, it is still the default bootloader for systems in which the Root partition is installed on CPU-dependent RAID controllers (such as many Promise or Highpoint controllers), Software RAID, or Logical Volume (LVM) managed disk. The chief difference between the two bootloaders is in how they find and load file systems. LILO looks for a file system based on where the partition table says it is. GRUB can read and identify several file systems (ext2, ext3, ReiserFS, JFS, XFS, Minix, and DOS). In YaST, the Boot Loader Configuration module is on the System page. You can set LILO as the default if you want and set many other options in this screen (see Figure 22.1). If you prefer, you can edit the file directly by clicking Edit Configuration Files. Figure 22.1. Select and configure your bootloader.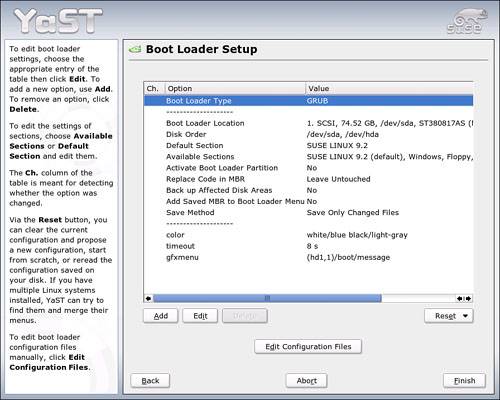 By default, GRUB displays a menu, allowing you to boot SUSE Linux from the hard drive, from a floppy drive, or into fail-safe mode. Fail-safe mode loads a kernel version with a set of parameters that makes it possible to boot with some hardware problems. If there's another operating system on your computer, GRUB will list this on your boot menu as well. After 8 seconds, GRUB will boot the first item on the menu; that is, SUSE Linux. Note At the bottom of the GRUB menu, you can specify options for the kernel, if you are so inclined. You can see how each process builds on the previous one, allowing different operating systems to work on the same hardware. The GRUB menu you see is controlled by the GRUB configuration file, which is located at /boot/grub/menu.lst. A sample menu.lst file is shown in Figure 22.2. Figure 22.2. Working with menu.lst.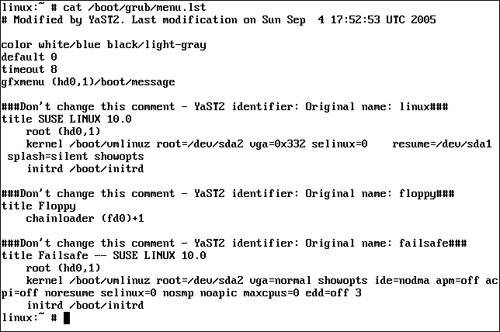 The first portion of menu.lst defines options for the display of the GRUB menu, such as the color scheme of the menu, the default menu option, and the number of seconds (timeout) before GRUB runs the default menu option. Following the display options are a list of items that will be displayed in the GRUB menu. Each menu item begins with "title." Notice in Figure 22.2 that this particular GRUB menu will display three items:
The remaining lines tell GRUB where to find the operating system files needed to run Linux. These include the following:
To configure how GRUB boots your system, you can either manually edit menu.lst with a text editor, or you can use the YaST System, Boot Loader module, shown in Figure 22.3. Figure 22.3. Configuring GRUB in YaST.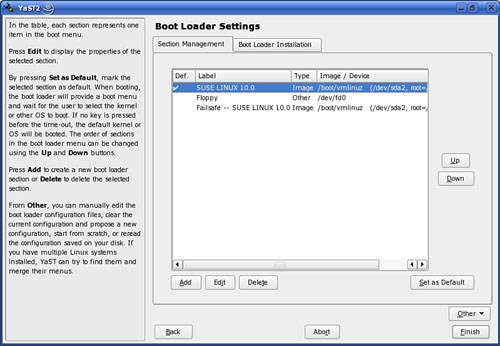 As you can see in Figure 22.3, each of your menu items is displayed in the Section Management screen. Here you can add, delete, or modify your GRUB menu items, as shown in Figure 22.4. Figure 22.4. Modifying a GRUB menu item in YaST.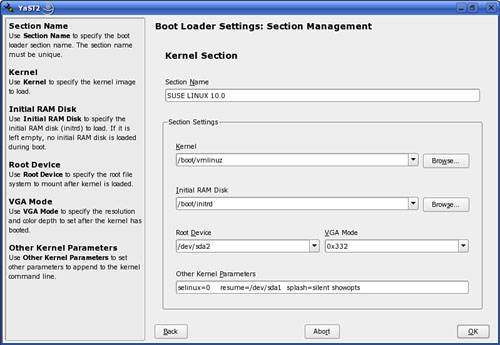 In this screen, you can edit your menu item name, the kernel file, initial ramdisk file, root device, and VGA mode, as well as optional kernel parameters. Note In addition to manually editing the menu.lst file and using YaST, you can also use the GRUB shell to configure how your system boots. Simply enter grub at the shell prompt. To learn how to manipulate GRUB from the shell, see the grub man page. Loading the KernelWhen GRUB hands over the process to the SUSE Linux kernel, it leaves the scene. The kernel now takes charge, putting up the message Uncompressing Linux...; it is present and available to you until you shut down the system. While the kernel boots, SUSE Linux puts up a nice blue wallpaper to hide all the boring text that scrolls by as the kernel initializes first your peripheral hardware, then the hard drive and attending file systems, followed by the serial ports. Press the Esc key to watch the boot process unfold. As a user, or even as an administrator, you don't have much direct interaction with the Linux kernel. You run applications, which occasionally interact with the kernel to get things done. In the kernel's view of things, an application is simply a process, one of many it deals with. The father of all processes, which the kernel loads soon after the kernel itself loads, is called init, located in the /sbin directory. The rest of the boot process (and later, the shutdown process) is really handled by init, not the kernel. All other processes are started by init or one of its child processes. Init is centrally configured by the /etc/inittab file. After activating the serial ports, the kernel runs a series of boot scripts, located at /etc/rc.d/boot.d, which activates (and, if required, mounts) still more devices and local file systems. Then boot.clock sets up the system clock, ldconfig identifies the current time zone, and local networking interfaces are turned on via boot.sysctrl, boot.localnet (for the loopback interface), and boot.isapnp. Finally, the kernel's System Boot Control declares The system has been set up and runs /etc/init.d/boot.local. This program invokes the appropriate runlevel for the system. There is much more on runlevels in the next section, but a standard networked desktop will launch Runlevel 5 as it hits the home stretch of the boot process. At Runlevel 5, networking services are started and various other services and the system logs come online. The sound driver, keyboard maps, CUPS printer interfaces, mail transfer agent, and xinetd Internet services come next. Finally, the kernel starts the X Window System and the display manager (KDM by default) that allows the user to log in. Logging in loads the desired desktop, and you're done. Note To closely examine your most recent boot process, open /var/log/boot.msg in a text editor, or open the YaST View Startup Log module from the Misc page. |
EAN: 2147483647
Pages: 332