Conditional Formatting
The basic concept behind conditional formatting is simple—if a condition is true, then some formatting attribute (or attributes) will be switched “on.” Conditional formatting can be applied to a number of different types of objects, including data-entry controls and sections. The reason that this chapter looks at conditional formatting is that the process of setting up conditional formatting is the same regardless of what type of object you are working with.
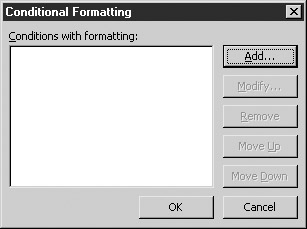
To set up conditional formatting on a text box, for example, click to select the text box object and then select Format | Conditional Formatting. This opens the dialog box shown in the following illustration and allows you to create the conditions that will trigger your formatting choices. You can also add conditional formatting by right-clicking the control, choosing properties, the Display tab and Conditional Formatting.
Notice that this dialog box can be used to enter multiple conditions—the order in which the conditions appear in the list determines the precedence. To add a new condition, click the Add button to open the Conditional Format dialog box, shown here.
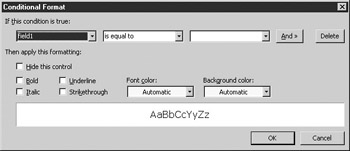
The first step in creating a new condition is to select a field or group to use from the first drop-down list (you’ll look at expressions in Chapter 10). By default, the field or group that is bound to the control you are working with will be displayed, but you can use the drop-down list to select another field or group from your form’s data source.
Once you have selected a field, you need to choose an operator from the next drop-down list. You can select from the following operators:
-
Is equal to
-
Is not equal to
-
Is less than
-
Is less than or equal to
-
Is greater than
-
Is greater than or equal to
-
Is present
-
Is not present
-
Is blank
-
Is not blank
-
Contains (to check whether a field contains a string you enter)
-
Does not contain
-
Begins with (to check whether a field starts with a string you enter)
-
Does not begin with
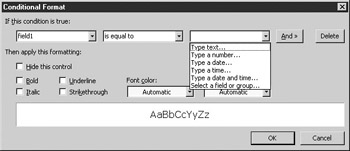
After you have selected an operator, you can use the third drop-down list to enter the value, field, or group you want to compare against. The available options are shown here.
If you want to add compound criteria, you can click the Add button to add another line to your list of conditions and keep on going. Conditions can be put together using either an And or an Or. For example, if you want to conditionally format a field to be displayed in red when the Expense Total field is over $1000 and the Cash Advance field is over $250, you could put these two conditions on separate lines and use the options in this dialog box to select the And operator.
With any of the conditions you may create, where the condition is true then a formatting attribute will be applied. Your options for these attributes include
-
Hide this control
-
Bold
-
Italic
-
Underline
-
Strikethrough
-
Font color
-
Background color
The box at the bottom of the dialog box will display what your field or object would look like if the condition were true. After you finish selecting your formatting attributes, click OK to return to the list of Conditional Formatting criteria to be applied to this object. You can use the Add button to add as many sets of criteria as you like and use the Move Up/Move Down buttons to set the precedence of the criteria.
EAN: 2147483647
Pages: 142