Creating Forms from XML Web Services
The last option for tying an InfoPath form to a back-end data source is through the use of an XML web service. A web service is a software component that is used to build applications and is based on an open standard, enabling organizations to share these services within their own organization and with external organizations as well.
InfoPath uses web services to submit information to disparate systems and applications. Web services can be created using a number of different languages and platforms and can be interfaced with just about any system or application. This makes web services an ideal back-end platform to be used with InfoPath forms.
Say, for example, you want to create a Travel Request form for your travel agent where you (the customer) could fill in the details of the trip that you want to take and the form would automatically be submitted to the travel agent’s reservation and booking system, which runs on a Unix server and has its own proprietary database system. You could create an InfoPath form to collect the information required and then save an XML file and e-mail it to your travel agent, but then they would have to import it into their own systems using time-consuming manual processes that would have to be repeated for each request.
A much easier solution would be to ask your travel agent to expose this system using a web service. A developer within their organization could create a web service that would accept the information required and put this information directly into their reservation and booking systems. From that point, you could create an InfoPath form that submits the information directly to this web service, eliminating the need for all of the extra manual processes. InfoPath also supports receiving information from web services, meaning that you could display information from a web service on your form.
This has a number of advantages, in that this web service can now be used by other organizations to submit their own forms and have that information directly entered into the back-end systems.
In the following section we are going to look at how to create InfoPath forms that can retrieve and submit information directly back to web services. To walk through some of these examples, you need a web service to work with—Microsoft has provided a number of sample web services in the Software Developer’s Kit (SDK) for InfoPath, but you need to install and configure these samples before you will be able to work through this section.
Getting Started
To start creating a form from a web service, open InfoPath and select File | Design a Form to open the Design a Form view of the Task Pane. From the options under Design a New Form, select New from Data Source to open the Data Source Setup Wizard. Select the Web Service option and click Next to continue to the next wizard page, shown in Figure 5-15. The following sections describe your options after you reach this point.
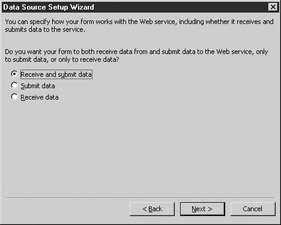
Figure 5-15: Specifying how your form works with the web service
Selecting Send/Receive Options
The first decision you need to make is whether your form is connecting to a web service that can send and receive data or do both. If you are using a web service that was created internally by a developer in your organization, you need to ask them which methods the web service supports—likewise, if you are working with a web service provided externally, you need to check to see how that web service is to be used.
Selecting a Web Service
If you know the name and URL of the web service you want to use, you can type it directly into the text box provided. If you don’t know the exact name or if you want to search for a web service to use, click the Search UDDI button to open the dialog box shown here.
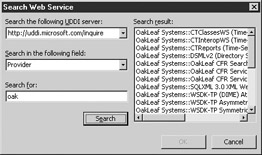
UDDI stands for Universal Description, Discovery, and Integration, which is a protocol that is used to define and find web services. By default, InfoPath shows the Microsoft UDDI Server and you can search by provider or service by entering a keyword in the Search For text box at the bottom of the dialog box. For example, if you know that one of your vendors offers an order-entry facility, you could specify Provider in the Search in the Following Field drop-down list and then enter the company’s name in the Search For text box and click Search. If you don’t know the name of the provider, you can also search based on the type of service that you want to find.
Once the Search process has found a matching web service, you are presented with a list of web services that match your criteria. Highlight the web service you would like to connect to and click the OK button to return to the Data Source Setup Wizard.
Not all XML web services can be used to retrieve and submit information through InfoPath forms. Make sure that you check with the developer who created the web service or other resource before you attempt to connect to the web service. If InfoPath is unable to utilize the web service as presented, you will receive an error message and will not be able to proceed with your connection.
Selecting Web Service Operations
Next, InfoPath looks at the web service you have selected and determines what operations are supported by the service. You are presented with a list similar to the one shown in Figure 5-16.

Figure 5-16: Web service operations
These operations could cover anything from retrieving data from a data source to submitting information to the same—each web service has its own operations that have been defined by whoever created the web service. Select the operation you would like to use for this form using the dialog shown in Figure 5-17 and click Next to continue.
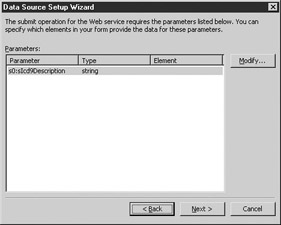
Figure 5-17: Web service parameters
Some operations require parameters, and if you have selected an operation that does require one or more parameters, you are presented with a dialog box similar to the one shown in Figure 5-18.

Figure 5-18: Setting web service parameters
Highlight a parameter and click the Modify button to map a field on your form to the parameter required. For example, you could have a parameter called Order Date that is used to return a list of orders based on the date entered. You could then tie this parameter to a field on your form.
After you have finished setting up any parameters that are required by your web service, click Next to proceed to the last step in the Data Source Setup Wizard, which presents a confirmation of the selections you have made and allows you to select whether you want to start with the Data or Query view first. After you have made your selection, click Finish to return to the InfoPath form designer and start working with your form using some of the skills you learned in the last chapter.
EAN: 2147483647
Pages: 142
- Challenging the Unpredictable: Changeable Order Management Systems
- Enterprise Application Integration: New Solutions for a Solved Problem or a Challenging Research Field?
- Data Mining for Business Process Reengineering
- Intrinsic and Contextual Data Quality: The Effect of Media and Personal Involvement
- Healthcare Information: From Administrative to Practice Databases