First Looks...
First Looks…
The InfoPath user interface is broken down into two main sections and a number of toolbars and menus, as shown in Figure 3-1.
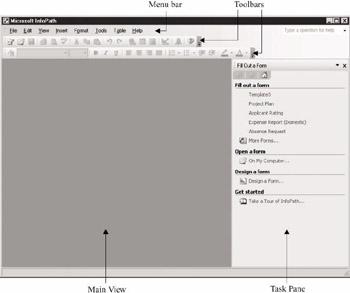
Figure 3-1: The InfoPath user interface
The following sections look at each of the areas labeled in Figure 3-1, starting with the Main View.
Main View
The Main View takes up the most real estate within the InfoPath window and is used to display and design forms. This area is empty when you first open InfoPath until you select whether to fill out or design a form. The Main View is used to display the form content, including the fields, tables, and so forth that are part of your form.
The Task Pane
The Task Pane is a dockable menu that contains shortcuts to commonly performed tasks. This area is called a “pane” because it contains a window that changes depending on the task you have selected. For example, if you are designing a form, this pane could contain all the tasks and tools related to form design. Likewise, when you are actually filling out a form, the pane shows tasks and tools relating to data entry.
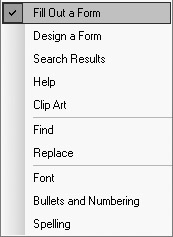
The drop-down list at the top of the Task Pane controls the task view. There are different views for designing forms, filling out forms, and so on. You can change the view within the Task Pane by using the drop-down menu. Click the down arrow to open a list of available views, like the one shown here.
There are also icons at the top of the Task Pane that allow you to move backward and forward through any pages you may have opened in the Task Pane, as well as a Home icon to take you back to the original page associated with the view you have selected. These icons work in a similar fashion to the Back, Forward, and Home buttons in your web browser and make navigation a little bit easier.
For example, if you had selected to view the tasks related to Design a Form and then clicked New Blank Form and then Layout, you could use the icons to navigate backward or forward within these three pages or click the Home icon to take you back to your starting page (Design a Form).
| Tip | You can show the Task Pane by selecting View | Task Pane or by selecting CTRL-F1. |
The Menu Bar
The menu bar at the top of the InfoPath window contains all the common Windows menus (File, Edit, and so on). Most of the features and functionality used when working with InfoPath can be found in those menus. Table 3-1 lists the various menus within InfoPath and describes the functionality of the commands they include.
| Menu | Related Tasks |
|---|---|
| | Design, fill out, save, print, merge, submit and export forms |
| | Cut, copy, paste, select all items, undo, redo, find and replace objects |
| | Control the Task Pane, toolbars, and other tools |
| | Insert tables, lines, pictures, hyperlinks, and sections |
| | Format fonts, bullets, numbering, borders, shading and objects |
| | Check spelling, change language settings, show error messages, use digital signatures, program customization and options |
| | Insert and format tables |
| | Invoke help, Internet links, product activation, customer feedback, detect and repair |
Toolbars
To make working with InfoPath a little easier, commonly used features have been organized into icons that appear on various toolbars.
| Note | The toolbars are also dockable so that you can move them around the InfoPath window by dragging and dropping them in place using the handle that appears on the left side of the toolbar. |
There are four toolbars available (Standard, Tables, Formatting, Task Pane) and you can control which toolbars appear by right-clicking in the menu bar and selecting the menu you want to see. Menus with a check mark are visible—those without are hidden.
| Note | Since this chapter focuses on filling out forms, it looks only at the Standard and Formatting toolbars. The chapters in which you actually design forms will discuss the features and functionalities contained in the other two toolbars. |
The Standard toolbar contains shortcuts to some of the most commonly used InfoPath features. Table 3-2 lists the different icons on this toolbar and what each is used for.
| Button | Name | Description |
|---|---|---|
| | Fill Out a Form | Displays the Fill Out a Form view in the Task Pane, which allows you to select a form to complete |
| | Open | Displays the Open dialog form and allows you to open an InfoPath form from the file system or SharePoint server |
| | Save | Saves the current form |
| | | Prints the current form |
| | Print Preview | Displays a WYSIWYG preview of how the form will look when printed |
| | Spelling | Verifies the spelling of the data you have entered into a form |
| | Cut | Removes the selection to the Clipboard |
| | Copy | Duplicates the selection to the Clipboard |
| | Paste | Copies the content of the Clipboard |
| | Undo | Reverts to the state before you performed the last action |
| | Redo | Performs the last action again |
| | Insert Hyperlink | Adds hyperlinks to Rich Text Format (RTF) fields on your form |
| | Insert Table | Adds tables to Rich Text fields on your form |
| | Insert Picture | Adds pictures to Rich Text fields on your form |
| | Design This Form | Changes the “mode” to show the design of the form |
| | Digital Signatures | Adds digital signatures to your InfoPath forms |
| | Microsoft Office InfoPath Help | Opens the InfoPath Help in the Task Pane |
The Formatting toolbar is used to format the data you enter on a form—if you have used Microsoft Word and are familiar with formatting text, the formatting options are similar here. Table 3-3 lists all the icons in the Formatting toolbar and their use with Rich Text fields.
| Button | Name | Description |
|---|---|---|
| | Font | Opens the Font view in the Task Pane |
| | Font Name | Changes the font name of the selected text |
| | Font Size | Changes the font size of the selected text |
| | Bold | Applies emphasis to the selected text |
| | Italic | Italicizes the selected text |
| | Underline | Underlines the selected text |
| | Align Left | Aligns the selected text block to the left |
| | Align Middle | Aligns the selected text block to the middle |
| | Align Right | Aligns the selected text block to the right |
| | Justify | Spreads the alignment of the selected text block evenly across the selected area |
| | Numbering | Creates a numbered list from the selected text |
| | Bullets | Creates a bulleted list from the selected text |
| | Decrease Indent | Removes space immediately preceding the selected text |
| | Increase Indent | Adds space immediately preceding the selected text |
| | Highlight | Changes the background color of the selected text |
| | Font Color | Changes the color of the selected text |
EAN: 2147483647
Pages: 142