Section 13.2. Impact of SELinux on System Administration
13.2. Impact of SELinux on System AdministrationAs with any Linux system, an administrator needs to understand numerous functions to manage an SELinux system. For the most part, SELinux is managed like an ordinary non-SELinux system. However, SELinux introduces additional requirements for several typical administrator actions. In this section, we discuss some of the areas of administration that commonly cause problems for administrators new to SELinux. 13.2.1. Managing UsersAdding, modifying, and deleting users has always been a challenge on SELinux systems. If not done correctly, it may appear that a user was added, but the user will not be able to log in (for example, due to problems with the default_contexts file). The generic SELinux user (user_u) resolved many of the user management difficulties for SELinux systems that do not require granular control over all Linux users. For example, when a user is added in FC4, it is automatically mapped to user_u simply because the new user was not defined in the policy. See Chapter 6 for more on user_u. Another challenge with users is how to label files in a user's home directory, which raises several issues. One challenge is how to generalize labeling for different types of user domain types (for example, sysadm_t vs. user_t). Another is how to determine the proper labels for a user when they are added to an existing system. If a user's home directory and files are not initially labeled correctly the user may encounter a variety of problems, such as not being able to log in or not being allowed to write files in their home directory. Fortunately we have made significant progress in recent years in addressing user management in SELinux with the ./contexts/files/file_contexts.home_dirs file discussed earlier. 13.2.1.1. Adding an Ordinary Unprivileged UserWith the inclusion of the generic user, user_u, it is fairly straightforward to add a user to an SELinux system by just running useradd. For example, below we show the process of adding a user jimmy on a typical FC4 system: # useradd jimmy # ssh jimmy@localhost jimmy@localhost password: $ id uid=502(jimmy) gid=502(jimmy) groups=502(jimmy) context=user_u:user_r:user_t Notice that the user identifier in the security context is the generic user user_u. That is because we did not add jimmy as a specific SELinux user, so FC4 uses the generic user by default. The generic user is adequate for most systems that do not need to define a large number of user roles. Most of the general purpose policies today have just a couple of roles (system, administrator, and user) and all new users are assigned to the user role (user_t domain type and user_r role) via the generic user as with jimmy. To add an ordinary unprivileged user to an SELinux system where user_u is defined, we do not have to do anything beyond the normal useradd command.
In this example, we add a new SELinux user named staff_u that is authorized for the roles sysadm_r and user_r, list all the SELinux users, add a new user mapping for the user joe to the SELinux user staff_u, and list all the user mappings. Notice that because FC5 uses the optional MLS features by default (to implement the MCS policy), MLS ranges are shown for users. 13.2.1.2. Adding a Privileged User AccountFor administrators, a root user is typically defined in the SELinux policy that corresponds to the root user account. The policy assigns this user a role (sysadm_r) and user domain (sysadm_t) that has sufficient privilege to manage a system. Although root in SELinux is not all-powerful as in a standard Linux system, it does have the authority to run all the programs that have the various privileges required. Users authorized to use the root user account (and its associated privileged user domain types) are generally given a different unprivileged user domain type (staff_t). This user domain type is exactly like the unprivileged domain type of ordinary users (user_t) except that it may transition into the privileged user domain type (sysadm_t). To add a privileged user, we run the useradd command as we did with an ordinary user account. However, we also need to edit the active policy's local.users file discussed previously. In this file, we define the user to the policy. For example, if we want to create a Linux user called "admin" that has administrator privileges, we would do the following: # useradd admin # create ordinary user # vi /etc/selinux/strict/users/local.users # add admin as privileged # load_policy /etc/selinux/strict/policy/policy.19 # reload policy # genhomedircon # fix homedir template # restorecon -R /home/admin # fix admin's homedir We used the same useradd command to create the account and home directory. However, this time we need to tell SELinux about the new user so that it does not treat it as a generic user. We do this by editing the local.users file and adding the following line: user admin roles { staff_r sysadm_r };This line lets the SELinux policy know of the user and defines the authorized roles for the user. To make this change effective, we need to run load_policy to reload the policy into the kernel. At this point, the user is defined in both the system and the SELinux policy. However, the user home directories are still labeled as if admin were a generic user. (This is the behavior of useradd.) So, next we need to run the genhomedircon utility that updates the home directory file security context file (./contexts/files/file_contexts.home_dirs) with the new user. We then use the restorecon program to update the new user's home directory based on its current roles. At this point, the user account is now created and authorized for both the unprivileged administrator role (staff_r) and the privileged administrator role (sysadm_r). The behavior of most login processes is such that the default security context for a user authorized for both roles is staff_r so that an administrator logs in as an unprivileged user by default. For example, let's log in as our new administrator account: # ssh admin@localhost admin@localhost's password: $ id uid=506(admin) gid=506(admin) groups=506(admin) context=admin:staff_r:staff_t Notice that our role and user domain type are staff_r and staff_t, respectively. As we said, these are the unprivileged role and type for administrative users. Choosing staff over sysadm as the default login role/type is a function of the default context for sshd as we discussed earlier. Processes with the staff_t domain type have essentially no more privilege than any other ordinary user, other than it is allowed to transition to the privileged domain type sysadm_t. For example, to perform administrator functions we could then do the following: $ su Password: Your default context is root:sysadm_r:sysadm_t. Do you want to choose a different one? [n] # id uid=0(root) gid=0(root) groups=0(root),1(bin),2(daemon),3(sys),4(adm),6(disk),10(wheel) context=root:sysadm_r:sysadm_t The su program (which also acts like a login program) has its default context set up such that a user running with the staff role/type will default to the sysadm role/type. Notice that the su program also asks whether you want to provide a security context other than the defined default. You always have the option of trying something other than the defined default (if the policy permits it). Note In FC5, su does not change the security context. Instead, users must use the newrole command. For example, the command newrole -r sysadm_r -t sysadm_t makes the equivalent change to the security context as the FC4/RHEL 4 example above. Remember that the default contexts for the various login programs define only defaults; they do not allow the necessary access. Only the policy may do that, as we discuss in Part II of this book. 13.2.1.3. Changing a User RoleChanging the role of an existing user is similar to adding a new administrator role. We just need to skip the useradd step because the user already exists. For example, to change the admin user we just defined back to an ordinary user we do the following: # vi /etc/selinux/strict/users/local.users # load_policy /etc/selinux/strict/policy/policy.19 # genhomedircon # restorecon -R /home/admin # ssh admin@localhost admin@localhost's password: id uid=506(admin) gid=506(admin) groups=506(admin) context=user_u:user_r:user_t To remove the administrator privileges, we remove the user from the local.users file, reload the policy, and fix the user home directory security contexts. As you can see, when we log in as this user now, our role/type is user and our user is now the generic user user_u. 13.2.2. Understanding Audit MessagesIn Chapter 5, "Type Enforcement," we discuss the policy rules that control the generation of audit messages from SELinux. Here we discuss the format of the messages generated from these policy statements and how to examine and manage the audit messages on a production system. On systems that utilize the kernel audit framework (including FC4 and 5), SELinux audit messages are stored in both the system log (that is, syslog) files and the audit daemon log files. By default, the audit daemon log is stored in /var/log/audit/audit.log, and the system log file is stored in /var/log/messages. The audit daemon log contains all the audit messages created by the audit framework including access vector cache (AVC) messages. AVC messages are the audit messages generated by SELinux as a result of access denials and auditallow rules. The system log contains more general SELinux audit messages. Note The original version and first update of RHEL4 did not use the audit framework. This means that all SELinux audit message should be in the system log, typically /var/log/messages. Beginning with RHEL4 update 2, the audit framework is used and it should work just like FC4. Some SELinux messages are still sent to the system log because they are generated as kernel messages rather than audit messages (for example, policy load messages), and any SELinux audit messages generated before the audit daemon is started are also stored in the system log. In FC5, the audit daemon is optional, meaning that SELinux messages will appear in either system log or the audit log depending of the configuration of the system. 13.2.2.1. General SELinux Audit MessagesSELinux generates audit messages at system initialization, policy load, and when Boolean states are changed. The policy does not control the generation of these messages; they are hard-coded into SELinux. All the general SELinux audit messages are currently stored in the system audit logs. At system initialization, SELinux generates audit messages that give information about the configuration of the SELinux LSM module. For example, here are the first audit messages from SELinux after booting the system: 1 Jul 22 11:44:25 milton kernel: Security Framework v1.0.0 initialized 2 Jul 22 11:44:25 milton kernel: SELinux: Initializing. 3 Jul 22 11:44:25 milton kernel: SELinux: Starting in permissive mode 4 Jul 22 11:44:25 milton kernel: selinux_register_security: Registering secondary module capability 5 Jul 22 11:44:25 milton kernel: Capability LSM initialized as secondary The initialization of the LSM framework generates line 1, and the subsequent initialization of SELinux generates line 2. This system was booted in permissive mode, which is reflected on line 3. Lines 4 and 5 show that the capability LSM module, which implements the standard Linux capability semantics, was registered as a secondary LSM module to SELinux. Later in system initialization, the policy is loaded for the first time, generating audit messages similar to the following example:
The first two lines of this example show the audit message generated every time a policy is loaded. As you can see, this message shows statistics about the policy loaded. This example policy has 3 users, 6 roles, 1,341 types, 62 Booleans, 55 object classes, and 345,260 rules. Recall from Chapter 5 that rules are expanded in the kernel binary policy format (for policies before version 20). The number of rules shown in these audit messages are for the expanded rule format, which will be significantly higher than the number of rules present in the policy source files. This example also shows the audit messages generated at the first policy load. Lines 3 and 4 show the completion of SELinux initialization, including the initialization of SELinux support for filesystem objects that were mounted before the first policy load. Lines 5 through 20 show the initialization of each filesystem object and the associated labeling behavior. The final general SELinux audit message is generated when the state of Booleans is committed. For example, consider the following two audit messages: Dec 2 14:07:41 book kernel: security: committed booleans { allow_write_xshm:1, mozilla_read_content:0, mail_read_content:0, cdrecord_read_content:0, allow_ptrace:0, read_untrusted_content:0, write_untrusted_content:0, user_dmesg:0, use_nfs_home_dirs:0, allow_execmem:0, allow_execstack:0, allow_execmod:0, use_samba_home_dirs:0, user_tcp_server:0, allow_ypbind:0, allow_kerberos:1, user_rw_usb:1, user_net_control:0, user_direct_mouse:0, user_rw_noexattrfile:1, read_default_t:1, staff_read_sysadm_file:1, allow_httpd_user_script_anon_write:0, allow_httpd_staff_script_anon_write:0, user_ttyfile_stat:0, httpd_unified:0, httpd_builtin_scripting:1, httpd_enable_cgi:1, httpd_enable_homedirs:1, httpd_ssi_exec:1, httpd_tty_comm:0, httpd_can_network_connect:0, allow_httpd_sys_script_anon_write:0, allow_httpd_anon_write:0, httpd_suexec_disable_trans:0, comsat_disable_trans:0, cron_can_relabel:0, cupsd_lpd_disable_trans:0, cvs_disable_trans:0, dbskkd_disable_trans:0, disable_evolution_trans:0, ftpd_is_daemon:1, ftp_home_di Dec 2 14:07:41 book kernel: :1, allow_ftpd_anon_write:0, disable_games_trans:0, inetd_child_disable_trans:0, allow_java_execstack:0, ktalkd_disable_trans:0, disable_mozilla_trans:0, allow_mplayer_execstack:0, allow_user_mysql_connect:0, named_write_master_zones:0, secure_mode:0, user_ping:0, allow_user_postgresql_connect:0, pppd_for_user:0, pppd_can_insmod:0, rlogind_disable_trans:0, nfs_export_all_rw:0, nfs_export_all_ro:0, allow_gssd_read_tmp:1, rsync_disable_trans:0, allow_rsync_anon_write:0, allow_smbd_anon_write:0, samba_enable_home_dirs:0, allow_saslauthd_read_shadow:0, spamassasin_can_network:0, squid_connect_any:0, ssh_sysadm_login:1, allow_ssh_keysign:0, run_ssh_inetd:0, stunnel_disable_trans:0, stunnel_is_daemon:0, swat_disable_trans:0, telnetd_disable_trans:0, disable_thunderbird_trans:0, uucpd_disable_trans:0, xdm_sysadm_login:0 }Boolean commit messages show the current state of all Booleans in the current policy. As the preceding example shows, this can result in long audit messages that are split into two separate messages by the audit framework. 13.2.2.2. AVC MessagesAVC messages are the audit messages generated as a result of access denials that were not suppressed by dontaudit messages or permitted access that matches an auditallow rule. These messages contain valuable information that can be used for system monitoring, administration, and policy development. Chapter 14, "Writing Policy Modules," illustrates how these messages are used as part of policy development. AVC messages are stored in the audit daemon log. The following is a representative example of an AVC message: type=AVC msg=audit(1135098961.471:1770): avc: denied { read } for pid=19850 comm="cat" name="sysadm_tmp_file" dev=dm-0 ino=67482 scontext=kmacmillan:staff_r:staff_t tcontext=kmacmillan:object_r:sysadm_tmp_t tclass=fileThis AVC message shows that a process with the security context kmacmillan:staff_r:staff_t was denied read access to a file with the security context of object_r:sysadm_tmp_t. The process was executing the cat program on the file /tmp/sysadm_tmp_file. As you can see, almost all the fields in AVC messages are in the form of name=value. For example, in the field pid=19850, the name of the field is pid, and the value, which is formatted according to the information in the field, is 19850. To understand the AVC messages, let's examine each of the fields. All AVC messages have the following six fields:
The rest of the fields in an AVC message provide additional detail about the access that was allowed or denied. The details are often object-class specific. For example, audit messages from file-related object classes often include the inode number of the object, and audit messages from network-related objects often include an IP address or port number. The preceding example has the following fields, which are typical for file-related object classes:
Note Under the new Linux audit framework, every AVC message is followed by a SYSCALL message with the same audit event ID. The SYSCALL message has the correct and full exe and path fields (corresponding to the comm and name fields, respectively) for the associated AVC message. This was done to supply the information that is not available at the time the AVC message is generated. AVC messages generated as a result of allowed access are similar. Consider the following example: type=AVC msg=audit(1135098723.344:1742): avc: granted { load_policy } for pid=19618 comm="load_policy" scontext=root:sysadm_r:load_policy_t tcontext=system_u:object_r:security_t tclass=securityThis example AVC message shows the successful loading of a policy. The auditallow rule that caused the generation of this AVC message is commonly included in policies because of the importance of loading a policy. 13.2.2.3. Using Seaudit to View Audit LogsSeaudit, a tool included with the Setools package along with apol, parses and displays SELinux audit messages. Figure 13-2 shows a typical seaudit session. Figure 13-2. A typical seaudit session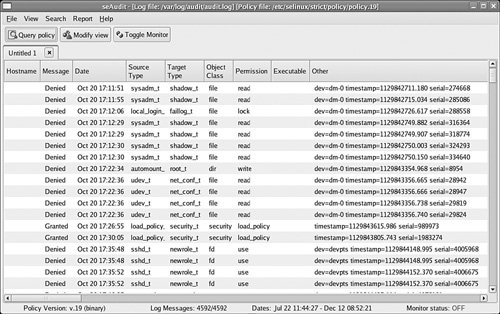 This tool parses the log file and displays a list of all the messages. Sixteen customizable fields may be displayed for each message. The Modify view button allows you to create custom filters so that only "interesting" data displays. You may save the view as a report. 13.2.3. Fixing Problems: File-Related Object LabelingDuring normal system use, file-related objects should not need labeling or relabeling. All of the files that are part of the operating system should be given a correct initial security context during installation, and the policy rules relating to labeling ensure that newly created files have the correct security context. However, during policy development, system setup, and system administration, files may need to be relabeled. Warning Relabeling objects has security risks, including potential race conditions, inconsistent access control being applied to objects, malicious hard links, and the lack of full revocation support. For the best security, relabeling should be avoided entirely on a production system. When it is unavoidable, however, the system should be in a known good state (for example, immediately after system installation or after verifying that the integrity of the system has not been compromised). For large labeling changes, such as would result from a large policy change, it is better for the system to be removed from production use. 13.2.3.1. File-Related Object Labeling CommandsFour main commands are used to relabel file-related objects: chcon(8), restorecon(8),setfiles(8), and fixfiles(8). All these commands relabel files, but they each have a specific use. Typically, chcon and restorecon are used for small labeling changes, whereas setfiles and fixfiles are used for larger changes. The chcon command sets the same security context, or a portion of a security context, for one or more files based on user input. It is the most basic labeling command and its use is analogous to chmod(1). For instance, consider the following example: $ mkdir public_html $ ls -dZ public_html/ drwxrwxr-x joe joe joe:object_r:user_home_dir_t public_html/ $ chcon -t httpd_user_content_t public_html/ $ ls -dZ public_html/ drwxrwxr-x joe joe joe:object_r:httpd_user_content_t public_html/ In this example, we changed the security context of a newly created directory, which was automatically assigned the security context joe:object_r:user_home_dir_t, to joe:object_r:httpd_user_content_t. The -t option alone specifies that the type of file should be changed while the rest of the security context is retained. The restorecon command is similar to chcon but sets the security context of file-related objects based on the default file context files for the current policy. The user, therefore, does not specify a security context. Instead, restorecon matches the filename with an entry in the file contexts files and applies the specified security context. In some sense, it is restoring the correct security context. For example, consider the following: $ mkdir public_html $ ls -Zd public_html/ drwxrwxr-x joe joe joe:object_r:user_home_dir_t public_html/ $ /sbin/restorecon public_html/ $ ls -Zd public_html/ drwxrwxr-x joe joe user_u:object_r:httpd_user_content_t public_html/ This example is functionally the same as the previous example using chcon but only because the file context files for this policy has the following entry: /home/[^/]*/public_html(/.+)? user_u:object_r:httpd_user_content_t The file context entry specifies that directories in user home directories named public_html/ should be labeled user_u:object_r:httpd_user_content_t. We can also use the restorecon command to check whether the labels on file-related objects match the specification in the file contexts files. For example: $ mkdir public_html $ /sbin/restorecon -nv public_html/ /sbin/restorecon reset /home/joe/public_html context joe:object_r:user_home_dir_t->user_u:object_r:httpd_user_content_t In this example, we specified the -n to prevent restorecon from actually performing the relabeling and the -v option, which causes restorecon to print in labeling changes performed. Together these options result in restorecon printing any differences between the on-disk labeling and the file contexts files. Finally, the restorecon command can be used to recursively relabel a large number of files. The option -R directs restorecon to descend into directories, relabeling all the contained files and directories. For example, consider the following session: $ mkdir public_html $ scp -r gotham:public_html/*.html public_html/. kmacmillan@gotham's password: 2005d10.html 100% 28KB 28.3KB/s 00:00 2005d11.html 100% 22KB 21.5KB/s 00:00 2005d12.html 100% 8575 8.4KB/s 00:00 2005d7.html 100% 15KB 14.9KB/s 00:00 calendar.html 100% 2839 2.8KB/s 00:00 coding_style.html 100% 1040 1.0KB/s 00:00 $ ls scontext public_html/* joe:object_r:user_home_dir_t public_html/2005d10.html joe:object_r:user_home_dir_t public_html/2005d11.html joe:object_r:user_home_dir_t public_html/2005d12.html joe:object_r:user_home_dir_t public_html/2005d7.html joe:object_r:user_home_dir_t public_html/calendar.html joe:object_r:user_home_dir_t public_html/coding_style.html $ /sbin/restorecon -R public_html/ $ ls scontext public_html/* user_u:object_r:httpd_user_content_t public_html/2005d10.html user_u:object_r:httpd_user_content_t public_html/2005d11.html user_u:object_r:httpd_user_content_t public_html/2005d12.html user_u:object_r:httpd_user_content_t public_html/2005d7.html user_u:object_r:httpd_user_content_t public_html/calendar.html user_u:object_r:httpd_user_content_t public_html/coding_style.html In this example, we copied several Web pages from another system, which all automatically received the security context joe:object_r:user_home_dir_t. Running restorecon recursively on the entire directory relabeled all the files to user_u:object_r:httpd_user_content_t. Here all the files received the same security context because they matched the same file context specification, but it is equally possible that some files would have matched other specifications and received different labels. Despite its ability to recursively relabel files and directories, restorecon is not normally used to make large labeling changes such as would result from switching policies. For this, we should use the fixfiles command. The fixfiles command is actually a shell script that uses either restorecon or setfiles depending on the requested use. Like restorecon, fixfiles uses the file contexts files for the current policy. Instead of requiring the user to specify which files or directories to relabel or check, fixfiles works on all mounted filesystems that support extended attribute labeling. The fixfiles command has three modes, one of which must be specified when running the command:
For example, following is how to relabel all file-related objects on the system: # /sbin/fixfiles relabel Files in the /tmp directory may be labeled incorrectly, this command can remove all files in /tmp. If you choose to remove files from /tmp, a reboot will be required after completion. Do you wish to clean out the /tmp directory [N]? n The final command, setfiles, requires that the user manually specify which file contexts files to use and the starting directory. In addition, setfiles does not traverse across mount points when descending into directories, meaning that it must be run once for each mounted filesystem that uses extended attribute labeling. It is more common to use fixfiles unless additional flexibility is needed. 13.2.3.2. Automatic RelabelingIn addition to using the file-related object labeling commands to relabel an entire system, a system can be automatically relabeled during boot. This is done by creating a file in the root of the filesystem called /.autorelabel. For example: # touch /.autorelabelIf this file is present during boot, the entire system is relabeled and the file is removed. The kernel may also be booted with the autorelabel argument that causes a relabel upon boot without the /.autorelabel file. When an SELinux system is booted with SELinux disabled, the /.autorelabel file is automatically created. 13.2.4. Managing Multiple PoliciesIn general, a production system should not maintain multiple policies and switch between them. However, this is a common scenario for development systems and may be an issue for some types of deployments and policy updates. The procedure for switching policies is as follows:
On reboot, the system will load the new policy and relabel all of the file-related objects. |
EAN: 2147483647
Pages: 154