OneNote Basics
| OneNote is simple to use, but you have to get used to its idiosyncrasies. Because of all OneNote does, it sometimes outthinks you, and assumes too much. For example, sometimes when you write, as you move your pen, it may decide you're starting a new thought and therefore start a new section, even if you're just continuing the sentence. Being consistent in where you begin sentences and your character spacing will help resolve most of this second-guessing. Tip
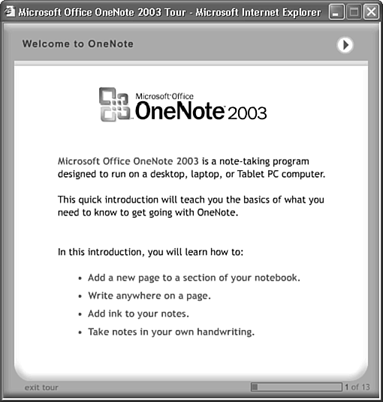
In this section, I will introduce you to OneNote, and help you understand how to use the main features of the program. Before I begin, however, I recommend that you use the OneNote Tour. To use it, tap Help, Get Going with OneNote, and then tap the Start tour button to begin. When you do, you will see the first screen of the Microsoft Office OneNote 2003 Tour, as shown in Figure 16.2. Just tap the arrow at the top of the dialog box to move forward. Throughout the demo, you also can see demos of the various actions that OneNote can perform by tapping on the Show Me button when it appears. Figure 16.2. The OneNote Tour helps you gain a basic understanding of OneNote and get started. Caution
Introduction to the InterfaceThe OneNote interface looks similar to the interfaces found in other Office applications. OneNote's interface does, however, have some special features, which I cover here. Tip
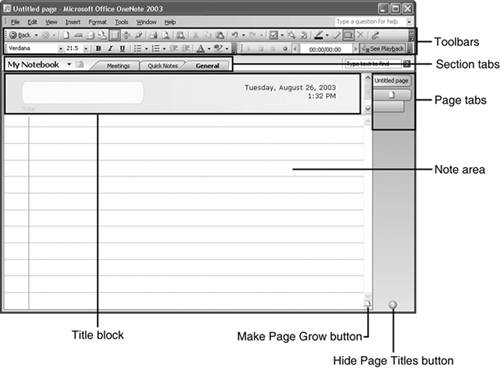
Figure 16.3 shows the main areas of the OneNote interface. Figure 16.3. The main functional areas of OneNote 2003. These main areas are as follows:
The Standard ToolbarThe Standard toolbar, shown in Figure 16.4, is where most of the tools in OneNote reside. Figure 16.4. This is the Standard toolbar, the main toolbar in OneNote. From left to right, here are the buttons found on OneNote's Standard toolbar:
The Audio Recording ToolbarThe Audio Recording toolbar, pictured in Figure 16.5, is where you control OneNote's sound-recording and playback features. Figure 16.5. The Audio Recording toolbar controls audio recording and playback. Tap the red circle to begin recording. When you start recording, the slider in the middle of the toolbar moves to the right as time increases. (During playback, you can also use the slider in the center to move the time bar to the point you want it for a particular section of the audio.) Tip
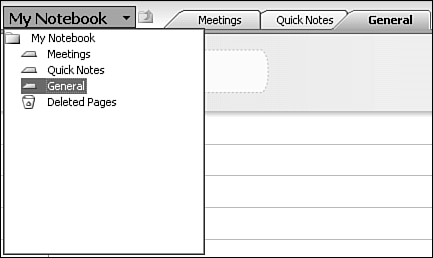
When you record audio, the audio files are stored in the My Documents\My Notebook folder by default. The files created will be Windows Media files and will have the .wma extension. As you enter other information, such as text, drawings, or handwriting, the audio will be linked to those objects based on time. As you insert other objects, the audio will link to the object that is active at the time of the recording. If you have highlighted an object that has audio attached, you can tap the See Playback button to begin audio playback. When you play back the audio, you will see the highlighted objects change over time, reflecting the links the audio recording made as you were making notes. When you play back audio, you also can tap the triangular Play button, the square Stop button, and the double-lined Pause button. These work like normal tape or CD controls. Section TabsTo move between sections, you can use the Section tabs that appear across the top of OneNote, along with the My Notebook drop-down list, as shown in Figure 16.6. Figure 16.6. The Section Navigation area lets you quickly switch between sections of your notebook. You can you tap on the tabs to navigate between sections of your notebook, and you can also use the My Notebook drop-down list to find your notes, including deleted pages. The Deleted Pages folder stores the pages that have most recently been deleted. Tip
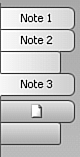
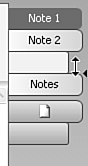
Page Navigation and ControlTo switch between pages within a section of your notebook, go to the right of the screen and use the page tabs you find there (see Figure 16.7). The top set of tabs will be your notes. The bottom two tabs are for creating new pages and sub-pages. Pages are basically new notes, whereas sub-pages are used to differentiate subordinate content levels within a page. Figure 16.7. The page tabs in OneNote let you switch between notes easily instead of having to open files. In Figure 16.7, notice the tab under Note 2, which denotes a sub-page. The tab names come from the title block of the note. Taking NotesTo take notes, you need to decide how you want to capture your ideas. If you want to type or enter text through the Input Panel, you can tap where you want the text to appear in the body of the note, and a light gray box will appear, waiting for your input. You can then tap anywhere to enter text. Tip
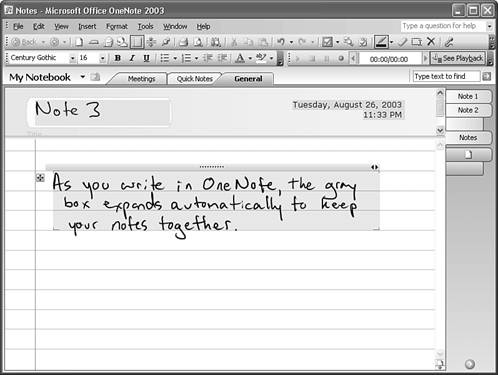
If you want to draw, just start drawing with your pen. You do need to make sure you are in Pen mode rather than Selection or some other mode. To get into Pen mode, tap the Pen button on the Standard toolbar. If you want to write notes by hand, get in Pen mode and start writing. As you get toward the end of a line of text, the gray box surrounding your text will expand downward, allowing you to include more notes in the same object (see Figure 16.8). Figure 16.8. The gray box that appears when OneNote recognizes your ink strokes as handwriting helps you keep your text together instead of in multiple objects. Caution
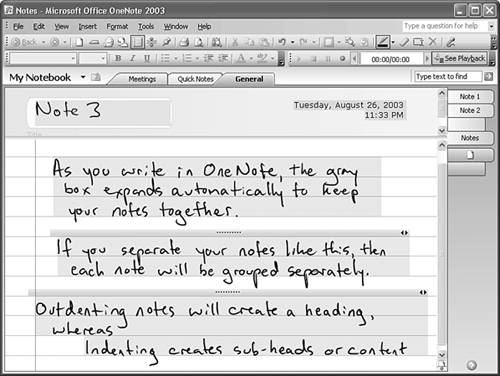
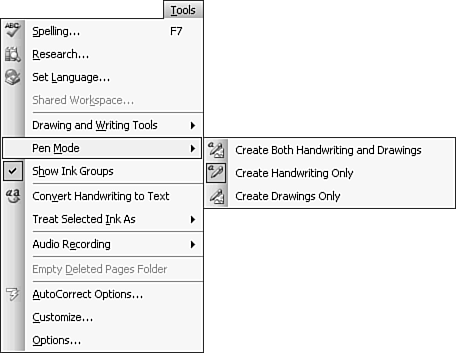
You can define a new paragraph by leaving vertical space between your previous notes and your new handwriting. Figure 16.9 shows how I have created three paragraphs, each of which is considered a separate object. Figure 16.9. Separating paragraphs by a line helps OneNote tell them apart. The Importance of Object SegregationIt is important to know where your pen marks are getting grouped. You want all related ideas to be in a single group, rather than chunked into multiple groups. One way to do this is to write within the gray boxes. In addition, using the Ruler Lines option is helpful for keeping your text together. Write on the lines, and OneNote will recognize your strokes as text. If you notice that your ink strokes start appearing in different object blocks (gray boxes with control handles), you may want to change the way OneNote treats ink. If you are only going to be writing text, you can force OneNote to recognize ink as text by tapping Tools, Pen Mode, and then selecting Create Handwriting Only, as shown in Figure 16.10. Figure 16.10. Select Create Handwriting Only to force OneNote to recognize your ink strokes as handwriting. When you set OneNote to recognize only handwriting, the handwriting box appears, letting you expand the box and keep handwritten paragraphs together. Tip
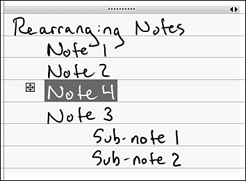
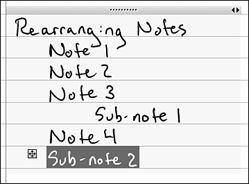
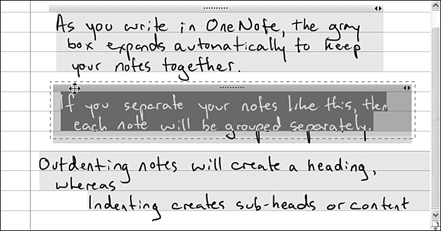
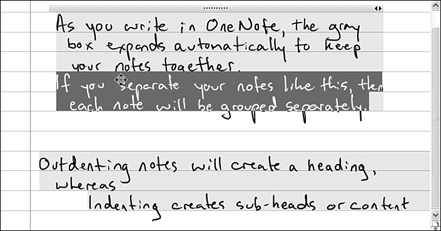
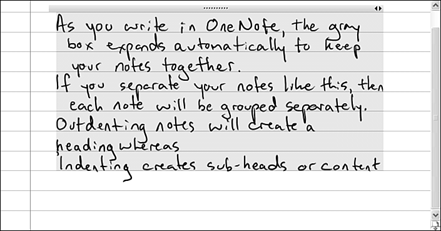
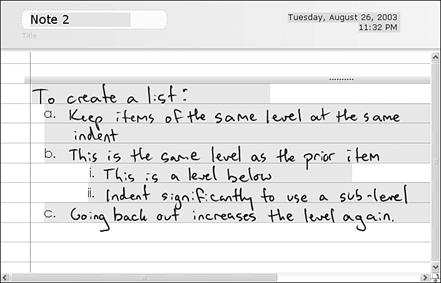
Rearranging NotesRearranging notes is easy in OneNote. Simply hover your pen or mouse over the text or object you want to move (see Figure 16.11), and then tap and hold the crossed arrow symbol that appears to the left of the object (this symbol is called the selection handle). As you hold your pen (or your mouse button) down, you can drag the object anywhere else in the note. When you lift your pen (or mouse), the object will stay where it was placed. Figure 16.11. OneNote lets you easily rearrange objects and notes by dragging the selection handle to the left of the object. Another great feature of OneNote's drag-and-drop organization is that you can pull objects up and down in the outline hierarchy easily by dragging left or right. In Figure 16.12, notice that I have dragged the Note 4 section down between the two sub-notes, and then outdented (dragged to the left) the Sub-note 2 item. This easy rearranging makes OneNote a fantastic tool for outlining and brainstorming. Figure 16.12. Ad-hoc note reorganization makes outlining easy in OneNote. Grouping NotesIt's easy to group note objects in OneNote. Just select the object you want to combine by tapping on the control bar, as shown in Figure 16.13. Then drag up or down to combine the selected object with another object, as shown in Figure 16.14. The control bar also lets you resize the note by dragging the right-left arrow at the right. Figure 16.13. Select the object you want to combine by tapping on the object's control bar. Figure 16.14. Drag objects together to combine them into a single object. After you combine all the elements you want into a single group, it will look more like Figure 16.15. Figure 16.15. Once combined, all the elements are treated as a single object in OneNote. Creating Lists and Applying Bullets and Numbering to Your NotesNotice that the last line of the handwriting is indented in Figure 16.14. This is the way OneNote differentiates between heading and bullet levels. If you want to create lists in OneNote like the one shown in Figure 16.16, just start writing, using the following suggestions: Figure 16.16. Creating a list in OneNote.
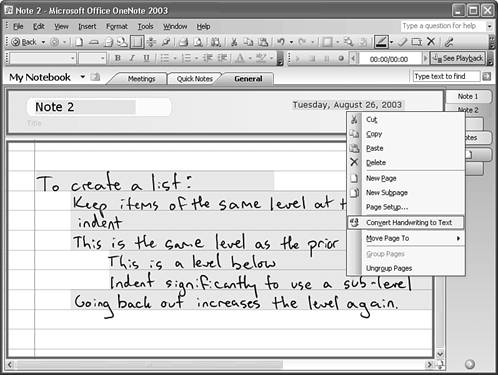
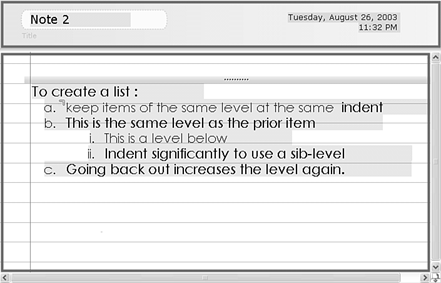
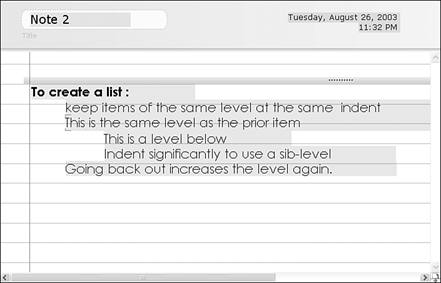
In the list in Figure 16.17, I selected the list and then tapped the Numbering button, which automatically added the outline numbering to my list. You can change the numbering format by tapping on the drop-down list to the right of the Numbering button, and then choosing a numbering style. Figure 16.17. Tapping the Numbering button after selecting the text automatically results in a numbered list based on the indents that OneNote recognizes. You can just as easily create a bulleted list by tapping the Bullets button on the toolbar, with the same drop-down selection capability. Converting Handwritten Notes to TextOne great feature of OneNote is its capability to bulk-recognize handwriting so that an entire page or notes section can be converted easily to text. To convert a page of notes to text, simply right-tap the note page and select Convert Handwriting to Text, as shown in Figure 16.18. Figure 16.18. You can easily convert a lot of handwritten notes to text. Once the text is converted (and cleaned up if the recognition wasn't perfect), it can be selected and copied into other applications, such as Word, where the formatting will appear just as you have it in OneNote. Figure 16.19 shows how the text looked after I converted this section of notes. Figure 16.19. The text, once converted, lacked consistent formatting, and contained a couple of typos (due to my handwriting). This can be fixed easily. The formatting was a bit off in the text, so I selected all of it and made it uniform in font size to get the results shown in Figure 16.20. I also bolded the heading. Figure 16.20. After only two formatting settings are adjusted, the text looks good. Tip
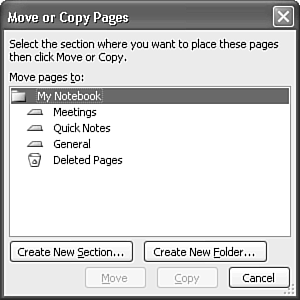
Organizing Your NotebookIt's easy to keep your notes organized in OneNote. The page tabs on the right keep your pages separated with easy access, while the section tabs at the top let you separate subjects just like you would in a multi-subject notebook. Slice and dice your notes any way that makes sense to you. If you want to move a page up or down along the right side, tap and hold on the tab you want to move, then drag to the right, to the edge of OneNote, and drag up or down. You should see a double arrow, as shown in Figure 16.21. Figure 16.21. You can move pages up and down by tapping and dragging along the right side of the page tab area. If you want to move a page to another section, right-tap the page, select Move Page To, and then tap Another Section. You will then see a dialog box similar to the one in Figure 16.22. Figure 16.22. You can move a page into another section by right-tapping the page and then selecting Move Page To. Choose the section you want to move the page to, and tap Move or Copy. Move moves the page from the source to the destination section and leaves nothing behind. Copy will duplicate the page in the destination section, leaving the page in the source section intact. Tip
You can also choose Create New Section or Create New Folder for the page you want to move or copy by tapping the appropriate buttons. The Create New Folder button creates a new folder in the My Documents\My Notebook folder. This helps you organize your files. The Create New Section button creates a new .one file in your My Documents\My Notebook folder. |


EAN: 2147483647
Pages: 172