Creating ADF Packages Using the Packager Utility
The final task to review in this chapter is the creation of ADF packages. As we already mentioned, Citrix's Packager utility can be used to create packages for deployment when an MSI package does not already exist for an application. In this section, we use the increasingly popular Mozilla Firefox web browser to demonstrate how an ADF package can be created.
The Packager is a wizard-driven program that creates an ADF package by recording the changes made to a server when an application or software component is installed. This information and the necessary files are stored together within the ADF package for deployment to target servers. Any type of software that can be installed on a MetaFrame server can be deployed in an ADF package.
Alert
The Packager creates only ADF packages. It does not create MSI or MSP packages.
Packager Components and Terminology
You need to be able to identify and understand the function of the main components of the Packager application and ADF packages:
-
Project Before you can build an ADF package, you must create an associated project that contains the intermediate files and information necessary to build the package. Details on what can be added to a project are discussed later in this section.
When a project is created, a subfolder is created underneath the Packager folder with the name of the project. The files and information for the project are maintained here. The default location for this is
%ProgramFiles%\Citrix\IM\Packager\Projects\<Project Name>
The following files are most commonly found in the project folder:
-
Record log file This file, named <Project Name>.ael, contains the information captured during an application installation recording session. The data in this log is used to generate the ADF file. If the package was generated using something other than installation recording, this file will not exist.
-
Project information file This binary file, named <Project Name>.aep, contains information on the properties of the project such as name, description, and target operating system.
-
Project creation log file When the project is being analyzed and the ADF package created, a log file is generated. This file, named <Project Name>_log.txt, contains information on the status of the creation process. This log file is stored in plain-text format.
-
-
ADF Package After gathering all the necessary information for a project, you can build an ADF package. This package contains the information that allows Installation Manager to deploy and install the application on the target servers. The built package is located in the folder <Project Name>\PkgSrc. The type of package created dictates what information is found in this folder.
-
ADF File As part of the package creation, an ADF file is generated. It contains all the Registry, environment variable, and file changes necessary to install the software. The final ADF file is built from the intermediate record log file (*.ael) found in the project folder. The ADF file, named <Project Name>.wfs, is placed into the actual deployment folder for the package. This is typically the network share point for Installation Manager. This file is maintained in plain-text format.
-
Application Compatibility Scripts Application compatibility scripts are used to ensure that legacy Windows-based applications function properly in a MetaFrame environment. Often these applications are designed as single-user applications and don't implicitly provide support for multiple concurrent user sessions. Citrix provides these compatibility scripts for many of the most commonly deployed legacy applications. The scripts available for inclusion can be found in the following folder:
%ProgramFiles%\Citrix\IM\Packager\appcompat
Note that application compatibility scripts are not required in all circumstances. Only when deploying a legacy application that does not natively understand a MetaFrame server configuration do you need to consider the use of these types of scripts.
Preparing for ADF Package Creation
Before you begin the creation of an ADF package, you need to ensure the following:
-
The Package Server meets the requirements outlined in the "Components of Installation Manager" section earlier in this chapter.
-
No other applications are currently running, and only standard server services are currently active. You need to minimize the chances of information that is not directly related to the application installation from accidentally being captured during the installation recording.
-
No other users (including administrators) are currently logged on to the server.
-
You have all the required installation media for the application you want to package.
-
You have defined the network share location and package management server. You can specify this information in the Packager, allowing it to directly build packages to the central network share and update the package management server with information of the new package's availability.
After verifying these points, you are ready to begin creating your ADF packages.
Package Creation Using the Packaging Wizards
You either can create an ADF package using the various packaging wizards or create them manually. Let's first review the automated creation of packages using the wizards and then look briefly at the same process when performed manually.
Unlike other components of MetaFrame, which are all accessed through the Management Console, the Packager is a standalone application and is accessed through the Start menu under
Programs, Citrix MetaFrame Presentation Server, Installation Manager, Packager
Unless you have selected not to show the startup dialog box, every time you start the Packager, you are presented with the dialog box prompting you to open an existing package or create a new one using the Project Wizard. Selecting Create a New Project starts the Project Wizard. You can also start the Project Wizard from the File menu.
When the Project Wizard opens, you need to select the type of project you want to create. The three choices are
-
Package an Installation Recording Choose this wizard when an application setup program prompts you for choices during the setup. Most programs that do not provide an MSI package fall into this category. The Firefox installation uses this wizard. The Packager runs in the background and records the application installation. After the installation is complete, the Packager will create the ADF package from the recorded information.
Alert
An ADF package can contain only one installation recording. If you have multiple recordings, you need to package them independently and then deploy them as a package group through Installation Manager.
-
Package an Unattended Program (Service Pack, and so on) Use this wizard when the application setup program does not prompt you for information (it performs a silent or unattended installation). Service packs and application updates are the most common applications to package with this wizard selection. When a package of this type is deployed through Installation Manager, an associated uninstall is not available.
-
Package Selected Files Choose this wizard when you want to deploy specific files or folders. No application installation is performed; files are just delivered through the generated package. Configuration files and individual files that update a custom application are common examples that you would package using this wizard.
Packaging Using the Installation Recording Wizard
Packaging an installation recording is one of the most common wizard tasks when creating ADF packages. We use the Firefox application to demonstrate how this type of package is created. The following steps summarize creation of a package using an installation recording:
| 1. | Choose the Package an Installation Recording Wizard and provide a name for the new project when prompted. |
| 2. | Provide the full path to the installation program. This can be a UNC path or a path containing a Windows drive letter. If special command-line parameters are required, you can add them in the space provided on this screen. |
| 3. | (Optional) The step is necessary only if the application requires a special application compatibility script. If you choose to include a compatibility script, click the Find Script button to list all the scripts Citrix provides. Choose a script, if necessary, and click Next. |
| 4. | Choose a build location. This is the place where the completed package will be stored. If you want to automatically populate Installation Manager with your built package, make sure that you set the build location to correspond with the network share location; otherwise , you will have to manually copy the package to the network share. |
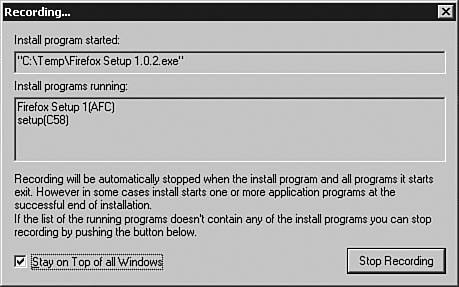
| 5. | Once recording begins and the installation program starts, the Recording window, shown in Figure 11.8, appears with information on the installation programs currently running. Figure 11.8. Once recording starts, the application setup program is run. |
| 6. | After the application installation is complete, click Done to stop the recording and continue. If the application installation requests a restart, make sure that you have stopped the recording before you allow the restart to occur. The Packager recording will not continue after a restart. |
| 7. | After you complete the recording, the Packager analyzes the recording log and generates the ADF package for the application. If you defined the package management server during the configuration of the Packager, you will be prompted to select a Citrix server to post the package to. Clicking OK automatically updates Installation Manager with the availability of the new package. If the package already exists, then it will generate an error. After the package build is complete, you are returned to the main window of the Packager, where you can review the new project information (see Figure 11.9). You can view any log information generated during the different stages of the package build by clicking the Analyze, Build, or Post tabs along the bottom of the window. Figure 11.9. You can review the settings for the ADF package after the build is complete.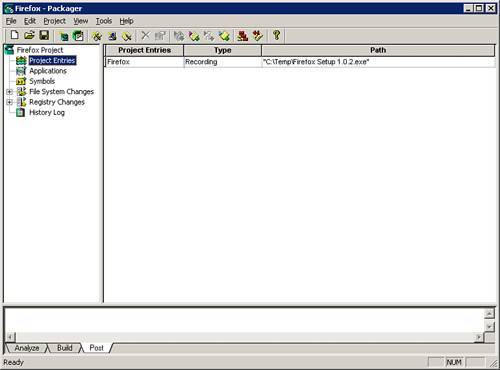 |
Rolling Back Installation Recording Changes
After you have completed the recording of an application installation, Packager enables you to roll back those changes to preserve the initial state of the Package Server. The Rollback option is located under the Tools menu. When launched, it opens a dialog box listing the saved recording sessions. You have two options. You can either roll back the recording session, removing the installed application from the server, or you can delete the recording entry, accepting the installation as part of the new base configuration for the Package Server. After the recording information has been deleted, the application recording cannot be rolled back.
If you want to roll back multiple records, make certain that you perform the rollback in reverse order. That is, you roll back the newest entry first, followed by the second newest, and so on, until you reach the oldest entry remaining in the list.
Note
Rolling back the changes or deleting the entry does not impact the saved project, nor the ADF package.
Packaging Using the Package an Unattended Program Wizard
The Package an Unattended Program Wizard is similar to the Installation Recording Wizard except, as already discussed, this wizard is intended for use when an application can be deployed using a silent installation.
Note
Batch scripts are also commonly deployed and executed using the Unattended Program Wizard. Registry changes can easily be scripted and deployed in this manner.
You package an unattended setup program as follows :
| 1. | Launch Packager and start the Package an Unattended Program Wizard. Provide a name for the package when prompted and click Next. |
| 2. | Locate the installation file and provide any necessary command-line parameters to ensure that the program will install silently. For example, Windows 2000 Service Pack 4 can be deployed silently using the /Q parameter. Another parameter to use is /Z , which prevents the server from restarting after the service pack has been installed. |
| 3. | You define additional program options. One option allows you to enforce a reboot after the program installation completes. You can enforce the reboot here or when you deploy the application through Installation Manager. You also have the option of running the installation directly across the network from the source location, or you can configure the ADF package to copy the files into a temporary folder directly on the target server prior to beginning the installation. The default option is not to reboot and to copy the installation program locally. When files are copied locally, they are copied into the target server's temp directory and are not removed after the package deployment is complete. |
| 4. | The wizard completes with a request to set the build location and then asks for confirmation on the settings before the package is created. If a package management server has been configured for the Packager, you will be prompted to select a Citrix server to post the package to. Unlike with the Installation Recording Wizard, the unattended installation program is not executed during the package build. The resulting ADF package is intended to deploy and launch the unintended installation program directly and not record specific installation information. It is for this reason that you are unable to generate an uninstall package for a package generated using the Unattended Program Wizard. |
You can then deploy the resulting ADF package within Installation Manager, as discussed earlier in the chapter.
Packaging Using the Package Selected Files Wizard
The final wizard-driven packaging option, Package Selected Files Wizard, allows you to create an ADF package containing selected files or folders that you want to deploy to the target servers. A common use for this type of package deployment is the upgrade of in-house or custom-developed applications. Often these types of application upgrades do not require the full installation of an application, but involve simply updating one or more executables and associated DLLs. A package containing these files can be created and deployed quickly into the environment.
The Package Selected Files Wizard is straightforward, requiring only that you provide the files and/or folders to include in the package. It is extremely important to note that, by default, the source location from which the files/folders are retrieved is used as the target location for copying those files on the target servers.
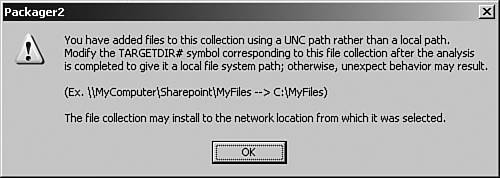
For example, if you select a file called InventoryManager.exe, located in the \\onfp01\Home\ToddM\My Documents\Deploy folder, by default, the Packager defines the TARGETDIR# symbol to point to \\onfp01\Home (the share portion), while the target folder itself would be \Toddm\My Documents\Deploy. When a network source location is selected, a warning message is automatically generated, as shown in Figure 11.10. This message reminds you to ensure the TARGETDIR# symbol is properly updated to avoid the situation in which the source files are copied back to the same network share.
Figure 11.10. If the source location is on a network share, the Packager will generate a warning message reminding you to update the TARGETDIR# symbol.
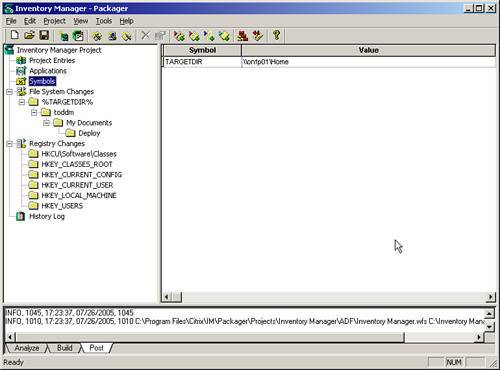
You should either locate the files on the Packager server in the exact location where you would like them to be deployed on the target servers, or create the desired structure on the network and update the TARGETDIR# symbol after you have created the package. Figure 11.11 shows where the TARGETDIR# symbol is found for the given package and the default value corresponding to the example described above.
Figure 11.11. The TARGETDIR symbol contains the path to the network share point when a network source location is being used.
Note
When configuring files for Package creation, I prefer to copy the desired files from a network share location into the exact folder that will be the destination folder on the client machines. The assumption is that any necessary testing should have been done with these files in the given location, ensuring that they will work as desired on the other MetaFrame servers. This is a personal preference, but one that has been reliable and consistent time and time again.
ADF Package Review
Before you deploy an ADF package, it is a good idea to quickly review the File System Changes and Registry Changes (refer to Figure 11.11) to ensure that no other modifications (symbol or otherwise) should be made to the package.
Manually Creating an ADF Package
You do not have to use the project wizards that Citrix provides to create an ADF package. Although you will find that the majority of the configuration steps are almost identical to those provided through the wizards, in some circumstances, there are additional advanced options available that you would otherwise not see when building a package using a wizard.
You create a package manually by selecting New Project from the File menu instead of Project Wizard. After you provide the name for the project, the basic project structure is generated and becomes visible. To this basic structure, you must add the desired package type, chosen from the Project menu.
You have four choices of information you can add to the project:
-
Add Recording This option adds an installation recording to the project. You provide the name of the setup program to run and optionally include the specific hard drives to monitor from the Advanced settings. Local hard drives are included by default.
You also have the option to monitor only the Run Program and Programs It Starts. This controls to what extent the Packager monitors events in the system. When enabled the Packager monitors only the setup program and any child programs that are launched. When disabled the Packager will monitor everything running on the server. Under most circumstances, you do not need to deselect this setting unless a recording fails. Otherwise, you can enable it to see whether a component that was originally missed is required to build the package successfully.
After you click the Start button, the Recording dialog box appears, exactly the same as when you run the Installation Recording Wizard. The only difference is that the package is not automatically built. You must select Build Package from the Project menu to actually build the package.
-
Add Compatibility Scripts This option opens a dialog box, allowing you to choose an application compatibility script to add to the current project.
-
Add Unattended Program This option provides a single dialog box where the unattended program settings are defined. All the options available here are also found in the Unattended Program Wizard. When completed, the unattended program is added to the project, but the package itself is not created until you select Build Package from the Project menu.
-
Add Files This selection allows you to provide a list of files and/or folders to add to the project, just as the Package Selected Files Wizard. As with the other options, the package itself must be manually built.
EAN: N/A
Pages: 199