MetaFrame Access Security
We are now going to focus on the three security components available as part of the core MetaFrame product. Although each is functionally unique, they all are used to achieve the common goal of securing connectivity to the MetaFrame server. The three security components are
-
ICA Connection Encryption Also known as SecureICA, ICA encryption is used to secure the communications between a MetaFrame Presentation Server and an MPS client.
-
Kerberos Client Authentication When version 8.x of the Win32 MPS client is employed, you can use Kerberos authentication to strengthen the authentication security from the Win32 client to an MPS 3.0 server farm. Kerberos client authentication is supported only in a Windows 2000 or Windows 2003 domain.
-
SSL Relay The Citrix SSL Relay component allows you to secure communications between MPS clients and/or the Web Interface to MetaFrame servers using Secure Sockets Layer (SSL) or Transport Layer Security (TLS).
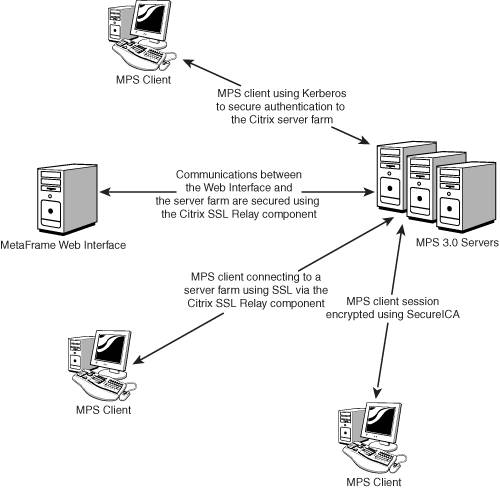
Figure 9.7 shows the layout of a simple MPS environment and where these three security components fit into the structure of the environment.
Figure 9.7. The three security components provide the ability to secure different areas of the MetaFrame environment.
ICA Connection Encryption
All MPS clients, with the exception of the minimal web client, provide support for encrypting the communications between the client and the MetaFrame server. ICA connection encryption, also known as Citrix SecureICA, supports five encryption configurations:
-
Basic encryption Citrix's basic encryption employs a simple encryption algorithm using an encryption key of fewer than 40 bits. This is not considered a secure encryption setting.
-
128-bit encryption for logon only A 128-bit encryption key is used for the authentication process only, leaving the remainder of the session data to transmit with only Basic encryption.
-
40-, 56-, and 128-bit encryption Regardless of the choice made, 128-bit encryption is used during authentication; then the actual session data is transmitted at the selected encryption level.
Note
All encryption configurations higher than Basic employ the RSA RC5 encryption algorithm. RC5 is known as a fast block cipher, which takes a fixed-length block of data and transforms it into an encrypted block of data that is the same size . The data block is encrypted and decrypted using the same secret key. This type of secret key sharing is known as symmetric-key encryption . Specifically, ICA encryption employs a 64-bit block size; 12 rounds of encryption (the encrypted data is passed through and encrypted again 12 consecutive times); and a secret key 40, 56, or 128 bits in size.
The sharing of this common secret key is carried out using the Diffie-Hellman key agreement algorithm. The Diffie-Hellman algorithm describes a way for the client and the server to exchange key information in a secure fashion over an insecure data link. The algorithm is known as a public-private key algorithm because users exchange a well-known public key from which they can derive the common, shared secret key.
Details on the specific steps involved in sharing the private key can be found in the "Citrix SecureICA Services Administrator's Guide," a slightly dated document from Citrix that still includes relevant information on the ICA encryption process.
ICA connection encryption has configurable settings on both the client and server. On the client side, the desired encryption settings for the session are defined prior to establishing the connection to the MetaFrame server. For example, when defining the properties for a connection within the ICA Client for Linux, you specify the level of encryption that you want to establish when connecting to the MetaFrame server.
When the client connects to a MetaFrame server, it attempts to negotiate the use of this encryption level for the session. Three factors may prevent this encryption level from being employed, and consequently, the user being denied access to log on to the MetaFrame server:
-
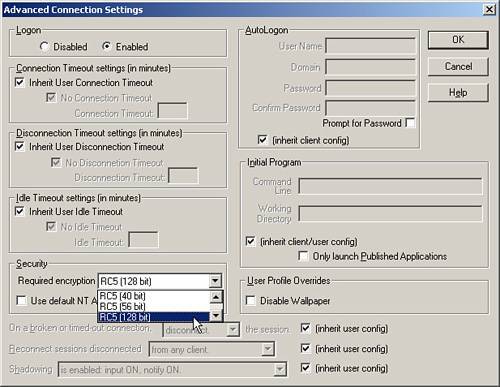
The first factor is the minimum required encryption level that has been defined for ICA connections on the server. The minimum required encryption level is configured from within the Citrix Connection Configuration tool. Within the Advanced Connection Settings window, you define the minimum required encryption level (see Figure 9.8). The default level is Basic, allowing a client to connect to the server with the desired encryption set to Basic or higher.
Figure 9.8. The Required Encryption setting dictates the minimum encryption level that must be defined for the MPS client.
-
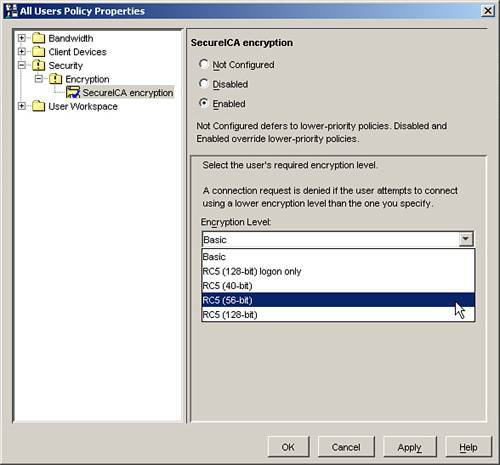
The second factor is whether a MetaFrame user policy has been defined to enforce a minimum encryption level for the user (see Figure 9.9).
Figure 9.9. The required encryption setting can also be managed through user policies.
-
If the client is connecting to a published application, the final factor is whether a minimum encryption level has been defined for the published application itself. One of the properties within a published application is the encryption level that will be enforced.
When a minimum encryption requirement has been defined (either in the connection settings, a policy, or a published application's properties), only the clients with their encryption level configured to meet or exceed this requirement can log on to the MetaFrame server. Anyone with lower encryption settings receives an error message stating "You do not have the proper encryption level to access this session."
Note
When encryption settings have been defined in multiple locations, the most restrictive encryption requirement always takes precedence.
For example, if the required encryption level is set to RC5(56 bit), only those clients configured with 56-bit or 128-bit encryption are able to log on. All clients with lower encryption settings are rejected, and the user is unable to log on to the server until his or her setting has been adjusted accordingly .
Limitations of ICA Encryption
Although ICA encryption does help to protect client/server communications, Citrix does not recommend that this be the sole means of securing access to a MetaFrame server across a public network, such as the Internet. A lack of client/server authentication does make ICA encryption, and the ICA protocol itself, theoretically susceptible to a man-in-the-middle attack.
Basically, in a man-in-the-middle attack, someone intercepts transmission between two sources, views and even modifies the information before it is passed on to the intended target. Without an authentication mechanism, the ICA protocol is unable to validate whether the encrypted transmission actually did originate from the source that it said it did.
ICA encryption is most often employed within a corporate network (LAN or WAN), where the threat of such attacks is typically low.
Kerberos Client Authentication
Version 8.x of the Win32 MPS client supports the use of Kerberos authentication as an alternative to sending the user's password across the network. Kerberos is an industry-standard network authentication system that allows machines communicating over networks to prove their identity to each other. Kerberos is an effective method of protecting against eavesdropping and attacks based on the replay of captured network traffic. Kerberos helps to ensure that authentication information travels safely and securely between the client and the MetaFrame server.
Kerberos is an integrated component of Windows Server 2003 and Windows 2000 Server and as such is supported only in a Windows 2000 or 2003 domain. Support for Kerberos client authentication is a new feature of MetaFrame Presentation Server 3.0 and leverages the Security Support Provider Interface (SSPI) in Windows Server. To use Kerberos client authentication, you must ensure the following in the MetaFrame server farm:
-
The MetaFrame servers and the MPS clients must belong to the same or trusted Windows 2000 or 2003 domains.
-
The MetaFrame servers must be configured to Trusted for Delegation. You set this by selecting the properties of the server through the Active Directory Users and Computers MMC snap-in.
-
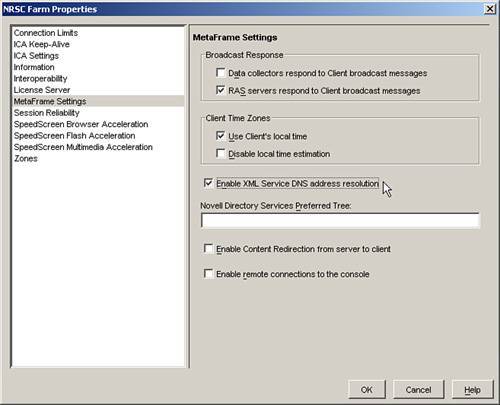
The use of SSPI within MetaFrame requires that the setting Enable XML Service DNS Address Resolution be enabled in the server farm. This setting is located under MetaFrame Settings in the server farm's properties (see Figure 9.10).
Figure 9.10. The DNS address resolution setting allows the server to return the fully qualified name to ICA clients, a requirement for Kerberos authentication.
MetaFrame supports the use of Kerberos authentication with or without pass-through authentication. The difference is that if Kerberos authentication fails, either the user is prompted to provide logon credentials or the local user account is used to attempt pass-through authentication to the MetaFrame server. Kerberos authentication without pass-through authentication is considered more secure.
The use of Kerberos without pass-through authentication is supported only with Custom ICA Connections or through the Web Interface for MPS. When you are using Application sets in Program Neighborhood or the Program Neighborhood Agent, if you want to use Kerberos, you must use Kerberos with pass-through authentication.
After the server-side components have been properly configured, the client side must be configured to utilize Kerberos authentication. For new client deployments, you can create a custom installation package configured to employ Kerberos authentication; otherwise , you can modify the Wfclient.ini file on each of the client devices.
The configuration of the MPS client, including enabling Kerberos authentication, is discussed in Chapter 13, "Citrix ICA Session and Client Configuration."
Citrix SSL Relay
Citrix SSL Relay supports full encryption of the data stream between the MPS client (or the Web Interface) and the MetaFrame Presentation Server.
Note
In this chapter, we focus on the use of SSL Relay to secure communications between the MPS client and the MetaFrame server. The use of SSL Relay and the Web Interface is discussed in Chapter 14.
Figure 9.11 illustrates how Citrix SSL Relay would fit into a typical MPS environment. Instead of the client contacting a MetaFrame server directly to retrieve server farm information or establish a MetaFrame session, when SSL Relay is employed, the client encrypts the data and transmits it to a server running the SSL Relay, which in turn decrypts the data and forwards it onto the appropriate resource (MetaFrame session connection or Citrix XML data request). Data transmitted back from the server is also directed through the SSL Relay, where it is also encrypted before being sent to the client.
Figure 9.11. SSL Relay encrypts the traffic between a client and the MetaFrame server using the industry-standard SSL/TLS protocol. When the data reaches the SSL Relay service, it is decrypted and sent onto either port 1494 if it is session data or onto port 80 (Citrix XML Service) if it is server location information.
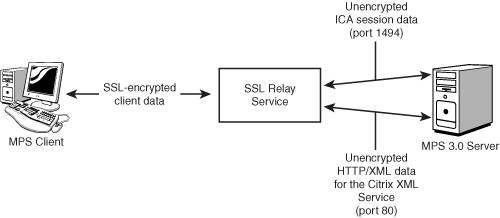
Because the communications are secured using SSL/TLS, not only is the information encrypted, but message integrity checks exist that verify the data transmitted to ensure it has not been tampered with. SSL Relay ensures both identity verification and data integrity, something that ICA Connection Encryption alone cannot do.
Citrix SSL Relay Client Requirements
The general client requirements for implementing SSL Relay are as follows :
-
The client device must support 128-bit encryption. Most clients now support this encryption level in regards to SSL/TLS connections. You can verify this by examining the Help, About setting for Internet Explorer and verifying that Cipher Strength is 128 bit.
-
The client device needs to have the appropriate root certificate installed so that it can verify the certificate authority that issued the certificate for the server. To be able to properly validate and secure the communications, all MetaFrame servers running the SSL Relay service must have a valid server certificate installed. When a client connects, it must be able to verify the authenticity of the certificate. Having the necessary root certificate available ensures this is the case.
-
The client must be configured so that it is aware of the SSL port used by the SSL Relay service in the farm. It is normally port 443, but this is configurable and can be changed if necessary to avoid conflicts with other software.
Full details on configuring the MPS client are discussed in Chapter 13.
Citrix SSL Relay Server Requirements
To utilize SSL Relay, you must configure the service on at least one MetaFrame server within your server farm. You can configure the SSL Relay service by completing the following four steps:
| 1. | Obtain a server certificate for each server that will run the SSL Relay service. This certificate must be issued by a trusted certificate authority (CA) and is used to electronically prove that the server is actually who it says it is. The root certificate for this CA must be available on each MPS client that will connect so that it is able to verify the authenticity of the server certificate. |
| 2. | Install the corresponding certificate on each server. You install certificates on the MetaFrame server using either the Certificate MMC snap-in or the Web Server Certificate Wizard if IIS is also installed on the MetaFrame server. |
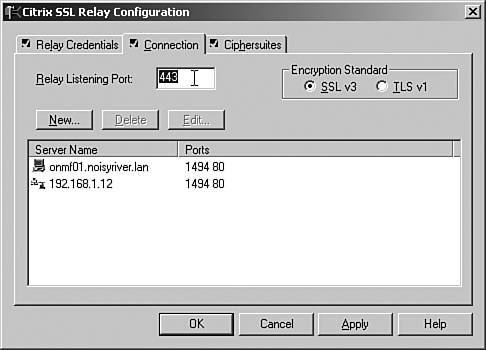
| 3. | If Microsoft Internet Information Services (IIS) is running on the MetaFrame server, you must modify either the IIS server or the SSL Relay port so that they do not conflict. You can easily modify the IIS SSL port by assigning an alternate port within the properties of a website. To redirect the SSL Relay port, you use the SSL Relay Configuration tool. Under the Connection tab, you can find the field to modify the relay listening port (see Figure 9.12). Figure 9.12. You can easily modify the SSL Relay listening port, if necessary, from within the SSL Relay Configuration tool. Note Modifying the listening port requires you to adjust the default port setting on the MPS client. This topic is discussed in Chapter 13. |
| 4. | From within the SSL Relay configuration utility, you need to select the server certificate to use and the available ciphersuites. After you configure these settings, the SSL Relay is ready to accept and process connection requests from MPS clients configured to use SSL/TLS. |
Obtaining Root and Server Certificates for a MetaFrame Server
For a server running SSL Relay to be able to prove that it actually is who it says it is, it must have a server certificate, issued by a trusted authority, that it can present to clients when requested , allowing for the initiation of the secure connection between the SSL Relay service and the client. Without such a certificate, the validity of the connection would be in question.
Server certificates are issued by a trusted entity, known as a certificate authority (CA). A request for a server certificate is sent to a CA, which in turn performs due diligence to ensure that the requester is actually who he or she says. After the identity is proven, the CA issues a digital certificate containing information that verifies the identity of the server.
How you choose the CA from which to receive your certificates can depend on a number of factors. Large companies can configure their own internal CA and issue certificates for their servers, or they can look to a well-known third-party CA and purchase the necessary server certificates.
In conjunction with the server certificate issued by the CA, you also require the root certificate from that CA deployed to all connecting clients so that these clients are able to verify the authenticity of the server certificate. By comparing the information in the root certificate with the data in the server certificate, the client can electronically verify the signature in the certificate. Assuming that the client trusts the root certificate, it can trust the information in the server certificate to be accurate.
Many operating systems come with root certificates available from the most common commercial CAs. The MetaFrame Web Interface and the MPS clients come with integrated support for two of the most common CAs, which are VeriSign Inc. (http://www.verisign.com) and Baltimore Technologies (http://www. baltimore .com). If your organization has acquired server certificates from either of these vendors , there is no need to manually deploy the corresponding root certificate. It is already available on the client.
When requesting a certificate, you generate what is known as a certificate signing request (CSR), which is then sent to the CA, and in return you receive a digitally signed server certificate for use. A common way to generate a CSR is through the Microsoft Web Server Certificate Wizard, a component of IIS. Using this tool, you provide the necessary information, which is then stored in a file that is sent to a CA for signing. The following steps summarize how to generate a CSR using the IIS Web Server Certificate Wizard:
| 1. | Start the IIS Manager from under Administrative Tools. |
| 2. | Expand the Web Sites folder, right-click the Default Web Site entry, and select Properties. |
| 3. | Select the Directory Security tab, and then click on the Server Certificate button. This launches the Web Server Certificate Wizard. |
| 4. | When prompted, select Create a New Certificate and continue through the wizard. |
| 5. | When you see the question "Prepare the request now or send it later," choose Send It Later and click Next . |
| 6. | You are prompted to provide a friendly name for the certificate. This can be any name you desire , but it is recommended that the name match the server name for which it is being created. On the same screen, you enter the desired bit length. The larger the bit length, the greater the security but the greater performance hit incurred to manage the key. Citrix recommends 1,024 bits or higher. If you choose a higher bit length, you need to ensure that the client supports this length. Do not select the Cryptographic Service Provider (CSP) check box. |
| 7. | Provide the requested organizational information. This should distinguish this certificate from other organizations. |
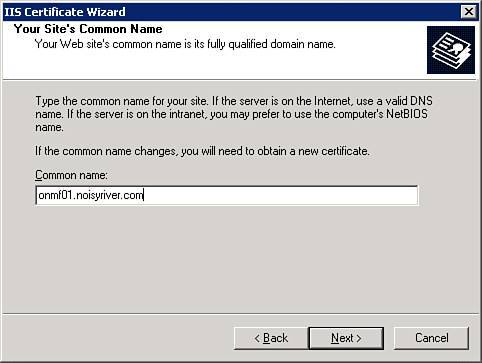
| 8. | Correctly entering the common name for the certificate is vital to ensuring the certificate properly represents the MetaFrame server. For SSL Relay to function properly, make sure you enter the fully qualified domain namefor example, onmf01.noisyriver.com , as in Figure 9.13. Figure 9.13. Fully qualifying the MetaFrame server name is vital to ensuring the certificate properly identifies the MetaFrame server running SSL Relay. |
| 9. | Provide the requested geographical information. |
| 10. | The next screen prompts you to provide a name for the resulting request file. Viewing this file after it has been created will reveal what looks like meaningless letters and numbers . This information is provided to the CA when requesting the certificate. |
| 11. | The final two screens provide summary information and complete the Web Server Certificate Wizard. |
Installing a Server Certificate
After a certificate request has been approved by the CA, you will receive the digital certificate for the server along with a password that will be used when installing the certificate on the MetaFrame server. If you have IIS installed on the MetaFrame server, you can restart the IIS Web Server Certificate Wizard and complete the installation of the retrieved certificate. When using this wizard on a MetaFrame server, make certain that you select an alternate port for SSL instead of 443; otherwise, you will have to redirect the SSL Relay service to an alternate port. Port redirection is discussed in the next section.
If you are not running IIS on your MetaFrame server, you can add the certificate using the Certificates MMC snap-in as follows:
| 1. | Open the MMC. The easiest way to do this is to type mmc at the Run prompt and press Enter. |
| 2. | If the Certificates snap-in is not visible, you can add it by selecting Add/Remove Snap-in from the File menu. Click the Add button; then select Certificates from the list of available snap-ins. |
| 3. | When prompted, choose Computer Account for the location to manage certificates, and then choose Local Computer when prompted. Close out of the Add/Remove dialog box, and return to the main MMC window. |
| 4. | Select the Personal folder, and then select Action, All Tasks, Import. This launches the Import Wizard. Browse to the location where the imported certificate file is located. |
| 5. | When prompted, provide the password for the import file, and then specify the target location for the certificate. The server certificate should be located under the Personal folder. Figure 9.14 shows the certificate added to a MetaFrame server. Figure 9.14. After the server certificate has been imported into the MetaFrame server, it will appear in the Certificates folder under the Personal folder of the local computer. |
| 6. | The server certificate is now installed and available on the MetaFrame server. |
Configuring the SSL Relay Service
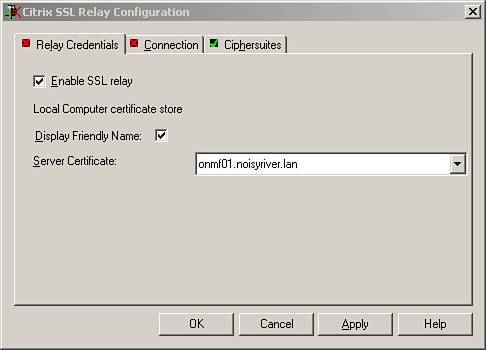
The final step in preparing SSL Relay for use in your MetaFrame environment is to configure the SSL Relay service. You do this using the SSL Relay Configuration tool. When this tool is opened for the first time, you receive a message stating that the relay configuration data is not complete because data is being loaded for the first time from the system but has not yet been saved for SSL Relay. This includes information on the server certificate, which should automatically appear in the Server Certificate drop-down list box (see Figure 9.15). This information is automatically pulled from the local certificate store on the server. If there are multiple certificates, make sure you select the correct one.
Figure 9.15. You can change the server certificate using the SSL Relay Configuration tool.
On the Connections tab, you list the address and port combinations for the servers to which the SSL Relay service will direct information. SSL Relay directs information only to the servers listed here. Add any additional servers and ports that you want to include. Make sure to create two entries for the serverone being the fully qualified name and the other being the IP address of the server.
The final tab of the SSL Relay Configuration tool is Ciphersuites. Here, you select the ciphersuites available for use in SSL Relay. The COM and GOV entries are both enabled by default, and you typically are not required to change them.
Ensure the Enable SSL Relay setting is checked on the Relay Credentials tab and click OK to save the changes. To enable the SSL Relay, you are now required to reboot the server. After rebooting, you can connect to the server using SSL/TLS encryption.
Steps on configuring and connecting with the MPS client are discussed in Chapter 13.
Changes from SSL Relay in MetaFrame XP Feature Release 1
SSL Relay in FR2 of MetaFrame XP and later now access server certificates directly out of the Microsoft server store instead of the file system folder employed in earlier versions. When upgrading from MetaFrame XP FR1 to MPS 3.0, you need to import the certificates stored in the \keystore\certs folder into the Microsoft Certificates store. If the files are stored in PFX format, you can directly import them using the Certificates MMC snap-in as discussed earlier. If the files are stored in PEM format, you must run the tool PEMtoPFX to convert these files to a format that can be imported by the Certificates snap-in. After they are imported, these certificates will be available to the new SSL Relay version.
EAN: N/A
Pages: 199