Creating Mathematical Calculations
| You can create mathematical calculations in Quattro Pro using a number of different approaches. In this section, we're going to explore a few of the ways available to you in Quattro Pro to do math. On Your OwnEarlier in this chapter, in the section, "Understanding the Order of Calculation Operations," I showed you how to use cell references to make a calculation. In the example, I added cells, but you can add, subtract, multiply, or divide using cell references. Tip
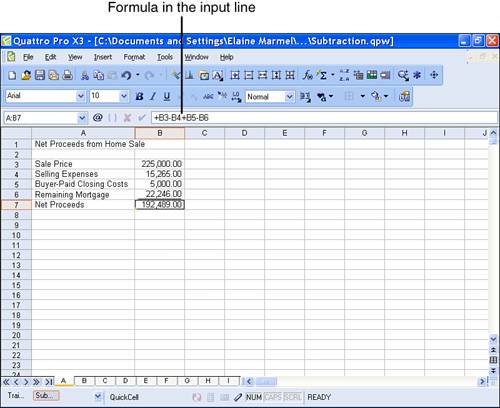
In Figure 10.4, I'm in the process of creating a formula that subtracts selling expenses from the sale price of a home, adds back buyer-paid closing costs, and subtracts the remaining mortgage balance to determine the amount with which the seller will walk at closing. Figure 10.4. You can create a formula that performs more than one mathematical operation.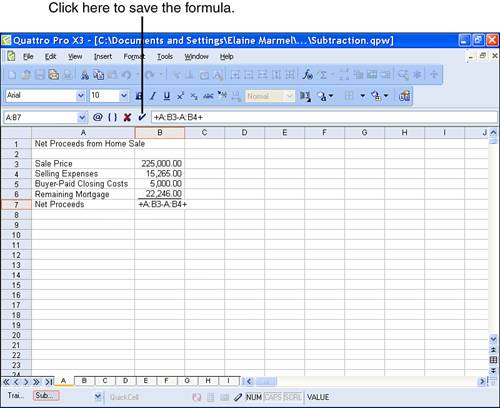 To create the formula, I followed these steps:
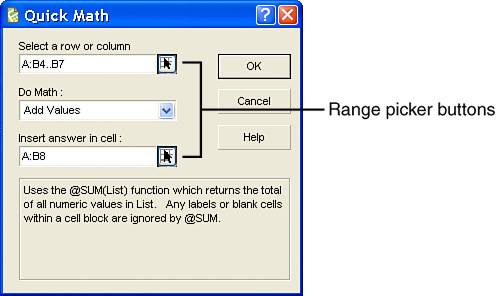
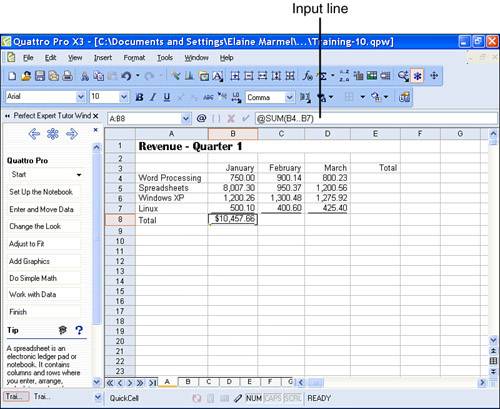
You also can use cell references to create a formula that multiplies and divides values. In Figure 10.6, I used multiplication and division to calculate the percentage of completed invoices. You can see the formula in the Input Line and the result in the cell containing the formula. I used the steps provided earlier in this section, substituting the slash key (/) and the asterisk key (*) for the plus sign (+) or the minus sign () to indicate the correct mathematical operation. Figure 10.6. To multiply or divide cell values, use the asterisk key (*) or the slash key (/).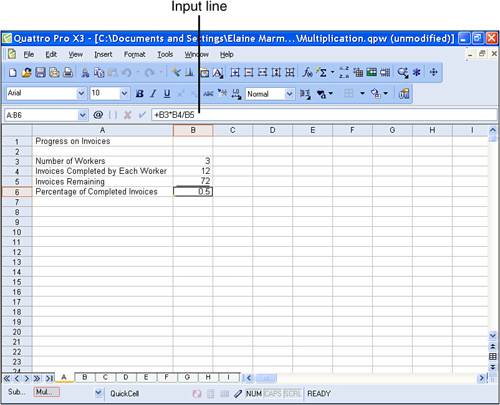 Using Quick MathMany of the formulas that you need to create are commonly used formulas, like summing a column of numbers. For a very long list of numbers, you'd find it exceedingly tedious to create the formula using the technique I described in the preceding section, where you select each value in the list, preceded by a plus sign. To save you time and effort, Quattro Pro contains a number of special built-in functions that make common calculations; a function is nothing more than a predefined formula. A function's appearance differs from a formula's appearance because all functions are preceded by an at sign (@). When you are first learning to use functions, you may want to take advantage of the Quick Math feature in Quattro Pro, which walks you through creating commonly used functions. I'll show you how to sum the numbers in the January column in Figure 10.7 using Quick Math. Figure 10.7. Columns B, C, D, and E need a sum, and column E should contain the sums for rows 4, 5, and 6.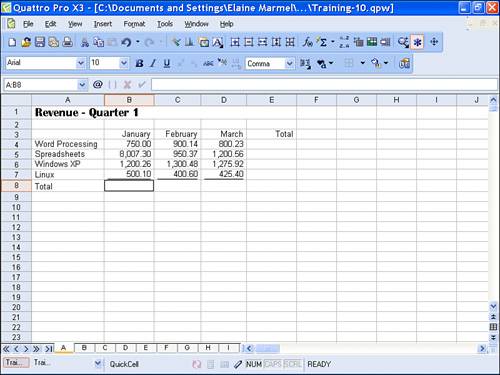 To use Quick Math to insert a function that calculates the sum of selected cells, follow these steps:
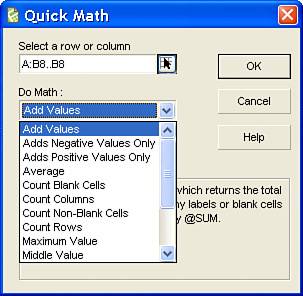
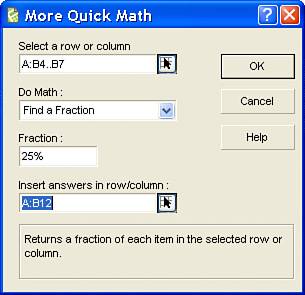
From the Quick Math dialog box, you can insert a number of functions that perform common mathematical calculations; for example, you can calculate the average of a range of cells or you can identify the maximum, minimum, or most frequent value in a range of cells. To insert any of these functions, follow the previous steps, but after step 7, open the Do Math list and select the appropriate type of calculation (see Figure 10.12). When you select a function, Quattro Pro changes the description that appears in the lower-portion of the Quick Math dialog box to give you an idea of the function's purpose. Figure 10.12. Use the Do Math list to select the type of function you want to insert in the spreadsheet. In addition to the functions you see in the Quick Math dialog box, you can use the More Quick Math dialog box to calculate fractions, percentages, and square roots of specified cells, and you can raise specified cells to a power you specify. In the Perfect Expert pane, click the Do Simple Math button and then the More Quick Math button to display the More Quick Math dialog box shown in Figure 10.13. The four calculations you can insert appear in the Do Math list box, and the rest of the dialog box works just like the Quick Math dialog box. Figure 10.13. Use the More Quick Math dialog box to perform additional common calculations that are not functions in Quattro Pro. The calculations that Quattro Pro performs when you make a selection from the More Quick Math dialog box are not functions; if you select a cell containing one of these functions and look at the Input Line, you won't see an at sign (@) at the beginning of the formula. Also, notice that I specified a single cell and not an entire range in the Insert Answers in Row/Column box. Make sure you select a blank cell and that the cells below or next to the selected cell are blank. Quattro Pro will automatically fill in the cells below the cell you selected if you selected a column of cells in the Select a Row or Column box of the More Quick Math dialog box. Similarly, Quattro Pro will automatically fill in the cells to the right of the cell you selected if you selected a row of cells in the Select a Row or Column box of the More Quick Math dialog box. A Shortcut to Commonly Used FunctionsQuattro Pro contains another shortcut besides the Quick Math dialog box that you can use to insert commonly used functions. On the Notebook toolbar, the Function button is actually a list button that contains many commonly used functions (see Figure 10.14). Figure 10.14. Click the list button beside the Function button to display a list of commonly used functions.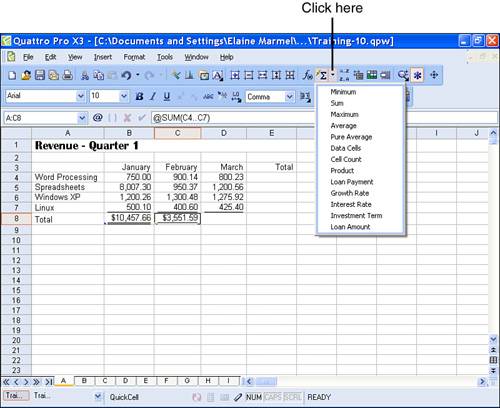 Tip
To take advantage of this shortcut, first select a blank cell in which you want to place the function. Then, click the list button beside the Function button and then click the function you want to insert. In Figure 10.15, I inserted the Average function into cell C8 (notice the Input Line); Quattro Pro displays the result of the function in the selected cell and changes the appearance of the Function button icon to match the icon you saw when you opened the Function button list. Figure 10.15. The appearance of the Function button changes, depending on the function you select to insert.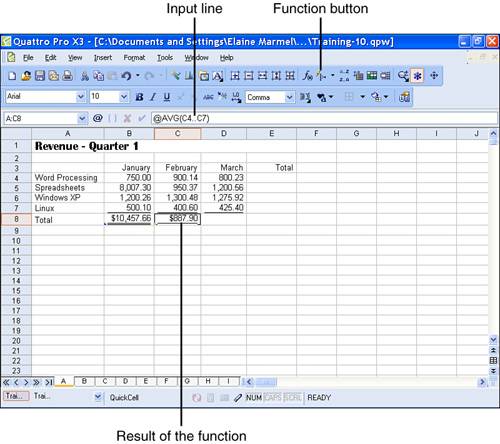 The appearance of the Function button won't change again until you select a different function. When you close Quattro Pro, you'll be prompted to save changes to the UA.WB3 template; if you click Yes, the appearance of the Function button will remain at whatever it was when you closed Quattro Pro. If you click No, the next time you open Quattro Pro, the Function button will appear to have the Sum symbol that you saw in Figure 10.14. Tip
|


EAN: 2147483647
Pages: 128