The Way It Was: Working with Film
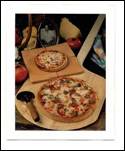
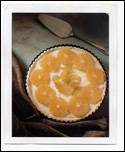
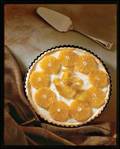
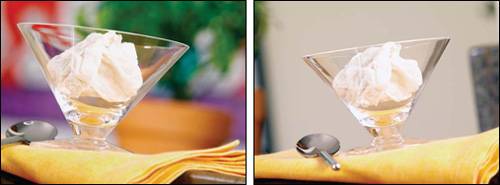
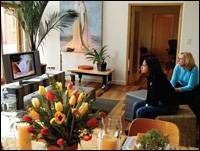
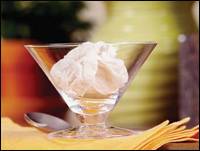
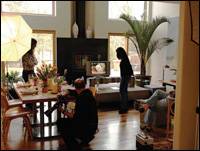
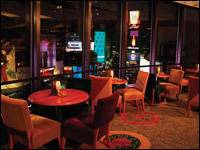
| During almost every commercial-photography assignment in my pre-digital days, one of my major concerns was whether I got the shot before the set was dismantled. No matter how carefully I planned or executed a shot, a wide range of technical problems could arise that were out of my control. Even for a professional photographer, it is very hard to see an image in a large-format, 8x10-view camera because it is upside-down and very dark. Not only was it very hard to view the image, but because of variations in emulsion from one batch of film to another, I would have to test the film for color balance and fidelity before shooting, and make fine adjustments with filters. That meant the exposure could easily have been wrong. Also, parts of the image could have been slightly out of focus, although they were not intended to be that way. There might have been reflections you couldn't see due to lack of detail in Polaroid test shots or on the ground glass of the camera. There might have been dust or scratches on the film. In a few instances, the lab ruined the film and we had to reshoot entire jobs. And sometimes, clients simply changed their minds and rejected images that had been previously approved. The solution was to overshootthat is, to take pictures from many different angles and exposuresto cover myself and to have a wide selection of images to choose from. It was time-consuming and expensive in terms of film, processing, and setting up, not to mention cleaning film holders in the darkroom, loading sheet film, and so on. Note In food photography, subjects can quickly lose their visual appeal under the hot lights. We regularly use stand-in food for focusing and composition, and then bring in the star dish after all the technical aspects have been determined. Only a few minutes of shooting and bracketing might be available before the star dish fades as well. Ice cream might look great for a minute or two, but it quickly becomes a mess. Shooting Polaroids was necessary for composition and lighting, but it cut into the time available for taking the "real" shots. As an artist and professional photographer, one of the most important skills I have is the ability to previsualize an image. I can see vividly in my head what the final image will look like before I ever take the picture. Taking test shots on Polaroid film, which was the practice in the days before digital photography, helped me give clients an idea of what the final image would look like, but it was not a foolproof solution. Although Polaroid prints can show composition and lighting, the one-minute chemical process cannot reproduce the color and clarity that can be captured on film. Also, it was very hard to explain to clients how the final image would differ from the Polaroid. A 4x5 Polaroid test shot taken in my studio almost 20 years ago. Polaroids were useful for lighting composition, but were limited in their ability to accurately portray colors and details in the shadows. A 4x5 transparency of the final shot from the same setup. 4x5 Polaroid test shot. 4x5 transparencyfinal shot. A crumpled paper napkin used as a stand-in for sorbet enables the photographer and clients to evaluate a variety of backgrounds and camera angles. On the set, clients can view the test shots on a flat-screen monitor. The final test shot of the "stand-in" with approved background and props. The photographer and clients agree on a final shot. Final shot of sorbet and garnish. Because I know what the final images will look like, differences between the test shots and the final shots are never as critical to me as they are to clients, who tend to be very literal in their interpretation of photographs. In fact, I can recall a number of cases in which a client fell in love with a Polaroid image, and it was a problem when the film image, generally a large-format color transparency, did not exactly duplicate the Polaroid. This proved to me that if clients like what they see, then that is what they want. Of course, in commercial photography, it's all about satisfying the client, and I knew instinctively that I had to find a way to get clients more in touch with the creative process. The original photograph of the Marriott Marquis Broadway Lounge taken with a five-megapixel Olympus E-10 camera. That's why, more than 20 years ago, I began setting up a small television camera next to my film camera to help my clients understand the process of creating a food image. Clients could watch a monitor and get a photographer's-eye view of a shot's lighting and composition, the props, and their placement. Even this was not a perfect solution, however, because although I constantly explained that the television image was not at exactly the same angle as the film camera, some clients just didn't get it. The good news was that using the TV camera saved a lot of money in Polaroid film and helped get clients more involved in my previsualization process. I was able to show them what worked and what didn't work in a photograph through the immediacy of the video image. Clients were happier because they always got what they wanted. Then, in 1995, everything changed when I "went digital." Even though I knew that, at the time, digital image quality was not as good as film for larger reproductions, the immediacy and versatility of digital photography proved to be satisfactory for my newspaper and Web work. I was very excited by this, and embraced the new technology with fervor. My first digital camera, a whopping one-megapixel model, set me back $15,000, not including all the computer hardware, software, and the thermal dye sublimation printer I needed to purchase to support the format. In all, I spent more than $60,000 on digital hardware and software. |