Top-Down Tile Creation and Management
|
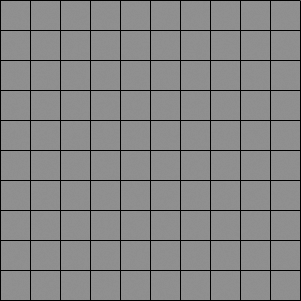
Most TBWs in Flash are going to be in either top-down view or 3D isometric view, like Shark Attack! The way you store and manipulate the tile data is exactly the same for both of those views, but the way you display the tiles on the screen is not. In this chapter we look at how to create the tiles in the top-down view and how to store information about those tiles. In the last part of this section, we'll introduce a very powerful but simple math trick that can greatly reduce the processing needed to use a TBW. Creating the Grid and Storing InformationTo build the grid of tiles on the screen, you must use nested loops loops within loops. If you wanted to build just one straight line of ten tiles, you would only need to use one loop. In each iteration of that loop (remember that in this example there would be ten iterations per outer loop) you would use attachMovie() to create an instance of a movie clip, and then you would place it in the correct spot on the stage. Since a grid has several of these types of lines right under each other, we loop the loop to create the entire grid. Remember that we have one loop to create a row of tiles, so then we run this loop one time for each row we want to add.
We have an outer loop set to loop, say, ten times. For each loop there is an inner loop that adds the movie-clip tiles to the row. Here is sample ActionScript that would handle just adding one line of ten movie clips to the stage. 1 for (var i=1; i<=10; ++i) { 2 //code to add and place the movie clip 3 } That would add one horizontal line of ten movie clips. To make this a grid, we need to start this loop one time for each row that we want to add. So we add an outer loop. 1 for (var j=1; j<=10; ++j) { 2 for (var i=1; i<=10; ++i) { 3 //code to add and place the movie clip 4 } 5 } What happens is this:
Here is the ActionScript used to create the game object. 1 game = {}; 2 game.columns = 10; 3 game.rows = 10; 4 game.spacing = 30; 5 game.depth = 1000; 6 game.path = _root.grid; 7 game.numberOfTypes = 8; Line 1 creates the game object, and all of the following lines add information to that object. Lines 2 and 3 define the dimensions of the grid; line 4 defines the spacing (the number of units between the registration points of the tiles). The next line sets a variable to the object called depth. This value will be incremented and used to assign a depth to each newly created movie clip. As we have seen in the previous chapters, we are starting to make it a habit to store references to movie clips in an object. That makes our code more object-oriented. So in line 6, you can see that a reference to the grid movie clip is created. Whenever we want to do anything with the grid, we don't have to type _root.grid we type game.path. The reference game.path will be interpreted as _root.grid since that is the reference we pointed it to in line 6 above. If at some point during the game-design process we had to change the name or location of the grid movie clip, then all we would have to do to update the code would be to change the game.path reference to point to the new grid location. If we did not use this game.path reference, then changing the name or path to grid would be a large undertaking, because we'd have to update a lot of code. The final line of ActionScript above sets a variable called numberOfTypes on the game object. This variable stores the number of tile types there are in this game definition. Since we have eight frames in the tile clip, each a different tile, then we give numberOfTypes a value of 8. Next, a function called buildGrid() is defined. 1 function buildGrid() { 2 for (var j=1; j<=game.rows; ++j) { 3 for (var i=1; i<=game.columns; ++i) { 4 var name = "cell"+i+"_"+j; 5 var x = (i-1)*game.spacing; 6 var y = (j-1)*game.spacing; 7 var type = 1; 8 game.path.attachMovie("cell", name, ++game.depth); 9 game.path[name]._x = x; 10 game.path[name]._y = y; 11 game[name] = {x:i, y:j, name:name, type:type, This function uses nested loops, as described earlier in this section. The outer loop loops through the number of rows. In each iteration of the outer loop, the inner loop loops through for each column. Each tile (which we call a cell here) is named uniquely by using the row and column of the cell as part of that cell's name. For instance, if the cell belongs to column 8 and row 6, the name would be cell8_6. In lines 5 and 6, the intended position of the new movie clip is calculated. Then a variable called type is created with a value of 1. This refers to the frame that the tile will display. In this example we start each tile on frame 1. Next, the movie clip is created and positioned. In line 11 we do something really important we create an object to store information about the cell that was just created, such as its type, its name, and a reference to the movie clip it represents. The final line of ActionScript in this file (not shown) is buildGrid(). It calls the function that we just dissected to create the grid.
Precision DetectionNow it's time to introduce the trick I mentioned: a simple but powerful maneuver that lightens the processor load in TBWs tremendously. Imagine this: If the game of Pac-Man were written in Flash, how would you detect if the Pac-Man character was colliding with a dot to be collected (or eaten, or whatever it is that Pac-Man does with it)? First of all, in Pac-Man everything moves fairly slowly, and precision isn't important, so hitTest() would not be a bad choice. Many early game programmers (including myself at one time) have guessed that you'd need to loop through the entire board, constantly performing hitTest(), to see if Pac-Man has collided with any dots. That is not a very efficient process. Luckily there is a trick that allows us to easily know which cell Pac-Man is in, and therefore only check for a collision in that cell. And of course, one collision detection is a lot less CPU-intensive than 100 collision detections. Let's see how to determine which cell Pac-Man is in.
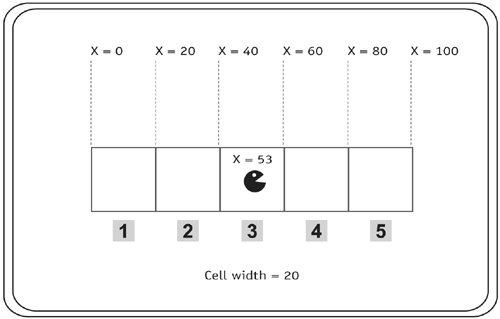
First, let's look at only one direction, horizontal. In the figure above, you can see that there are five cells, each with a width of 20. Pac-Man's x position is 53. Which cell is he in? 1 spacing = 20; 2 x = 53; 3 cell_column = Math.ceil(x/spacing); In line 1, we set a variable called spacing. That is the width of each cell. Line 2 creates a variable called x that stores the position of Pac-Man. In line 3 we employ the simple math trick by dividing the position by the spacing. We then round that number up to the nearest integer. With this trick we can easily find which cell Pac-Man is in! This works in the same way for a vertical situation.
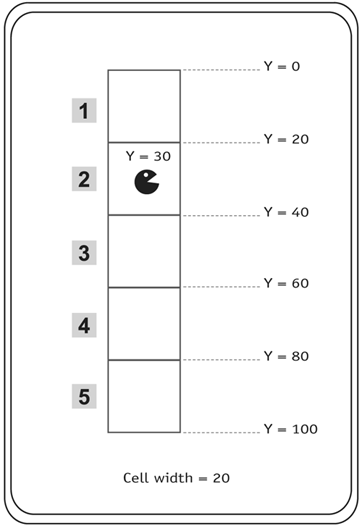
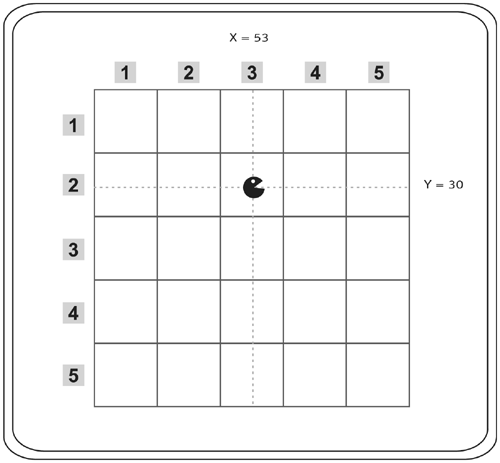
Like the horizontal example, this one also contains five cells, each with a width of 20. The y position of Pac-Man is 30. Here is how you find the number of the cell he's in: 1 spacing = 20; 2 y = 30; 3 cell_row = Math.ceil(y/spacing); By putting both of these together, we can locate Pac-Man's position in the grid. We find the row and the column he's in, and that specifies the cell in the grid. 1 spacing = 20; 2 x = 53; 3 y = 30; 4 cell_column = Math.ceil(x/spacing); 5 cell_row = Math.ceil(y/spacing);
Now that we know which cell Pac-Man is in, we can perform a hitTest() between the Pac-Man movie clip and a dot in that tile. Perhaps you can now understand why this is such a powerful trick. If you are making a game in which the character is walking around, and a few tiles contain water, then when your character is in one of those cells, you can make him swim, or drown, or just slow down a little bit. What typically happens is the following:
1 function gameClicked(mx, my) { 2 var x = Math.ceil(mx/game.spacing); 3 var y = math.ceil(my/game.spacing); 4 var cell = "cell"+x+"_"+y; 5 var ob = game[cell]; 6 if (ob.type<game.numberOfTypes) { 7 ++ob.type; 8 } else { 9 ob.type = 1; 10 } 11 ob.clip.tile.gotoAndStop(ob.type); 12 } 13 _root.onMouseDown = function() { 14 var mx = _xmouse; 15 var my = _ymouse; 16 if (game.path.hitTest(mx, my)) { 17 gameClicked(game.path._xmouse, game.path._ymouse); 18 } 19 }; Look at lines 13 19 first, the onMouseDown event. When the mouse button is pressed, the coordinates of the mouse are saved. If these coordinates are over the grid movie clip (referenced by game.path), we call the gameClicked() function above, passing the coordinates of the mouse into gameClicked(). In lines 2 and 3 we use the trick described in this section to determine the cell that was clicked. In the following line we construct the name of the object that contains information about this cell, and then in line 5 we create a reference to that object called ob. Lines 6 10 check to see if ob.type is less than 8, and if it is, we increment it; otherwise we set it back to 1. Finally, on line 11, we change the frame where the movie clip is to match that of the tile type. Create a SWF from this file and test it out. Click the cells to change the cell types. Types 2 8 are walls. You can easily create unique configurations of the board.
In the next section we will go over how to add a character to this TBW.
|
EAN: N/A
Pages: 163
 clip:game.path[name]};