| A class can gain (inherit) all members from another class. This is called inheritance. The class that's gaining the members is called a subclass, and the class from which it inherits is called the superclass. If B is a subclass of A, B is said to extend A. Inheritance promotes code reusability. It allows you to give functionality to other classes without having to rewrite code that would be redundant. This concept will be much clearer by the end of this lesson. Imagine for a moment that you're writing the ActionScript for a game. This game has a hero, controlled by the user, and lots of simple enemy characters. The enemies are not the same as the hero, but they share a number of similarities, such as the ability to walk, get hurt, heal, and die. If you program-separate Hero and Enemy classes, you end up rewriting much of the same code to handle these common capabilities. So it makes sense to create a general class that programs these common capabilitieslet's call it the Character classand then create additional classes (Hero and Enemy) that inherit all the functionality of the Character class as well as extend that functionality, each in unique ways. The Hero class might extend the Character class with the capability to be controlled via a user interface and the capability to wield many types of weapons. The Enemy class might extend the Character class with the capability to use an artificial intelligence algorithm to govern its movement. In this example, the base superclass (Character) is written once, and two subclasses (Hero and Enemy) extend the functionality of the base class to make new and unique classes. Let's look at how this is done. Let's assume that a Character class has already been created, given properties and methods, and saved as Character.as. A subclass of the Character class (we'll use the Hero class) is created by using the keyword extends in the class definition. For example: class Hero extends Character { public function Hero() { //Constructor } }
The first word, class, says that what follows is a class definition. The next word, Hero, gives a name to the class. Next you see extends Character. This statement gives the Hero class all the methods and properties found in the Character class (the Hero class inherits from the Character class). In addition to inheriting from the Character class, the Hero class can also be given functionality (properties and methods) unique to itself.  A class can only extend (inherit from) one other class. For example, if Hero extends Character, it cannot extend any other class; however, Hero can extend Character and then MyHero can extend Hero, and so on. 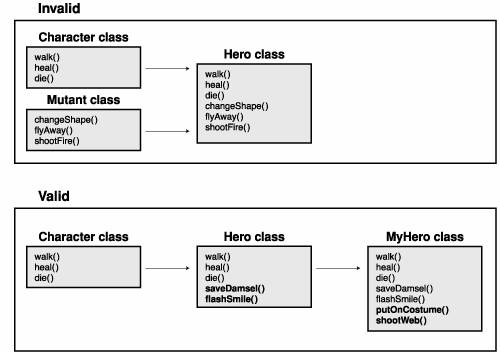 When a class extends another class, the resulting subclass gains all the properties and methods of the superclass; however, those properties and methods can still be changed or enhanced. Replacing a property value or method of the superclass with a new one in the subclass is called overriding. Let's look again at the Character class example to help you get a better understanding of this concept. Let's say that both the Hero and Enemy classes extend the Character class, and the Character class has a die() method. As a result of inheritance, both the Hero and Enemy classes inherit the functionality of the die() method, as well as all the other members of the Character class. But let's say you want heroes and enemies to die in a different manner than the inherited die() method allows. In this case, you would simply define a new die() method in the Hero and Enemy classes. Creating a method in a subclass with the same name as an inherited method from its superclass causes the functionality of the subclasses' method to take precedence over the inherited method. 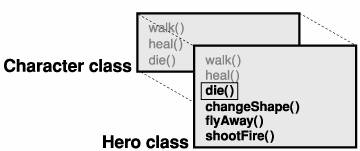 Being able to override properties and methods in this way is useful for creating object-oriented code. You can explicitly call a method in the base superclass by using the super keyword like this: super.die();
You can explicitly call the constructor of the base superclass like this: super();
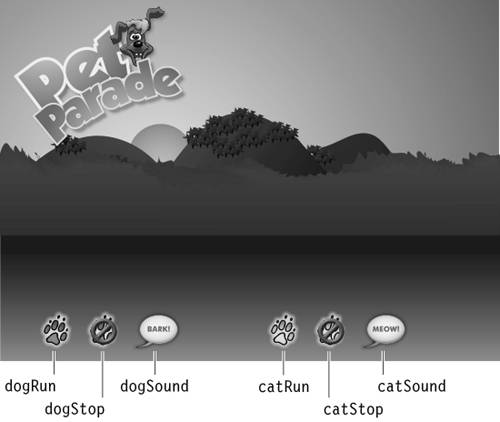
In the following exercise, you'll put into practice most of the concepts you learned in this lesson so far. You'll create a class called Animal and program the Animal class with several capabilities, including running and stopping, as most animals can do. You'll also create a Cat class that extends Animal by giving Cat animals the capability to meow. (Because the Cat class extends the Animal class, the Cat class inherits the functionality of the Animal class; Cat animals automatically can run and stop.) In addition, you'll create a Dog class that extends the Animal class in a manner similar to that of the Cat class, except that Dog animals will be able to bark. When you finish scripting these classes, you'll associate the Cat and Dog classes with different movie clips in the library. As a result of this association, each instance of one of those clips that you drag into your project will take on the characteristics of the class with which it's associated. In this exercise, you'll gain experience creating classes, extending a class, overriding methods and properties, and working with instances of custom-made classes. Let's get started! 1. | Open PetParade1.fla from the Lesson06/Start folder.
The first order of business is to become familiar with the contents of this FLA file. There are three layers in this project file. The Background layer holds the background graphics; the Assets layer currently contains six buttons named dogRun, dogStop, dogSound, catRun, catStop, and catSound. The Actions layer is currently empty, but will eventually contain script.
 For this exercise, it's also important to understand the assets in the library because they will play an integral role in how the final application works. For this exercise, it's also important to understand the assets in the library because they will play an integral role in how the final application works.
| 2. | Choose Window > Library to open the Library panel.
The library contains a folder, two sound clips, and three movie clips. The Interface Elements folder contains miscellaneous elements that you're free to examine, but you won't work with them directly in this exercise.
The three movie clips are named Dog, Cat, and Balloon. Dog and Cat are the graphical and interactive representations of the Dog class and Cat class. This is important to understand; things that we program the Dog and Cat classes to do will be graphically and interactively carried out by instances of the Dog and Cat movie clips. The Balloon movie clip will be used and explained later in the exercise.
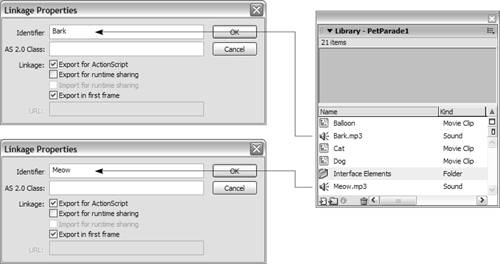
The two sound clips, Meow.mp3 and Bark.mp3, represent the sounds that our Cat and Dog animals will make. If you right-click (Ctrl-click on a Macintosh) either of these sounds and then choose Linkage from the menu that appears, you see that the Meow.mp3 sound has been given an identifier of Meow, and the Bark.mp3 sound has been given an identifier of Bark. Steps 9 and 11 in this exercise will explain how these sounds are used.
 Now that you're familiar with the project's assets, it's time to begin creating the class files that it will use. Now that you're familiar with the project's assets, it's time to begin creating the class files that it will use.
Note You will be creating and working with several files in this exercise. As we progress through the steps, keep all the files open. You will be instructed when to switch between the files. | 3. | Create a new ActionScript file called Animal.as in the Lesson06/Start folder. Add the following script to the Animal.as file:
class Animal extends MovieClip { private var speed:Number; public function Animal() { speed = 5 }
The first line gives the class a name, Animal, and then specifies that this class extends the MovieClip class. This means that instances of the Animal class inherit all the functionalities (properties and methods) of movie clipsproperties such as _x and _name, as well as methods such as gotoAndPlay() and loadMovie(). This is your first experience creating a new class that inherits from another class. You can think of this technique as taking the basic functionality of movie clips and extending it in a way that's appropriate for programming how Animals work. This will become clearer as we progress through the steps.
Note Any of Flash's built-in classes can be extended in this way. With this capability, for example, you can create an enhanced Sound, TextField, or Array class to fit your needs exactly. The line following the class declaration defines a private variable named speed that will used by the class. Remember that private variables can only be accessed and used by scripts within the class definitionnot directly by instances of the class. The speed variable will be used by a method named run() that we'll create in a moment. This method will be used to move a movie clip based on the value of speed.
The final three lines of the ActionScript in this step define the constructor method for the Animal class. Remember that scripts within the constructor are executed at the moment when an instance of the class is created. Because the Dog and Cat classes inherit from the Animal class, any scripts placed here will be executed when an instance of the Dog class or Cat class is created. The only action here is to set the value of speed for the class. In other words, whenever an instance of the Animal class is created, that instance is given an initial speed value of 5. We'll add more scripts to the Animal class constructor later in the exercise.
| 4. | After the class constructor, add the following script to handle making an animal run:
public function run():Void { onEnterFrame = function() { _x += speed; } }
The run() method is used to put instances of the Animal class into motion. When an instance of the Animal class invokes this method, an onEnterFrame event is attached to that instance. The action within the event moves the instance along its x axis by the value of the speed variable. Remember that in Step 3 we set the initial value of speed in the constructor method to 5. When an instance of the Animal class invokes this method, it will begin moving 5 pixels at a time, 24 times per second (the frame rate of our movie). The instance will continue to move until stopped with the stop() method.
 | 5. | Next, add the following stop() method:
public function stop():Void { delete onEnterFrame; }
This method stops the instance from moving, simply by deleting the onEnterFrame event from the instance.
| 6. | End the definition of the Animal class with a closing curly brace (}); then choose File > Save to save the class file.
You created the Animal class. Next you'll create the two subclasses (Dog and Cat) that extend Animal.
| 7. | In the same directory as Animal.as, create a new ActionScript file named Cat.as. Start the class definition with the following script:
class Cat extends Animal {
The first two words tell Flash that you're creating a new class called Cat. The next two words, extends Animal, tell Flash that this class inherits every method and property of the Animal class, including run() and stop(). We used similar syntax when defining the Animal class; it extended the MovieClip class. As a result, not only does the Cat class get all the capabilities of the Animal class, but those of the MovieClip class as well. Inheritance trickles down like this as long as you continue extending classes.
In the following steps, we'll program the Cat class to deal with functionalities unique to cats. Running and stopping is something that most animals can do; that's why those functionalities were defined in the more general Animal class, from which the Cat class inherits. The great thing about object-oriented inheritance is that we could create 50 more classes (based on different animals) that all extend the Animal class, but to change the way in which each class handles running we would simply edit the run() method in the Animal class file. We'll demonstrate this principle later in the exercise.
Let's set up the unique features of the Cat class.
| 8. | Create the following constructor method for the Cat class:
public function Cat() { speed = 1; }
When a new instance of the Cat class is created, its speed property is given a value of 1. In Step 3, we created a variable named speed in the Animal class constructor method and gave it an initial value of 5. Because the Cat class inherits from the Animal class, it automatically inherited that property and its value. You might be wondering why we're setting it again here. Instances of the Animal class will still have a speed value of 5, but instances of the Cat class will have a speed value of 1. We're overriding the inherited value with a value specific to cats.
Overriding an inherited property value involves nothing more than using the name of the property you want to overridethe speed property in this caseand assigning it a new value. As a result, when an instance of the Cat class is created, its speed property is set to 1.
Properties and methods defined in a class always have precedence over properties and methods inherited from another class with the same name; therefore, instances of the Cat class will see and use the speed value of 1 as opposed to a value of 5.
The run() and stop() methods of the Animal class are still inherited and still work with instances of the Cat class as they were defined in the Animal class file because we haven't overridden them with methods of the same name in the Cat class (we won't override those methods in this exercise).
| 9. | Create a method called meow() that plays a meowing sound when called:
public function meow():Void { var sound:Sound = new Sound(this); sound.attachSound("Meow"); sound.start(); }
When called, this method creates a new sound object. This object has the sound in the library with a linkage identifier of Meow attached to it. The sound is played by calling the start() method of the sound object. Because this method is defined in the Cat class, only instances of the Cat class can call it.
| 10. | End the definition of the Cat class by adding the closing curly brace (}); then choose File > Save to save the class file.
You have completed the first subclass of Animal. Next you'll create another subclass of Animal, the Dog class.
| 11. | In the same directory as Animal.as, create a new ActionScript file called Dog.as. Define this class as follows:
class Dog extends Animal { public function Dog() { speed = 2; } public function bark():Void { var sound:Sound = new Sound(this); sound.attachSound("Bark"); sound.start(); } }
This class is similar to the Cat class. The first line of ActionScript names the class Dog and extends the Animal class.
Next, the constructor method sets the value of speed to 2, overriding the value of the property with the same name in the Animal class; instances of the Dog class will all have a speed property with a value of 2.
Similar to the meow() method discussed in Step 9, the bark() method creates a new sound object. The method attaches the sound with the linkage identifier of Bark and then plays the sound.
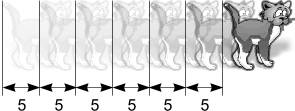
In the end, Dogs and Cats both run() and stop(), as most Animals do, but Dogs run at a speed of 2 and Bark, while Cats run at a speed of 1 and Meow.
| 12. | Choose File > Save to save the Dog class file.
For the moment, our class files are complete. We'll return to the Animal class file shortly, but it's time to open the actual project file to plug in these class files and their functionality.
| 13. | PetParade1.fla should already be open in the authoring environment. Click its tab to make PetParade1.fla the active window.
The first order of business is to associate our Dog and Cat classes with the Dog Clip and Cat Clip movie clips in the library.
| 14. | With the Library panel open, right-click (Ctrl-click on a Macintosh) the Cat movie clip and choose Linkage from the menu that appears. In the Linkage Properties dialog box, select the Export For ActionScript option; then enter cat in the Identifier field and Cat (the first letter must be uppercase) in the AS 2.0 Class field. Click OK.
Although you configured several settings in this step, the one you need to focus on is the AS 2.0 Class field. By entering a value of Cat in this field, you're associating the Cat movie clip in the library to the Cat class you created. This means that all instances of the Cat movie clip you place in your project will take on the functionality defined in the Cat class file. As a result, these instances can run(), stop(), and meow(), as you will soon see.
 | 15. | Right-click (Ctrl-click on a Macintosh) the Dog movie clip and choose Linkage from the menu that appears. In the Linkage Properties dialog box, select the Export For ActionScript option; then enter dog in the Identifier field and Dog (the first letter must be uppercase) in the AS 2.0 Class field. Click OK.
This step associates the Dog movie clip with the Dog class. As a result, all instances of the Dog movie clip you place in your project can run(), stop(), and bark(). This is a great feature of Flash that allows you to create highly interactive class-based movie clips. You simply create a custom class and then associate that class with a movie clip; you instantly have a custom movie clip.
Note To use this feature, the associating class (which in this case is Dog) must inherit from the MovieClip class somewhere up the line. | 16. | Click and drag instances of the Dog and Cat movie clips onto the stage. Give the Dog instance the name dog and give the Cat instance the name cat.
Next, we'll add scripts to cause these instances to perform the actions that cats and dogs do, based on what we programmed into our custom class files.
| 17. | With the Actions panel open, select Frame 1 of the Actions layer and add the following button events to control the dog movie clip instance:
dogRun.onRelease = function() { dog.run(); } dogStop.onRelease = function() { dog.stop(); } dogSound.onRelease = function() { dog.bark(); }
When the dogRun is clicked, the run() method of the Dog class is called, and the dog instance starts moving. Remember that the Dog class inherits the run() method from the Animal class. The method is set up to move the calling instance horizontally by using an onEnterFrame event (added in Step 4). The amount by which the instance is moved is based on its internal speed value. We programmed the Dog class to set this value to 2 for all instances created from the Dog class; therefore, when the run() method is called in relation to the dog movie clip instance, that instance will move 2 pixels at 24 times per second.
dogStop() calls the stop() method to stop the dog from moving, and the dogSound instance makes the dog bark. When clicked, it calls the bark() method.
| 18. | Add the following button events to control the cat movie clip instance:
catRun.onRelease = function() { cat.run(); } catStop.onRelease = function() { cat.stop(); } catSound.onRelease = function() { cat.meow(); }
As with the buttons that control the dog instance, these buttons will make the cat instance run, stop running, and make a sound. The cat's sound is a meow, so the meow() method is called when the catSound instance is clicked.
Whew! It's finally time to test your work.
| 19. | Select Control > Test Movie. When the movie appears, click the buttons at the bottom of the stage to see the results. Then close the test movie to return to the authoring environment, but leave the Library panel open for the next exercise.
As the movie is being exported, Flash pulls in code from the external Animal, Dog, and Cat class files as it detects the references to these classes in our project. The dog and cat can both run, stop, and make sounds, all based on the code in our class files.
|
|