| Zinc is an excellent program created by Multidmedia Limited (MDM). Zinc is used to take a SWF file and to create a PC application, Mac application, or even a Pocket PC application from it. The latest version of Zinc no longer uses fscommand() functions for communication between a SWF file and the Zinc wrapper. Zinc now provides an easy-to-use API that allows Flash to communicate synchronously with it. So Flash can execute a method on the API provided by Zinc and get a response in that same line of code. In earlier versions of Zinc and in other tools like it, fscommand() functions have been used, which typically had a response delay of at least one frame. You'll see how easy Zinc is to use in the next lesson, in which you'll create an enhanced stand-alone Flash application. But first you need to install it! Install the Zinc trial version (Windows only) of Zinc on your computer by following these steps: 1. | Locate the file zinc_trial_setup.exe in the Software folder on the CD-ROM for this book and double-click the file to open it.
| 2. | Follow the installer's instructions to install Zinc.
| 3. | After installation, launch the application.
|
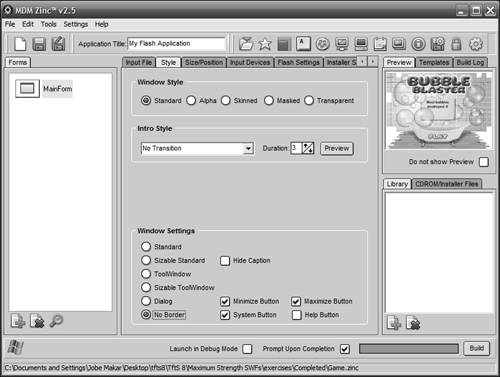
When launching Zinc for the first time, you get a pop-up window asking what type of application you want to create. The choices range from PC applications to Mac or Pocket PC applications. In this book, we'll cover only the PC desktop applications. Click Desktop Application. You can control a variety of Zinc settings (see figure). The following is a brief overview of some of the most important available options and settings: 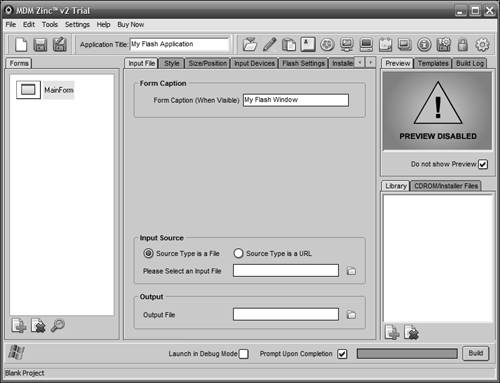 Tab | Description |
|---|
Input File | Zinc creates an executable file for various platforms that hold at least one SWF file. On this tab, you specify the location on your hard drive for that SWF file. In addition to the input file you can specify the name and location of the file to be created. | Style | On this tab, you can change visual properties of the file and the window in which it launches, including properties such as various window styles and their settings. | Size/Position | On this tab, you can specify the size of the window and where on the screen it should position itself when launched. | Input Devices | On this tab, you can define how you want the window to respond to certain keypresses, mouse interactions, joysticks, or even touch screens! | Flash Settings | This tab allows you to specify a few playback options for the Flash file, such as quality and background color. |
Now that you're acquainted with Zinc's interface, let's use it to create an enhanced Flash game. This game creates a text file (used for holding a high score), shakes the projector window, and even talks to you! 1. | Open Game1.fla in the Lesson18/Start directory.
Notice that there are five layersBackground, Assets, Top Bubbles, Actions, and Labels as well as three frame labels (which we'll discuss in a moment). The Labels layer contains no content. It's just used to place empty frames that are given a frame label. The Background layer contains the project's background graphics. The Assets layer contains most of the remaining visual elements for the game, except for a bitmap of some bubbles on the Top Bubbles layer (this graphic was added to give the game some depth). As usual, the Actions layer will contain the ActionScript used in this project.
The game that you'll build is very simple. You move a ship left and right using the Left arrow and Right arrow keys. You can fire a projectile upward from the ship by using the spacebar. Bubbles appear from the left side of the screen and move to the right. The goal is to destroy as many bubbles as you can within a certain time limit. When finished, your score is saved to a text file if you have attained a new high score.
The Initial frame label will contain script to load the current high score data from a text file. Also on this label is a button that we'll use to begin gameplay. When the user clicks the button, the Timeline moves to the Game label, which contains the script and assets for playing the game. After the game's time limit has been exceeded, the Timeline moves to the Game Over label, where the current score is saved to a text file if the score is higher than the previously saved high score.
Other than a few specific commands used in this exercise, all the ActionScript used in this project should be familiar from earlier lessons. There are functions, arrays, duplicated movie clips, and the hitTest() method. Instead of dissecting each script line by line, we'll focus more on what a group of code accomplishes, and in some cases how it relates to the use of Zinc.
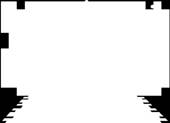
Before we begin scripting, you should be aware of two important assets you'll use in the exercise, both of which are contained in the Lesson18/Assets directory. Both of these assets must be in the same directory as the final project file. The first asset is a text file named highest_score.txt. This file contains the variable declaration score=0. We'll explain this in a moment. The second asset is a file named mask.bmp, which is a black-and-white bitmap image that acts as a mask for the game application's window.
 | 2. | Move the playhead to the Initial frame label.
This frame contains two important assets: a text field named score_txt that displays the current high score, and a button instance named play_btn that moves the Timeline to the Game frame label. We'll script both of these elements in a moment.
| 3. | With the Actions panel open, select the frame in the Actions layer (at the Initial frame label) and add the following line of ActionScript:
mdm.Forms.MainForm.showMask("mask.bmp");
When the resulting SWF file is wrapped in a Zinc executable file, this line of ActionScript talks to that Zinc shell. In this case, the command tells the executable file to apply the specified bitmap file as a mask to the playback window. The end result is an executable file in the shape defined by the black-and-white image of the bitmap.
When Zinc is used to create an executable from a SWF file, it injects some ActionScript into your SWF file. This ActionScript is an API that you can use to interact with Zinc. All commands start with mdm. The Zinc help system is very helpful in showing you what lines of ActionScript are needed to call certain commands.
A Zinc application can be just one window, which is typical, or it can handle many. These windows are called Forms. Each form has a name and can be individually masked. In our case, we have only one form and it is the main form for the entire application. Therefore, to mask the main form we use the line of ActionScript just added:
mdm.Forms.MainForm.showMask("mask.bmp");
| 4. | Add the following script to load and display the previously saved high score:
var highscore:Number; function scoreLoaded() { score_txt.text = "Most bubbles destroyed: "+ lv.score; highscore = Number(lv.score); } var lv:LoadVars = new LoadVars(); lv.onLoad = scoreLoaded; lv.load("highest_score.txt");
This script creates an instance of the LoadVars class and loads the contents of the highest_score.txt text file into it. When the text file is loaded, the string "Most bubbles destroyed: 37" is displayed in the score_txt text field. The number of bubbles destroyed varies depending on the current value of score in the loaded text file.
The first line of the script in this step declares highscore as a variable on the main Timeline. In the scoreLoaded() function, when the text file is loaded the value of score in the file sets highscore's initial value. The highscore variable is declared on the main Timeline because we need to keep it around for the duration of gameplay. At the end of the game, the current score is compared to this value to determine whether a new text file containing the updated high score should be created.
| 5. | Add the following script for the Play button:
play_btn.onRelease = function() { gotoAndStop("Game"); }; stop();
When the play_btn button instance is clicked, the Timeline moves to the Game frame label.
The final action list keeps the movie from playing automatically when the application is opened.
 | 6. | Move the playhead to the Game frame label.
This frame contains three movie clip instances: bubble_mc, ship_mc, and projectile_mc. The ship is controlled with the arrow keys, allowing it to move left or right depending on which arrow key is pressed. The bubble_mc clip is duplicated at certain times, with the duplicates acting as potential targets. The projectile_mc clip is duplicated when the spacebar is pressed. These duplicates are used to shoot down (pop) bubbles as they move across the screen.
| 7. | With the Actions panel open, select the Actions layer at the Game frame label and add the following actions:
var ship_speed:Number = 2; var projectiles:Array = new Array(); var projectile_speed:Number = 4; var bubble_speed:Number = 3; var shooting:Boolean = false; var bubbles:Array = new Array(); var game_length:Number = 60 * 1000; var hits:Number = 0; var depth:Number = 0;
The ship, projectiles, and bubbles all move at their own speeds. A speed value is the amount that the object can move (in pixels) during one frame. The variables ship_speed, bubble_speed, and projectile_speed define these speeds.
Arrays of projectiles and bubbles are also created, named projectiles and bubbles, respectively. These arrays store and keep track of bubbles and projectiles that are created and used during gameplay. Using arrays makes it easy to loop through the existing projectiles and bubbles to check for collisions or to remove them all from the screen.
The hits variable stores the number of bubbles destroyed. The depth variable stores the current highest unused depth. The game_length variable stores the amount of time that the game lasts, in milliseconds (we set it to last 60 seconds). The shooting variable stores a value of false. These variables will be discussed later.
| 8. | Add the following onEnterFrame event at the end of the current script:
this.onEnterFrame = function() { generateBubbles(); captureKeyPresses(); moveProjectiles(); moveBubbles(); detectCollisions(); };
This onEnterFrame event executes these five functions (none of which have been created yet) for every frame:
generateBubbles() creates a new bubble at a random time. captureKeyPresses() checks whether the arrow keys or spacebar have been pressed. Depending on which key is pressed, this function moves the ship left or right, or fires a projectile. moveProjectiles() moves fired projectiles upward. moveBubbles() moves bubbles to the right. detectCollisions() loops through the projectiles and bubbles looking for collisions.
Let's add these functions next and briefly discuss how they work.
| 9. | Add the generateBubbles() function at the end of the current script:
function generateBubbles() { if (random(50) == 0) { ++depth; var name:String = "bubble" + depth; var clip:MovieClip = bubble_mc.duplicateMovieClip(name,depth); bubbles.push(clip); clip._xscale = clip._yscale = 50 + random(50); } }
If random(50) evaluates to 0, a new bubble is created. Statistically, this process should occur once every 50 frames. When a new bubble movie clip instance is created, a reference to it is stored in the bubbles array. The generated bubble instance is given a random size by setting its _xscale and _yscale properties to values between 50 and 100.
| 10. | Create the captureKeyPresses() function:
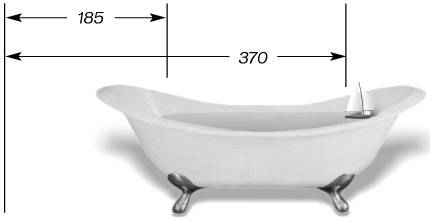
function captureKeyPresses() { if (Key.isDown(Key.LEFT) && ship_mc._x> 185) { ship_mc._x -= ship_speed; } else if (Key.isDown(Key.RIGHT) && ship_mc._x < 370) { ship_mc._x += ship_speed; } if (Key.isDown(Key.SPACE) && !shooting) { shooting = true; shoot(); } else if (!Key.isDown(Key.SPACE)) { shooting = false; } }
If the Left arrow or Right arrow key is pressed, and ship_mc is within a horizontal boundary of 185 on the left and 370 on the right, the ship_mc instance is moved the amount of ship_speed in the appropriate direction. The boundary exists to prevent the instance from moving beyond the area of water in the tub.
 If the Spacebar is pressed and the value of the shooting variable is false, the shoot() function is called, and shooting is set to true. If the spacebar is not pressed, shooting is set to false again, which ensures that the game player has to press the spacebar once for every shot. Without this condition, the game player could hold down the spacebar to have a continuous barrage of shots fired. That's not fair to the bubbles!
| 11. | Add the shoot() function at the end of the current script:
function shoot() { ++depth; var name:String = "projectile" + depth; var clip:MovieClip = projectile_mc.duplicateMovieClip(name, depth); clip._x = ship_mc._x; clip._y = ship_mc._y; projectiles.push(clip); }
This function is called when the spacebar is pressed. It creates a new projectile, positions it on top of the ship_mc movie clip instance (so it appears that the projectile is being fired from the ship), and adds a reference to the new projectile in the projectiles array.
| 12. | Now create the moveProjectiles() function:
function moveProjectiles() { for (var i:Number = projectiles.length - 1; i >= 0; --i) { var clip:MovieClip = projectiles[i]; clip._y -= projectile_speed; if (clip._y < 40) { clip.removeMovieClip(); projectiles.splice(i, 1[a1]); } } }
At this point in the book, you're used to seeing for loops; however, this is the first time that we've used a for loop to count backward. This function serves two purposes: moving any projectiles that have been created as a result of the user pressing the spacebar and removing the projectiles if they get too high on the screen.
This loop processes every projectile instance referenced in the projectiles array. With every iteration, each instance referenced in the array is moved up on the screen by the amount of projectile_speed. If the y position of the currently referenced movie clip instance goes past 40, the instance is removed. The instance is removed in two steps: It's physically removed from the screen by using the removeMovieClip() method; then the reference to the instance in the projectiles array is deleted, using the splice() method of the Array class.
You may wonder why this particular loop call requires i to be counted backward (--i). Think of the references to projectile instances in the projectiles array as a stack of nine books, with the book at the bottom of the stack having an index value of 0, and the topmost book having an index value of 8. Now suppose you're given the task of removing the books at positions 1 and 4. If you remove the book at index 1, the remaining books on top of that book drop down one position; the book that was formerly at position 2 is now at position 1, the book that was at position 3 is now at position 2, and so on. This creates a problem when you remove the book at position 4 because it has been dropped to position 3. Removing the book at position 4 actually results in removing the book that was formerly at position 5. The book that was originally at index 4 is skipped altogether.
 The same kind of logic problem would exist in our loop if we removed items by starting at index 0 and working our way up. By working backward, we eliminate this problem. Here's how.
Returning to the book illustration, if book 4 is removed first, books 5 through 8 are all dropped one position. But that's okay because you're working backward; the book at position 1 is still at position 1. When the time comes to remove it, it's right where it needs to be. Our backward loop solves this problem in the same way when removing projectiles.
 | 13. | Create the moveBubbles() function:
function moveBubbles() { for (var i:Number = bubbles.length - 1; i >= 0; --i) { var clip:MovieClip = bubbles[i]; clip._x += bubble_speed; if (clip._x > 550) { clip.removeMovieClip(); bubbles.splice(i, 1); } } }
This function works like moveProjectiles(), except that it handles the movement and deletion of bubble instances. They are moved to the right at the rate of bubble_speed and removed when they breach the rightmost boundary of the project.
| 14. | Next, create the detectCollisions() function:
function detectCollisions() { for (var i:Number = projectiles.length - 1; i >= 0; --i) { var projectile_clip:MovieClip = projectiles[i]; for (var j:Number = bubbles.length - 1; j >= 0; --j) { var bubble_clip:MovieClip = bubbles[j]; if (projectile_clip.hitTest(bubble_clip)) { ++hits; projectile_clip.removeMovieClip(); projectiles.splice(i, 1); bubbles.splice(j, 1); bubble_clip.play(); mdm.Application.shake(5); } } } }
This function has a nested loop. For every projectile in the projectile array, the entire bubble array is looped through, and a hitTest() is performed. If hitTest() returns a value of true, a collision has occurred between the projectile being tested and a bubble instance.
If a collision is detected, the hits variable is incremented, the projectile is removed, and the bubble is removed from the bubbles array. The bubble is told to play a "bursting" animation. The final frame in the bubbles_mc movie clip has an action assigned, this.removeMovieClip(), which removes the bubble clip as soon as the bubble has burst.
The final action that occurs if a collision is detected is the execution of the Zinc command: shake. The shake command tells the application to shake the playback window the number of times listed as the second parameter. When a collision is detected, the playback window shakes five times.
| 15. | Create the gameOver() function to handle ending the game:
function gameOver() { clearInterval(gameID); for (var i:Number = projectiles.length - 1; i >= 0; --i) { var clip:MovieClip = projectiles[i]; clip.removeMovieClip(); projectiles.splice(i, 1); } for (var i:Number = bubbles.length - 1; i [a2]>= 0; --i) { var clip:MovieClip = bubbles[i]; clip.removeMovieClip(); bubbles.splice(i, 1); } gotoAndPlay("Game Over"); } var gameID:Number = setInterval(gameOver, game_length);
The last line of script shown here uses setInterval() to tell the gameOver() function to execute after the game has been played for one minute, which is the length of time specified in the game_length variable created in Step 7.
When executed, the gameOver() function takes four actions: It first clears the interval so that the gameOver() function is not called again in another 60 seconds. Then it uses a couple of looping statements to loop through and remove any outstanding projectile and bubble instances. Finally, it sends the movie to the Game Over frame label.
| 16. | Move the playhead to the Game Over frame label.
This frame contains the text showing that the game has ended. There is also a button named playagain_btn that moves the Timeline back to the Initial frame so that the game can be played again.
No ActionScript will actually be assigned to this frame; instead it will be assigned to the next frame because of the command used. Typically, when these commands are placed on a frame, they're executed before the visual content of the frame is rendered. Therefore, execution of commands on the Game Over frame label technically occurs while the user still sees the content of the Game label (albeit just for a split second). By putting these commands on the next frame, we let the visual content of the Game Over frame label render on the screen first, before the execution of the commands.
| 17. | Select the frame in the Actions layer directly after the Game Over frame label and add the following script:
if (hits != 1) { var message:String = "Game Over! You destroyed "+ hits + "bubbles!"; } else { var message:String = "Game Over! You destroyed " + hits + "bubble!"; } mdm.Application.say(message);
Both Windows 2000 and Windows XP come with a speech pack built in, allowing them to render strings of text to voice. This script formats a dynamic message and has Windows play the message using the mdm.Application.say method. The parameter specifies a variable whose value is the text to speak.
Note If you're testing the game on a Windows 98 or Windows 95 machine (which doesn't have a built-in speech engine), don't include this portion of script, or you'll get an error at the end of the game. | 18. | Add the following script to handle saving a high score:
if (hits > highscore) { var saveTo:String = "highest_score.txt"; var saveContent:String = "score=" + hits; mdm.FileSystem.saveFile(saveTo, saveContent); }
At the end of the game, this conditional statement compares the value of hits(the number of bubbles hit) with the value of highscore (which is the current high score, as discussed in Step 4). If hits has a greater value, a new high score has been achieved and needs to be saved. The mdm.FileSystem saveFile method saves the new score to a text file, which is loaded at the beginning of the next game.
This method accepts two parameter values, separated by commas. The first line within the conditional creates a variable named saveTo, which represents the name of the target text file. The second line creates a variable named saveContent, which contains the text that will be saved. The value of this variable is created by adding the string "score=" to the value of hits. If hits has a value of 53, for example, the text score=53 is written to the highest_score.txt file, overwriting any existing text in the file.
| 19. | Add the following button event handler and stop() action at the end of the current script:
playagain_btn.onRelease = function() { gotoAndStop("Initial"); }; stop();
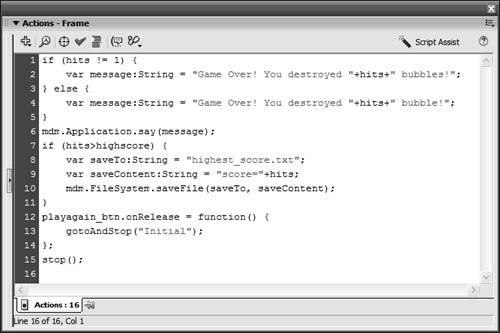 When the playagain_btn button instance is clicked, the user returns to the Initial frame label, in which the high score is reloaded and the game can be replayed. A stop() action is added here to keep the movie from playing. When the playagain_btn button instance is clicked, the user returns to the Initial frame label, in which the high score is reloaded and the game can be replayed. A stop() action is added here to keep the movie from playing.
The scripting of our file is complete. The last tasks are creating a SWF file and then wrapping that file in an executable generated by Zinc.
| 20. | Choose File > Publish to create a SWF file.
In the previous step you completed all scripting needed to make this application function. For Zinc to create an executable file it takes a SWF file and spits out an executable file. In this step you create the SWF file that Zinc needs.
Next you will be using Zinc to create an executable file.
Note This step assumes that the default publish settings are used. | 21. | With Zinc open, select the Input File tab. At the bottom of the tab is the option Please Select An Input File. Use this option to browse to and select the Game1.swf file on your hard drive.
Obviously, this is where you select the file that you want to convert into a Zinc executable.
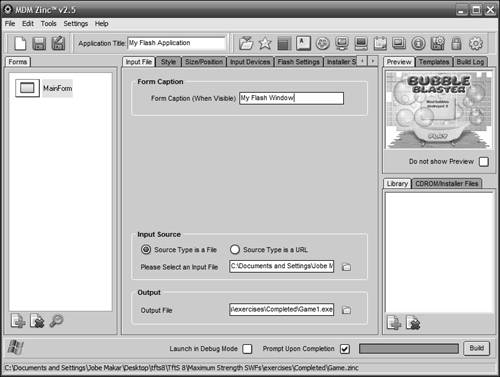 | 22. | At the bottom of the same tab is the option Output File. Use this option to select the name and directory for the output file. This should be the default directory that contains the mask image and highest_score.txt file.
In this step, you told Zinc what to name the output executable file, and where to put it. There is a Build button on the bottom right. When clicked, it will take the input file, process it, and create the output file.
| 23. | Click the Style tab. In the lower-left corner of the tab, click the No Border radio button.
This option setting is necessary for the bitmap mask to fit the movie properly.
 | 24. | Click on the Input File tab again. Click the Build button to generate the executable file.
A progress bar appears as Zinc creates an executable file. When complete, a dialog box asks whether you want to launch the file. Select Cancel.
| 25. | Check your working directory for a file named Game1.exe. Double-click this file to launch your game!
Immediately upon launching, the game's playback window is masked based on the all-white portions of the mask.bmp image. The Initial frame label is shown first, and the current high score (which is 0) is loaded. Play the game and watch the special Zinc commands we added in action. When you hit a bubble, the playback window shakes. At the end of the game, the application talks to you (on Windows 2000/XP) to let you know how many hits you made. If you've achieved a new high score, it's saved to the highest_score.txt file.
| 26. | Close the executable file by pressing the Escape key and then close Zinc. Return to the Flash authoring environment and save your work as Game2.fla.
You have created an enhanced executable file using Zinc. Zinc and other third-party tools offer hundreds of custom commands to enhance your content. You might find it interesting to read through the help files for Zinc to learn about the other available commands. You might also want to play around with different Zinc options when creating your executable files, such as assigning an icon to the file or having it fade in when the file is opened.
If you're bored with plain ol'ActionScript (yeah, right), learning to use third-party tools such as Zinc can open up a new and powerful means of creating incredibly dynamic applications.
|
|