Good Hand Coding Practices
|
When you're hand coding, it makes sense to follow a number of simple guidelines to ensure your code is easy to read and understand, both for yourself and others in the future. It's worth spending a little extra time laying your code out neatly and adding comments - you'll really appreciate it when you have to go through the code again to add a function in the future. In this section we'll be looking at how the built-in features of Dreamweaver MX can help you to create nicely laid out and easily readable code.
Code OptionsWhen you are in Code view, or using the Code inspector, at the top of the Code window is the View Options button. If you are unsure which button it is, hold your mouse cursor over each button in turn, and their names will be displayed. This menu contains the following options:
Indenting CodeIndenting code makes it more readable, and easier to see the code structure. For example, look at the code below without indentation:
<?php if($myresult > 1) { if ($myresult < 5) echo ("small"); if ($myresult > 5 AND $myresult < 10) echo ("medium"); if ($myresult >= 10) echo ("large"); } ?> The same code, with indentation, is easier to read:
<?php if($myresult > 1) { if ($myresult < 5) echo ("small"); if ($myresult > 5 AND $myresult < 10) echo ("medium"); if ($mtresult >= 10) echo ("large"); } ?> You can now see that the code is one if statement, the contents of which are run if the variable $myresult has a value greater than 1. In that case, the value of $myresult is checked to see if it is less than 5, between 5 and 10, or greater than or equal to 10, in which case the text small, medium, or large is printed to the page. It's much easier to understand the program flow. You can either indent code yourself, using the Tab key, or can use the Dreamweaver MX Indent command, by selecting Edit -> Indent Code from the main menu bar. (Alternatively, you can use the keyboard shortcut Ctrl + Shift + >.) To outdent code (which is the opposite of indenting - it moves the line to the left instead of the right), you should select Edit -> Outdent Code from the main menu bar. Again there is a keyboard shortcut: Ctrl + Shift + <.
Commenting Your CodeWhen you are typing your code, it's always best to add comments here and there, to explain how the code works. If someone else has to work on the code in the future, or indeed if you have to add a function to the code in six months' time, it makes the code much easier to go back to and understand. You don't have to go into minute detail, but write a short accurate description of what the code is doing, or what type of data a function expects, for example. Comments are ignored by the PHP engine - they are only there to make the code easier to understand for the programmer, and anyone else who has to work on the code in the future. In PHP, there are three types of comments you can use in your code. These are:
Hash MarksHash marks are usually used to head sections of code, as they are very visible and easy to find in your code. The PHP engine ignores everything in the code from the hash mark to the end of the line, or the closing PHP tag, whichever happens first. For example:
############################## # Send Email confirming login details ##############################
Double Forward SlashesDouble forward slashes are used in exactly the same way as the hash marks above. For example:
////////////////////////////////////////////////////////// // Send Email confirming login details ////////////////////////////////////////////////////////// or to comment a single line of code:
// This is an example of a simple comment
Multi-Line Comments (/* */)The /* and */ marks are used to delimit a comment when it spans more than one line. For example:
/* This is a comment spanning multiple lines. It makes the code easier to read, and can be as long as you like. */ When the page is run, everything between the opening tag (/*) and closing tag (*/) is ignored, including valid PHP code.
Naming VariablesIt's worth mentioning the way you name variables here. It's handy when you're starting some PHP coding to create some rules for variable names, and then to use that convention all the way through the site. For example, prefix the name of all variables that should contain text with str:
$strMessage $strErrorDescription For variables that should only hold numbers, use the prefix val:
$valAmount $valDiscount For all recordset parameters, use the prefix rs:
$rsName $rsAge Sticking to such a naming convention makes the code much easier to follow and understand, and is extremely useful when debugging. When you're designing a site with others, make sure you all agree on your naming conventions before you start, so everyone uses the same method. You will then be able to swap code with the other developers, and will all be able to understand the way the code functions.
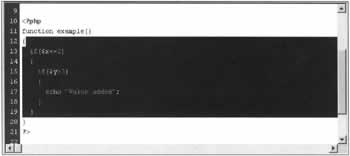
Balancing BracesDreamweaver MX's Balance Braces option is extremely useful for checking your code. This option is available by either selecting Edit > Balance Braces on the main menu bar, or using the key combination Ctrl+'. As the name suggests, this option scans your code, and checks that all tags or braces ({}) are balanced. This is extremely useful when your code is complex and has many opening and closing braces. Take the following code for example:
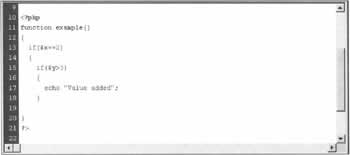
<?php function example() { if($x==2) { if($y>3) { echo "Value added"; } } } ?> This has three sets of braces, nested into one block of code. If we are in Code view, and place the cursor to the right of the first brace, {, and then select the Balance Braces option, the code is highlighted as shown below: Notice that all the code between the opening brace and its closing brace is highlighted - this shows that all the opening and closing braces within those braces are balanced. What happens if we missed a brace, as in the code below?
<?php function example() { if($x==2) { if($y>3) { echo "Value added"; } } ?> Again, place the cursor to the right of the first brace, and select Balance Braces. The area will be shown without highlighting, as shown below, indicating that the braces aren't balanced. If you now start with the cursor to the right of the innermost brace, after if ($y>3), you can work outwards quickly by repeatedly using the key combination Ctrl + ', until you come to the unbalanced brace. You can then correct the problem, by adding a closing brace. This is extremely useful, as it saves all the time you would have spent manually reading through the code, trying to find out the braces that were unbalanced. | ||||||||||||||||||||||||||||||

EAN: 2147483647
Pages: 88