Building the Pages
|
We now have all three sections planned, so we can start building the pages. First, create a folder called bookings, into which we can place the pages. Next create pages from your template, and save them with the following filenames in the bookings folder:
At this stage do not add anything to the pages, just save them with the filenames shown above and close the pages. We do this now, so that when we are using the database server behaviors, we can select the page to link to, as the page exists in the bookings folder, even though we may not have worked on it yet.
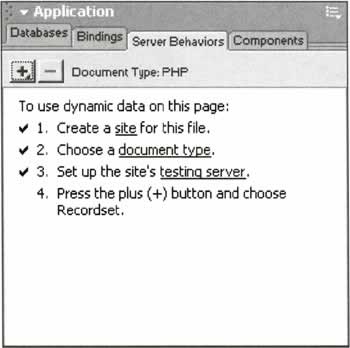
Creating the Bookings PagesThe logical place to start is with the bookings pages, so that we can create some bookings that we can use to test the other sections.
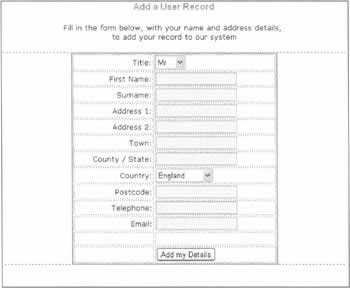
Adding user records - add_user_record.phpThe first page we are going to create, is add_user_record.php, so open this page in Dreamweaver MX.
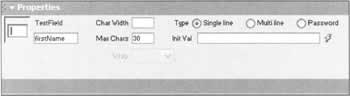
Creating the PageDesign the page, so it looks similar to the screenshot overleaf: First, place a form on the page by selecting Insert -> Form from the main menu bar. Name the form userform. There is no need to set an action for the form. On the page above we have used a table to hold the form fields, so all the fields line up neatly with each other. The fields for first name, surname etc. are text fields, and are inserted by placing the mouse cursor at the desired location, and then selecting Insert -> Form Objects -> Text Field from the main menu bar. Once you have inserted a text field, you can click on it, and its settings will be shown in the properties inspector panel, as shown in the image below: Set the text fields up with the settings shown in the table below:
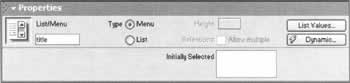
You may have noticed that we have set all of the text field names to be the same as the database field they insert into. This allows Dreamweaver MX to automatically match the field data to the correct fields in the database. You don't have to do this, but it makes the process easier, if you do. The "Maximum Characters" field allows you to set the maximum number of characters that the text field will accept. We have matched this to the field length in the database, so that a user can't enter more characters than we can store in the database field. Lastly, we set all the text fields to be single line, as they will only be holding small pieces of data. We have created a drop-down menu for the title field, which was created by selecting Insert -> Form Objects -> List/Menu from the main menu bar. This inserts an empty drop-down menu. Select the drop-down menu, and from the properties inspector, shown below, name the menu title, and then click the "List Values" button. When you click the "List Values" button, the following dialog box appears, which allows you to enter the labels and values for the drop-down menu. To add a new menu item, click the + button, and you can then insert the item label and value. The "Item Label" field is shown to the user as the menu item in the drop-down, and "Value" is the corresponding value that will be inserted into the database, when that option is selected. Enter the following data into the List Values dialog box:
If you need to delete a row, simply select the row, and click the - button. When you have entered the values above, click OK. The Country drop-down menu is created in the same way as the title drop-down above, and is named country, but you need to enter the menu options below, again by clicking the "List Values" button on the properties inspector.
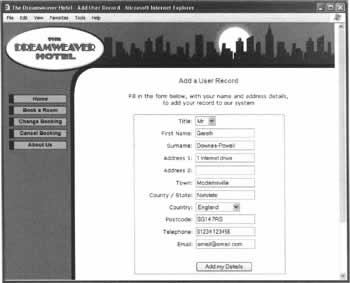
Our last job is to create the button the user clicks to submit the form. You can add this button by selecting Insert -> Form Objects -> Button. Change the button label to "Add my Details". This completes the design of the page.
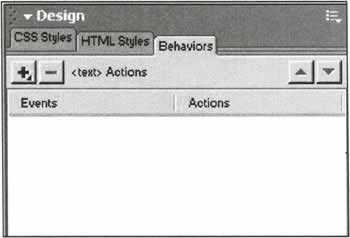
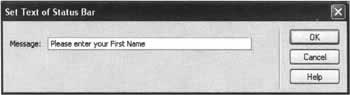
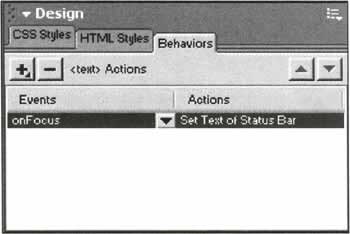
Creating User HelpWe are now going to add some prompts for the user, to explain the data they need to enter. First click on the firstName text field, to select it. Select the Behaviors tab, on the Design panel, so that it looks like the image to the right: Click the + button, and select Set Text -> Select Text of Status Bar from the menu options that appear. A dialog box will open similar to the one shown below: Enter the following in the dialog box: Please enter your First Name Click OK, and the dialog box will close. You will now see the action "Set Text of Status Bar" in the Behaviors action. You will see however, that the Event is set to "onMouseOver". This means that when the user moves their mouse over the firstName text field, the status bar will display "Please enter your First Name". For the event we require, change it from "onMouseOver" to "onFocus". The Behaviors panel should now look like the image to the right: Now when the user's cursor is in the firstName text field, either by using the tab key or by clicking in it, the Help message will be displayed in the browser's status bar. This is especially useful on complex forms, to allow you to add instructions for the user. Repeat the above procedure for each form field, adding appropriate Help text for each field.
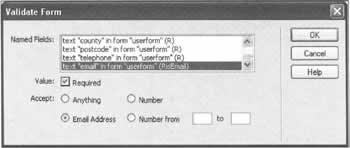
Validating the FormWe now want to add another behavior to validate the form data the user submits. Click on the "Add my Details" button, and from the Behaviors tab on the Design panel, click the + button and then select "Validate Form". The following dialog box appears: In the "Named Fields" box we have a list of all our fields that exist in our form. We can select whether fields are required, that is, they cannot be left blank, and we can also check for various types of data. Select every field in "Named Fields" as "Required", except for Address2, which can be left empty if it doesn't apply to the user. Set the data type for each form field that is required as "Anything", except for the e-mail field, which should accept an "Email Address" only. Finally click "OK", and the action is added to the button. Note that this isn't actually PHP, but client-side JavaScript, so the form will not be submitted to the server unless it has been validated.
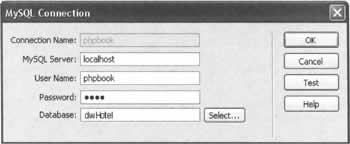
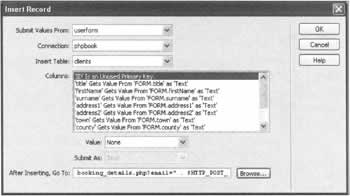
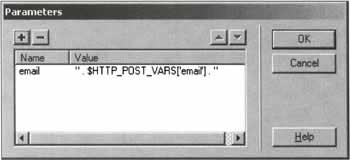
Adding the Insert Record BehaviorOur last job on this page is to actually insert the record into the database when the form is submitted. You should already have a database connection defined in Dreamweaver MX for connection to the mySQL database. You can check this by looking on the Databases tab on the Application panel, and you should see your database connection as in the screenshot below: If you haven't got a database set up, click the + button, and select MySQL Connection, and enter your database connection details for your database, as in the figure below. Once you have your database connection established, select the Server Behaviors tab, so the panel looks like the image to the right. Click the + button, and select "Insert Record" from the menu options. The Insert Record dialog box appears as shown below: From the "Submit Values From:" menu select userform, which is the name we gave to our form earlier. Select your database connection from the "Connection:" menu, and clients from the "Insert Table" menu, as we want to insert our data into the clients table. Below this we have the "Columns" menu that shows all our database fields, and the name of the form fields as well as their data types. As we created our form fields with the same name as the database fields that the data inserts into, Dreamweaver MX automatically matches the form fields to the correct database fields. It's always worth double-checking the column items, just to make sure that your data is being inserted into the correct database fields. If any options are mismatched, you can change the settings by selecting the form field from the Value menu, and the data type from the "Submit As:" menu. You will notice that the database field ID does not have any form fields linked to it. This is because the ID was created as an Auto Number field, and the record number is automatically inserted by the database. Lastly we need to set the page that the user is redirected to, once the form data has been inserted. Click the "Browse" Button, and then click the "Parameters" button on the dialog box that appears. The Parameters dialog box is shown: These parameters are added to the URL of the page that we redirect the user to, and can carry addition information from page to page. Click the + button to add a new row, and enter email for the parameter name, and " . $HTTP_POST_VARS ['email'] . " for the value. This means that when the page is inserted the value from the email field, which is referred to by placing a $ in front of the field name, is added to the URL Click "OK", and then click on the booking_details.php page, and click OK. Now, if a user with the email address <test@test.com> submitted the form, the user would be redirected to:
booking details.php?email=test@test.com The email field value is passed in the URL. Click "OK" to close the Insert Record dialog box if you haven't already, and all the necessary code is automatically added to the page by Dreamweaver MX. So to recap, our page allows the user to enter their data, it validates all fields are filled in (apart from address 2), and then it inserts the data into the clients table, and redirects to the booking_details.php page passing the user's email address. At this stage, you can upload this page to your server, call it up in your browser, and enter a test record. You can then use a database administration tool, to check the data you typed has been entered correctly, and into the correct fields. If any data is incorrect, you can double-click on the Insert Record behavior, and the dialog box will appear again, allowing you to correct any problems. The completed page when viewed in a browser looks similar to the screenshot overleaf:
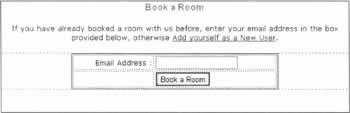
The Book a Room Page - book_a_room.phpThis page is a fairly simple page, and is the page the user goes to when they click "Book a Room" from the main menu on the web page. Open the book_a_room.php page that you created earlier, and insert a form, giving it the name bookingform, as shown in the image below: Set the form action to the booking_details.php page, and set the form method as GET. This means when the form is submitted, it will send the form data to the booking_details.php page, and adds the form values to the URL. The rest of the page is shown in the image below: The text field is named email, with Max Chars set to 100, the same as the email field in the database. Next, add a button, and change its label to "Book a Room". Create a text link to the add_user_record.php page, so that the user can create a new record if they haven't made a previous booking. To summarize, the user enters their email address, and the form data is sent to the booking_details.php page, with the email address in the URL as shown below:
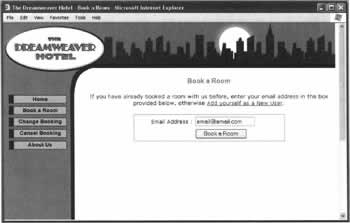
booking_details.php?email=test@test.com Notice that this is exactly the same format as the create_new_user.php page, so that whichever page submits to confirm_booking.php the same data is sent. The completed page viewed in a browser is shown in the screenshot below.
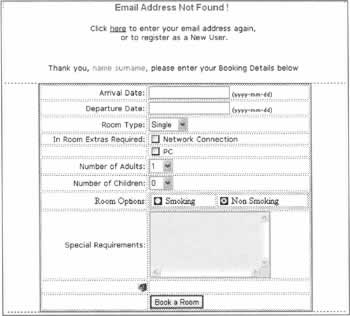
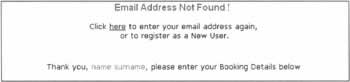
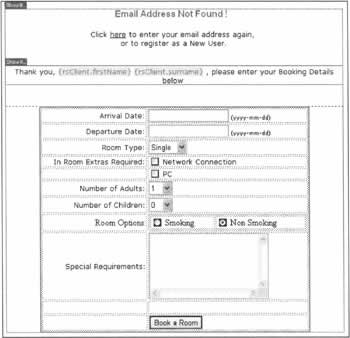
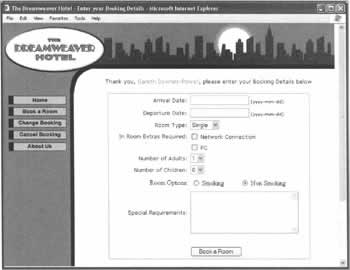
Making a Booking - booking_details.phpThis page allows the user to actually enter their booking details. First open the page booking_details.php that you created earlier. The page should be laid out in a similar way to the screen-shot below: First of all we have some ordinary text telling the user their email address is not found, and to ask them to click the link to go back to the book_a_room.php page. Later in this section we will set this text to only be shown if the user's email address is not found. Next create a line with the following text: Thank you, name surname, please enter your Booking Details below. Again, later in this section we will change name and surname, to be the user's first name and surname read from the database.
Creating the FormAdd a form to the page, and name it bookroom. There is no need to set a form action as the Insert Record server behavior does this for us. Leave the form method set to POST, which is the default. Again we created a table to hold the form fields so they are neatly lined up. First create the two text fields, to hold the user's arrival and departure dates, and give them the following settings:
Next, insert a drop-down menu, and call it roomType, and add the following, after clicking the "List Values" button in the properties inspector.
We now come to the in-room extras required, with two options, Network Connection and PC. We use check-boxes for this data. Create a checkbox by selecting Insert -> Form Object -> Check Box. Click on the new check box, and the properties inspector will appear with checkbox settings, as shown below: For the checkbox name, enter networkconnection, enter 1 for the "Checked Value", and select "Unchecked" for the "Initial State". This means that when the checkbox appears unchecked initially, and if its checked by the user, it will have a value of one, which we can write to the database. Create another check box, called PC, again with a checked value of 1, and unchecked for the "Initial State". We next have two drop-down menus, so the user can select the number of children and adults staying in the room. Create these two drop-down menus, and name them adults and children. The adults drop-down has the following menu items:
Then set the children drop-down to have the following menu items:
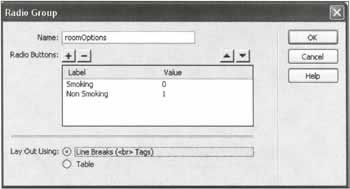
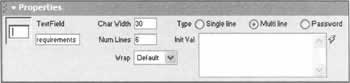
We now come to the room options, which gives the user a choice of a smoking or non-smoking room. To do this we use a radio group, which is a set of options, of which only one option from the group can be selected at any one time. When you select an option from the group, all the other options are deselected. This is useful for situations like this to make the user select one from a series of options, and stopping them from selecting more than one. To insert the radio group, select Insert -> Form Objects -> Radio Group from the main menu bar, and the following dialog box will appear: Give the radio group the name roomoptions, as this is the field in the bookings table that the data will be inserted into. Change the labels to read "Smoking" with a value of 0, and "Non Smoking" with a value of 1. Select "Lay Out Using Line Breaks", as we don't want another table inserted. Click OK, and the option group will automatically be inserted. Drag the circular buttons to a more suitable location. Our last field is for the user to enter any special requirements they may have. It's a text field, but it allows multiple lines of text to be entered. Create the field by selecting Insert -> Form Objects -> Text Area from the main menu bar. Select the text area and the properties inspector will look like the following: Note this is the same as for a text field, but the "Multi Line", instead of "Single Line", option is selected. Enter requirements for the text area name, 30 for the char width, and 6 for the number of lines, to give the user a decent sized area in which to type. Lastly, insert a button and give it the label "Book a Room".
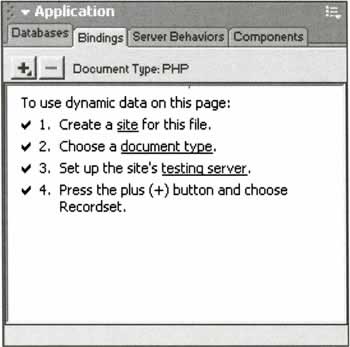
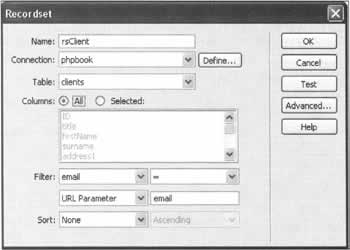
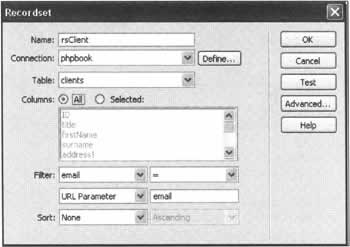
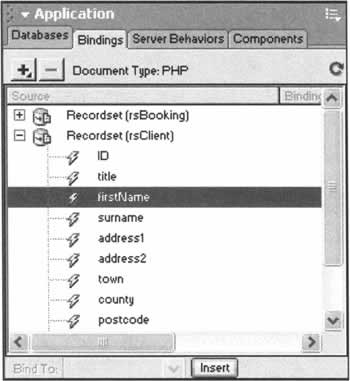
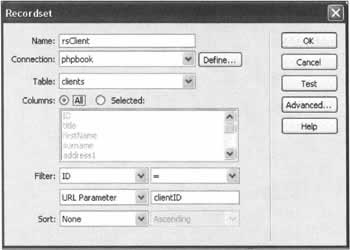
Creating the Database RecordsetsNow we've created our form, we can start creating the database interactions. We first want to open a recordset that contains the user's name and address details, which we can find by using the e-mail parameter, sent in the URL to this page from the preceding pages. On the "Application" Tab, click the "Bindings" Tab, as shown below: Click the + button, and select "Recordset (Query)". The recordset builder dialog box will appear as shown below: If the recordset dialog box that appears is different to the above image, it means it's in advanced mode, so click the button labeled "Simple..." on the right of the dialog box, to revert back to simple mode. We'll be looking at the advanced mode later on in the chapter. For the recordset name enter rsClient. It's advisable to name your recordsets like this, so that you can easily identify the recordset later. Select your database connection from the "Connection" menu. Select the clients table from the "Table" menu, as this is where the user's record is stored. We can now build our query quickly and easily. From the "Filter" drop-down menus, select:
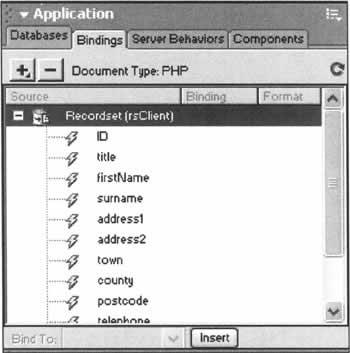
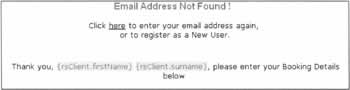
email = URL Parameter email This does exactly as it reads, and opens a recordset containing a record where the email field in the database matches the email parameter in the URL. We don't need a sort, as we're only expecting one record to be returned. Lastly click OK to create the recordset. The recordset rsClient will now appear in the "Bindings" window, and clicking on it to open its tree shows the following: As you can see all the fields in the recordset are shown. We are now going to go back to the top of our page, to the text above the form, which is set out similar to the image below: In the last sentence, we have name and surname. We want to replace these with the values from the rsClient recordset. First highlight name, by clicking at the start of name and holding the mouse button down dragging across it. Click on firstName in the recordset field list, and click the insert button. Dreamweaver MX adds a placeholder showing that the data for name is dynamic, and will be replaced with firstName from rsclient when the page is viewed in a browser. Highlight lastName select lastName in the Bindings window, and again click insert. The sentence should now look the same as the image below. The user's first name and surname will now be substituted into the text when the page is viewed in a browser.
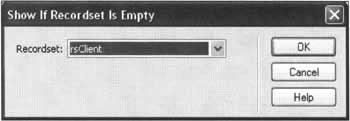
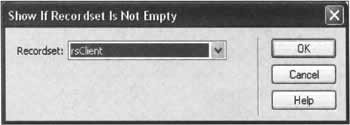
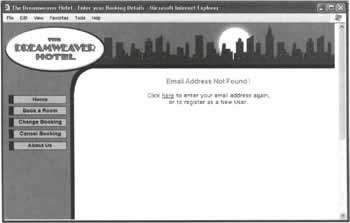
Hiding and Displaying TextIf we look at the top of our page again, we have the two sections of text, one saying the e-mail address has not been found, another thanking the user and asking them to enter their booking details. Obviously we don't want the user to see both sections of text; only one or the other, depending on whether the user's e-mail address was found in the clients table. Now we know that if the recordset we created, rsclient, contains a record, then the user's e-mail address and details have been found. If the user's e-mail address is not found, then the rsclient recordset will be empty. We can now add server behaviors that display or hide the text, according to the state of the rsclient recordset. First select the whole text block that tells the user their address has not been found, including the text with the link underneath. Click the "Server Behaviors" tab, which is next to the "Bindings" tab we have been looking at, on the Application panel. Click + to add a server behavior, and select Show Region -> Show if Recordset is Empty from the menu. The following dialog box will appear: From the recordset menu, select rsClient and click OK. The PHP code will automatically be added to the page, and you will see the server behavior appear on the Server Behaviors panel. Next select everything from the start of the sentence thanking the user to the end of the form, right at the bottom of the page. Click + to add a server behavior, but this time select Show Region -> Show if Recordset is Not Empty. This time the dialog below appears: Again select the rsClient recordset, and click OK to apply the behavior. Your page should now look similar to the screenshot below: Note that the two regions we created are marked automatically by Dreamweaver MX, so we can see which data is in which region.
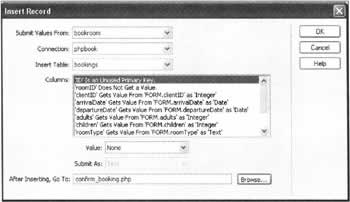
Inserting the RecordNow we've created our page, we can add the server behavior to insert the record into the database. Before we do this however we will create a hidden field on our form, which we will use to hold the ID number of the user, obtained from the rsClient recordset. Select Insert -> Form Objects -> Hidden Field from the main menu bar to insert a hidden field. Click on it, and enter its name as clientID in the properties inspector; don't type anything in the value field. Again, click the hidden field to make sure it's selected, and click on the ID field in our rsClient recordset on the "Bindings" tab. Next click the "Bind" button, which binds the ID field in the rsClient recordset to our hidden field. This means that when the page is viewed in a browser, the value of the hidden field will automatically be set to the value in the ID field of the rsClient recordset. Now we've done all the preparation, we can finally apply the Insert Record behavior. Click back to the "Server Behaviors" tab, and click the + button to add a server behavior. Select "Insert Record" from the menu. The Insert Record dialog box appears as shown overleaf: Select bookroom for "Submit Values From:", your database connection from the "Connection" menu, and the bookings table for "Insert Table", which tells Dreamweaver MX to use the values from the bookroom form to insert into the bookings table. For this page, bookroom is the only form available, but if you use more than one form on your page, the names of all the forms will be displayed in this menu. As we created the form fields to match the names of the fields in the bookings table, Dreamweaver MX automatically matches the form fields to their corresponding database fields. Check through the list to make sure that all the data is being inserted into the correct place. We want the user to be redirected to the confirm_booking.php page once the data has been inserted, so browse to this page and select it for the "After Inserting, Go To:" field. We do not need to set any parameters, as the Insert Record behavior automatically carries across any existing parameters, that is, the e-mail parameter, and adds it to the URL. You can now upload this page to your server, open the add_user_record.php page and enter your details. When you add your details, you will be taken to our booking_details.php page, and your name should be showing in the greeting at the top of the page. When viewed in the browser, the page will look similar to the one opposite: If the user entered an e-mail address on the book_a_room.php page, and the e-mail address is not found, then the page will show the following: These two pictures show the Show Region server behavior in action. Both show the same page, but one showing with a record in rsClient, the other when rsclient is empty. The Show Region server behavior is extremely useful, as you can use the same page to cover different scenarios, cutting down the number of pages you have to design, saving you time.
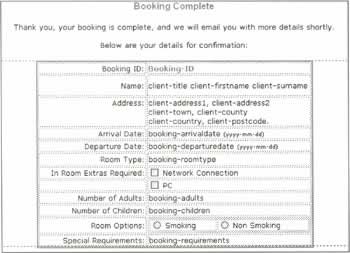
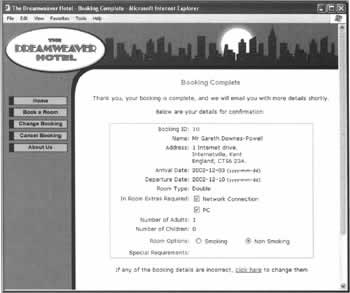
Confirming a Booking - confirm_booking.phpThe last page in this section is to show the booking details to the user for confirmation. To do this we use two recordsets, and data from the bookings and the clients table. First, we use the e-mail address that is passed to this page in the URL parameter e-mail, to open and find the last of the user's bookings in the bookings table (which will be the booking) they just made. This gives us the user's booking details to display on the page. From the booking record, we get the client's ID number, and we use this to pull the users name and address details from the clients table. We then display all this data on the page, so the user can print off a copy or save the page, as confirmation of their booking details.
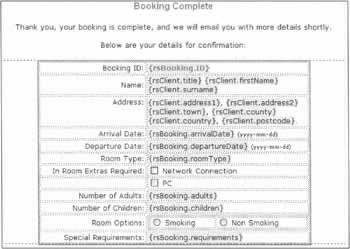
Creating the Page LayoutFirst open the confirm_booking.php page you created earlier. Create a form, but don't set an action. We're not actually using this form to submit data, just so we can use form elements to display existing data. Lay the page out in a similar way to the screenshot below: Again we've used a table to set out the data neatly. Create placeholders for the dynamic data we are going to be inserting into the page. The placeholders are labeled so that they show the table their data comes from, and the fieldname, to make it easier when we come to add the dynamic data later on. As the fields for Network Connection, PC, and Smoking and Non Smoking are entered in the database tables as 1 or 0, we add form elements to show this data in a way the user can understand. Again the "In Room Extras Required" options are checkboxes, and the "Room Options" field is a radio group with the same settings as on the bookings page, Smoking, 0 and Non Smoking, 1. It doesn't matter this time what the fields are called as we are not using them to insert data into the database, only to display it. For the same reason we do not need to add a submit button to the form, as we do not want it to actually be submitted, but you need a form if you want to use form elements.
Creating the RecordsetsWe are now going to create the recordsets that pull the correct data from the clients and bookings tables. First we want to retrieve the correct client data, which we can do using the URL parameter email which is passed by the booking_details.php page. Click on the "Bindings" tab, and click the + button, and select "Recordset". Enter rsclient as the recordset name, and select your database connection. Select clients as the table to pull the data from. For the filter, select from the filter options: email = URL Parameter email Again this finds the record in the clients table, where the address in the email field matches the email parameter in the URL. We know that there definitely will be a record, as booking_details.php will not allow you to add a booking unless you have entered an email address that exists in the clients table. Leave "Sort" as "None", as we should only find one matching record. Click "OK" to create the recordset.
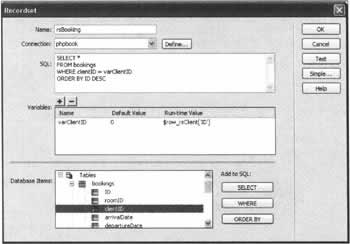
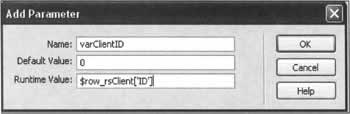
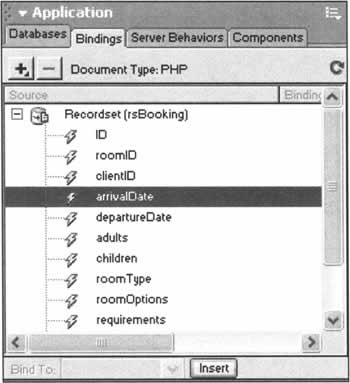
Advanced RecordsetsWe now need to add another recordset, to pull a booking record from the booking table. Click the + button on the Bindings tab, and select "Recordset". This time we're going to use an advanced recordset, so click the "Advanced..." button, which is on the right-hand side of the Recordset dialog box. The dialog box expands to look like the image opposite: Enter rsBooking for the name, and select your database connection. Once you have selected your database connection, the "Database Items" box at the bottom is populated with all of the tables and fields in your database, which you can see by clicking "Tables" to expand the tree, and then clicking the bookings table, to show all its fields. Place the mouse cursor on the bookings table, in the Database Items window, and then click "SELECT". The SQL will automatically be added to the SQL box. Next click on the clientID field in the bookings table, and click "WHERE", and more SQL is automatically generated. Lastly click on the ID field in the bookings table and press the "ORDER BY" button, and the order by statement is automatically added. You will need to manually add DESC to the end of the ORDER BY statement, as we want the records in descending order of ID. If we wanted the records in ascending order we could have added ASC. Now we come to the reason we are using the recordset builder in advanced mode. We want to select a booking from the booking table, where the clientID is equal to the value of the ID field in the rsClient recordset we created. This way the results from one recordset are used to search for data from another recordset, which is extremely useful. In the middle of the Recordset dialog box, you will see a box labeled "Variables". Click + to enter a new variable, and the variables parameter box will appear, as shown overleaf. For the name enter varClientID, enter 0 for the default value (which is substituted in if there isn't a value when the page is run, to stop errors occurring). Lastly for the "Runtime value" enter:
$row_rsClient['ID'] This takes the value of ID from the rsclient table when the page is opened in a browser. The format is always:
$row_RECORDSETNAME['FIELDNAME'] Click "OK" to create the new variable. You can retrieve data from any field, in any recordset using the above format, just replace RECORDSETNAME with the name of your recordset, and FIELDNAME with the name of the field you want to pull the value from. When you use this technique, of using data from one recordset to select records from another, you need to make sure that you create the recordsets in a logical order. For example you can't use a recordset field value to select records from a table, if the recordset from which you're taking the value hasn't already been created. Our last job is to add our new variable to our WHERE clause. At present we have for the WHERE clause:
WHERE clientID = Change this to
WHERE clientID = varClientID This takes our run-time variable, and opens a recordset containing records where the clientID matches the value in varClientID, which in turn comes from the ID field of our rsclients recordset. We sort the bookings into descending order, using the ORDER BY clause, so we get the last ID number of that user, which will be the record we just added. Click "OK" on the Recordset dialog box, to create the recordset. Now in the bindings tab we have two recordsets, rsclient and rsBooking, with all the fields the tables contain. We can now populate our page with this data, by highlighting each placeholder and inserting the appropriate field. When you have done this to each placeholder, your page should look similar to the screenshot overleaf. Another way of merging results from more than one table is by using a SQL JOIN between the bookings and the clients table, this involves a more advanced SQL statement. This, and other advanced uses of SQL, is covered in Chapter 7.
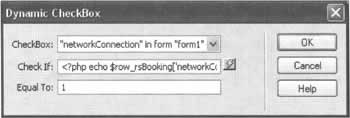
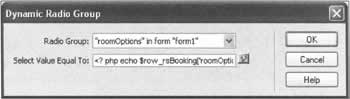
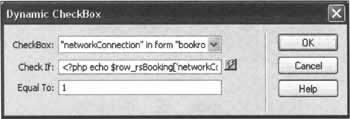
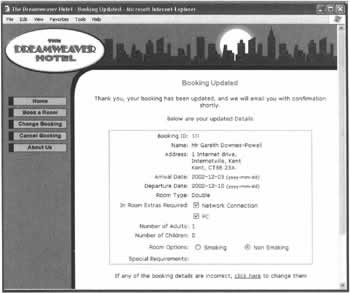
Dynamic Form FieldsOur last job on this page is to make the correct values show in the "In Room Extras" checkboxes, and the Room Options radio group. Select the first check box, for "Network Connection", and then click the "dynamic" button on the properties inspector. The following dialog box will appear: For the "Checkbox" field, select networkConnection, which is the name of the checkbox. For "Check If', press the lightning bolt icon, and select the networkConnection field. Finally enter 1, for "Equal To:". Click OK to continue. This means that if the value in the field networkConnection in the bookings table is equal to 1, the box will be displayed with a check mark in, if not the box will be empty. Repeat the same process for the PC Check box, setting it to "Check" if the value of the PC field in the bookings table is equal to 1. Lastly select one of the options in the radio group for Room Options and click the "dynamic" button in the properties inspector. The following dialog box will appear: Select roomOptions for the Radio Group, and for "Select Value Equal To:" click the lightning bolt icon, and select the roomOptions field from the bookings table, then click "OK". Now when the page is viewed in a browser, the option with a value matching the roomOptions field in the bookings table will be selected. Finally, at the bottom of the page, we'll create a button to change the booking details if they are wrong. Create a new form using Insert > Form. Within this form create a single hidden element and a submit button. Name the hidden element bookingID and set it to the dynamic value of the ID column from the rsBookings table (do this by clicking the lightning bolt icon, and selecting the appropriate record set element). Set the label of the submit button to "If any of the booking details are incorrect, click here to change them". Set the form action to submit to change_booking_details.php. When the user clicks on the submit button, the bookingID will be submitted to the Change_booking_details.php. This ensures the correct record is selected on the change_booking_details.php page, as we are mimicking the action of the change_booking.php page, which we create, and look at in detail in the next section. We now have our first section completed. Upload confirm_booking.php to your server, and you can then book a room and see the results in your browser. The screen should look similar to the one overleaf:
Changing a BookingNow we have created the booking pages, we are going to create the pages that will allow the user to change their booking. The first page we are going to create is to allow the user to enter their booking number, and is a fairly simple page.
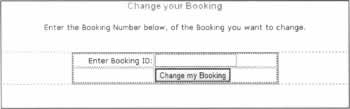
Changing a Booking - change_booking.phpOpen the change_booking.php page that you created earlier in the chapter. Our first job is to create the form on the page.
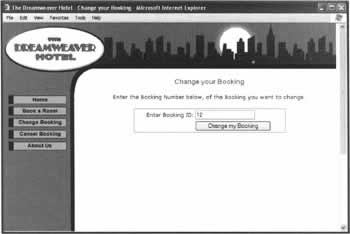
Creating the FormInsert a form onto your page, and change its name to changeform, and set the form action to change_booking_details.php. Create the page layout so it looks similar to the screenshot below: Name the text field bookingID, and set its "Max Characters" attribute to 5, by using the properties inspector. When the user selects "Change Booking" from the Main menu, this is the page that is loaded. They can then type in their booking ID, and the form sends this data to the change_booking_details.php page. The image below shows this page when viewed in a browser: Save this page and upload it to your server so we can use it later.
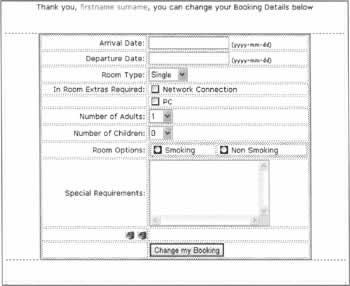
Changing the Booking Details - change_booking_details.phpThis page is similar to the booking_details.php, which we created in the last section. This page is opened when the form on the previous page, change_booking.php, is submitted. It is passed the booking ID the user enters, and we can use this to retrieve the user's booking, and the user's details. Open the change_booking_details.php page you created earlier. Add a form to the page, and name it bookroom. We don't need to set a form action this time, as the Update Record server behavior we are going to use adds it automatically. We are going to create the page, so that it looks similar to the screenshot overleaf: At the top of the page above the form, add the following message: Thank you, firstname surname, you can change your booking details below. The firstname and surname above are our placeholders, and we will replace these with the user's first name and surname from the database. As the table with the form field above is exactly the same as the one we created on the booking_details.php page, we can save a lot of time by opening the booking_details.php page and selecting the table (just the table, make sure you don't select the form as well). You can then press Ctrl + c, or use Edit -> Copy from the main menu bar to copy the table. You can now close the booking_details.php page. On the change_booking_details.php page, place the cursor inside the form we created, and press Ctrl + v, or select Edit -> Paste from the main menu bar. The table will now appear in the form, complete with all the form fields with their attributes intact. Click on the hidden field named clientID, and look at the Server Behaviors tab on the Application panel. You will see that the Dynamic Data behavior was also copied over. This is no longer valid, so delete it by clicking the - button. We will recreate this later on, with the correct data for this page. Create another hidden field, and name it bookingID. We are going to insert the booking ID number into this hidden field, so the booking number will be sent with the rest of the form fields. Hidden fields are extremely useful to pass information from page to page that you need, but don't want to display, or get from the user. Hidden fields can be inserted into the database the same as any other form fields. Note that the user can see hidden fields if they view the page source in their browser, so they should not be used for confidential data such as passwords etc. Now we've created the form, we can start creating the database behaviors.
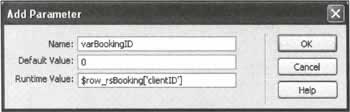
Creating the RecordsetsThe first recordset we are going to create is to retrieve the booking record for the booking ID number that is passed to this page. Click on the "Bindings" tab, on the "Application" panel, and click the + button, and then select "Recordset". The details we are going to enter are shown here: If the Recordset Dialog box appears in advanced mode, click the "Simple..." button, as we will be creating the recordset in the simple mode. You will often find yourself swapping between the recordset builder modes, as queries can be created quickly and easily using the simple mode, but more complicated queries require the advanced mode. Enter rsBookings for the recordset name, and select your database connection and the bookings table. Set up the Filter so it reads: ID = Form Variable bookingID Finally click "OK". This creates our recordset containing a record where the ID field matches the bookingID sent from the previous page. Now we need to create another recordset, to retrieves the user's details from the database table clients. Click the + button on the "Bindings" tab and select "Recordset". This time click the "Advanced..." Button, as we will be creating this recordset in advanced mode. What we need to do is to open a recordset containing the record from the clients table, where the ID field matches the value stored in the clientID field of the booking record we retrieved with the previous record. In advanced mode, click the + button by the variables section, to add a new variable. The settings to enter are shown below: Enter varBookingID for the Parameter Name, 0 for the "Default Value", and $row_rsBooking[ 'clientID' ] for the "Run Time Value", and click "OK" to add the parameter. The rest of the settings for the recordset are shown below: For the recordset name enter rsClient, and select your database connection. Click on the clients table, in the "Database Items" box, and click the "SELECT" button. Open the table in the tree, if it's not already open, and click on the ID field, then click the "WHERE" button. The SQL should now be:
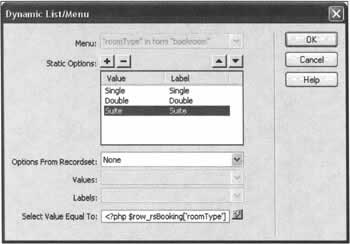
SELECT * FROM clients WHERE ID = Change this to
SELECT * FROM clients WHERE ID = varBookingID so that the record found will be the record where ID matches the clientID field in the rsBooking recordset we created earlier. Click OK to create the recordset.
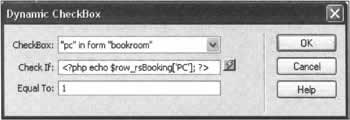
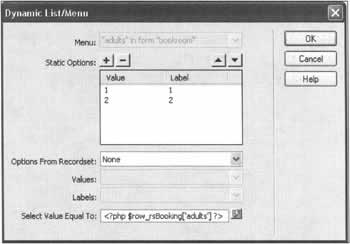
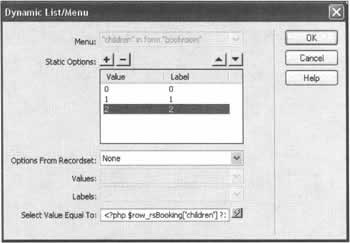
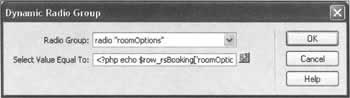
Adding the Dynamic DataNow we have the two recordsets rsBooking and rsClient, we have all the fields we need to make the form fields dynamic. First select the placeholder for firstname and insert the firstName field from the rsClient recordset as shown oppsite, then insert the surname from the surname field in the rsClient recordset. Select the text field that holds the arrival date, then select the arrivalDate field from the rsBooking table under the "Bindings" tab, and then click the "Bind" button. When the page is loaded in a browser, the text field will now contain the value of the arrivalDate field in the rsBooking recordset. The "Bindings" tab is shown in the image below: Click the text field for departure date, and bind it to the departureDate field in the rsBooking recordset. Next select the roomType drop-down menu, and click the "dynamic" button on the properties inspector panel. Leave "Options from Recordset." set to None, as we only want the "Static Options" to be available. On the "Select Value Equal To:" line, click the lightning bolt icon, and select the roomType field from the rsBooking recordset. When the page is loaded in the browser, the option that is automatically selected is the same as the value of the roomType field in the rsBooking recordset. Next we come to the two checkboxes for Network Connection and PC. First click the networkConnection checkbox, and click the "dynamic" button on the properties inspector. For the "Check If:" field, select networkConnection from the rsBooking table, and set the "Equal To:" Value to 1. So when the page is viewed in a browser, the networkConnection check box will be checked if the networkConnection field in the rsBooking recordset is equal to 1, and unchecked if the field contains 0. Click OK, and then click the "dynamic" button for the PC checkbox. Select the PC field from the rsBooking recordset, and enter 1 in the "Equal To:" field. Click OK. Next select the adults drop-down menu, and click the "dynamic" button. Set the "Select Value Equal To:" field to the adults field from the rsBooking recordset. Click "OK", and select the children drop-down. Set the "Select Value Equal To:" field to the children field in the rsBooking recordset. Click "OK". Next select one of the options in the roomOptions radio group, and click the "dynamic" button. Set the "Select Value Equal To:" field to the value of the roomOptions field in the rsBooking recordset, then click OK. Next select the requirements text area, and select the requirements field in the rsBooking recordset, and click the "Bind" button, to bind the value in this field to the text area. Our last job is to bind the hidden field, clientID, to the clientID in the rsBooking recordset, and the hidden field, bookingID, to the ID field in the rsBooking recordset. Change the label for the submit button on the form to "Change my Booking".
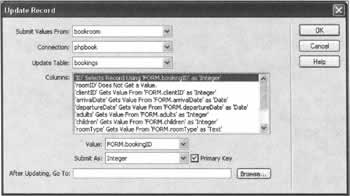
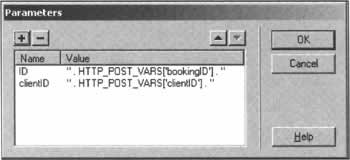
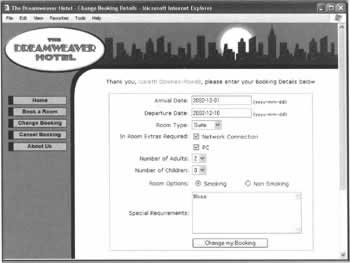
Adding the Update BehaviorOur last job on this page is to add the Update Record behavior, to update the data stored in the bookings table, with the user's new choices. Select the "Server Behaviors" tab on the "Application" panel, and click the + button, and then select "Update Record" from the menu that appears. Select the bookroom form for "Submit Values From:", and bookings from the "Update Table" menu. Check the form fields are correctly matched to the fields in the database they insert into, which they should do as the form fields have the same names as the database fields. We do need to make one change however, and that is to tell the Update Record behavior which record we want updated. It's important to make sure that this value is set correctly, as it could lead to the incorrect record being updated if it's not correct. Select the ID field in the Columns box, and then select FORM.bookingID, (which is our hidden field containing the booking ID number), from the Value menu, and make sure the "Primary Key" checkbox is ticked. This makes sure that the record in the bookings table, which is updated, has the same ID as the value in the hidden field bookingID. Lastly for the "After Updating, Go To:" field, click browse and select booking_updated.php and click the parameters button. Add the following parameters: Add a parameter called ID with the value ".$HTTP_POST_VARS ['bookingID']." and a parameter called clientID with the value ".$HTTP_POST_VARS ['clientID'].". ".$HTTP_POST_VARS ['bookingID']." takes the value of the bookingID hidden field when the form is submitted, and ".$HTTP_POST_VARS [' clientID' ]." takes the value from the clientID field, and we pass these values to the next page booking_updated.php through the URL. Click OK, and then OK to close the Update Record dialog box and apply the behavior. You can now save the page, and upload to your server for testing later. The complete page when viewed in a browser is similar to the following:
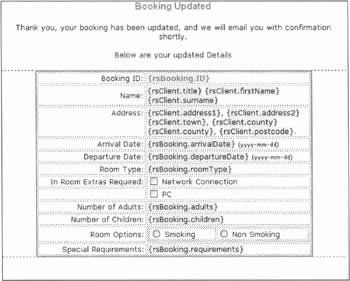
User Confirmation - booking_updated.phpThis page will confirm to the user that the new booking details have been saved, and display the booking record. Again as this page is very similar to the confirm_booking.php we are going to save some time by copying the confirm_booking.php page. The easiest way to do this is to open the confirm_booking.php page, and then save it as booking_updated.php, selecting yes when you are prompted to overwrite the existing page, which is blank. Change the wording on the page, so it is similar to the screenshot opposite:
Creating the RecordsetsBefore we can create our recordsets, we need to remove the two recordsets already on the page from when it was confirm_booking.php. On the "Bindings" tab, on the "Application" panel, click on the rsClient recordset and then click -. You will get a warning as we are using data from this recordset on our page, but it's ok, as we will be recreating it. Remove the rsBooking recordset in the same way. We deleted the recordsets, as they took different parameters to the ones that are passed to this page, ID and clientID, which is the booking ID number and the client ID number. Click + and select recordset. Click the Recordset dialog box into simple view, if you are not already there, and set up the following options: Set the name to rsBooking, select the bookings table, and set the filter as: ID = URL Parameter ID Click OK to create the recordset. This creates the rsBooking recordset which will contain a record where the ID number matches the ID parameter sent through the URL, from the previous page. Next create another recordset to retrieve the client details: Call the recordset rsClient, select the clients table, and use the following filter: ID = URL Parameter clientID Click OK to create the recordset. Again this creates the rsClient recordset containing a record where the field ID is equal to the value of the URL parameter clientID. As we have named the two recordsets we created the same as the two we deleted, all the bindings on the page will still work, without any further intervention. Our last job is to add a direct link to the change_booking_details.php page again, so the user can change their details if they make a mistake. As our recordset names are exactly the same as on the confirm_booking.php page, we can copy the dynamic link from that page, and then paste it into position on our booking_updated.php page. Save the page, and upload it to your server. The page looks similar to the following when viewed in a browser: You should now be able to test this whole Change Booking section, and modify a booking that you previously entered.
Canceling a BookingThe last section in this chapter explains how to create the Cancel Booking pages, which allows a user to cancel an existing booking. To do this we use a Delete Record server behavior, but before we can do this we need to find out which booking to delete.
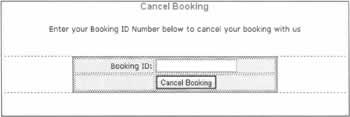
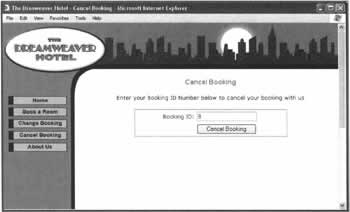
Canceling a Booking - cancel_booking.phpOpen the cancel_booking.php page that we created at the start of the chapter. Add a form, and name it deletebooking. Set the form action to submit to itself, that is, cancel_booking.php. Add a text field, and name it bookingID. Add a button to the form, and change its label to "Cancel Booking". The page should now look similar to the image above. Now when the form is submitted, the page will reload and the form variable bookingID will be set with the booking ID number the user entered.
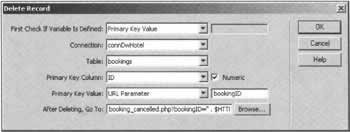
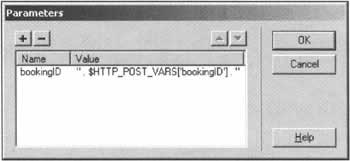
Applying the Delete Record behaviorOn the "Server Behaviors" tab, on the "Applications" panel, click the + button, and select "Delete Record'. The Delete Record dialog box will appear as shown above. Set "First Check if Variable is Defined:" as "Form Variable", and enter bookingID. Now the behavior will only delete a record if the user has entered a booking ID and submitted the form, not when the page is first loaded. Select the bookings table, and set the "Primary Key Column:" to ID, which is the field that holds the booking ID, and make sure "Numeric" is selected. For the "Primary Key Value:" select FormVariable, and again enter bookingID. This means that the behavior will only delete the record where the ID field in the bookings table matches the booking ID entered by the user in the bookingID field. Lastly set "After Deleting, Go To:" to booking_canceled.php and add the following parameter: This passes the value in the bookingID field to the next page, as a URL parameter called bookingID. Click OK, and OK again to apply the Delete Record behavior. You can now save this page, and upload to your server. The page looks similar to the following when viewed in a browser:
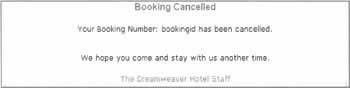
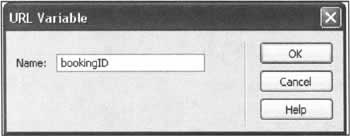
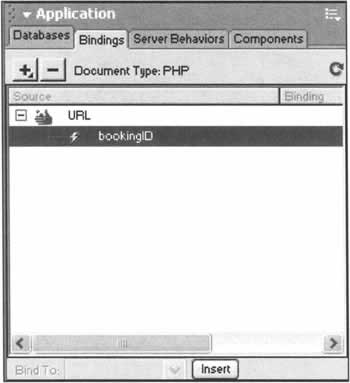
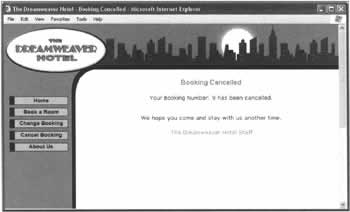
User Confirmation - booking_cancelled.phpThis page is extremely simple, and simply shows a message to the user that their booking has been canceled. Create the page so it looks similar to the following: The above is all standard text, but note we have added a placeholder for the booking ID number, which we send to the page in the URL parameter bookingID. On the "Bindings" tab, on the "Applications" panel, click the + button, and select URL variable; the following dialog box appears: Enter bookingID, which is the name of the URL parameter we sent to the page, and click OK. The bookingID parameter appears in the Bindings window, and you can now insert this over your bookingID placeholder on the page. We have now finished this page, and this section. So upload the page to your browser, and test the pages we have just created. This resulting page looks similar to the screenshot below when viewed in a browser:
Editing the Template - Linking the PagesOur final job for this chapter is to edit our template file, and update the links on the navigation menu, so that they point to our newly created pages. Open the library file that was created in the previous chapter, NavigationBar.lbi, which is in your Library directory. The menu appears as in the screenshot opposite: The button names, and the pages to link to are show in the table below:
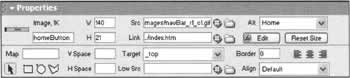
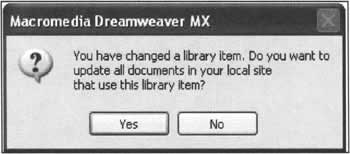
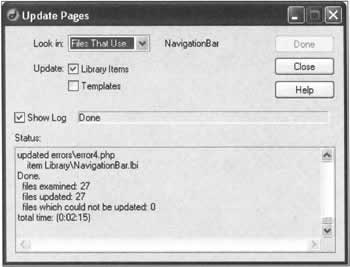
Click on each of the buttons above, and set the link in the properties inspector to the appropriate page, as shown in the example below for the Home button. Once you have changed the link for each of the three buttons, save the file, and the following dialog box will appear: Click "Yes" at the above prompt, as we want Dreamweaver MX to automatically update the links on all pages using our navigation menu. Dreamweaver MX will then automatically update all pages using our navigation menu, and the pages are shown in the dialog box as they are updated. Once the updating is complete, you can close the navigation menu library file. You will now need to upload all the pages that have been updated to the server. The easiest way to do this is to use the Dreamweaver MX synchronize site option, which will automatically select and upload all the pages that have been updated.
Suggestions for ExpansionThis has been a fairly basic example, but we have created a working system. By adding some hand coding to the pages, we could add some improvements, such as creating a login system, so the user can only change or cancel their booking if they enter a username and password. With hand coding you also add a facility to automatically check whether the actual room is available, rather than just saving the bookings for the hotel staff to allocate, which could save both time and staff wages. We will discuss a login system, and hand coding with Dreamweaver MX later on in the book. | ||||||||||||||||||||||||||||||||||||||||||||||||||||||||||||||||||||||||||||||||||||||||||||||||||||||||||||||||||||||||||||||||||||||


EAN: 2147483647
Pages: 88