Creating a Site Definition
|
A site definition is the essential starting point to the development of any web site. With the information that is provided here, Dreamweaver will be able to accurately track the directory structure of your site, keep a watchful eye over all your internal (and external) hyperlinks and maintain a list of all images, movies, colors, and external files. Using the Site Definition, Dreamweaver is also able to provide you with a preview of what your page will probably look like without even uploading it to the server. In essence, the Site Definition is the root of all the built-in site management functions. Without this information Dreamweaver will have no idea where to begin looking. So, to get the very best use out of the software, you need to provide it with all the information you can. Dreamweaver employs two methods for defining sites. There is the Basic method, which employs a step-by-step Wizard that guides you through the Site Definition process, and there is an Advanced Definition process, which gives you complete control over every aspect of your site's definition. It is often best to work through the Wizard, and then customize your definition by amending the properties in the Advanced Definition section. For this reason, we will cover the Site Definition Wizard only, as this will introduce you to the settings and properties that are also used within the advanced section.
Site Definition Wizard - A Step-By-Step GuideThe whole process of defining a site within Dreamweaver is made simple with the Basic Configuration Wizard, which walks you through the whole process. There are essentially four different ways to configure your site using the Basic Configuration Wizard:
These different configuration options have slightly different steps within the Wizard. For this reason we will cover each option individually. The first two stages in "Defining a Site" with the "Basic Configuration Wizard" remain the same, regardless of the configuration that you have, so we will look at those now.
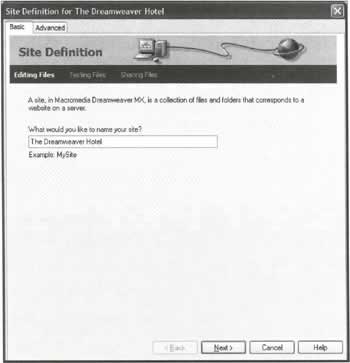
Naming the SiteTo begin defining a site in Dreamweaver MX using the Site Definition Wizard go to the Site menu and click on New Site. The Site Definition Wizard will launch: As you can see from the screenshot overleaf, the first stage in defining a site is to give the definition a name. In this case, we are defining a site for our example "The Dreamweaver Hotel". Here you should enter any name that is appropriate for the site that you want to develop. This name isn't used within your web site itself and won't be placed on any of your pages. It is an internal setting, which helps Dreamweaver to identify the site you are working on. Once we have determined a name for the site we need to set up the Server Technology that the site will use.
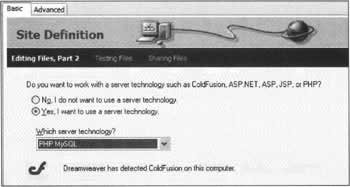
Server TechnologyFirst, you need to decide whether your site will be using Dynamic Scripting technologies (such as ASP, JSP, CFML, or PHP) or just rendering static HTML pages. Of course, for the purpose of this book, we will be using PHP and MySQL, so select the 'Yes, I want to use a server technology' option. A dropdown containing the available options will then appear, and from it select PHP MySQL. One important note from the screenshot opposite (which was taken on my own machine) is the reference to ColdFusion - "Dreamweaver has detected ColdFusion on this computer". You probably won't see this statement unless you have Coldfusion installed on your own machine. The latest version of ColdFusion, ColdFusion MX, has a special relationship with Dreamweaver MX, as these products are both developed by Macromedia. Due to this relationship, ColdFusion is automatically detected when installed on the same machine. There is no such detection for PHP. With your Server Technology correctly selected we can now proceed to give Dreamweaver more information about the files we will be working with.
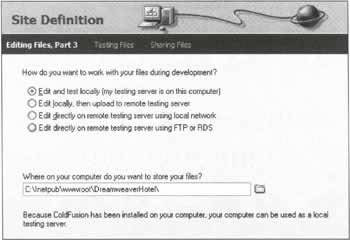
Working with Files During DevelopmentThis stage of the Wizard really sees the beginning of your site definition proper. From here, you determine where your source files will be stored while you are working on them, and whether your web server is a local machine, a remote machine on a local network, or a remote machine that requires an active Internet connection. The subsequent steps in the Wizard are determined by your choice here. As each of the choices in this dialog produce different steps, we will look at the options and subsequent stages of the Wizard in more detail.
Edit and Test Locally (My Testing Server Is On This Computer)You should select this option if everything is working from the same machine. This is the default selection, since many developers opt to run a web server from their development machine. If in Chapters 1 and 2 of this book, you opted to install PHP and MySQL onto your local machine, then this is the perfect option to choose. However, if you installed PHP and MySQL onto another machine that you have access to, either via the Internet or via a Network connection, then you should follow the instructions for Edit Locally, Then Upload To Remote Testing Server. When selected, the only information that the Wizard requires is where you will be storing all of the files associated with your web site. To do this, you can click on the folder icon, and browse to the correct directory. Once you have done this, you can safely proceed to the next stage in the Wizard.
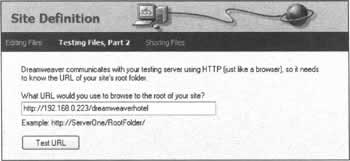
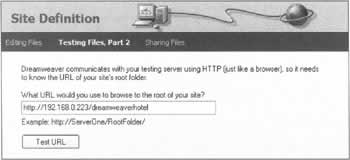
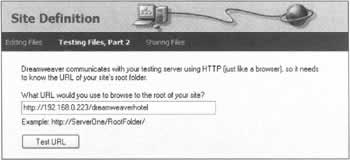
a. Communication with Your Testing Server In this stage of the Site Definition Wizard, you need to enter the web address used to view your web pages in your browser. Since you are editing and testing your files locally, this address can begin with either http://localhost or http://127.0.0.1 - both of these addresses are synonymous, and point to the same location. If you were editing directly on a remote testing server, the address you entered would be prefixed with a different value (which would vary depending on your server and network configuration). Normally it would be the numeric IP Address of the server in question. Once you have entered a value here, you should test the URL using the button provided, to ensure that everything is working fine. If you receive an error message flip forward to the section entitled Connection Errors, but if you get a message stating, "The URL Prefix test was successful", you can proceed to the next stage of the Site Definition Wizard.
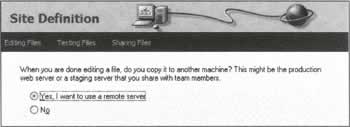
b. Specifying a Remote ServerThis stage of the Wizard determines whether your files will be transferred to another machine, or stored locally. As you have opted to edit and test your files locally, there is no need to specify a remote server at this stage, so you should select 'No'. Click Next to proceed to the summary of your Site Definition (see later).
Edit Locally, Then Upload To Remote Testing ServerYou should select this option if you are designing your pages and uploading them to a server based on a different machine. This option normally applies if you have a secondary machine acting as a server that lives either on your Local Area Network or the Internet. When selected, the only information that is required is the directory path to where your files will be stored on the local machine.
a. Testing Server InformationThe next stage in defining a site consists of giving Dreamweaver the location of your testing server. To do this Dreamweaver needs to know how it should be connecting to the server. Taking a look at the dropdown under the heading 'How do you connect to your test server? you will see the options listed in a dropdown box. We will discuss these now.
I'll set this up laterYou should select this option only if none of the other options in this dialog appropriately describe your configuration, or if you wish to enter all of the settings manually. For the purposes of this step-by-step guide to the Site Definition Wizard, this option will not be used.
Local/NetworkYou should select this option if your development files are stored either on your local machine, or a machine that is accessible through the network file system. When selected, you should enter the full path to the folder where your work is stored, or click on the folder icon and browse to the relevant folder. The final piece of information required by this dialog asks whether or not you wish to refresh the remote file list automatically. The remote file list is shown in the Site panel within the Dreamweaver User Interface, checking this box ensures that all changes made to the contents of the local work folder are also reflected in the remote folder.
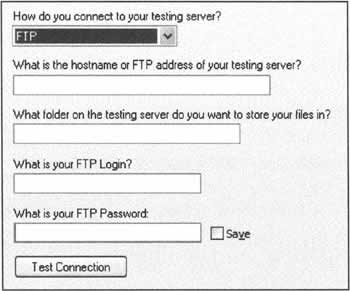
FTPYou should select this option if you edit your files locally, and then upload them to your testing server, or if you edit your files directly on your remote testing server. When selected, the dialog changes and you have a number of other settings to complete. As you can see from the screenshot above, there are a number of additional settings that Dreamweaver requires to make an FTP connection to your server. The hostname or FTP address of your server is likely to be the same as that of your web site itself. If your host provider, or system administrator has given you alternative FTP information, you should employ that here. To complete the configuration of this step, you should complete the name of the folder that your web site will be stored in. The FTP login and Password are essential for connecting to your server and should have been provided to you by either your host provider or network administrator. When you have completed this form, perform the connection test, to ensure that the details you have entered are correct. If upon testing you receive an error message, then some part of the information you have entered is incorrect and you should double-check your settings. If the settings are correct, Dreamweaver will notify you of a successful connection.
RDS - Remote Development ServiceAs previously mentioned, the Remote Development Service is for use with a ColdFusion server. This option should not be used when working with the PHP Server Model.
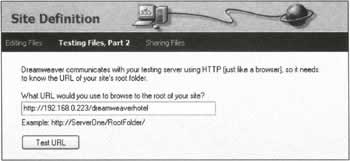
b. Communication with Your Testing Server In this stage of the Site Definition Wizard, you need to enter the web address used to view your web pages with a browser. Once you have entered a value here, you should test the setting using the button provided, to ensure that everything is working fine. If you receive an error message flip forward to the section entitled Connection Errors later in the chapter. However you should receive a message stating, "The URL Prefix test was successful".
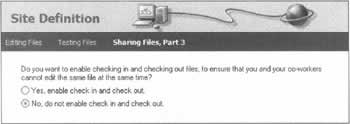
c. Checking in and Checking Out Dreamweaver utilizes a check in - check out system for users who work in a collaborative environment, or for users who work from multiple machines. Checking a file out to work on automatically makes that file unavailable to anyone else. This prevents other members of your workgroup from editing a file that you are currently working on. Checking the file back in automatically makes it available to anyone else who needs it for further amendment. Selecting 'Yes' at this stage presents a few more settings for completion, allowing you complete control over whether Dreamweaver should check out a file, or open a read-only copy of the file. So that other workgroup members can immediately see who is working on which file, you also need to enter your name and e-mail address for the purposes of identification. You can now proceed to the summary (see later).
Edit Directly On Remote Testing Server Using Local NetworkThis option should be selected if none of the files you are working on will be stored on the local machine. This option normally applies if you have a secondary machine acting as a web server on your Local Area Network (LAN) and you want all of the development files to be stored on that machine. This is a very common scenario if you are part of a Workgroup or if you are collaborating with other developers, but there are many developers who are able to run a dedicated web server themselves. This server might be for development purposes only, but it could also provide some remote access so that clients can view a project's development and evolution. If you access your web server via a LAN and do not wish to store your work files on your local computer then this is the ideal option. When selected you can use the folder icon to browse your network file system to find the folder where all of the web site's files will be stored.
Communication with Your Testing Server You need to enter the web address used to view your web pages in your browser. Once you have entered a value here, you should test the setting using the button provided, to ensure that everything is working. If you receive an error message flip forward to the section later in this chapter entitled Connection Errors, but you should receive a message stating, "The URL Prefix test was successful". You can now proceed to the summary (see later).
Edit Directly On a Remote Testing Server Using FTP or RDSAs stated earlier, File Transfer Protocol (FTP) and the Remote Development Service (RDS) are two technologies that allow you to connect to your web server in a relatively secure environment. RDS is a ColdFusion MX technology, and as such doesn't apply here, but FTP is a common method for transferring files to a remote file system, such as that on a web server on the Internet. When transferring web sites from your development server to your production server, you will undoubtedly make use of FTP. Because FTP is a secure method of connection, it is susceptible to something called a 'Time Out'. Quite literally, the FTP Server will only allow you to remain connected for a certain period of time. Once that time has elapsed, you are immediately disconnected. As I'm sure you will realize, with a development environment such as Dreamweaver MX this can cause difficulties, as frequent time-outs can slow the whole process of development, and in this instance it is necessary to dedicate a folder on your local machine for storing your development work. Once you have completed your development, you can immediately transfer the files from your local directory to your web server, without leaving the Dreamweaver interface at all.
a. Testing Server InformationThe next stage in defining a site consists of giving Dreamweaver the location of your testing server. To do this Dreamweaver needs to know how it should be connecting to the server.
b. Communication with Your Testing Server In this stage, you need to enter the web address used to view your web pages in your browser. Once you have entered a value here, you should test it using the button provided, to ensure that everything is working fine. If you receive an error message flip forward to the section entitled Connection Errors later in the chapter. You should receive a message stating, "The URL Prefix test was successful" and proceed to the next stage.
c. Checking In and Checking OutDreamweaver utilizes a check In - check out system for users who work in a collaborative environment, or for users who work from multiple machines. The setup is exactly the same as described in the "Edit locally, then upload to remote server" section.
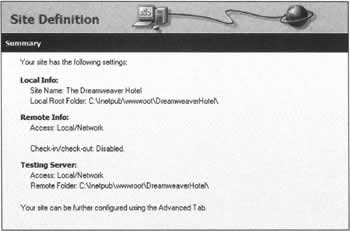
Summary This stage of the Wizard allows you to review all of the values that you have entered. Should you need to amend any of the values, you can use the Back button to return to the appropriate step. Once you have completed the Site Definition Wizard, and clicked Finish, Dreamweaver will automatically create a cache of all the files in your work directory and will automatically refresh the Files panel, to show the contents of your working directory.
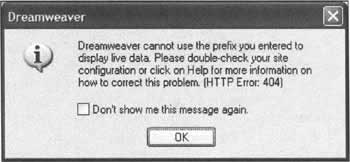
Connection ErrorsIf, when initially testing your connection, you receive an error message similar to the one below, then it is likely that the root URL you entered for your site is incorrect. If you do encounter an error similar to this, then you are given a clue as to the cause of the problem by the message (HTTP Error: 404). This is a standard HTTP error, similar to the kind that you might encounter when browsing the web. In this case 404 means file not found, so it is likely that the address entered is incorrect.
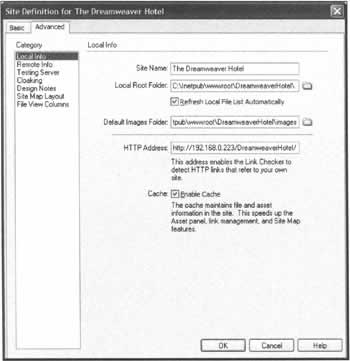
Advanced Site Definition - An OverviewWhilst the Site Definition Wizard is an extremely user-friendly way of defining your site, it hides many of the configuration options available. This is necessary so that the Wizard can provide a simplified and unified approach to defining a site, but this isn't always enough. If you need to change specific configuration options, or access other configuration options not detailed in the Site Definition Wizard, then you need to access the Advanced Site Definition. The Advanced Site Definition can be accessed by clicking on the Advanced tab, when opening the Site Definition Wizard. The screenshot opposite displays the first category, Local Info. As you can see, from the column on the left of the screenshot, there are a number of different categories. Some of these you will immediately recognize as steps within the Site Definition Wizard, and others will be completely new. Due to the nature of an Advanced Site Definition, it is impossible to cater for every applicable configuration scenario, so for this reason we shall work through each of these categories, and describe the options available to you, allowing you to make a more informed choice.
Local InfoThe Local Info category is for defining the settings and options that are applicable to the development environment on the machine that you are using Dreamweaver on. You will already be familiar with a number of the settings here, as they are similar to their corresponding settings in the Site Definition Wizard. However, other settings are new, and have not previously been covered. Default Images Folder is one such setting. This allows you to specify a folder within your web site that is dedicated to storing all the images that are used within it. This is normally a good practice, as some web sites may use literally hundreds of images in different places. Placing these images in a central directory makes them easy to find and easy to manage. Dreamweaver has its own reasons too for wanting to know where your images will be stored, as it can better keep track of all your site's images and make them available within the Assets tab in the File panel. Dreamweaver also uses this information to track links to your images, and uses this information whenever you insert an image stored outside your web site's root folder, to determine where an image must be copied to. The other option, which you will probably be unfamiliar with, is Enable Cache. Cache technology is crucial in the day-to-day working of the Internet. It speeds up connections around the world, and gives users a better experience in general. A cache essentially stores a local copy of the file in question, allowing it to be more quickly accessed, and Dreamweaver's cache works in exactly the same way. By default this option is checked, and when you are developing it works transparently, allowing you to view pages more quickly. Whenever you add, amend, or delete a file in the web site the cache is recreated so as to remain accurate and consistent. It is usually a good idea to leave this option at its default setting.
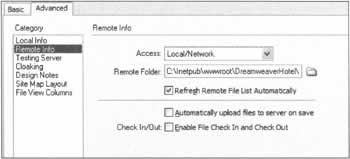
Remote Info The Remote Info category is largely the same as in the Site Definition Wizard, however there is one additional option here, not covered in the Wizard. Automatically upload files to server on save does exactly that; uploads your files to the web server, whenever you save them. This is perfect if you're working one a number of different web pages at the same time, so you can be sure that you don't forget to upload on of the files. However, this option does require that you have an active Internet connection if you connect to a remote server via FTP.
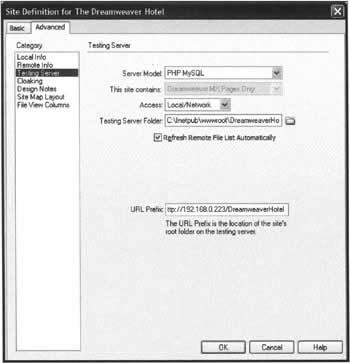
Testing Server One piece of useful information that is completely hidden from you in the Site Definition Wizard is the fact that you can independently configure a testing server to work with Dreamweaver MX. This allows for some developers who have a Development Folder, a Test Site, and a Production Site. We have previously discussed all of the options and settings available here in the Site Definition step-by-step guide.
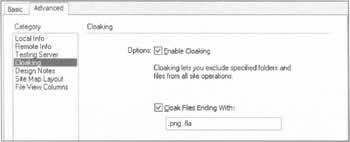
Cloaking Cloaking is a completely new addition to Dreamweaver's functionality, and allows you to specify types of files that you do not want uploading to your web server. Typically these are files that are created during the development of some portion of your web site, but are not used as part of the end product. A good example of this is a Macromedia Flash source file (called an FLA). These files are the canvas used to create the flash animation itself, but aren't used in the final animation. Of course, if these were uploaded to your web server, they would be accessible to everyone, which isn't necessarily appropriate. By enabling cloaking, and specifying the file extensions of files that you do not wish to be uploaded to the web site, you can ensure that they remain safe.
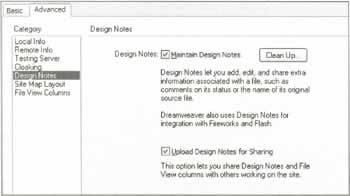
Design Notes Design Notes are useful during the production of a web site, as they allow you to make essential notes about design ideas and tips about a particular file directly within Dreamweaver. If you like, Design Notes are Dreamweaver's version of a Postlt note, and are accessible (optionally) to whomever you share web development tasks with. By default Design Notes are maintained, but you can turn this feature off, though this isn't really recommended, as Design Notes are used to store more than just your information about a file. They also store internal system values, such as recordset information, and can be shared amongst development teams by enabling the Design Notes-sharing option. You can purge all design notes from a site at any time by clicking the "Clean Up..." button.
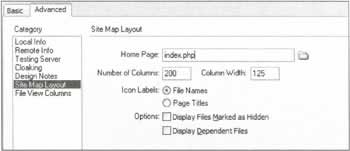
Site Map Layout One of Dreamweaver's most useful features is its ability to diagrammatically show you the structure of your web site. This allows you to view the relationship between various pages easily, as well as see at a glance any broken or orphaned links within your site. All site maps are generated in relation to a specified homepage, so if you wish to take advantage of Site Mapping features, then you should specify the very first page of your site here. Number of Columns and Column Width allow you to control the size of the generated site map, while the Icon Labels options allow you to determine which icons in the site map have descriptive text next to them. Display Files Marked as Hidden ensures that all files (hidden or otherwise) are shown within your site map, so that you can properly see their relationship to other files in your site, whilst Display Dependent Files, displays a list of every file referred to in each page.
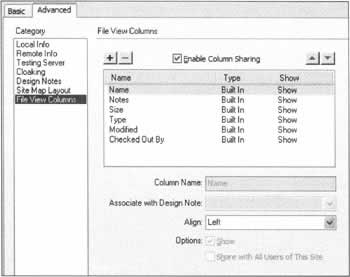
File View Columns File view columns are only available when you click on the This opens up a larger window showing each file within your site, along with a number of associated properties. This category of the Advanced Site Definition allows you to change the order of the columns, add a new column, or delete a column. The actual columns themselves represent properties of each file, and these may be either typical file-related properties, or internal pointers to Dreamweaver references. For example, it is possible to include a column that will specifically map to a value stored as a design note. However, this truly is advanced usage, and is beyond the scope of this book. If you wish to find out more about the customization of the File View Columns, you should consult the Dreamweaver MX User Guide. Now that we have defined our site, and Dreamweaver has all the settings it needs to manage your workflow, all we need to do is to configure a connection to your MySQL database, and you are ready to begin using the full power of the Dreamweaver MX development environment.
Creating a Database ConnectionDatabase connections are very simple to create. Thankfully Dreamweaver MX handles the majority of this process for you. Armed with your MySQL server information, we shall now look at creating a connection to your database. To begin creating a database connection we have to turn to the Application panel, and the Databases tab. Before we proceed, if next to the minus button it says "Document Type: HTML", then you must close the currently open document, and create a new PHP File. Why do you have to do this? Well, this comes back to Dreamweaver's Context Sensitivity that we discussed in Chapter 1. Dreamweaver changes the way it works depending on the task at hand and makes available only the tools that you can use. Unfortunately if the default open document is a plain HTML file, Dreamweaver will not allow access to any of its dynamic behaviors, including connections, as they do not apply to a standard HTML page. Now you have a new blank PHP file open, we can proceed with creating the connection. Returning to the Application panel, click on the plus sign and then click on MySQL Connection. Before we complete this dialog, it is worthwhile noting that there is a standard naming convention for connections. Whilst not entirely necessary, they can help you identify a reference to the connection if you ever delve in Code View. With connections the naming convention is to prefix your chosen name for the connection with the string 'conn'. In this case, as we are using the Dreamweaver Hotel example that we have already introduced, we will call this connection 'connHotel'. The MySQL Server value for this dialog should be the hostname or IP Address of your MySQL Server. If your web server is at www.mysite.org, then you would enter www.mysite.org in the MySQL Server textbox.
When you have entered all of the above information that is relevant to your site, click on the Select... button. This will open a new dialog that will allow you to choose your database. Upon selecting the database from this dialog, click OK, for the name of that database to be entered into the connection dialog. All that now remains is to test the connection by clicking the Test button. If you have entered the correct details, you will be presented with a message informing you that the connection has tested successfully. When this happens, click OK to complete the Connection Definition process. With this is done, Dreamweaver MX automatically updates the Databases tab of the Application Panel. From here you can readily see all of the tables and columns within your Database.
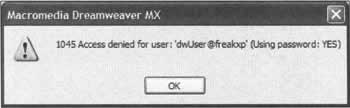
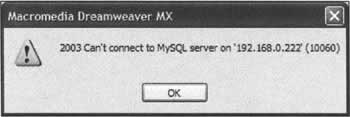
Connection TroubleshootingYou could be forgiven for thinking that a dialog as simple as the connection dialogue doesn't pose any problems. As always, this could never be further from the truth. Here are some common error messages that occur when creating a MySQL Connection: There are a number of reasons why something similar to this error might occur. The most common of these are that the authentication information is incorrect (that is wrong username or password) or that the MySQL Database has been set to deny remote connections. The denial of remote connections is not a standard MySQL configuration option, and it is therefore unlikely to occur when you are running your own server. If you receive an error similar to the one above, then Dreamweaver has been unable to locate your MySQL Server. It is likely that either the server is not running, or that the wrong MySQL Server address has been entered. | |||||||||||||||||||||||||||||||||

EAN: 2147483647
Pages: 88