Hack4.Add Pictures to the Address List
Hack 4. Add Pictures to the Address List
If your Palm device supports it, you can be sure you'll never have trouble putting a name to a face again. With a couple of easy steps, you can add pictures to the entries in your address list, as you can see in Figure 1-9. You need to have a memory card installed on your Palm device and your Palm needs to support this feature. To check, go to the Address List and tap one of the addresses. Tap Edit. If the Edit page says No Image, then your PDA supports images. Figure 1-9. Address view, showing a picture You have a couple of choices. If you are running a PC you can use the Image Converter application to copy files over. You can also just copy the files over directly. 1.5.1. Image ConverterIf you want to use Image Converter, then either run it and select images from there, or from the Windows desktop, right-click on images and hit Send To With Image Converter running, attach your Palm device to the cable or cradle and launch the Data Import application. When Data Import is running, press the Connect button.
You can select images from Image Converter. When you have all of the images selected that you want to transfer and your Palm device is connected via Data Import, then press the Output button. This will bring up a dialog box that prompts you to save the images to a drive. When you run the Data Import button and hit Connect, Windows treats the memory card as a new drive. From the save dialogbox, you can select the Settings button to resize the images or to fit them to a specific size, as you can see in Figure 1-10. The images that are transferred over are not specific to the Address Bookyou can use them for other purposes as well. If you want to size the images specifically for the Address Book, then you are looking at a square size of 88 x 88 pixels on most devices, although Treos use images of 96 x 96 pixels. You can also resize images down if they don't look good when squared to other sizes (e.g., 88 x 66). Figure 1-10. Settings dialog box in Image Converter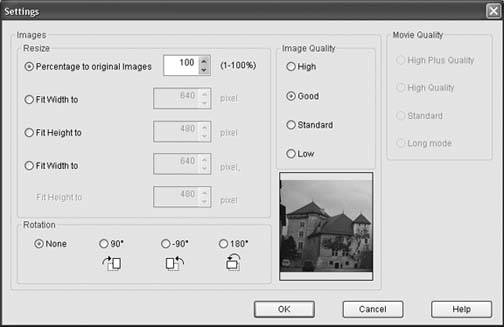 1.5.2. Direct CopyingYou can also directly copy files from your desktop machine to the correct location on the memory card. Note that Address Book images are displayed at a maximum of 88 x 88 pixels. If the image is smaller than that in both dimensions, it will be scaled up. If the image is longer in one dimension than in the other, then the longest dimension will be scaled to 88 pixels. If you want the best images in the Address Book, then you should scale the images down on the desktop so that they look good at 88 pixels. The Gimp (http://www.gimp.org) is a great program for doing this kind of manipulation. You can copy over either JPEGs or Windows bitmaps. The location on the memory card is something like: /DCIM/<filename>.jpg (or .bmp). If this path doesn't already exist on your expansion card, go ahead and create it and put your image files there. This should work on most devices. If it doesn't work on your device, try using the Image Converter (or related software such as Data Export) from the desktop to copy over some images. Then check your memory card to see where the images were stored. 1.5.3. Address BookAfter you have loaded some pictures on to your Palm device, run Address Book. Tap on a name to add an image to it. Tap on Edit, and tap the words No Image (or the existing image if you want to replace it). This will bring up a pop-up menu that lets you remove the image from the address or choose a different image. From the image chooser, the images you transferred should be visible. Choose the one you want and it should appear. |
 Image Converter from the pop-up menu.
EAN: 2147483647
Pages: 115
- Article 240 Overcurrent Protection
- Article 352 Rigid Nonmetallic Conduit Type RNC
- Article 360 Flexible Metallic Tubing Type FMT
- Article 406: Receptacles, Cord Connectors, and Attachment Plugs (Caps)
- Example No. D10 Feeder Ampacity Determination for Adjustable-Speed Drive Control [See 215.2, 430.24, 620.13, 620.14, 620.61, Tables 430.22(E), and 620.14]