Data Controls
Overview
It's often remarked that a large percentage of Windows applications are little more than attractive window dressings over a relational database. This is especially true of the internal software that powers most businesses. The chief responsibility of this type of software is to allow highly structured data entry and provide reportgenerating modules that summarize vast quantities of information. As a result, a great deal of thought (and code) is usually concentrated in the user interface tier.
Of course, databases aren't only used for workflow and administrative software. Almost every application needs to connect to a data source and retrieve, format, and display information at some point. Even an Internet e-commerce site is really just an interactive product catalog that draws information from one table and logs transactions in another. The situation becomes more complicated with Windows applications, which provide a wide range of user interface options for displaying data.
This chapter considers how you can use Windows controls with data. I'll also share some advice about how to do it without hopelessly intermingling details about your data source in your user interface code. You'll consider three fundamental topics:
- How to use .NET's data-binding framework with any generic control. You'll also learn about the specialized DataGrid control.
- How to create "data aware" controls-controls that interact efficiently and intelligently with data sources without requiring data binding.
- How to use adapter classes and miscellaneous wizardry to help automate the shuffle of information through the levels of your application, and write more focused code.

 Companion Web Site
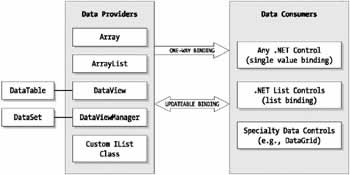
Basic Data BindingAlmost every control in .NET supports data binding in one form or another. However, different controls support data binding in different ways. For example, when binding to a text box, button, or image control, you will usually bind to the TextBox.Text, Button.Text, or PictureBox.Image property (although there are other possibilities, as you'll discover shortly). Each of these properties can bind to a single piece of information at a time. On the other hand, a control like ListBox or CheckedListBox can hold an entire list of data or the contents of a single field from a database. Last, there are rich controls like DataGrid that can display all the information from a DataSet on their own. You don't need to create any database code to start working with data binding. .NET allows controls to bind to any class that implements the IList interface. Possible data sources include the following:
Figure 9-1 shows the relationship between data providers and data consumers.
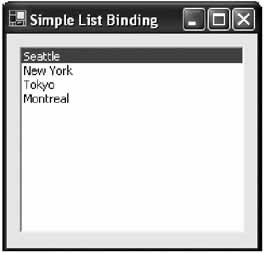
Simple List BindingBinding to a list is one of the most common data binding tasks. All the basic .NET list controls supply a DataSource property that accepts a reference to any IList data source. To test out simple data binding, create and fill an array, and bind it to a list using the DataSource property:
string[] cityChoices = {"Seattle", "New York", "Tokyo", "Montreal"};
lstCity.DataSource = cityChoices;
The list appears with the items from the array preloaded (see Figure 9-2).
There are two caveats: First, the Items collection of the list control is now read-only and can't be modified in your code. Second, if you change the contents of the array, the modifications do not appear in the list unless you clear the current binding and then rebind the list to the array.
string[] cityChoices = {"Seattle", "New York", "Tokyo", "Montreal"};
lstCity.DataSource = cityChoices;

// This change will not appear in the list.
cityChoices[3] = "Toronto";

// To update the list, you must rebind it.
lstCity.DataSource = null;
lstCity.DataSource = cityChoices;
If you want to provide for more flexibility, you can circumvent data binding and just copy the array items into the list:
string[] cityChoices = {"Seattle", "New York", "Tokyo", "Montreal"};
lstCity.Items.AddRange(cityChoices);
Though this approach appears to be equivalent, there are several differences. First, existing entries in the list remain in place. Second, you are free to modify the Items collection of the list. However, the most important differences may not appear until you begin to bind multiple controls simultaneously, as you see a little later in this chapter. Binding Lists to Complex ObjectsYou can also bind a list control to a more complex object that provides several different fields of data. In this case, you still bind to the entire data source, but the DisplayMember property configures what text is used for each list entry. DisplayMember accepts a string that identifies a property in the data source. For example, you could create an array of special City objects and bind it to a list. You would then specify the property from the City class that should be used for the text. Note that the DisplayMember cannot be a public member variable. Instead, it must be a full property procedure. Consider the sample City class shown in the code that follows. It defines two properties and a constructor for easy initialization.
public class City
{
 private string name;
 private string country;

 public string Name
 {
 get
 {
 return name;
 }
 set
 {
 name = value;
 }
 }
 public string Country
 {
 get
 {
 return country;
 }
 set
 {
 country = value;
 }
 }

 public City(string name, string country)
 {
 this.Name = name;
 this.Country = country;
 }
}
You could bind this in an array as follows:
City[] cityChoices = {new City("Seattle", "U.S.A."),
 new City("New York", "U.S.A."), new City("Tokyo", "Japan"),
 new City("Montreal", "Canada")};

lstCity.DataSource = cityChoices;
lstCity.DisplayMember = "Name";
The list looks and behaves exactly the same as the simple array example. The only difference is that when you retrieve the currently selected item, you find that it's a full City object, complete with all the City properties. That allows you to store your data directly in a control, without needing to worry about retaining other collections. To test this out, add the following code, and attach it to the lstCity.DoubleClick event that fires when an item in the list is double-clicked:
private void lstCity_DoubleClick(object sender, System.EventArgs e)
{
 MessageBox.Show(((City)lstCity.SelectedItem).Country);
}
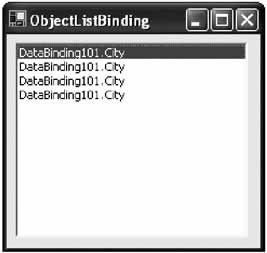
One interesting thing to note is what happens if you don't set the DisplayMember property. In this case, .NET simply calls the ToString() method of each object, and uses that to provide the text. Typically, this is the fully qualified class named, which means that every list appears exactly the same, as shown in Figure 9-3.
However, you can put this behavior to good use by creating an object with an overriden ToString() method. This method could return some more useful information or a combination of different properties. Here's an example:
public class City
{
 private string name;
 private string country;

 public string Name
 {
 get
 {
 return name;
 }
 set
 {
 name = value;
 }
 }

 public string Country
 {
 get
 {
 return country;
 }
 set
 {
 country = value;
 }
 }

 public City(string name, string country)
 {
 this.Name = name;
 this.Country = country;
 }

 public override string ToString()
 {
 return Name + ", " + Country;
 }
}
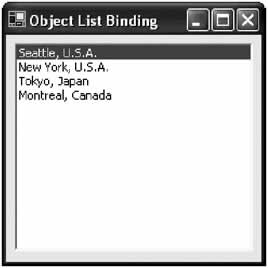
You then bind it without setting the DisplayMember property.
City[] cityChoices = {new City("Seattle", "U.S.A."),
 new City("New York", "U.S.A."), new City("Tokyo", "Japan"),
 new City("Montreal", "Canada")};

lstCity.DataSource = cityChoices;
The result of this code, using the overridden version of the ToString() method, is shown in Figure 9-4.
Single Value Binding.NET list controls are designed for this type of data binding and provide a helpful DataSource property that's inherited from the base ListControl class. Other controls, like text boxes and buttons, don't add this feature. However, every control gains basic single-value data binding ability from the Control.DataBindings collection. Using this collection, you can link any control property to a field in a data source. To connect a text box to an array, you can use the following syntax:
string[] cityChoices = {"Seattle", "New York", "Tokyo", "Montreal"};
txtCity.DataBindings.Add("Text", CityChoices, "");
The first parameter is the name of the control property as a string. (.NET uses reflection to find the matching property, but it does not detect your mistakes at compile time.) The second parameter is the data source. The third parameter is the property or field in the DataSource that is used for the binding. In this case, the data source only has one set of information, so an empty string is used. The results of this code are a little perplexing. The text for the first city appears in the text box, but there won't be any way to move to other items. Programmers who are familiar with traditional data binding will probably expect that they need to add a clumsy workaround to the form, like a special navigation control. This isn't the case. Instead, you have two options-controlling navigation programmatically, which you look at a little later, or adding a list control to provide simple navigation. For example, you can combine the list control example and the text box example to try out multiple control binding. Whatever item is selected in the list box appears in the text box. You'll also notice that the text in the text box is still editable, although the changes have no effect (see Figure 9-5).
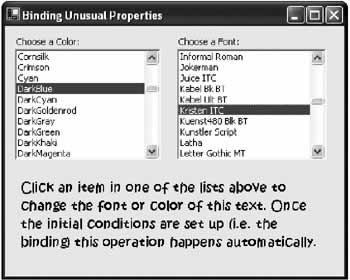
The nicest thing about single-value binding is that it can be used with almost any property. For example, you could set the background color of a text box, or specify the font. Unfortunately, there is no implicit type conversion when setting these specialized properties, which means you can't easily convert a string representing a font name into an actual font object. The code example that follows demonstrates some of the extra effort you need to go through if you want to bind one of these properties. It makes for an interesting example of extreme data binding. For it to work it requires that the System.Drawing namespace be imported.
// These are our final data sources: two ArrayList objects.
ArrayList fontObjList = new ArrayList();
ArrayList colorObjList = new ArrayList();

// The InstalledFonts collection allows us to enumerate installed fonts.
// Each FontFamily needs to be converted to a genuine Font object
// before it is suitable for data binding to the Control.Font property.
InstalledFontCollection InstalledFonts = new InstalledFontCollection();
foreach (FontFamily family in InstalledFonts.Families)
{
 try
 {
 fontObjList.Add(new Font(family, 12));
 }
 catch
 {
 // We end up here if the font could not be created
 // with the default style.
 }
}

// In order to retrieve the list of colors, we need to first retrieve
// the strings for the KnownColor enumeration, and then convert each one
// into a suitable color object.
string[] colorNames;
colorNames = System.Enum.GetNames(typeof(KnownColor));
TypeConverter cnvrt = TypeDescriptor.GetConverter(typeof(KnownColor));

foreach (string colorName in colorNames)
{
 colorObjList.Add((KnownColor)Color.FromKnownColor(
 cnvrt.ConvertFromString(colorName)));
}

// We can now bind both our list controls.
lstColors.DataSource = colorObjList;
lstColors.DisplayMember = "Name";
lstFonts.DataSource = fontObjList;
lstFonts.DisplayMember = "Name";

// The label is bound to both data sources.
lblSampleText.DataBindings.Add("ForeColor", colorObjList, "");
lblSampleText.DataBindings.Add("Font", fontObjList, "");
You'll notice that the ForeColor and Font properties of the text box are simultaneously bound to two different data sources, which doesn't require any additional code. Some work is involved, however, to retrieve the list of currently installed fonts and named colors. The application is shown in Figure 9-6.
|
||||||||||||||||||||||||

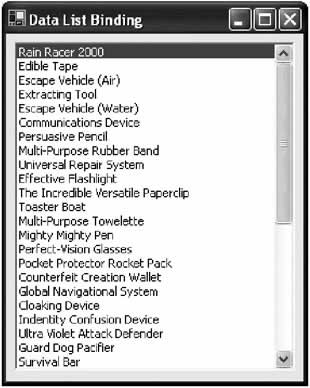
ADO NET Data BindingOne of the most common applications of data binding is with ADO.NET data objects. This type of binding is easy, painless, and built on one of .NET's core standards. The basic principle is the same for binding collections of custom objects. However, instead of specifying a property name with the DisplayMember, you use it to indicate the database field name. The following example uses this technique to bind to the ModelName column in a DataTable. It uses information drawn from Microsoft's sample IBuySpy e-commerce Web application. The result is shown in Figure 9-7.
DataSet dsStore = new DataSet();
dsStore.ReadXmlSchema(Application.StartupPath + "\store.xsd");
dsStore.ReadXml(Application.StartupPath + "\store.xml");

lstName.DataSource = dsStore.Tables["Products"];
lstName.DisplayMember = "ModelName";
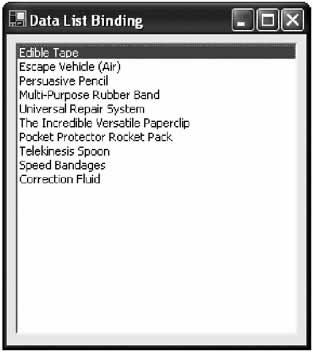
In this example, the code appears to bind to a DataTable object, but it actually binds to the DataTable.DefaultView property. This property provides a DataView object that implements the required IList interface. For the most part, you can ignore this lower-level reality, unless you want to use the DataView object to customize the displayed data. For example, the code that follows doesn't change the actual information in the DataTable, but it does ensure that only a subset of it will be shown in the list control: DataSet dsStore = new DataSet(); dsStore.ReadXmlSchema(Application.StartupPath + "\store.xsd"); dsStore.ReadXml(Application.StartupPath + "\store.xml"); dsStore.Tables["Products"].DefaultView.RowFilter = "UnitCost < 5"; lstName.DataSource = dsStore.Tables["Products"]; lstName.DisplayMember = "ModelName"; Figure 9-8 shows the filtered list.
The DataView class provides other properties that allow you to implement sorting, and to specify whether the data-bound collection allows deletions, additions, and modifications (these properties don't apply to the list control, which never allows the modification of a bound data source). Taken together, these options provide an extra layer of indirection, which allows your code to be more flexible. Table 9-1 shows useful DataView members and a description of each.
You can also bind to a list control with the following syntax. The result is the same, but in this case the DataSet.DefaultViewManager is used for the data binding. This property contains a DataViewManager object for the entire DataSet. The DisplayMember property then specifies the appropriate table and field. DataSet dsStore = new DataSet(); dsStore.ReadXmlSchema(Application.StartupPath + "\store.xsd"); dsStore.ReadXml(Application.StartupPath + "\store.xml"); lstName.DataSource = dsStore; lstName.DisplayMember = "Products.ModelName";
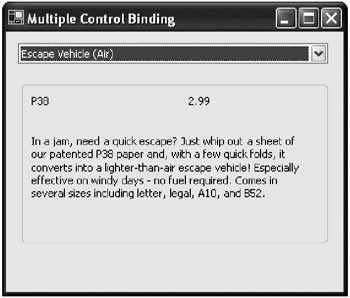
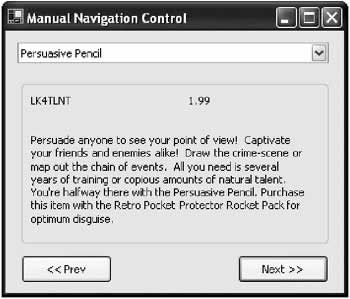
Multiple Control BindingThe next example shows a more practical use of data binding. The information from a product record is displayed on a form using a combination of three labels and a drop-down list control. This list control allows navigation—when the user selects a different model name, the other data bound controls are updated automatically without requiring any code. Here's the complete code for this example:
public class MultipleControlBinding : System.Windows.Forms.Form
{
 // (Windows designer code omitted.)

 internal System.Windows.Forms.ComboBox cboModelName;
 internal System.Windows.Forms.Label lblDescription;
 internal System.Windows.Forms.Label lblUnitCost;
 internal System.Windows.Forms.Label lblModelNumber;
 private void MultipleControlBinding_Load(object sender, System.EventArgs e)
 {
 DataSet dsStore = new DataSet();

 dsStore.ReadXmlSchema(Application.StartupPath + "\store.xsd");
 dsStore.ReadXml(Application.StartupPath + "\store.xml");

 cboModelName.DataSource = dsStore.Tables["Products"];
 cboModelName.DisplayMember = "ModelName";

 lblModelNumber.DataBindings.Add("Text",
 dsStore.Tables["Products"], "ModelNumber");
 lblUnitCost.DataBindings.Add("Text",
 dsStore.Tables["Products"], "UnitCost");
 lblDescription.DataBindings.Add("Text",
 dsStore.Tables["Products"], "Description");
 }
}
Figure 9-9 shows the resulting form.
Updating with Data BindingAs was described earlier, you can perform basic binding with any IList data source. However, data sources that implement additional interfaces can gain some extra features. Four such interfaces are listed in Table 9-2.
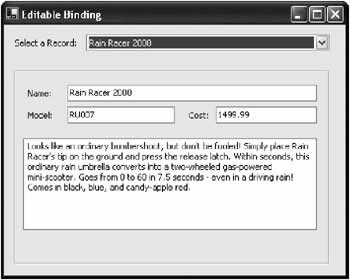
The DataView, DataViewManager, and DataRowView ADO.NET objects work together to implement all these interfaces. This means that when you bind to a DataSet, you acquire a much greater level of functionality. For example, if you modify the multiple control sample to use input controls, you will be able to make changes that permanently modify the DataSet. When you navigate to a changed record, you will see that its change persists. Furthermore, if multiple controls display the same data (for example, if you use a list control for navigation and allow the same field to be modified in a text box) they will all be updated with the new content when you browse back to the record. You can see this behavior with the product name field in the example that follows. The code is largely unchanged. The key difference is that the Label controls are replaced with TextBox controls. Figure 9-10 shows the corresponding form.
DataSet dsStore = new DataSet();
dsStore.ReadXmlSchema(Application.StartupPath + "\store.xsd");
dsStore.ReadXml(Application.StartupPath + "\store.xml");

cboModelName.DataSource = dsStore.Tables["Products"];
cboModelName.DisplayMember = "ModelName";

txtModelName.DataBindings.Add("Text", dsStore.Tables["Products"], "ModelName");
txtModelNum.DataBindings.Add("Text", dsStore.Tables["Products"], "ModelNumber");
txtUnitCost.DataBindings.Add("Text", dsStore.Tables["Products"], "UnitCost");
txtDesc.DataBindings.Add("Text", dsStore.Tables["Products"], "Description");
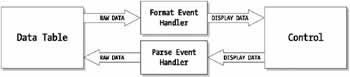
Of course, changes made to the data set won't affect the original data source (whether it is a database or an XML file, as it is in this case). Remember, the DataSet is always disconnected by nature. To commit changes, you need to add something like an update button, which would then use the WriteXml() method (in your example), or the DataAdapter.Update() method (to update a relational database). But because this book only covers the user interface aspect of your code, I won't explore these options. Formatting Data Before BindingOne limitation in your current example is that there is no way to handle data that needs to be formatted before it can be displayed. (Occasionally, you may have values that come out of a database in a less-than-professional looking state. For example, certain fields might use hard-coded numbers that are meaningless to the user, or use a confusing short form.) There's also no way to do the converse—take user supplied data, and convert it to a representation suitable for the appropriate field. Luckily, both tasks are easy provided you handle the Format and Parse events for the Binding object. Format gives you a chance to modify values as they exit the database (before they appear in a data bound control). Parse allows you to take a user-supplied value and modify it before it is committed to the data source. Figure 9-11 shows the process.
Here's an example that works with the UnitCost variable. It formats the numeric (decimal) value as a currency string when it's requested for display in a text box. The reverse process ensures that the final committed value doesn't use the currency symbol. To connect this logic, you need to create the Binding object, register to receive its events, and then add it to the DataBindings collection. Notice that the following code adds a trick—it registers for the DataTable's ColumnChanged event. This way, you can verify what value is actually inserted into the DataSet.
DataSet dsStore = new DataSet();
dsStore.ReadXmlSchema(Application.StartupPath + "\store.xsd");
dsStore.ReadXml(Application.StartupPath + "\store.xml");

cboModelName.DataSource = dsStore.Tables["Products"];
cboModelName.DisplayMember = "ModelName";

// Create the binding.
Binding costBinding = new Binding("Text", dsStore.Tables["Products"],
 "UnitCost");

// Connect the methods for formatting and parsing data.
costBinding.Format += new ConvertEventHandler(DecimalToCurrencyString);
costBinding.Parse += new ConvertEventHandler(CurrencyStringToDecimal);

// Add the binding.
txtUnitCost.DataBindings.Add(costBinding);

// Register an event handler for changes to the DataTable.
dsStore.Tables["Products"].ColumnChanged += new EventHandler (TableChanged);
The event-handling code for formatting simply returns the new converted value by setting the e.Value property.
private void DecimalToCurrencyString(object sender, ConvertEventArgs e)
{
 if (e.DesiredType == typeof(string))
 {
 // Use the ToString method to format the value as currency ("c").
 e.Value += ((decimal)e.Value).ToString("c");
 }
}

private void CurrencyStringToDecimal(object sender, ConvertEventArgs e)
{
 if (e.DesiredType == typeof(decimal))
 {
 // Convert the string back to decimal using the static Parse method.
 e.Value = Decimal.Parse(e.Value.ToString(),
 System.Globalization.NumberStyles.Currency, null);
 }
}
The DataTable.ColumnChanged event handler is quite straightforward. It notes the changes by updating a label.
private void TableChanged(object sender, System.Data.DataColumnChangeEventArgs e)
{
 lblStatus.Text = "Detected change. Column " + e.Column.ColumnName;
 lblStatus.Text += " updated to " + e.ProposedValue.ToString() + ".";
}
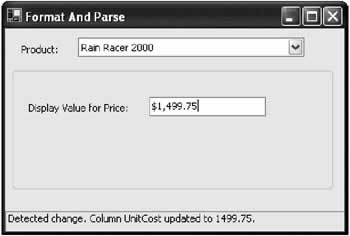
Figure 9-12 shows the form after changing a value.
Advanced ConversionsYou can use a similar technique to handle more interesting conversions. For example, you could convert a column value to an appropriate string representation, straighten out issues of case, or ensure the correct locale-specific format for dates and times. Here's one example that compares hard-coded integers from the database against an enumeration:
private void ConstantToString(object sender, ConvertEventArgs e)
{
 if (e.DesiredType == getType(string))
 {
 switch (e.Value)
 {
 case ProjectStatus.NotStarted:
 e.Value = "Project not started.";
 break;
 case ProjectStatus.InProgress:
 e.Value = "Project in progress.";
 break;
 case ProjectStatus.Complete:
 e.Value = "Project is complete.";
 break;
 }
 }
}
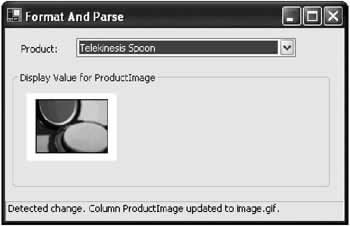
Now let's look at an additional trick that's useful when storing records that link to pictures. When storing a record that incorporates a graphic, you have two options. You can store the image as binary information in the database (which is generally less flexible but more reliable), or you can store the filename, and ensure that the file exists in the appropriate project directory. The next example uses the Format event to convert a picture name to the required Image object. Unfortunately, data binding is always a two-way street, and if you implement a Format event handler, you need to create a corresponding Parse event handler to reverse your change. In our example, the Format event handler takes the filename, and inserts the corresponding picture into a PictureBox. In the event handler, the code needs to take the picture, change it to the appropriate filename string, and insert this into the DataTable. This bidirectional conversion is required even though the application doesn't offer any way for the user to choose a new picture file, and the content in the PictureBox can't be changed. To make matters more complicated, there's no way to convert an image object back to the filename, so we have to fall back on another trick: storing the actual filename in the control, for retrieval later. Here's the data binding code:
cboModelName.DataSource = dsStore.Tables["Products"];
cboModelName.DisplayMember = "ModelName";

Binding pictureBinding = new Binding("Image", dsStore.Tables["Products"],
 "ProductImage");
pictureBinding.Format += new ConvertEventHandler(FileToImage);
pictureBinding.Parse += new ConvertEventHandler(ImageToFile);

picProduct.DataBindings.Add(pictureBinding);
And here is the formatting code (note that it requires the System.Drawing namespace to be imported):
private void FileToImage(object sender, ConvertEventArgs e)
{
 if (e.DesiredType == typeof(Image))
 {
 // Store the filename.
 picProduct.Tag = e.Value;

 // Look up the corresponding file, and create an Image object.
 e.Value = Image.FromFile(Application.StartupPath + "\" + e.Value);
 }
}

private void ImageToFile(object sender, ConvertEventArgs e)
{
 if (e.DesiredType == typeof(string)) {
 {
 // Substitute the filename.
 e.Value = picProduct.Tag;
 }
}
This can only be considered a "conversion" in the loosest sense. What's really happening here is a file lookup. The process, however, is completely seamless. If you allow the user to dynamically choose a picture (maybe from a file or the clipboard), you could even create a corresponding Parse event handler that saves it to the appropriate directory with a unique name and then commits that name to the database.
Row Validation and ChangesNow that you realize how easy it is to commit changes to a bound DataSet, you are probably wondering what you can do to restrict the user's update ability—making sure some fields are read-only and others are bound by specific rules. This validation can be performed in exactly the same way it always is—by handling events like KeyPress in a text box, or using the validation techniques described in Chapter 4. These controls behave exactly like ordinary .NET controls—the only difference is that their changes are stored in the DataSet as soon as the user navigates to another record. Resist the urge to enter error-handling code into the Parse event handler. This method is purely designed to convert a value before attempting to store it. Instead, you can handle ordinary DataTable events like ColumnChanging. Here is an example that uses the ColumnChanging event, and refuses to allow a change to the UnitCost column if the number is negative. Instead, it substitutes the existing value, effectively canceling the change.
private void TableChanging(object sender,
 System.Data.DataColumnChangeEventArgs e)
{
 if (e.ProposedValue < 0)
 {
 e.ProposedValue = e.Row[e.Column.ColumnName];
 }
}
To use this code, you need to connect the event handler (typically at the same time you add the data binding): dsStore.Tables["Products"].ColumnChanging += new DataColumnChangeEventHandler(TableChanging); This code is useful as a basic level of error protection, but it doesn't provide an easy way to notify the user about the error, because the user has more than likely already moved to another record. In some cases you may need to prevent the user from navigating to a new record after making invalid changes. To apply this logic, you need to take manual control of record navigation. This technique is explored in the next section. The interesting question in these multiple control examples is how the controls work in conjunction with each other. If you know a little about ADO.NET, you'll remember that the DataSet is always disconnected for the data source, and doesn't provide any cursor or bookmark to store a current position (unlike the traditional ADO Recordset). Similarly, ordinary classes like arrays and ArrayList collections certainly don't have this capability. So where does it come from? The next section considers what's really at work in data binding, and shows how you can interact with it programmatically. |
|||||||||||||||||||||||||||||||||||||||||||||||||||||||||||||||||||||||||
Data Binding ExposedThe secret behind data binding lies in two objects that you don't ordinarily see: BindingContext and CurrencyManager. Every Windows Form provides a BindingContext object. In turn, every BindingContext provides a collection of zero or more CurrencyManager objects. Both objects are contained in the System.Windows.Forms namespace. The CurrencyManager object shoulders the responsibility for tracking the user's position in the bound data and synchronizing all the controls that are bound to it. To this end, the CurrencyManager provides a small set of properties, including Count, and the ever-important Position, which indicates an integer row index. It performs its work automatically. The BindingContext object, on the other hand, creates CurrencyManager objects as required. Depending on how you configure your form, you could have several different CurrencyManager objects, allowing you to bind to different data sources (or different positions in the same data source). Figure 9-14 diagrams this relationship.
There are really only three reasons that you might want to access the data binding objects:
Navigation with Data BindingTo navigate programmatically you need to access the form's BindingContext object, and modify its Position property. Unfortunately, to find the correct BindingContext object, you need to submit the data source object. That means you either need to store the data source in a form-level variable, or create a form-level variable to track the binding object. The following example demonstrates the second technique with the DataSet product example. First, create the variable for storing the BindingContext object: private BindingManagerBase storeBinding; Next, in the Form.Load event handler create the bindings and store a reference to the binding object. The only new line is highlighted in bold.
private void MultipleControlBinding_Load(object sender, System.EventArgs e)
{
 DataSet dsStore = new DataSet();
 dsStore.ReadXmlSchema(Application.StartupPath + "\store.xsd");
 dsStore.ReadXml(Application.StartupPath + "\store.xml");

 cboModelName.DataSource = dsStore.Tables["Products"];
 cboModelName.DisplayMember = "ModelName";

 lblModelNumber.DataBindings.Add("Text", dsStore.Tables["Products"],
 "ModelNumber");
 lblUnitCost.DataBindings.Add("Text", dsStore.Tables["Products"], "UnitCost");
 lblDescription.DataBindings.Add("Text", dsStore.Tables["Products"],
 "Description");
 storeBinding = this.BindingContext[dsStore.Tables["Products"]];
}
Now you can control the position through the StoreBinding object. Here's an example with Previous and Next buttons that allows the user to browse through the data (see Figure 9-15):
private void cmdPrev_Click(object sender, System.EventArgs e)
{
 storeBinding.Position--;
}

private void cmdNext_Click(object sender, System.EventArgs e)
{
 storeBinding.Position++;
}
Reacting to Record NavigationAs it stands, the navigation controls harmlessly fail to work if you try to browse past the bounds of the data source (for example, click the Previous button on the first record). However, a more intuitive approach would be to disable the controls at this position. You can accomplish this by reacting to the Binding.PositionChanged event. First, you connect the event handler (after binding the data source): storeBinding = this.BindingContext[dsStore.Tables["Products"]]; storeBinding.PositionChanged += new EventHandler(Binding_PositionChanged); The PositionChanged event doesn't provide you with any useful information (such as the originating page). But it does allow you to respond and update your controls accordingly. In the example below, the previous and next buttons are disabled when they don't apply.
private void Binding_PositionChanged(object sender, System.EventArgs e)
{
 if (storeBinding.Position == storeBinding.Count - 1)
 {
 cmdNext.Enabled = false;
 }
 else
 {
 cmdNext.Enabled = true;
 }

 if (storeBinding.Position == 0)
 {
 cmdPrev.Enabled = false;
 }
 else
 {
 cmdPrev.Enabled = true;
 }
}
If you want to be able to track the previous record, you need to add a formlevel variable and track it in the PositionChanged event handler. This technique has a few interesting uses, including validation (which you examine later in this chapter).
private int currentPage;

private void Binding_PositionChanged(object sender, EventArgs e)
{
 // At this point, currentPage holds the previous page number.
 // Now we update currentPage:
 currentPage = storeBinding.Position;
}
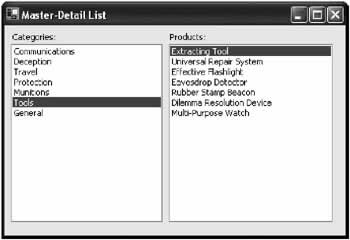
Creating Master Detail FormsAnother interesting use of the PostionChanged event is to create master-detail forms. The concept is simple: you bind two controls to two different tables. When the selection in one table changes, you update the second by modifying the set of displayed rows with the RowFilter property. This example uses two list controls, one that displays categories and one that displays the products in a given category. The lists are filled in the normal manner:
private BindingManagerBase categoryBinding;
private DataSet dsStore = new DataSet();

private void MasterDetail_Load(object sender, System.EventArgs e)
{
 dsStore.ReadXmlSchema(Application.StartupPath + "\store.xsd");
 dsStore.ReadXml(Application.StartupPath + "\store.xml");

 lstCategory.DataSource = dsStore.Tables["Categories"];
 lstCategory.DisplayMember = "CategoryName";

 lstProduct.DataSource = dsStore.Tables["Products"];
 lstProduct.DisplayMember = "ModelName";

 categoryBinding = this.BindingContext[dsStore.Tables["Categories"]];

 categoryBinding.PositionChanged += new EventHandler(Binding_PositionChanged);

 // Invoke method once to update child table at startup.
 Binding_PositionChanged(null,null);
}
Now, when the PositionChanged event is detected for the category binding, the current view of products is automatically modified:
private void Binding_PositionChanged(object sender, System.EventArgs e)
{
 string filter;
 DataRow selectedRow;

 // Find the current category row.
 selectedRow = dsStore.Tables["Categories"].Rows[categoryBinding.Position];

 // Create a filter expression using its CategoryID.
 filter = "CategoryCategoryID"].ToString() + ""';

 // Modify the view onto the product table.
 dsStore.Tables["Products"].DefaultView.RowFilter = filter;
}
The result is a perfectly synchronized master-detail list, as shown in Figure 9-16.
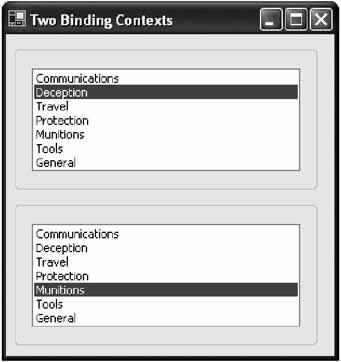
Creating a New Binding ContextIn the previous example, both controls were synchronized separately and had separate binding contexts because they were bound to two different tables (and hence two different DataViewManager objects). In some cases, however, you might want the ability to bind to two different positions in the same table (or any other data source). To accomplish this, you need to manually create an extra binding context. The last task is easy. All you need to do is place the controls that you want in different binding contexts into different container controls (like a group box). Before you bind the data to the controls in the group boxes, manually create a new BindingContext object for one of them. Voila-you have two sets of controls that are synchronized separately. The code that follows carries out this operation for two list controls in different group boxes. // Make sure all the controls in this group box have a different binding. grpCategory.BindingContext = new BindingContext(); DataSet dsStore = new DataSet(); dsStore.ReadXmlSchema(Application.StartupPath + "\store.xsd"); dsStore.ReadXml(Application.StartupPath + "\store.xml"); // Configure the first group. lstCategory.DataSource = dsStore.Tables["Categories"]; lstCategory.DisplayMember = "CategoryName"; // Configure the second group. lstProduct.DataSource = dsStore.Tables["Categories"]; lstProduct.DisplayMember = "CategoryName"; Figure 9-17 shows the separately synchronized panels.
|
||||||||||||||||||

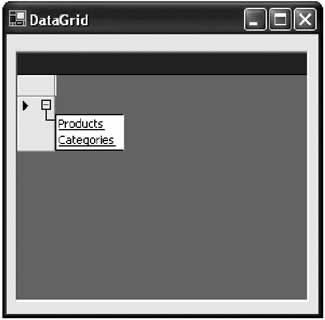
The DataGrid ControlThe DataGrid is perfect for those who want a single data control that can do everything on its own. Even with some impressive column mapping features, it's still not as customizable or flexible as the approaches you've looked at so far, and the visual appearance doesn't provide much variety (multiline text columns, for example, are not supported except when editing a row). If you need a perfect super-grid control, you are likely to find that many custom options will soon appear on the network, and these third-party controls are likely to have a far wider range of features and much more customizability. Still, the DataGrid control is useful in the true, rapid application design spirit. It even provides simple userediting functionality. To use the DataGrid, you only need to assign a table or DataSet to its DataSource property. If you use an entire DataSet, the DataGrid provides special navigation links that allow you to browse to any of the tables it contains (see Figure 9-18).
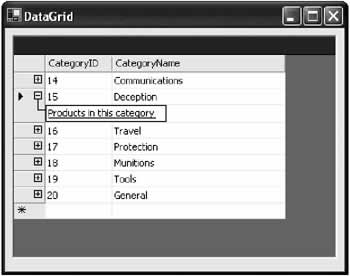
DataGrid RelationsYou can also make use of these navigation links to create a master-detail list. All you need to do is create the appropriate table relations first.
// Create a relation between categories and products.
DataRelation dr = new DataRelation("Products in this category",
 dsStore.Tables["Categories"].Columns["CategoryID"],
 dsStore.Tables["Products"].Columns["CategoryID"]);

// Add the relation to the DataSet.
dsStore.Relations.Add(dr);

// Bind the data grid.
dataGrid1.DataSource = dsStore.Tables["Categories"];
It's not as flexible as our custom solution for master-detail forms, but it works well with little tweaking required. Figure 9-19 shows the master-details list.
DataGrid Column MappingOrdinarily, the DataGrid uses default header text and column widths and adds every field from the data source. In typical use, however, you may need to change cryptic field names, expand some columns to fit data, hide others, and choose the order they are displayed in. To do this, you need to create a DataGridTableStyle collection and add column objects that represent every column you want displayed. When you add this collection to the DataGrid.TableStyles property, the DataGrid changes its default behavior, and only displays the columns contained in the collection. It also abides by all the column settings you have configured. Here is an example that configures a DataGrid to show only one field: // Create the column collection. DataGridTableStyle columns = new DataGridTableStyle(); columns.MappingName = "Products"; // Create and configure the columns you want to display. DataGridTextBoxColumn colDescription = new DataGridTextBoxColumn(); colDescription.HeaderText = "Description of Product"; colDescription.Width = 500; colDescription.MappingName = "Description"; // Add the columns to the collection. columns.GridColumnStyles.Add(colDescription); // Configure the DataGrid to use these column settings. dataGrid1.TableStyles.Add(columns); // Bind the grid. dataGrid1.DataSource = dsStore.Tables["Products"]; Creating Custom DataGrid Column StylesThe DataGrid only provides two types of columns: one for text data and one for true/false Boolean fields. These column types correspond to the .NET column classes DataGridBoolColumn and DataGridTextBoxColumn. It doesn't take much experimentation with the DataGrid control to realize that there are many types of data that don't suit either column type. The usual solution is to provide a read-only text field, or try to code innovative algorithms in the Format and Parse event handlers that can perform the required conversions. However, you can derive your own custom classes from the DataGridColumnStyle class, and use them to support other types of data. Table 9-3 lists the methods you need to override to create a custom DataGridColumnStyle.
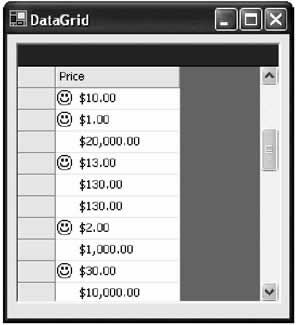
Support for unusual data types isn't the only reason to create a DataGridColumnStyle. You might just want to tweak the display for a specific field. For example, you might want to display an icon in a field that indicates something about the status of a given record (for example, a graphical "New!" starburst next to a recently added product). The next example presents a custom DataGridColumnStyle that's designed to show prices-with a twist. Prices that are lower than the indicated "special" price are displayed with a happy icon next to them. Start by defining the basic class, with a public member for the threshold price:
public class DataGridPriceIconColumn : DataGridColumnStyle
{
 public decimal NicePrice;

 public DataGridPriceIconColumn(decimal nicePrice)
 {
 this.NicePrice = nicePrice;
 }
}
Next, the editing methods are overridden. No actual code is added, as this column only supports read-only use.
protected override void Abort(int rowNum)
{
 // Do nothing.
}

protected override bool Commit(CurrencyManager dataSource, int rowNum)
{
 return true;
}

protected override void Edit(CurrencyManager source,
 int rowNum, System.Drawing.Rectangle bounds,
 bool readOnly, string instantText, bool cellIsVisible)
{
 // Do nothing.
}

protected override void Edit(CurrencyManager source,
 int rowNum, System.Drawing.Rectangle bounds, bool readOnly)
{
 // Do nothing.
}
protected override void Edit(CurrencyManager source,
 int rowNum, System.Drawing.Rectangle bounds,
 bool readOnly, string instantText)
{
 // Do nothing.
}
Next, the code is added to return size information:
protected override int GetMinimumHeight()
{
 return 20;
}
protected override int GetPreferredHeight(System.Drawing.Graphics g,
 object value)
{
 return 20;
}
protected override System.Drawing.Size GetPreferredSize(
 System.Drawing.Graphics g, object value)
{
 return new Size(100, 20);
}
Finally, the interesting code is added. This code uses some basic GDI+ techniques to draw an icon and the actual price text in the provided rectangle (which represents the cell). Notice that there are three versions of the Paint() method, and you need to implement them all. In this sample implementation, the versions with fewer parameters simply call the fullest Paint() method with some logical defaults.
protected override void Paint(System.Drawing.Graphics g,
 System.Drawing.Rectangle bounds, CurrencyManager source, int rowNum,
 System.Drawing.Brush backBrush, System.Drawing.Brush foreBrush,
 bool alignToRight)
{
 // Clear the cell.
 g.FillRegion(backBrush, new Region(bounds));

 decimal price = (decimal)this.GetColumnValueAtRow(source, rowNum);
 Icon priceIcon;
 if (price < NicePrice)
 {
 priceIcon = new Icon(Application.StartupPath + "\happy2.ico");
 // Draw the optional "nice price" icon.
 g.DrawIcon(priceIcon, new Rectangle(bounds.X, bounds.Y, 16, 16));
 }
 // Draw the text.
 g.DrawString(price.ToString("C"), new Font("Tahoma", (float)8.25),
 Brushes.Black, bounds.X + 20, bounds.Y + 2);
}

protected override void Paint(System.Drawing.Graphics g,
 System.Drawing.Rectangle bounds, CurrencyManager source,
 int rowNum, bool alignToRight)
{
 this.Paint(g, bounds, source, rowNum, Brushes.White, Brushes.Black,
 alignToRight);
}

protected override void Paint(System.Drawing.Graphics g,
 System.Drawing.Rectangle bounds, CurrencyManager source, int rowNum)
{
 this.Paint(g, bounds, source, rowNum, Brushes.White, Brushes.Black, false);
}
Figure 9-20 shows the custom DataGridPriceIconColumn in action.
This design could also be implemented using a separate column. For example, you could bind a Price column to a normal DataGridTextBoxColumn and to a custom DataGridPriceIconColumn to show the icon. You could then place the DataGridPriceIcon column at the beginning of the row. |
|||||||||||||||||||||||||||||||
Encapsulation with Data ControlsWith this exhaustive look at data binding, you now know how to tailor data for your user interface without writing manual code to loop through records and commit changes. However, all this functionality comes at a price. Namely, if you use data binding in the way I've described, you'll soon end up with a tangle of database-specific details (such as formatting and field names) directly in your form code. What's worse, this code is fragile and loosely typed-meaning that if a field name changes in the database, your user interface code needs immediate modifications to survive. This state of affairs is far from ideal. Luckily, there are a few ways to minimize the problem. One way is not to use data binding at all. Instead, create a database table with three columns: FormName, ControlName, and DataField. You can then fill this table with content that maps individual controls to specific data fields. A simple helper function in a database adapter class can then manage all the information transfer:
public class DBHelper
{
 public static void FillForm(Form formToBind,
 DataTable mappings)
 {
 DataRow[] rowMatch();

 foreach (Control ctrl in formToBind.Controls)
 {
 // See if this menu item has a corresponding row.
 rowMatch = mappings.Select("ControlName = "' + ctrl.Text + ""');

 // If it does, configure the binding accordingly.
 if (rowMatch.GetLength(0) > 0)
 {
 // We use offset 0 because there can only be one match.
 string fieldToUse = rowMatch[0]["DataField"];

 // We assume the text property is the one to be filled.
 // Alternatively, we could add a database field with
 // this information.
 ctrl.Text = dt.Rows[fieldToUse];
 }
 }
 }
}
This technique works well because it establishes an extra layer of indirection between the database and the controls. It's easy to modify this table if field names or user interface elements change. Best of all, the routine to fill the user interface is quite generic. Of course, you need to manually call this method every time the user moves to a new row to ensure that control synchronization occurs as naturally as it does with data binding.
Another way to help separate your database from your user interface code is by keeping database-specific content like field names and constants (used in the Parse and Format methods) in a separate resource class. The next example, which shows how you can use proper validation with data binding, demonstrates a perfect example of this technique with validation. Validating Bound DataEarlier in this chapter, you learned that one problem with ADO.NET data binding is validation. You can write specific error-handling code for each control, which is often a good approach, but one that creates extra code and ends up importing database details into your form code. Another approach is to handle the DataTable events like ColumnChanging, ColumnChanged, RowChanging, and RowChanged. The potential problem here is that the user may browse to another record, not realizing that invalid data has been rejected. Taking control of data binding navigation allows you to provide a more elegant solution. First, you create two form-level variables: one that tracks the current page, and the other that tracks the validity of the current record. private int currentPage; private bool errFlag; You also need to hook up the events for column changes and position changes. storeBinding.PositionChanged += new EventHandler(Binding_PositionChanged); dsStore.Tables["Products"].ColumnChanged += new DataColumnChangeEventHandler(TableChanging); Next, you make the record navigation conditional on the current record being valid. If the ErrFlag member variable is set to true, the user is automatically sent back to the original page.
private void Binding_PositionChanged(object sender, System.EventArgs e)
{
 if (errFlag)
 {
 // Reset the page.
 storeBinding.Position = currentPage;
 }
 else
 {
 // Allow the page to change and update the currentPage variable.
 currentPage = storeBinding.Position;
 }
}
Next, you add the validation code, which occurs in response to a table change. This event is fired when the user tabs to a new field after making a modification, or tries to browse to a new record after making a modification. It always occurs before the PositionChanged event.
private void TableChanging(object sender,
 System.Data.DataColumnChangeEventArgs e)
{
 string errors = DBStore.ValidateProduct(e.Row);

 if (errors == "")
 {
 errFlag = false;
 }
 else
 {
 errFlag = true;
 }

 lblErrorSummary.Text = errors;
}
You'll notice that so far this form doesn't contain any database-specific code. Instead, the validation is performed by passing the current row to a special static method provided by a database class. This method returns an error string, or an empty string if the validation succeeded.
public class DBStore
{
 public static string ValidateProduct(DataRow row)
 {
 string errors = "";

 if (((decimal)row["UnitCost"]) <= 0)
 {
 errors += "* UnitCost value too low
";
 }

 if (row["ModelNumber"].ToString() == "")
 {
 errors += "* You must specify a ModelNumber
";
 }

 if (row["ModelName"].ToString() == "")
 {
 errors += "* You must specify a ModelName
";
 }
 return errors;
 }
}
The error message is displayed in the window. Everything works nicely together. Database validation code is in a database component, but record navigation is halted immediately if an error is found. Figure 9-21 shows the final application detecting an error.
|
||||||||||||||||||

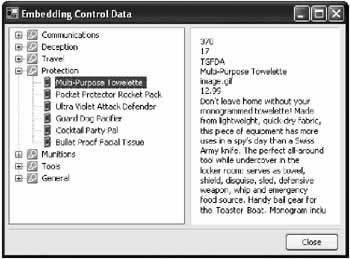
Data Aware ControlsNot all controls work well with data binding. For example, the popular TreeView and ListView controls need to be filled manually. In other circumstances, you may have controls that support data binding, but you want to take control of the entire process. Maybe you want to create a control that can't be filled all at once, but uses partial data reads or just-in-time queries to allow a user to browse through a large amount of data. .NET provides many opportunities for data integration without data binding. One handy technique is using the Tag property. Every control provides the Tag property, but the .NET framework doesn't use it. Instead, you can use the Tag property to store any information or object you need. For example, you could use this property to store the relevant business object with each node in a TreeView, or a DataRow object with each row in a ListView. The next example shows a TreeView that embeds the data it needs to use the Tag property of each node. Here's the code needed to fill the TreeView (which could be placed in the Form.Load event handler):
DataSet dsStore = new DataSet();

dsStore.ReadXmlSchema(Application.StartupPath + "\store.xsd");
dsStore.ReadXml(Application.StartupPath + "\store.xml");

// Define the relation.
DataRelation relCategoryProduct = new DataRelation("Products in this category",
 dsStore.Tables["Categories"].Columns["CategoryID"],
 dsStore.Tables["Products"].Columns["CategoryID"]);
dsStore.Relations.Add(relCategoryProduct);

TreeNode nodeParent, nodeChild;
foreach (DataRow rowParent in dsStore.Tables["Categories"].Rows)
{
 // Add the category node.
 nodeParent = treeDB.Nodes.Add(rowParent["CategoryName"]);

 // Store the disconnected category information.
 nodeParent.Tag = rowParent;

 foreach (DataRow rowChild in rowParent.GetChildRows(relCategoryProduct))
 {
 // Add the product order node.
 nodeChild = nodeParent.Nodes.Add(rowChild["ModelName"]);

 // Store the disconnected product information.
 nodeChild.Tag = rowChild;
 }
}
When a node is selected, a generic code routine reads the accompanying DataRow and displays all the information it contains in a label. (This code reacts to the TreeView.AfterSelect event.)
private void treeDB_AfterSelect(object sender,
 System.Windows.Forms.TreeViewEventArgs e)
{
 lblInfo.Text = "";
 DataRow row = (DataRow)e.Node.Tag;

 foreach (object field in row.ItemArray)
 {
 lblInfo.Text += field.ToString() + "
";
 }
}
The result, shown in Figure 9-22, is a TreeView that has easy access to the information for each node.
A Decoupled TreeView with Just in Time NodesThe preceding TreeView example requires very little information about the data source. Instead, it loops through the available fields to display a list of information. However, in doing so the control also gives up the ability to format the data in a more acceptable format. For example, fields that aren't important are always displayed, and the field order is fixed. There is an elegant way to solve this problem. The next example shows a TreeView that still embeds data, but relies on a ProductDatabase class to transform the DataRow fields into display information. An instance of the ProductDatabase class is created as form-level variable: private ProductDatabase DataClass = new ProductDatabase(); Thanks to the ProductDatabase class, the TreeView doesn't need to handle the table hierarchy. Instead, it begins by filling the tree with a list of categories and adds dummy nodes under every level.
private void TreeViewForm_Load(object sender, System.EventArgs e)
{
 TreeNode nodeParent;

 foreach (DataRow row in DataClass.GetCategories().Rows)
 {
 // Add the category node.
 nodeParent =
 treeDB.Nodes.Add(row[ProductDatabase.CategoryField.Name].ToString());
 nodeParent.ImageIndex = 0;

 // Store the disconnected category information.
 nodeParent.Tag = row;

 // Add a "dummy" node.
 nodeParent.Nodes.Add("*");
 }
}
When a node is expanded and the TreeView.BeforeExpand event fires, our code calls the ProductDatabase with the expanded node, and requests more information. The ProductDatabase class then returns the information needed to add the appropriate child nodes.
private void treeDB_BeforeExpand(object sender,
 System.Windows.Forms.TreeViewCancelEventArgs e)
{
 TreeNode nodeSelected, nodeChild;
 nodeSelected = e.Node;

 if (nodeSelected.Nodes[0].Text == "*")
 {
 // This is a dummy node.
 nodeSelected.Nodes.Clear();

 foreach (DataRow row in
 DataClass.GetProductsInCategory((DataRow)nodeSelected.Tag))
 {
 string field = row[ProductDatabase.ProductField.Name].ToString());
 nodeChild = nodeSelected.Nodes.Add(field);

 // Store the disconnected product information.
 nodeChild.Tag = row;
 nodeChild.ImageIndex = 1;
 nodeChild.SelectedImageIndex = 1;
 }
 }
}
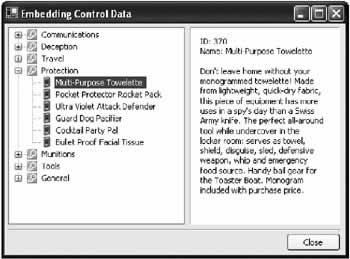
When an item is selected, the code again relies on the ProductDatabase class to "translate" the embedded DataRow. In this case, the code responds to the TreeView.AfterSelect event:
private void treeDB_AfterSelect(object sender,
 System.Windows.Forms.TreeViewEventArgs e)
{
 lblInfo.Text = DataClass.GetDisplayText((DataRow)e.Node.Tag);
}
This pattern allows the ProductDatabase to handle its own data access strategy—it can fetch the information as needed with miniqueries every time a node is expanded, or it can retain it in memory as a private member variable (as it does in this example). Even better, the ProductDatabase code is extremely simple because it doesn't need to convert ADO.NET objects into "business" objects. The TreeView can use and embed the ADO.NET objects natively, without needing to know anything about their internal field structures.
public class ProductDatabase
{
 public class Tables
 {
 public const string Product = "Products";
 public const string Category = "Categories";
 }

 public class ProductField
 {
 public const string Name = "ModelName";
 public const string Description = "Description";
 }

 public class CategoryField
 {
 public const string Name = "CategoryName";
 }

 private DataSet dsStore;
 DataRelation relCategoryProduct;

 public ProductDatabase()
 {
 dsStore = new DataSet();

 dsStore.ReadXmlSchema(Application.StartupPath + "\store.xsd");
 dsStore.ReadXml(Application.StartupPath + "\store.xml");

 // Define the relation.
 relCategoryProduct = new DataRelation("Prod_Cat",
 dsStore.Tables["Categories"].Columns["CategoryID"],
 dsStore.Tables["Products"].Columns["CategoryID"]);
 dsStore.Relations.Add(relCategoryProduct);
 }

 public DataTable GetCategories()
 {
 return dsStore.Tables["Categories"];
 }

 public DataRow[] GetProductsInCategory(DataRow rowParent)
 {
 return rowParent.GetChildRows(relCategoryProduct);
 }

 public string GetDisplayText(DataRow row)
 {
 string text = "";

 switch (row.Table.TableName)
 {
 case Tables.Product:
 text = "ID: " + row[0] + "
";
 text += "Name: " + row[ProductField.Name] + "

";
 text += row[ProductField.Description];
 break;
 }
 return text;
 }
}
The ProductDatabase methods could easily be used with other controls. None of them are specific to the TreeView. Can There Be a Data Bound ListView Control?It seems like dealing with data is always a compromise. You can have a fullfeatured control that supports flexible data binding and lacks user interface niceties, like the DataGrid, or a more attractive ListView or TreeView that doesn't have any intrinsic support to display information from a data source. Wouldn't an ideal solution combine both of these worlds and create a ListView or TreeView that can bind to any data source? The short answer is no. Programmers have developed ListView controls that can automatically display DataTable information, and TreeView controls that can accept DataSets and show a master-details list by inspecting the table relations. But these custom controls are rarely flexible enough to be used in a real application. Their intelligence is remarkable, but once you start to work with them, you repeatedly stumble across basic limitations. For example, in a data-bound ListView there would be no easy way to set column widths and ordering. This type of information can't be stored in a DataSet or DataTable object, and even if it could, it might vary with the display font or the current user's preferences. Similarly, a data-bound TreeView would have no support for multiple groupings. A just-in-time node solution (like you saw in the previous example) can't be implemented because the data-bound TreeView requires a completely configured DataSet. These limitations are not trivial. The DataGrid solves them partially by providing another layer of indirection with DataGridColumnStyle classes. These styles allow you to configure the display appearance of the data separately from the data itself. Even still, the DataGrid lacks many formatting and display niceties. To work with a richer control like the TreeView would require the development of a similar framework. As an undertaking, it would be far more difficult than creating a customized TreeView that's tailored for your type of data. In short, the best approach is to design your control to suit your data strategy. No single control can support every type of data, and no data-binding framework can accommodate every possible way data binding can be used. If you are creating a control that needs to support several different ways of interacting with data, follow the design explained with the decoupled TreeView. This control allows you a maximum of programming convenience, with the flexibility to change your controls or your data access strategy later. |
|||||||||||||||
The Last WordThis chapter has provided an in-depth examination of the inner workings of data binding. It has also considered the best practices you need to use for data binding without crippling your code and tying it too closely to the specific data source details. In Chapter 11 you revisit this issue with a twist, and examine a case where tight coupling is exactly what you want! The chapter also considered some useful examples about how to sidestep data binding and create custom controls that are data-aware. These smart controls are invaluable in cleaning up tangled messes of code, and provide an excellent solution when you want to use controls that don't support data binding well, like the ListView and TreeView. |
|||||||||||||||
MDI Interfaces and Workspaces |
|||||||||||||||
Introduction
EAN: 2147483647
Pages: 142
