7.4. Delete Queries Delete queries are the simplestand most dangerousof the action queries. A delete query works much like a normal select query. You specify a set of filter conditions, and then Access finds the matching records in the table. But the delete query doesn't just display the recordsinstead, it erases them from the database. Delete queries are great for clearing out a huge number of records at once after you've finished transferring them to another table. In the append-query example described earlier (Section 7.3.1), you probably want a way to remove the original records once you've copied them to the new table. A delete query fits the bill perfectly . To create a delete query, follow these steps: -
Create a new query by choosing Create  Other Query Design . Other Query Design . -
Change your query to a delete query by choosing Query Tools Design Query Type Delete . The Sort and Show boxes disappear from the column list, and the Delete box appears. -
Add the fields you want to use for filtering, and then set your filter conditions . Your filter conditions determine what records are deleted, so make sure you define them carefully . If you don't include any filter conditionsgulpAccess will delete all the records when you run the query. -
Add any other fields that you want to inspect to confirm you're getting the correct records in the datasheet preview . It's critical that you verify that you're removing only the records you want to delete. Delete queries have a nifty feature that can help you identify each record before you perform the actual delete operation. To use it, double-click the asterisk (*) in the table field list. The Delete box automatically sets itself to From, which indicates this information isn't being used as part of a filter conditioninstead, it's just there to show the list of to-be-deleted records in your previews. 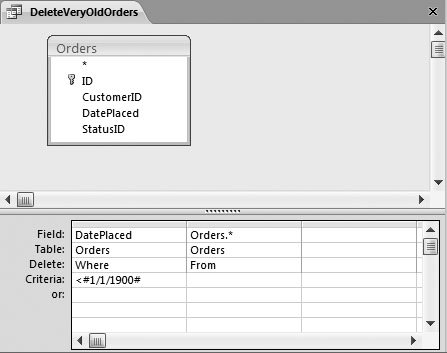 | Figure 7-8. The first field in the query defines the filter condition (orders with a DatePlaced before 1900). The second field (*) is a shortcut that lets you see all the fields in the preview, so you can carefully review the data you're removing. | | -
Right-click the tab title, and then choose Datasheet View to see the rows that'll be affected by your query . This step lets you preview the rows that you're about to delete. If you used the asterisk (*), you'll see the full information for each record. -
If you're confident you've got things right, then switch back to Design view, and then choose Query Tools Design Results Run to remove the records . Access warns you about the change it's about to make. Click Yes to delete the records for good. -
If you want to save your query, hit Ctrl+S (or close the query tab). You'll need to supply a name for your query . If you don't plan to use your delete query again, consider not saving it. It's a dangerous tool to have lying around. |