Section 16.2. Putting Code in a Form
16.2. Putting Code in a FormRunning a code routine directly is a bit awkward . At least when you run a macro directly, you can launch it from the navigation pane or use a handy button in the ribbon (Section 15.1.2). Neither option's available with VB code. Instead, you need to open the Visual Basic editor, choose the right module, scroll to the right subroutine, and then click Run. No one actually takes this approach, because it's just too tedious . Fortunately, there's a better approach. You can place code in a form, and then set it to run automatically when something important happens. The following sections explain how. 16.2.1. Responding to a Form EventInstead of running code routines straight from the editor, Access fans wire them up to form events, just as you can with macros. Here's how you can try this out:
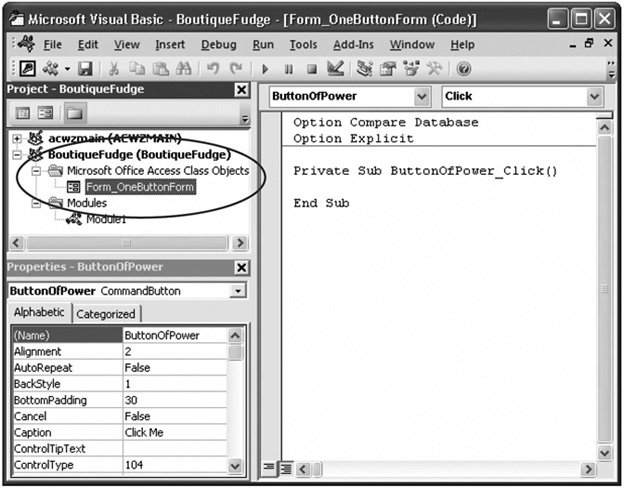
The first time you add code to a form, Access creates a new module for that form. This module's named after the form and placed in a special group in the Project window named Microsoft Office Access Class Objects (see Figure 16-4). If you add more code to the same form, whether it's connected to the same control or another one, Access inserts the code routine in the existing module for that form. Tip: Form modules don't appear in the navigation pane. If you want to edit them, then you have to open the Visual Basic editor yourself, and then, in the Project window, double-click the module. Or you can open the corresponding form, select the appropriate event, and use the ellipsis button to jump straight to the code routine that interests you.
When you follow these steps, Access doesn't just create a new module; it also inserts a new, empty subroutine for your event. Assuming your button was named ButtonOfPower, you'll see code that looks like this: Private Sub ButtonOfPower_Click() End Sub This subroutine looks similar to the subroutine you created earlier, but with two differences:
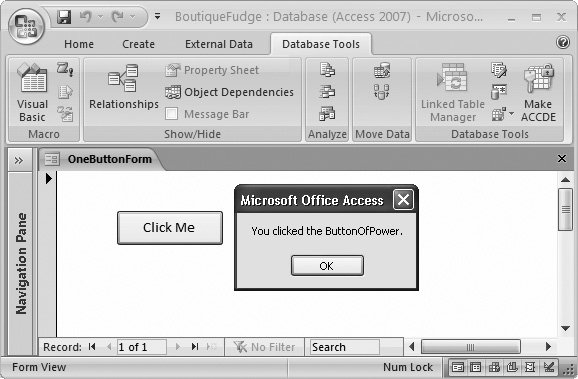
Note: Wait a secondisn't it the On Click event? Just to keep you on your toes, Visual Basic uses a slightly different naming convention for events than the Access form designer. It ignores the word "On" and leaves out any spaces, which means that On Click becomes just Click. It's best not to worry about the naming discrepancy. Instead, let Access create the right subroutine names for you. To try out your subroutine, you need to add some code. So far, you've learned only one code command, so try using that to show a message: Private Sub ButtonOfPower_Click() MsgBox "You clicked the ButtonOfPower." End Sub Now switch back to the form and click your button. You should see the message shown in Figure 16-5, which indicates that your code caught the event and responded successfully. Tip: You don't need to save your module when you make changes. Instead, you can freely jump back and forth between your code window and the form you're using in the Access window to test every change you make.
If you delete the ButtonOfPower later on, Access doesn't remove your code. Instead, it stays there, inactive. This behavior's good if there's something really useful in that code that you might want to use somewhere else later on. (In this case, a little cutting and pasting can help you out.) But if it's just a bunch of old code, use the Visual Basic editor to delete the subroutine as soon as you get the chance. 16.2.2. Calling the Code in a ModuleBased on what you've learned so far, you may wonder why you would ever bother to create an ordinary module by hand. After all, there's no convenient way to run the code, and you can't connect it to a control event in a form.
Ordinary modules become useful if you create a fantastically useful piece of code that you want to use in several different places. You could design the perfect search routine and use it in two, three, or four dozen different forms. And you could cut and paste the code into each subroutine that needs it. Except that duplicate code is always a Bad Idea (just like duplicate data). Why? Consider what happens if you need to fix a problem or add an improvement. With duplicate code, you'll be forced to hunt down each copy of the code and repeat the same change. That's a sure way to waste your holiday weekends. The solution's to take your useful, reusable code routine, and place it in a module. You can then call that code routine wherever you need itand you can edit it just once when you need to update or fix it. To call a code routine in another module, you use the name of the module, followed by a period (.), followed by the name of the subroutine. Here's an example: Private Sub ButtonOfPower_Click() MyCodeRoutine End Sub Here's a play-by-play account of what happens when you use this code:
You can break a single task into as many subroutines as you want. You can also call subroutines that call other subroutines, which call still more subroutines, and so on. Access doesn't care. All it's interested in are the actual code statements. Note: You can use this trick only with public subroutines. Private subroutines aren't accessible to code outside the module where they're stored. All subroutines are automatically public unless you add the word Private before the word Sub. So the MyCodeRoutine example you saw in Section 16.1.2 is public. If the ButtonOfPower_Click and MyCodeRoutine subroutines are both in the same module, there's a bit of a shortcut. You no longer need to include the module name when you call MyCodeRoutine. Instead, you can use this code: Private Sub ButtonOfPower_Click() MyCodeRoutine End Sub Now Access assumes MyCodeRoutine must be in the same module, and it looks for it there. Also, in this case it doesn't matter whether MyCodeRoutine is public or privateeither way, your code can call it. Tip: If you want to reuse a piece of code in several places in the same form (for example, in response to different button clicks), then consider creating your own subroutine and putting your code there. If you want to reuse a piece of code in several different forms, then consider putting it in a subroutine in a separate module. 16.2.3. Reading and Writing the Fields on a FormAs you learned in Chapter 15, the most exciting macros are those that take charge of your forms and controls. In VB code, this task's spectacularly easy. You just need to know the names of all the controls you want to work with. Suppose you're creating a (somewhat dangerous) code routine that clears a text box. You plan to use this routine to reset the text in the Description field. Here's the line of code that does the job: Description = "" This line's a basic Visual Basic assignment statement (a line of code that modifies a piece of data), and it all revolves around the equal sign (=). When Access runs this line of code, it takes the content on the righthand side of the equal sign (in this case, an empty set of quotation marks that represents no text), and it stuffs that content into the receptacle on the left-hand side (in this case, the Description field). The end result's that the current content in the Description field is wiped out. Note: You can also use the familiar square brackets so that it's [Description] rather than Description. The brackets are optional, unless you've been reckless enough to break the good field naming rules you learned about in Section 2.5.1. If you have a text box name with a space in it, then you always need to wrap the name in square brackets. Of course, you can also substitute a specific piece of text: Description = "Type something here, please" The effect of running this code is just the same as if you typed in the new text yourself (except it happens a whole lot faster). As you know, when you modify any field, you place the current record into edit mode. As soon as you move to another record or close the form, Access commits your edit and saves your new values in the database. There's only so much you can do with fixed text values. After all, when you use a fixed piece of text, you need to decide at the outset exactly what you want to use. By the time you actually click a button and trigger your code, you may want something different. For that reason, programmers rarely used fixed values in this way. Instead, they use more complex expressions , which are a lot like the Access expressions you used for query calculations (Section 7.1) and validation rules (Section 4.3). With text, you can use the & operator to create a large piece of text out of several smaller pieces. Here's an example that takes the current description and adds a sentence at the end that identifies the product by name. Description = Description & " This is a description for " & ProductName & "." If the Description starts off as "Enjoy delectable waves of fudge.", it may end up being "Enjoy delectable waves of fudge. This is a description for Fudge Tsunami."
More commonly, expressions manipulate numeric or date values. Here's the code for an IncreasePrice button that ratchets up a price by 10 percent every time you click the button (and best of all, you can click it as many times as you like): Private Sub IncreasePrice_Click Price = Price * 1.10 End Sub For a review of the different operators you can use with expressions to perform different types of calculations (like addition, multiplication, division, and so on), go back to Section 7.1.2. Note: Visual Basic treats Yes/No fields (Section 2.3.7) as True/False fields. The end result's the same, but the syntax you use is just a bit different. To set the value of a Yes/No field, you use one of two built-in Visual Basic keywords: True or False. |
 Controls