14.1. Mastering the Navigation Pane Chapter 1 introduced the navigation pane, and you've used it ever since to breeze around the database. However, the navigation pane starts to get congested as your database grows. Depending on your monitor size , once you hit about 20 database objects, they don't fit into view all at once. As a result, you need to scroll from top to bottom to find what you need, which can be a major pain in the wrist. One way you can combat this confusion is by designing your own switchboard forms that let you move around the database. But before you jump to that solution, it's worth considering some of the features built right into the navigation pane. These features may solve the problem with less work. 14.1.1. Configuring the Navigation List For starters, consider using filtering to cut down the amount of information shown in the navigation pane. You might have a database with three dozen objects, only 10 of which you use regularly. In this case, there's no reason to show the objects you don't use. Essentially, Access lets you make two decisions with the navigation pane: -
You can choose the way objects are arranged in the navigation pane. This process is known as categorizing your database objects. -
You can choose which objects are hidden from view. This process is known as filtering your database objects. The confusing part's that you make both these choices using the same menu. To open this menu, click the drop-down arrow in the navigation pane's title region. Figure 14-1 explains how it works. You can choose to categorize the navigation pane in five ways: -
Tables and Related Views groups database objects based on the table they use. If you've created two forms, three queries, and a report for a Students table, you'll see all these objects together in one group (under the heading "Students"). The challenge with this option's that you can have a hard time telling the difference between the different types of database objects, particularly if you use similar names . You need to look carefully at the icon to determine whether a given item's a form, a report, or something else. Tables and Related Views is the categorization setting with which Access starts you off.
Tip: Many database objects use more than one table. If you create a query that uses a join (Section 6.3) to show products with category information, then your query uses both the Products and ProductCategories tables. In Tables and Related Views mode, you see this query in two placesunder the Products heading and under the ProductCategories heading.
When you use Tables and Related Views, the menu's Filter By Group section includes every table in your database. If you choose a specific table, then you see only the objects that are related to that table. You can also choose Unrelated Objects to see any objects that don't fit into one of the table-specific categories, like code files. 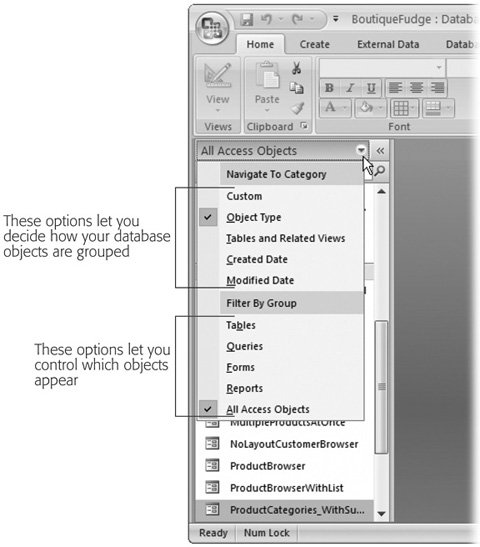 | Figure 14-1. When you're ready to tell Access how to arrange objects in the navigation pane, make your selection in the menu's top portion (named Navigate to Category). The current choiceObject Typegroups tables, queries, forms, and reports into separate sections. To decide which objects appear, make a selection in the menu's bottom portion (named Filter By Group). These options let you decide how your database objects are grouped These options let you control which objects appear | |
-
Object Type groups database objects based on the type of object. This method clearly distinguishes tables from forms, reports, and other sorts of objects. Many Access gurus prefer using this view when browsing a complete database, because it imposes order on the unruliest database. It also works particularly well if you don't remember the exact name of the object you want. If you know you need to print a report that shows a list of classes, then you can head straight to the Reports group. When you use Object Type, the filtering list lets you see just a single type of object. If you've created forms for every task you need, then select Forms to see your forms and hide everything else. -
Created Date groups database objects based on the time they were created. Access creates a group for Today, groups for the recent days of the week (Monday, Sunday, and so on), and groups for longer intervals (Last Week, Two Weeks Ago, and so on). You probably won't use this view mode regularly, because as time passes , the objects move from one group to another. However, it's a good way to hunt down recent work. When you use Created Date, the filtering options let you pick out just those object that were created today, yesterday , last week, last month, and so on (as shown in Figure 14-2). If you remember when you created an important form or report, but don't know its name, this ability can save serious time.  | Figure 14-2. When grouping by Created Date, you see groups that organize your objects based on when they were created. | |
-
Modified Date works like the Created Date option, except it lets you pick out database objects that have been changed recently. This option's handy if you want to ignore tables and other objects that you rarely use. When you use Modified Date, you get all the same filtering options you do with Created Date. -
Custom lets you choose exactly what database objects are shown, and which ones are hidden. This choice is good if you have certain commonly used objects, and others that you want to tuck out of sight. You'll try out custom groups in Section 14.1.4.
Tip: You can quickly apply filtering. Right-click a group heading, and then choose Show Only [Group-Name]. To show just tables when grouping by Object Type, right-click the Tables group, and then choose Show Only Tables. To remove the filtering, right-click the navigation pane again, and then choose Show All Groups.
When you apply filtering in the navigation pane, Access completely hides whatever you don't want to see. But as you probably already know, Access gives you another option. You can click the collapse arrows next to a specific section to shrink it down so that only the section title's visible (Figure 14-3). You can then pop it back into display when you need it. 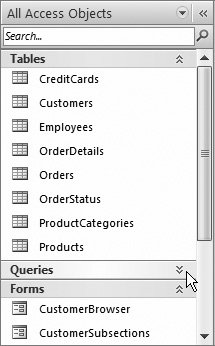 | Figure 14-3. Click the collapse arrows to quickly hide the objects in a particular section. In this example, the queries group's collapsed neatly out of the way. | |
GEM IN THE ROUGH
Sort and View Options in the Navigation Pane | | The navigation pane has many carefully buried settings you can configure. For example, if you don't like the way items are ordered in each group, you have several sorting options. To see them all, right-click the navigation pane's title bar, and then choose the Sort By submenu. As you'll see, you can apply an ascending or descending sort according to any of the following criteria: -
Name sorts according to the database object's name. -
Type sorts according to the object type (form, report, table, and so on). This option has no effect if you're already grouping by object type. -
Created Date and Modified Date sort so that older or newer objects appear first. You can also change what the navigation pane looks like by right-clicking the navigation pane's title, and then choosing an option from the View By menu. Figure 14-4 compares the different settings. |
14.1.2. Better Filtering The filtering system has one limitationit lets you choose only one category at a time. If you've chosen Tables and Related Views, then you can filter the list down to the objects that are related to a single table. However, you can't choose to include two (or more) table groups. Similarly, if you choose Object Type, then you can show all the forms or all the reports in your database, but you can't show forms and reports without including everything else (although the collapsing trick shown in Figure 14-3 helps to reclaim most of the space). There's an easy way around this restriction. To get more control over filtering, follow these steps: -
Right-click the navigation pane's title bar, and then choose Navigation Options . The Navigation Options dialog box appears (Figure 14-5). 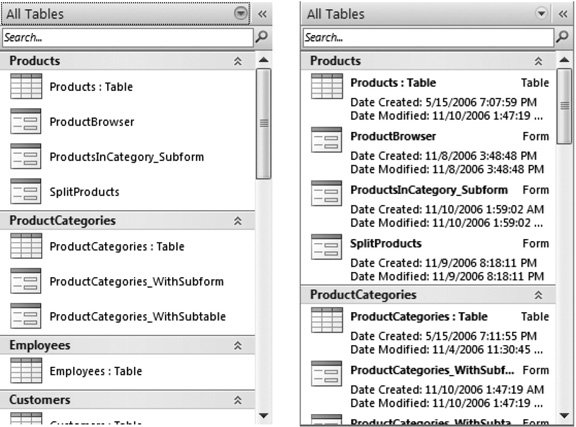 | Figure 14-4. So far, you've been using List view in the navigation pane, the most compact option. However, Access also lets you use a slightly bigger icon view (left), or a details view that includes information about when an object was created and last modified (right). | |  | Figure 14-5. The list on the left shows the different ways you can categorize the navigation pane. You don't see the Created Date and Modified Date options, because you can't customize those. The list on the right shows the groups in the currently selected category. | | -
Choose the category you want to customizeeither Tables and Related View or Object Types . The list on the right shows all the groups in that category. -
If you don't want a category to appear in the navigation list, then clear the checkmark next to it . If you want your navigation pane to show only reports and forms, choose the Object Types category, and then clear the checkmark next to Tables, Queries, Macros, and Modules. -
If you're customizing the Tables and Related Views category, then you can also change the order of the groups, as shown in Figure 14-6 . The only item you can't move is Unrelated Objects, which always appears at the bottom. And you can't change the order of the groups in the Objects Types category at all. 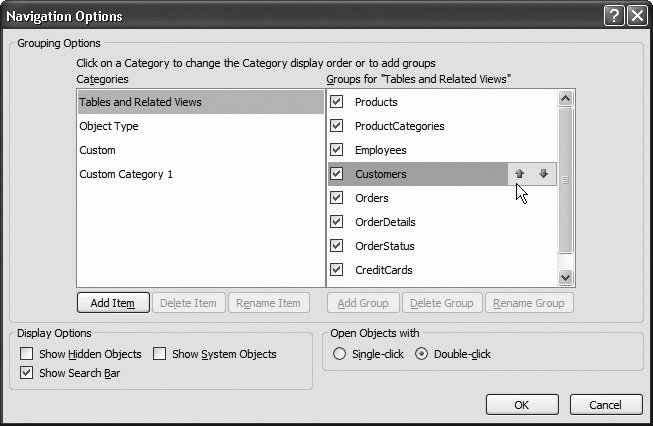 | Figure 14-6. To move a group, just select it. An up and down arrow icon appears in the item, as shown here. You can click these arrows to move the group up or down. | | -
Click OK to close the window .
Tip: Many databases get a whole lot clearer the moment you hide the extra objects. If you've outfitted your database with a full complement of forms and reports, these objects may be all you need to see. So why not go ahead and hide the lower-level tables, queries, and code?
14.1.3. Hiding Objects Hiding the groups you don't want to see is all well and goodbut what if there's a single object you want to tuck out of sight? Maybe you want to make sure other people who use your database aren't distracted by a few potentially risky action queries (Chapter 8) that they really shouldn't use. No problem. Just right-click the query in the navigation pane, and then choose Hide in this Group.
Note: When you hide an object, it's hidden in the current view mode, in the current group. (Remember, in Tables and Related Views mode, some objects may appear in more than one group.) If you want to hide an object everywhere, you need to track it down in each group, and hide it there.
To reveal a hidden object, you first need to configure the navigation pane so that it shows hidden objects. To do so, right-click the title bar, choose Navigation Options, add a checkmark in the Show Hidden Objects box, and then click OK. Now, hidden objects appear in the navigation pane, but they're slightly faded so you can distinguish them from the other non-hidden objects. To unhide an object, right-click it, and then choose Unhide in this Group. All of these approachesfiltering, custom groups, hidden objectsare designed to make your database easier to use. These approaches don't provide any security. (A person who really wants to use a database object can just change the navigation settings to get to it.)
Note: in Section 18.2, you'll learn how to divide a database into separate files, which gives you the best way to keep some database objects out of the wrong hands. However, no matter what you do, Access is not bulletproof. Access is designed to be intuitive, capable, and easy to use. Unlike server-side databases like SQL Server (Section 20.1.1), it's not designed to lock out bad guys if they get hold of your database files.
14.1.4. Using Custom Groups Ordinary people don't think in terms of tables and database objects. Instead, they think about the tasks they need to accomplish. But none of the ready-made grouping options fit this approach. Fortunately, you can build your own groups that do. Here's how: -
Click the drop-down arrow in the navigation pane's title bar, and then choose Custom . In a new database, you start out with two groups in the Custom view. The first, Custom Group 1, is empty. The second, Unassigned Objects, contains all the objects in your database. -
You can create a new group and move an object into it in one step. To do so, right-click the object you want to relocate (in the Unassigned objects section), and then choose Add To Group  New Group. Enter the group name, and then hit Enter. Figure 14-7 shows the results . New Group. Enter the group name, and then hit Enter. Figure 14-7 shows the results . Repeat this step to create all the groups you need. If you want to move an object into an existing group, right-click it, choose Add To Group, and then pick the corresponding group name.
Tip: For speedier work, just drag and drop your objects into the right groups.
-
You can also rename, remove, and reorder your groups. The easiest way to do this is using the Navigation Options dialog box. Right-click the navigation pane's title, and then choose Navigation Options . The Navigation Options dialog box lets you make a few useful group-related things happen: 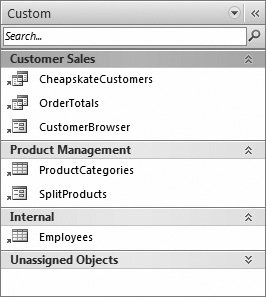 | Figure 14-7. It's often a good idea to create groups that reflect specific types of tasks, as in this database. | | -
Select a group, and then click Rename Group to apply a new name. -
Remove your groupjust select it, and then click Delete Group. -
Add a group, by clicking Add Group. It starts with no objects. -
Rearrange your groups. Just click one, and then use the arrow icons that appear to move it up or down. -
Move your custom category to a different place in the list, which affects how the menu appears when you click the drop-down arrow in the navigation pane. -
Hide a group (temporarily, or for the long term ). Just remove the checkmark next to the group. The only thing you can't do with groups in the Navigation Options dialog box is change the objects that each group contains. (In order to change them, you need to drag your objects around the navigation pane, as described in step 2. You can also change the name of the view that contains all your groups. Initially, this category's named Custom, but you can change it to something more descriptive by selecting it in the Navigation Options dialog box, and then clicking the Rename Item button. And if you're more ambitious, you can create more than one top-level custom view mode. Click Add Item to add a new one, and Delete Item to remove it. Figure 14-8 shows an example with several custom categories. -
Click OK when you're finished making your changes . 14.1.5. Searching the Navigation List If you just can't bear to have anything out of your sight, you may need to put up with a cumbersomely long list of objects in the navigation pane. However, Access still provides you with one convenient feature that can save you hours of scrolling. 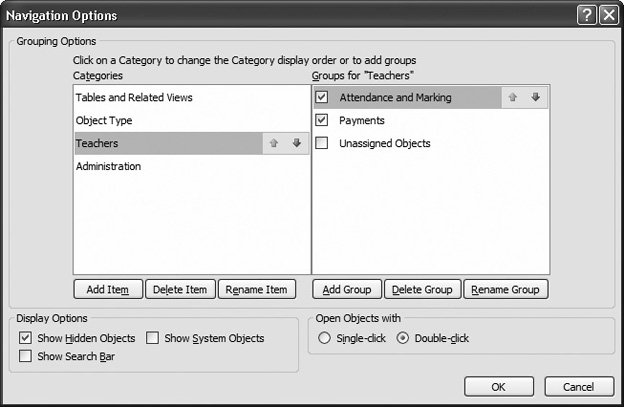 | Figure 14-8. One reason you might create multiple views is if different people use your database. In the Cacophon Studios example, the administrative staff sees forms for creating classes and adding students (using the Administration view), while the teachers get to print attendance lists and create assignments (using the Teachers view, which is selected here). As you can see, the Teachers view contains a category named "Attendance and Marking" and one named "Payments". Each has its own set of forms and reports. | |
It's the search box , and it lets you jump to an object almost instantaneously, pro-vided you know its name. To show the search box, follow these steps: -
Right-click the navigation bar's title, and then choose Navigation Options . -
In the Navigation Options window, choose Show Search Bar . -
The search box appears at the top of the list in the navigation pane. As you type, Access filters down the list so it includes only matching objects (Figure 14-9). 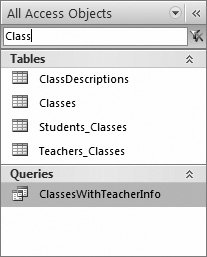 | Figure 14-9. The search box matches objects that contain the text you type. So if you type "Class", you'll see objects like Classes and Students_Classes. | |
|