12.2. Sorting and Filtering in a Form Sorting and filtering are two indispensable features that Access gives you with Form view. Learning how to use them could hardly be easierin fact, you already learned everything you need to know when you tackled the datasheet in Chapter 3. The creators of Access took great care to ensure that filtering and sorting work the same in forms as they do in the datasheet. You use the same commands, on the same part of the ribbon, to put them into action. 12.2.1. Sorting a Form As you've probably realized by now, forms show your data in raw, unsorted order. So records appear in the order you created them. (The only exception's if you create a form that gets its data from a query, and that query uses sorting.) Fortunately, sorting's easy. In fact, you can sort the records that are shown in a form in exactly the same way you sort records in a datasheet. Choose the field you want to use for sorting, right-click it, and then choose one of the sorting options. In a text-based field, you'll see the sorting choices "Sort A to Z" (for an alphabetical sort) and "Sort Z to A" (for a reverse-alphabetical sort ). You can also use the Ascending and Descending buttons on the ribbon's Home  Sort & Filter section. Sort & Filter section. For more information about your sorting options (including how to sort by multiple fields), see Section 3.2. 12.2.2. Filtering a Form Filtering's a feature that lets you cut down the total number of records so you see only those that interest you. Filtering can pick out active customers, in-stock products, expensive orders, and other groups of records based on specific criteria. In a form, you have the following filtering choices: -
Quick filter shows you a list of all the values for a particular field and lets you choose which ones you want to hide. It's easy to use, but potentially time-consuming . If you want to hide numeric values that fall into a certain range, then you'll get the job done much faster with the "filter by condition" approach (as described later). To show the list of quick filter values, move to the field you want to filter, and then click Home Sort & Filter Filter. Section 3.2.2.1 has full details about quick filters. -
Filter by selection applies a filter based on an existing value. First, find the value in one of the records, right-click it, and then choose a filter option. You can right-click a price value of $25, and then choose "Greater Than or Equal to 25" to hide low-cost items. For more information, see Section 3.2.2.2. -
Filter by condition lets you define the exact criteria you want to use to filter records. You don't need to base it on an existing value. To add this sort of filter, right-click the field and then look for a submenu with filtering options. This menu item's named according to the data, so text fields include a Text Filters option, number fields have a Number Filters option, and so on. You can learn more about this type of filter in Section 3.2.2.3. -
Advanced filters are filters that you design using a window that looks just like the query designer. The advantage of advanced filters is that you can apply filters on more than one field in a single step. To create a set of advanced filters, choose Home Sort & Filter Advanced Filter Options Advanced Filter/Sort.
Note: If you insert a new record that doesn't match the currently active filter conditions, your new record disappears from sight as soon as you add it. To get it back, remove the filter settings using the ribbon: Select the Home tab, click the Advanced button in the Sort & Filter chunk , and then choose Clear All Filters. Or, use the Toggle Filter button to temporarily suspend your filter settings (and click Toggle Filter later to get them back).
12.2.3. Using the Filter by Form Feature One other filtering technique works with forms: filter by form . Essentially, "filter by form" transforms your form into a full-fledged search form. Using this search form, you supply one or more criteria. Then you apply the filter to see the matching record (or records). Although you can use "filter by form" with the datasheet, it really shines with forms. "Filter by forms" is particularly useful for searching out a single hard-to-find record. (If you want to use filtering to pull out a whole group of records, one of the other filtering options is generally easier.) Here's how to use the "filter by form" feature: -
Choose Home Sort & Filter Advanced Filter Options Filter By Form . Access changes your form to search mode. In search mode, your form looks exactly the same, except all the fields are blank. If you've already used the "filter by form" feature and you're returning to change the filter settings, then you should start by clearing the previous set of filters. To do so, right-click a blank spot on the form surface, and then choose Clear Grid. -
Move to the field you want to use for filtering . A drop-down arrow appears in the field. -
Click the drop-down arrow, and then choose the value you want to include in your results . The drop-down list shows all the values from the different records in the table (Figure 12-10). When you choose one, it appears in the field box in quotation marks. -
If you want to apply a filter to more than one field, then return to step 2 . Use multiple filter conditions if a single filter condition may result in more matches than you want. If you don't remember a customer's last name, you could apply a FirstName filter. But if that customer has a common first name , then you may also want to apply a filter on another field, like City. If you don't want to use exact matches, then you can write in more complex filters using an expression. Use <10 to find numeric values under 10, and Like Jon* to find text values like "Jones," "Jonathon," and "Jonson." Filtering's particularly useful with date fields. Section 6.2.1.1 has the full scoop on filtering expressions. -
If you want to perform more than one filtering operation and combine the results, then click the Or tab and fill out more filter settings (Figure 12-11) . If you fill out your first search form so that it matches the LastName "Gorfinkel," and the second search form to match the FirstName "Jehosophat," your results will include all the records that have the last name Gorfinkel and all those that have the first name Jehosophat. However, if you put both those filter conditions on the same search form, your matches include only people named Jehosophat Gorfinkel. 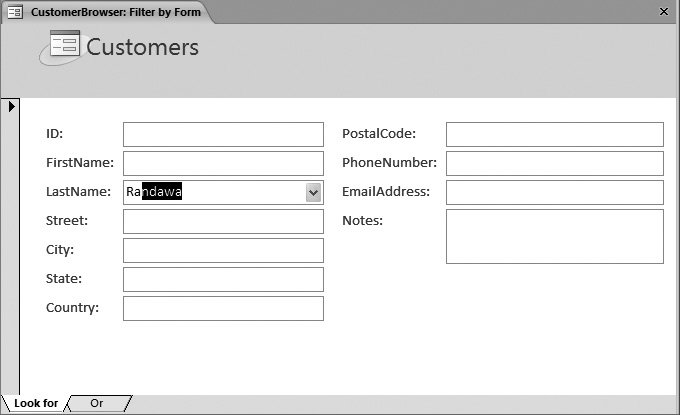 | Figure 12-10. Here's the Customers form in "filter by form" mode. Using the dropdown list, you can quickly find a customer by last name. Or you can find a name by typing the first few letters rather than scrolling through the list, as shown here. In this example, typing "Ra" brings up the first alphabetical match: the last name Randawa. | | 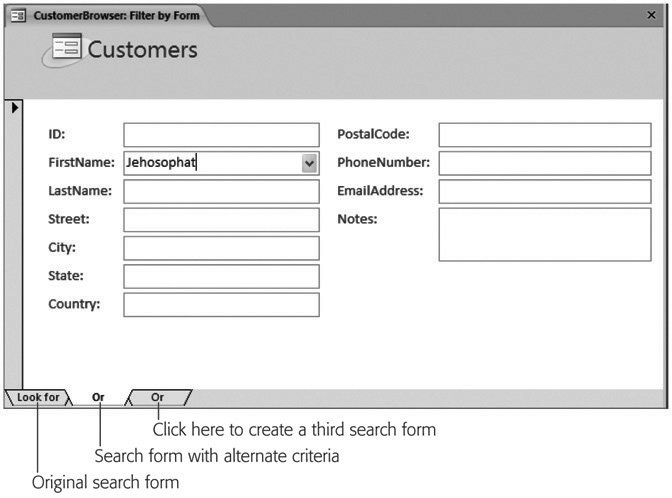 | Figure 12-11. The Or tab appears at the bottom of the form. When you click the Or tab, a second copy of your search form appears, where you can fill out additional filter conditions. Each time you click the Or tab, another Or tab appears. You can repeat this process to fill in a dozen search forms at once, but there's rarely any reason to go to such lengths. | | -
Right-click a blank spot on the form surface, and then choose Apply Filter/Sort . Access switches back to your normal form, and then applies the filter settings. At the bottom of the form, between the navigation buttons and the search box, you see the word "Filtered" appear to let you know that you aren't seeing all the records. If you decide not to apply the filter settings, just close the search form. Access switches back to your normal form but doesn't apply any filtering.
Tip: To remove your filter settings but keep them handy for later use, choose Home Sort & Filter Toggle Filter. To reapply the filter settings later on, click Toggle Filter a second time. Access stores the most recent filter settings with your form, so theyre always available.
12.2.4. Saving Filters for the Future One of form filtering's limitations is that Access remembers only your most recent set of filters. If you've perfected a complex filter expression that you want to reuse later, this quality's a problem. As soon as you apply a different filter, you'll lose all your hard work. Fortunately, you have several solutions to this dilemma. One option's to create a whole new query that performs the filtering, and use that query in a whole new form. This choice is a good one if you want to use your filter criteria to perform a specific task, and you also want to customize the way the form works or the way it displays its data. On the other hand, if you don't plan to use your filtering settings very often, but you just want to have them on hand for the next time you need them (or if you need to store dozens of different filter settings, and you don't want to be stuck with dozens of nearly identical forms), there's a better option. You can save your filter settings as a query in your database. Then, when you want them back, you can load them up and apply them to your form. Here's how to pull this trick off: -
Apply your filters . Use any of the techniques described in Section 12.2.2. -
Choose Home Sort & Filter Advanced Advanced Filter/Sort . This action opens a query window. This query uses the same data source (table or query) as your form, and it applies your filtering using the Criteria box under the appropriate field (Section 6.2.1). You don't need to make any changes in the query window because Access automatically fills in the Criteria box (or boxes) based on the current filter settings. -
Choose Home Sort & Filter Advanced Save as Query. Supply a name for this query, and then click OK . Although you can use this query like a normal query, you probably won't. So to prevent confusion, use a different type of name, like CustomerBrowser_Filter, that clearly indicates this query's designed for form filtering. The next time you want to retrieve your filter settings and reapply them, open your form and follow these steps: -
Choose Home Sort & Filter Advanced Advanced Filter/Sort . This action shows the query window. -
Choose Home Sort & Filter Advanced Load From Query . Access shows all the queries that use the same table and don't involve joins. -
Pick the filter query you created earlier, and then click OK . The filter settings for that query appear in the query window. -
Right-click anywhere on the blank space in the query window, and then choose Apply Filter/Sort to put your filter settings into effect .
Tip: You can use this trick to apply the same filter expression to different forms, as long as these forms include the fields you want to filter. (You can use the filter settings that you created for the Customer-Browser form to filter another form that shows a list of customers, but not a form that shows products.)
|