Section 4.1. Data Integrity Basics
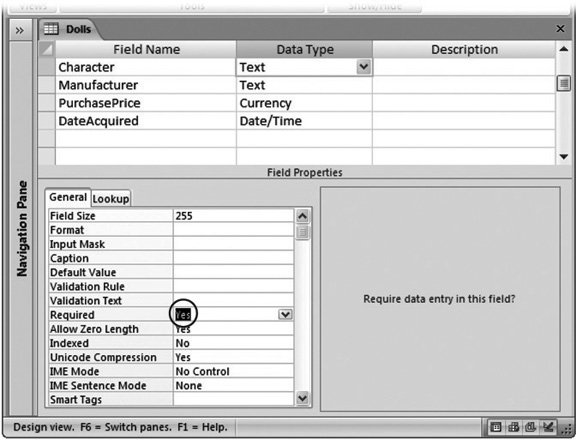
4.1. Data Integrity BasicsAll of Access's data validation features work via the Design view you learned about in Chapter 2. To put them in place, you choose a field and then tweak its properties. The only trick's knowing what properties are most useful. You've already seen some in Chapter 2, but the following sections fill in a few more details. Tip: Remember, Access gives you three ways to switch to Design view. You can right-click the table tab title and then choose Design View from the menu, use the Home  View button on the ribbon, or use the tiny view buttons at the Access windows bottom-right corner. And if you're really impatient, then you don't even need to open your table firstjust find it in the navigation pane, right-click it there, and then choose Design View. View button on the ribbon, or use the tiny view buttons at the Access windows bottom-right corner. And if you're really impatient, then you don't even need to open your table firstjust find it in the navigation pane, right-click it there, and then choose Design View. 4.1.1. Preventing Blank FieldsEvery record needs a bare minimum of information to make sense. However, without your help, Access can't distinguish between critical information and optional details. For that reason, every field in a new table is optional, except for the primary-key field (which is usually the ID value). Try this out with the Dolls table from Chapter 1; you'll quickly discover that you can add records that have virtually no information in them. You can easily remedy this problem. Just select the field that you want to make mandatory in Design view, and then set the Required field property to Yes (Figure 4-1).
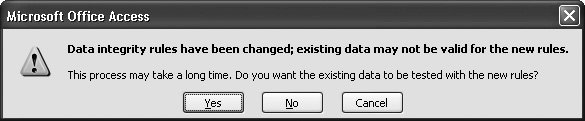
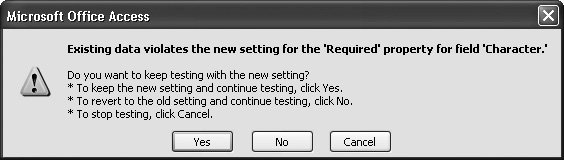
Access checks the Required field property whenever you add a new record or modify a field in an existing record. However, if your table already contains data, there's no guarantee that it follows the rules. Imagine you fill the Dolls table with a few bobbleheads before you decide that every record requires a value for the Character field. You switch to Design view, choose the Character field, and then flip the Required field property to Yes. When you save the table (by switching back to Datasheet view or closing the table), Access gives you the option of verifying the bobblehead records that are already in the table (Figure 4-2). If you choose to perform the test and Access finds the problem, it gives you the option of reversing your changes (Figure 4-3).
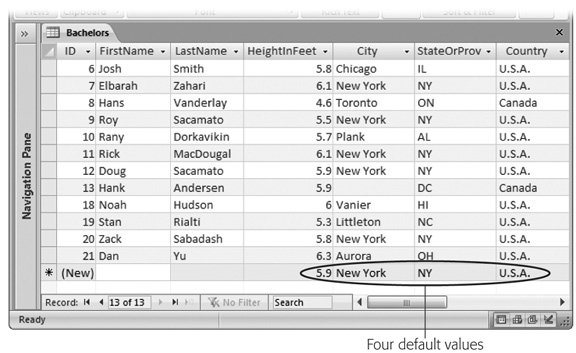
4.1.1.1. Blank values and empty textAccess supports this Required property for every data type. However, with some data types you might want to add extra checks. That's because the Required property prevents only blank fieldsfields that don't have any information in them at all. However, Access makes a slightly bizarre distinction between blank values and something called empty text . A blank (null) value indicates that no information was supplied. Empty text indicates that a field value was supplied, but it just happens to be empty. Confused yet? The distinction exists because databases like Access need to recognize when information's missing. A blank value could indicate an oversightsomeone might just have forgotten to enter the value. On the other hand, empty text indicates a conscious decision to leave that information out. Note: To try this out in your datasheet, create a text field that has Required set to Yes. Try inserting a new record, and leaving the record blank. (Access stops you cold.) Now, try adding a new record, but place a single space in the field. Here's the strange part: Access automatically trims out the spaces, and by doing so, it converts your single space to empty text. However, you don't receive an error message because empty text isn't the same as a blank value. The good news is that if you find this whole distinction confusing, then you can prevent both blank values and empty text. Just set Required to Yes to stop the blank values, and set Allow Zero Length to No to prevent empty text. Note: A similar distinction exists for numeric data types. Even if you set Required to Yes, you can still supply a number of 0. If you want to prevent that action, then you'll need to use the validation rules described later in this chapter (Section 4.3). 4.1.2. Setting Default ValuesSo far, the fields in your tables are either filled in explicitly by the person who adds the record or left blank. But there's another optionyou can supply a default value . Now, if someone inserts a record and leaves the field blank, Access applies the default value instead. You set a default value using the Default Value field property. For a numeric AddedCost field, you could set this to be the number 0. For a text Country field, you could use the text "U.S.A." as a default value. (All text values must be wrapped in quotations marks when you use them for a default value.) Access shows all your default values in the new-row slot at the bottom of the datasheet (Figure 4-4). It also automatically inserts default values into any hidden columns (Section 3.1.4). Access inserts the default value when you create a new record. (You're then free to change that value.) You can also switch a field back to its default value using the Ctrl+Alt+Space shortcut while you're editing it.
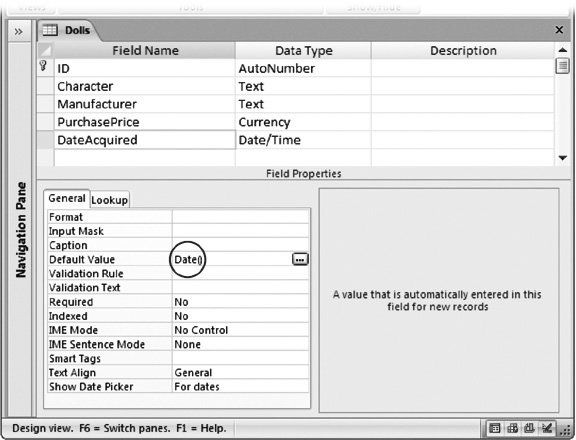
Tip: One nice feature is that you can use the default value as a starting point for a new record. For example, when you create a new record in the datasheet, you can edit the default value, rather than replacing it with a completely new value. You can also create more intelligent dynamic default values. Access evaluates dynamic default values whenever you insert a new record, which means that the default value can vary based on other information. Dynamic default values use expressions (specialized database formulas) that can perform calculations or retrieve other details. One useful expression, Date() , grabs the current date that's set on your computer. If you use Date( ) as the default value for a date field (as shown in Figure 4-5), then Access automatically inserts the current date whenever you add a new record. Note: You'll learn much more about SQL expressions in Part Two. 4.1.3. Preventing Duplicate Values with IndexesAny table's first rule is that each record it contains must be unique. To enforce this restriction, you need to choose a primary key (Section 2.4), which is one or more fields that won't ever be duplicated in different records. Here's the catch. As you learned in Chapter 2, the safest option's to create an ID field for the primary key. So far, all the tables you've seen have included this detail. But what if you need to make sure other fields are unique? Imagine you create an Employees table. You follow good database design principles and identify every record with an automatically generated ID number. However, you also want to make sure that no two employees have the same Social Security number (SSN) to prevent possible errorslike accidentally entering the same employee twice.
Note: For a quick refresher about why ID fields are such a good idea, refer to Section 2.4.1. In the Employees table, you certainly could choose to make the SSN the primary key, but it's not the ideal situation when you start linking tables together (Chapter 5), and it causes problems if you need to change the SSN later on (in the case of an error), or if you enter employee information before you've received the SSN. You can force a field to require unique values with an index . A database index is analogous to the index in a bookit's a list of values (from a field) with a cross-reference that points to the corresponding section (the full record). If you index the SocialSecurityNumber field, Access creates a list like this and stores it behind the scenes in your database file: Table 4-1.
Using this list, Access can quickly determine whether a new record duplicates an existing SSN. If it does, then Access doesn't let you insert it. So how do you apply an index to a field? The trick's the Indexed field property, which is available for every data type except Attachment and OLE Object. When you add a field, the Indexed property's set to No, which means Access doesn't create a field. To add an index and prevent duplicates, you can change the Indexed property in Design view to Yes [No Duplicates]. The third option, Yes [Duplicates OK], creates an index but lets more than one record have the same value. This option doesn't help you catch repeated records, but you can use it to speed up searches (see the box, "How Indexes Speed Up Searches" in Section 6.2.2 for more).
Note: As you know from Chapter 2 (Section 2.4.1), primary keys also disallow duplicates, using the same technique. When you define a primary key, Access automatically creates an index on that field. When you close Design view after changing the Indexed field property, Access prompts you to save your changes. At this point, it creates any new indexes it needs. You can't create a no-duplicates index if you already have duplicate information in your table. In this situation, Access gives you an error message when you close the Design window and it attempts to add the index.
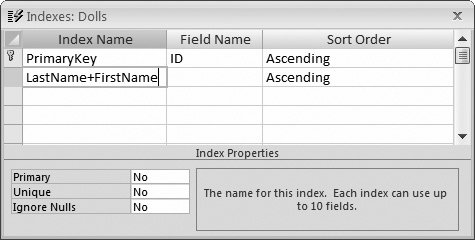
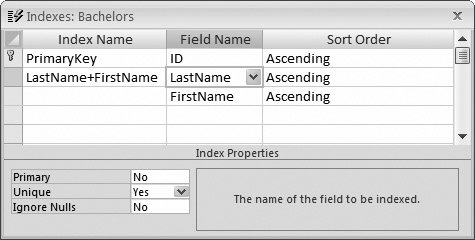
4.1.3.1. Multifield indexesYou can also use indexes to prevent a combination of values from being repeated. Imagine you create a People table to track your friends and their contact information. You're likely to have entries with the same first or last name. However, you may want to prevent two records from having the same first and last name. This limitation prevents you from inadvertently adding the same person twice. Note: This example could cause endless headaches if you honestly do have two friends who share the same first and last names . In that case, you'll need to remove the index before you're allowed to add the name. You should think carefully about legitimate reasons for duplication before you create any indexes. To ensure that a combination of fields is unique, you need to create a compound index , which combines the information from more than one field. Here's how to do it:
|