Section 6.2. Printing
6.2. PrintingPrinting in Excel is pretty straightforwardas long as your spreadsheet fits on a normal 8.5 x 11-inch piece of paper. If you're one of the millions of spreadsheet owners who don't belong to that club, then welcome to the world of Multiple Page Disorder: the phenomenon in which pages and pages of apparently unrelated and noncontiguous columns start spewing from your printer. Fortunately, Excel comes with a slew of print-tweaking tools designed to help you control what you're printing. First off, though, it helps to understand the settings Excel uses when you click the print button: Note: You can change most of the settings listed; the following is just a list of what happens if you don't adjust any settings before printing a spreadsheet.
6.2.1. How to Print an Excel FileTo print an Excel file, follow these steps:
Tip: If you're printing a very large worksheet, Excel shows a Printing dialog box for a few seconds as it sends the pages to the printer. If you decide to cancel the printing processand you're quick enoughyou can click the Cancel button in this Printing dialog box to stop the operation. If you don't possess the cat-like reflexes you once did, you can also open your printer queue to cancel the process. Look for your printer icon in the notification area at the bottom right of your screen, and double-click that icon. Then, select the offending print job in the list, and press the Delete key (or choose Document  Cancel from the menu). Some printers also provide their own cancel button that lets you stop a print job even after its left your computer. Cancel from the menu). Some printers also provide their own cancel button that lets you stop a print job even after its left your computer.
6.2.2. Customizing Print SettingsExcel's standard print settings are fine if you've got a really small amount of data in your worksheet. But most times, you'll want to tweak these settings so that what you print out is easy to read when it's on paper. The Page Setup dialog box is your control center: it lets you do everything from adding headers and footers to shrinking the size of your data so you can cram more information onto a single printed page. To display the Page Setup dialog box (Figure 6-11), select File Figure 6-11. The Page Setup dialog box, on the Page tab.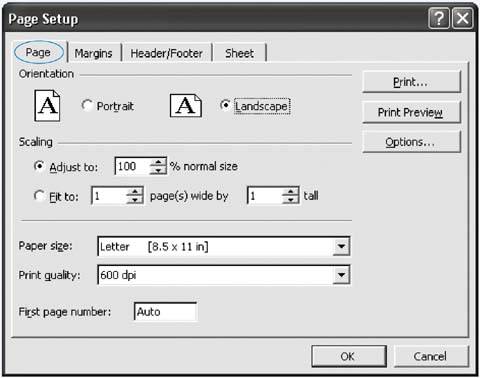 6.2.2.1. Page settingsThe Page tab of the Page Setup dialog box contains two of Excel's most useful print toolsOrientation and Scalingplus a handful of other, less frequently used options:
Note: Page Break Preview mode, described on Section 6.2.4, gives you yet another way to squeeze more data onto a single page.
6.2.2.2. Margins settingsThe Margins tab of the Page Setup dialog box (Figure 6-12) lets you adjust the size of your printed page's margins (the space between your worksheet data and the edge of the page). The margin numbers indicate the distance between the item indicated (for example, the Top of the page, or the Bottom Footer) and the edge of the paper. All you need to do is modify the numbers in the various boxes around the Margin tab. Figure 6-12. Excel allocates space at the top and bottom of your printout for a header or footer. In this example, Excel has set the header margin to 0.5, which means that any header information appears half an inch below the top of the page; and it's set the top margin to 1, meaning the worksheet data appears one inch below the top of the page. Note: The units Excel uses for margins depend on the regional settings on your computer (which you can adjust through the Regional and Language Options icon in the Windows Control Panel). Unfortunately, Excel doesn't indicate the type of units it uses in the Page Setup dialog box, and it doesn't give you any choice to override your regional settings and use different units. As an example, if you set the header margin to 0.5, when you print your worksheet any header information appears half an inch below the top of the page. If you set the top margin to 1, the worksheet data appears one inch below the top of the page. Tip: When adjusting either of these settings, be careful to make sure that you always set the top margin larger than the header margin; otherwise, your worksheet's data prints on top of your header. The same holds true with footers when changing the bottom margin. If you aren't using headers or footers, it doesn't matter what you set the margins at. Logically enough, if you reduce the size of your margins, you have more room to print your stuff. However, you can't completely eliminate your margins. Most printers require at least a little space (usually no less than .25 inches) to grip onto the page, and you won't be able to print on this part (the very edge of the page). If you try to make the margins too small, Excel won't inform you of the problem; instead, it just sticks with the smallest margin your current printer allows. This behavior is different than other Microsoft Office programs (like Word). To see it in action, try setting your margins to 0 and looking at the result in the print preview window. You'll see there's still a small margin left between your data and the page borders. Tip: A good rule of thumb is to adjust margins symmetricallyprintouts tend to look nicest that way. So, for example, if you shrink the left margin to 0.5, make the same change to the right margin. Generally, if you want to fit more data and you don't need any header or footer space, you can safely reduce all your margins to 0.5. If you really want to cram in the maximum amount of data, you can try 0.25, but that's the absolute minimum margin that most printers allow. When you have only a few rows or columns of information, you may want to use one of the "Center on page" options at the bottom of the tab. Select Horizontally to center your columns between the left and right margins. Select Vertically to center your data between the top and bottom of the page. 6.2.2.3. Creating headers and footersThe Header/Footer tab of the Page Setup dialog box lets you create a new header or footer using one of the settings Excel provides, or by creating your own. The header contains the text you want Excel to print at the top of every page in your printout, while the footer contains text you want Excel to print at the bottom of every page. You can use one, both, or neither in a printout. The easiest way to create a header or footer is to use one of Excel's suggestions, which you find when you click either the Header or Footer pull-down menu. When you make a selection, you see a preview indicating what the header and footer will look like on the page. (Another way to see exactly what they'll look like is via the Print Preview window, described on Section 6.2.3.) Some of the options Excel suggests for a header or footer include:
The header and footer options are the same. It's up to you to decide whether you want page numbering at the bottom and a title at the top, or vice versa. If none of the standard options sounds enticing, you can click the Custom Header or Custom Footer button to display the Header and Footer dialog boxes (respectively) and create your own header or footer. You can add two types of information to a custom header or footer: literal text and placeholders. Literal text consists of ordinary characters that you type, which Excel then copies directly into the header or footer. Placeholders are special codes Excel replaces with a corresponding value. For example, you can insert codes that represent the current page number, the total number of pages, the date, the file name, and so on. In the Header (or Footer) dialog box you see three sections, representing left-aligned, centered, and right-aligned text. You can use one section, or any combination of all three. Inside these boxes, simply type the text and codes that you want to appear in your header or footer. Fortunately, you don't have to remember Excel's codes for the page number, the current date, yadda yadda yadda. Instead, you can click the appropriate button in the Header or Footer window (Figure 6-13) to insert the code you want. The Header and Footer dialog boxes also offer options that let you set the font or insert a graphic. 6.2.2.4. Sheet settingsThe Sheet tab of the Page Setup dialog box includes a collection of miscellaneous settings that let you control things like whether the gridlines in a spreadsheet appear in a printout. It also contains a handy tool for printing column titles on the top of every page. The Sheet tab includes the following settings:
Figure 6-13. When you create your own header or footer, a special dialog box appears with three sections, representing left-aligned, centered, and right-aligned text. Inside these boxes, simply type the text (or click to insert the codes) that you want to appear in your header or footer.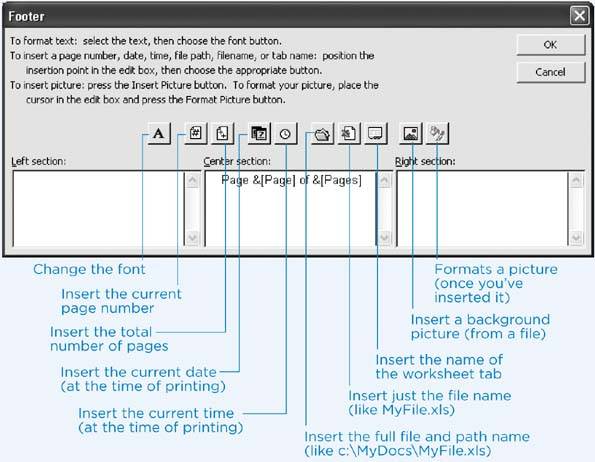 Note: The first three settings of the Sheet tab"Print area" and the two "Print titles" settingsask you to type in a range of cells. If you click the icon with the arrows at the right end of the text box, you can select the cells directly from the worksheet, rather than typing in the range manually. (See Section 3.1.2 for more on manually indicating cell ranges.) Figure 6-14. The Sheet tab lets you set a bunch of miscellaneous of options. In this example, Excel uses the "Print titles" section to ensure that every page in this printout will display the first row of the spreadsheet as well as the first column.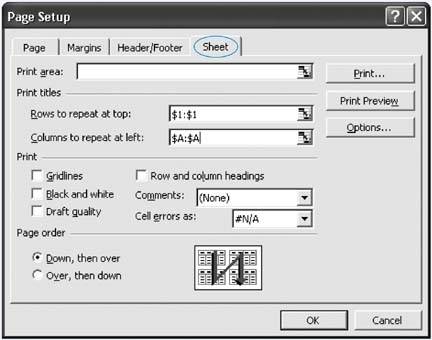
6.2.3. Getting a Print SnapshotYou don't have to be a tree-loving environmentalist to want to minimize the number of pages you print out. Thanks to the Print Preview tool (Figure 6-15), you can see what your printout looks like before it appears on paper. This tool is especially helpful if you've just tweaked a bunch of the Page Layout settings (described in the preceding sections) and you first want to see what the effects will be before clicking Print. To see the Print Preview for a worksheet, select File How does the Print Preview differ from your worksheet view? There are several notable differences, including:
Figure 6-15. A print preview shows you exactly what your printout looks like. In this example, the worksheet has 21 columns, but since 21 columns are wider than the width of a single printed page, Excel starts by printing the leftmost four columns.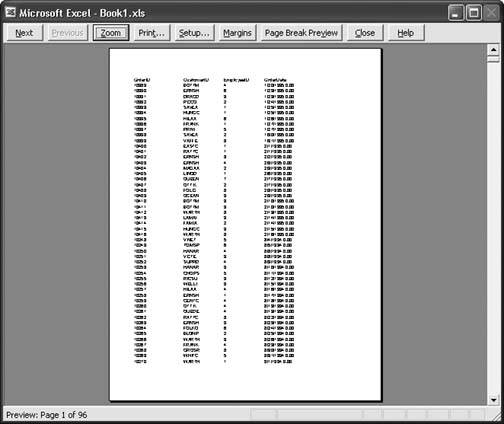
When you first display the Print Preview window, you see a replica of the first page of your current worksheet as it would appear if you printed it out. To jump in for a closer look, click anywhere on the preview page (notice that the pointer has become a magnifying glass), or click the Zoom button. Doing so magnifies the sheet to 100 percent zoom, so you can more clearly see the text and details. (The preview window supports only two levels of zoom: 100 percent and full page view. To return to full-page view, click the page or click the Zoom button again.) To move from page to page, you can use the scroll bar at the side of the window, or you can click the Next button at the top of the window. You can also use the Page Up and Page Down keys. Tip: If you only want to see how a select group of cells will print out, first set a Print Area (Section 6.1.4). Now Print Preview displays only the data that's inside the print area you've designated. Here are some of the tasks you can perform from the Print Preview window:
Figure 6-16. The Print Preview window lets you set margins using your mouse.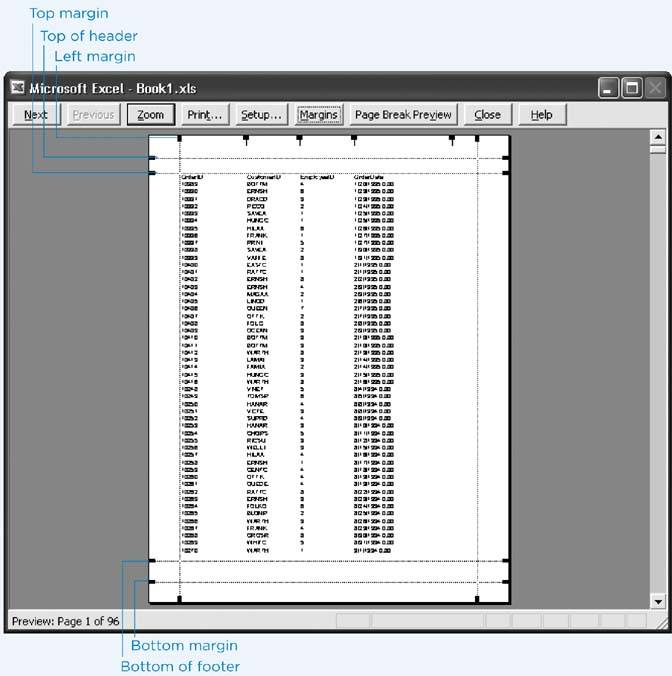 Note: When setting the top and bottom margins, make sure you don't drag the page margin line beyond the line used to delineate the header or footer. If you do, your header or footer overlaps your worksheet's data.
Note: If you look carefully, you can get a hint about page breaks before you even open the Print Preview window. In Normal view (View Normal), Excel uses a dashed line in lieu of a normal grid line to indicate where a page break occurs. If youre having trouble spotting these dashed lines, you can also use the Page Break Preview window, which is described in the next section.6.2.4. Page Break Preview: A Bird's-Eye View of Your WorksheetPrint Preview is good for getting a snapshot of how an individual page is going to print out, but it's not the only print preview tool that Excel gives you. Page Break Preview is a great way to get a bird's-eye view of how an entire worksheet is going to print out. It's particularly useful if your worksheet is made up of lots of columns. That's because Page Break Preview zooms out so you can see a large amount of data at once, and it uses thick blue dashed lines to show you where page breaks occur, as shown in Figure 6-17. In addition, the Page Break Preview numbers every page, placing the label "Page X" ("X" is the page number) in large gray lettering in the middle of each page. Note: Excel never breaks a printout in the middle of a column or row. To preview the page breaks in your data, select View Once you're in Page Break Preview mode, you can do all of the things you do in Normal view mode, including editing data, formatting cells, and changing the zoom percentage to reveal more or fewer pages. You can also click the blue dashed lines that represent page breaks and drag them to include more or less rows and columns in your page. Figure 6-17. Here's a large worksheet in Page Break Preview mode. The worksheet is too wide to fit on one page (at least in portrait orientation), and the thick dashed line indicates that the page breaks after column D and before row 53. You can change the zoom percentage (View |
 Set Print Area from the menu. The portion of the worksheet that youve highlighted now has a thin dashed outline, indicating it's the only region Excel will print. You can have only one print area at a time, and setting a new one always clears the previous one. To remove your print area so that you can print the entire worksheet, choose File
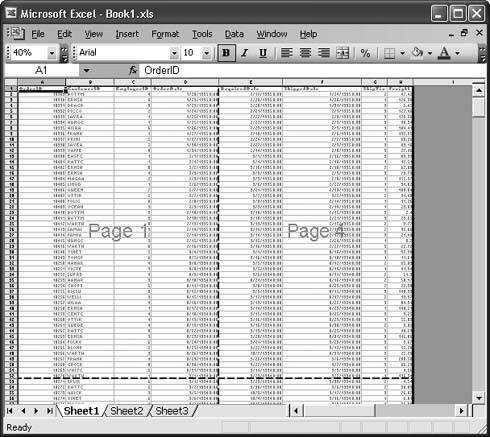
EAN: 2147483647
Pages: 85
- Chapter I e-Search: A Conceptual Framework of Online Consumer Behavior
- Chapter VI Web Site Quality and Usability in E-Commerce
- Chapter VIII Personalization Systems and Their Deployment as Web Site Interface Design Decisions
- Chapter XII Web Design and E-Commerce
- Chapter XIII Shopping Agent Web Sites: A Comparative Shopping Environment