Section 14.3. Dynamic HTML
JavaScript underwent a minor revolution in the late 1990s, adding support for a set of features called Dynamic HTML (DHTML). Dynamic HTML isn't a new technologyinstead, it's a fusion of three distinct ingredients :
-
Scripting languages like JavaScript, which let you write code.
-
The CSS (Cascading Style Sheet) standard, which lets you control how an HTML element appears and how it is positioned.
-
The HTML document object model (or DOM), which lets you treat an HTML page as a collection of objects .
The last point is the most important detail. DHTML extends scripting languages like JavaScript so they can interact with the page as a collection of objects . This is a radical shift in Web programming. Each HTML element you add, including images, links, and even the lowly paragraph, is treated like a separate programming ingredient that your JavaScript can play with. And when you mix in style sheet attributes, your code can change what each element looks like or even where it gets placed on the page.
Note: Most DHTML operations require Internet Explorer 4 or later, Netscape 7 or later, Opera 7 or later, or Firefox. Although these options represent the browsers that are most commonly in use today, you should test your pages with older browsers if you need to support them, too. Also, be wary of proprietary features (like the innerHTML property that only Internet Explorer supports).
14.3.1. HTML Objects
Clearly, DHTML requires a whole new way of thinking about Web page design. Your scripts no longer look at your Web page as a static block of HTML. Instead, they see a combination of objects .
| UP TO SPEED Understanding Objects |
| In many programming languages, including JavaScript, everything revolves around objects. What exactly is an object? In the programming world, an object is nothing more than a convenient way to group some related features or information. For example, say you wanted to change the picture that's shown in an <img> tag in a Web page (useful, if you wanted to write a script that flashed a series of images). The easiest way to interact with an <img> tag in JavaScript is to use the corresponding image object. In effect, the image object is a container holding all sorts of potentially useful information about what's happening inside an <img> tag (including its dimensions, its position, the name of the image file associated with it, and so on). The image object also gives you a way to manipulate the <img> tagthat is, to change some or all of these details. For example, you can use an image object to get information about the image, like this: document.write("The tooltip says" + image.title ) Or, you can even change one of these details. For example, you can modify the actual image that an <img> tag is showing by using this code: image.src = "newpic.jpg" You'll know an object's at work by the presence of a dot (.) in your code line. The dot separates the name of the variable (the first part) from one of the built-in functions it provides (called methods ), or one of the related variables (called properties ). The properties and methods are always placed after the period. In the previous examples, src and title are two of the image object's properties. In other words, the code image.src = "newpic.jpg" is the equivalent of saying "Hey, Mr. Objectnamed- Image: I have a new picture for you. Change your src to point to newpic.jpg ." Programmers embraced objects long ago, because they're a great way to organize code conceptually (not to mention a great way to share and reuse it). You might not realize it at first, but working with the image object is actually easier than memorizing a few dozen different commands that manipulate an image. |
Before you can manipulate an object in your Web page, you need a way to uniquely identify it. The best choice is the id attribute. Add this attribute to the tag for the element you want to manipulate, and choose a unique name, as shown here:
<h1 id="PageTitle">Welcome to My Page</h1>
Once you give your element a unique ID, it's easy to dig up (and use) the matching object in your code. JavaScript has a trick for just this purposeit's the document.getElementById() method. Basically, document is an object that represents your whole HTML document. It's always available and you can start using it any time you want. The document object, like any object worth its name, provides some handy properties and methods. The getElementById() method is one of the coolestit's able to scan the whole page looking for a specific HTML tag.
When you call the document.getElementById() method, you supply the ID of the HTML element you're looking for. Here's an example that digs up the object for an HTML tag with the ID PageTitle :
var titleObject = document.getElementById("PageTitle") This gets the object for the <h1> element (shown earlier), and stores it in a variable named titleObject. That way, you can perform a series of operations with the heading without having to look it up more than once.
What exactly can you do with an HTML object? To a certain extent, it depends on the type of element. For example, if you have a hyperlink, you can change the URL. If you have an image, you can change the source. And there are some actions you can take with most HTML elements, like changing the style information, or modifying the text that appears between the beginning and ending tags. As you'll see, these tricks are useful when you're making a page more dynamicfor example, you want your page to change when your visitors do something. That way, they feel like they're using an intelligent , responsive program, instead a plain, inert Web page.
For example, here's how you could modify the text inside the just-mentioned <h1> element:
titleObject.innerText = "This Page Is Dynamic"
If you run this code in a script, the header's text changes immediately when the script runs.
The trick that makes this script work is the innerText property . Like all properties, innerText is just one aspect of an HTML object that you can alter. In order to write code statements like this, you need to know what properties there are for you to play with. Obviously, some properties are for specific tags onlylike the src attribute of an image. However, modern browsers boast a huge catalog of DOM properties that you can use for just about any tag. Table 14-1 lists some of the most useful.
Tip: To get the properties that a specific HTML tag supports, check out the reference at www.w3schools.com/htmldom/dom_reference.asp.
Currently, this example works in two steps (getting the object, and then manipulating it). Although this two-step maneuver is probably the clearest approach, it's possible to combine these two steps into one line, which scripts often do. Here's an example:
document.getElementById("PageTitle").innerText = "This Page Is Dynamic" The advantage of getting an object first is that you can change several properties one after the other, without needing to look up the HTML object using getElementById() each time.
Table 14-1. Common HTML Object Properties
| Property | Description |
|---|---|
| className | Lets you retrieve or set the class attribute (see Section 6.6). In other words, this property determines what style (if any) this element uses. Of course, this style needs to be present in an embedded or linked style sheet, or you'll just end up with the plain-Jane default formatting. |
| innerText | Lets you read or change the text inside this element. innerText is insanely useful, but has two quirks . First, any tags you include are automatically converted to plain text using the HTML character entities (see Section 2.3.5.3). In other words, if you set this property with the text <b>Hi</b>, it's converted to <b>Hi</b> which is displayed as the text <b>Hi</b>. If you want to actually make the text bold, you'll need to use the style property instead (which is also described in this table). Second, if you use a tag that has other tags inside it, the innerText refers to the text between the opening tag and the first nested tag. So if you have a paragraph with bolded text, as in "<p>This <b>word</b> is bold</p>," the inner-Text is just the first part: "This." Using innerText can be quite confusing, so it's recommended that you don't use it on tags that contain other tags. If you want to modify a specific piece of a paragraph, wrap that piece in a <span> tag. |
| parentElement | Provides the HTML object for the tag that contains this tag. For example, if the current element is a <b> tag in a paragraph, this gets the object for the <p> tag. Once you have this object, you can modify the paragraph. Using this technique (and other similar techniques in DHTML), you can jump from one tag to another. |
| style | Bundles together all the CSS attributes that determine the appearance of the HTML element. Technically, the style property returns a full-fledged style object, and you need to add another dot (.) and the name of the style attribute you want to change, as in myObject.style.fontSize. You can use the style object to set colors, borders, fonts, and even positioning. |
| tagName | Provides the name of the HTML tag for this object, without the angle brackets. For example, if the current object represents an <img> tag, this returns the text "img". |
| value | In an <input> tag (Section 12.2.2.2), the value attribute has a special meaning. For example, in a checkbox, it indicates whether or not the checkbox is turned on; in a text box, it indicates the text inside the box; and so on. Other tags don't use the value attribute. |
14.3.1.1. Using HTML objects in a script
The easiest way to come to grips with how HTML objects work is to look at an example. The Web pages shown in Figure 14-6 includes a paragraph that continuously grows and then shrinks, as your code periodically tweaks the font size .
|

The way this example works is quite interesting. First of all, in the <head> section of the underlying HTML, two variables are defined. The size variable keeps track of the current size of the text (which starts at 10 pixels). The growIncrement variable determines how much the text size changes each time the code runs (initially, it grows by two pixels at a time).
<html> <head> <title>DHTML</title> <script type="text/javascript"> // The current font size. var size = 10 // The amount the font size is changing. var growIncrement = 2
Next , the script defines a function named ChangeFont(). This function retrieves the HTML object for the <p> tag that should have the growing and shrinking text. Once again, the getElementById() function does the job.
function ChangeFont() { // Find object that represents the paragraph whose text size you want to change. var paragraph = document.getElementById("animatedParagraph") Now, using the size and growIncrement variables, it's easy to perform a calculation to determine the new size for the paragraph.
size = size + growIncrement
And it's just as easy to set the new size using the paragraph.style.fontSize property:
paragraph.style.fontSize = size
If this code runs perpetually, you'll eventually end up with text that grows so ridiculously huge you can't see any of it on the page. To prevent this from happening, the code has a safety valve.
When the text size hits 100, it's time to stop growing and start shrinking. At that point, the growIncrement variable is switched to subtract two pixels, and the paragraph text is also changed to let you know what's taking place. The next time this code runs, it will shrink the text instead of growing it. To make this happen, the code uses conditional logic courtesy of the if statement. Here's what it looks like:
// Decide whether to reverse direction from // growing to shrinking (or vice versa). if (size > 100) { paragraph.innerText = "This Text is Shrinking" growIncrement = -2 } Of course, you don't want the shrinking to go on forever either. So it makes sense to add one last check that tests if the text has shrunk to 10 pixels or less, in which case it's time to go back to enlarging the text.
if (size < 10) { paragraph.innerText = "This Text is Growing" growIncrement = 2 } Now here comes the really crafty bit. JavaScript includes a setTimeout() function, which lets you give an instruction to the browser that says "call this function, but wait a bit before you do." The setTimeout() function is very handy when creating interactive pages. In this example, the setTimeout() function instructs the browser to call the ChangeFont() method again in 100 milliseconds (0.10 seconds).
setTimeout("ChangeFont()", 100) } </script> </head> Because the ChangeFont() always uses setTimeout() to call itself again, the shrinking and resizing never stops. However, you could alter this behavior. For example, you could add conditional logic so that the setTimeout() method is called only a certain number of times.
The last detail is the <body> section, which contains the actual paragraph that's being resized and a script that calls ChangeFont() for the first time, starting the whole process.
<body> <p id="animatedParagraph">This Text is Growing</p> <script type="text/javascript"> ChangeFont() </script> </body> </html>
Although the resizing paragraph trick is absurdly impractical , the same technique is the basis of many much more impressive scripts (to download the whole script and play around with it yourself, download the script from the "Missing CD" page at www.missingmanuals.com). For example, you can easily find scripts that animate text in various ways, making it fly in from the side of the page (see www.codejunction.com/detailed/sequential-fly-in-text-effect.html); showing words appear one letter at a time, typewriter-style (www.javascript-page.com/tickert.html); or making a sparkle float over a title (www.flooble.com/scripts/animate.php). Each of these examples uses the same basic approach but adds significantly more code, and gives you a much slicker solution.
14.3.2. Events
The most exciting JavaScript- powered pages are dynamic , which means they perform various actions while your visitors interact with the page (moving their mice, typing in text, clicking things, and so on). A dynamic page is far more exciting than an ordinary HTML page, which appears in the browser in one shot and sits there, immobile.
To make dynamic pages, you need to program your pages to react to JavaScript events . Events are notifications that an HTML element sends out when specific things happen.
For example, JavaScript gives every <a> tag an event named onMouseOver. As the name suggests, this event takes place (or fires , to use programmer-speak) when the mouse pointer moves over an HTML element like a paragraph, link, image, table cell , or text box. At that point, the event is triggered and your code flies into action.
Note: The capitalization of JavaScript events is a little controversial . As you learned in Chapter 2, HTML isn't case-sensitive, and it doesn't care what mix of uppercase and lowercase letters you use. Long-time scripters have a tradition of capitalizing the first letter of each word in the event (except the first word "on"), as in onMouseClick. Although this is the most common approach, if you want to upgrade to XHTML (Section 2.4) in the future, you may as well get used to less-readable, all-lowercase names , like onmouseclick. That's what XHTML requires.
Here's an example that displays an alert message when a surfer moves his mouse pointer over a link:
<html> <head> <title>JavaScript Test</title> </head> <body> <h1>You Will Be Wowed (Again)</h1> <p>When you hover over <a href="SomePage.htm" onMouseOver="alert('Colorless green ideas sleep furiously.')" > this link</a> you'll see a secret message. </p> </body> </html> When you use an event, you don't absolutely need a script block (although it's a good idea to use one anyway, as described in the next section). Instead, you just put your code in between quotation marks next to the event attribute:
<a onMouseOver= "[Code goes here]" ></a>
There's one detail to keep in mind. In this example, the text argument ('Colorless green ') uses single quotes instead of double quotes. That's because the event attribute uses double quotes, and using them for two different purposes at the same time will horribly confuse the browser.
Figure 14-7 shows the result of running this script and moving the mouse pointer over the link.
|

In order to use events effectively, you need to know what events there are, and what HTML tags support them. Although the events you can use depend on the HTML tag they're applied to, Table 14-2 provides a list of commonly used events (and you can find a more complete reference at www.w3schools.com/htmldom/dom_reference.asp). In the following sections, you'll see two common scenarios that use some of these events.
Table 14-2. Common HTML Object Properties
| Event | Description | Applies To |
|---|---|---|
| onClick | Occurs when you click an element. | Almost all |
| onMouseOver | Occurs when you move the mouse pointer over an element. | Almost all |
| onMouseOut | Occurs when you move the mouse pointer away from an element. | Almost all |
| onKeyDown | Occurs when you press a key. | <select>, <input>, <textarea>, <a>, <button> |
| onKeyUp | Occurs when you release a pressed key. | <select>, <input>, <textarea>, <a>, <button> |
| onFocus | Occurs when a control receives focus (the cursor appears there so you can type something). Controls include text boxes, checkboxes, and so onsee Section 12.2.2.1 in Chapter 12 for a refresher. | <select>, <input>, <textarea>, <a>, <button> |
| onBlur | Occurs when focus leaves a control. | <select>, <input>, <textarea>, <a>, <button> |
| onChange | Occurs when you change a value in an input control. In a text box, this event doesn't fire until you move to another control. | <select>, <input type="text">, <textarea> |
| onSelect | Occurs when you select a portion of text in an input control. | <input type="text">, <textarea> |
| onError | Occurs when an image can't be downloaded (usually due to an incorrect URL). | <img> |
| onLoad | Occurs when a new page finishes downloading. | <img>, <body>, <frame>, <frameset> |
| onUnload | Occurs when a page is unloaded. (This typically occurs after a new URL has been entered or a link has been clicked. It fires just before the new page downloads.) | <body>, <frameset> |
14.3.3. Image Rollovers
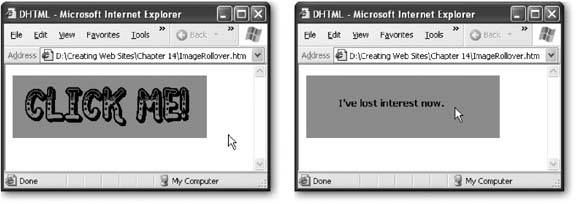
The most popular way to use mouse events is to create image rollovers . With an image rollover, you start by creating an <img> tag that shows a specific picture. Then, when the mouse pointer moves over the <img> tag, a new picture appears, thanks to the onMouseOver event. Creating an image rollover is a fairly easy task. All you need to do is get the HTML object for the <img> tag and modify the src property.
In this situation, you can't get everything done with a single line of code. You could pile your entire script into the event attribute (using semicolons to separate each line), but it would be dreadfully confusing. A better choice is to put your code in a function. You can then call the function using the event attribute.
For example, here's the function you need to swap an image. This function is written in a very generic way using parameters, which lets you reuse the function over and over, as you'll see in a moment. Every time you call the function, you specifically indicate which image you want to change (by name) and what new image file you want to use. That way, you can call the same function for any image rollover, anywhere on your page.
<script type="text/javascript"> function ChangeImage(imageName, newImageFile) { // Find the object that represents the <img> tag. var image = document.getElementById(imageName) // Change the picture. image.src = newImageFile } </script> When creating an image rollover, you need to use two events. Use the onMouseOver event to switch to the rollover picture. Additionally, use the onMouseOut event (which occurs when the mouse pointer moves off the HTML element) to switch back to the original picture.
<img id="SwappableImage" src="pic1.gif" onMouseOver="ChangeImage('SwappableImage', 'LostInterestMessage.gif')" onMouseOut="ChangeImage('SwappableImage', 'ClickMe.gif')" > Figure 14-8 shows the result.
|
If you want to add more rollover images, just add a new <img> tag with a different name. The following tag uses the same initial image, but shows a different rollover image each time the mouse pointer moves on and off the image:
<img id= "SwappableImage2" src="pic1.gif" onMouseOver="ChangeImage( 'SwappableImage2', 'MouseOverPicture.gif' )" onMouseOut="ChangeImage( 'SwappableImage2', 'InitialPicture.gif' )" >
If you want to get really fancy, you can even use the onClick event (which occurs when the element is clicked) to throw yet another picture into the mix.
Note: You'll get your hands dirty with more image rollovers when you create fancy buttons in Chapter 15.
14.3.4. Collapsible Text
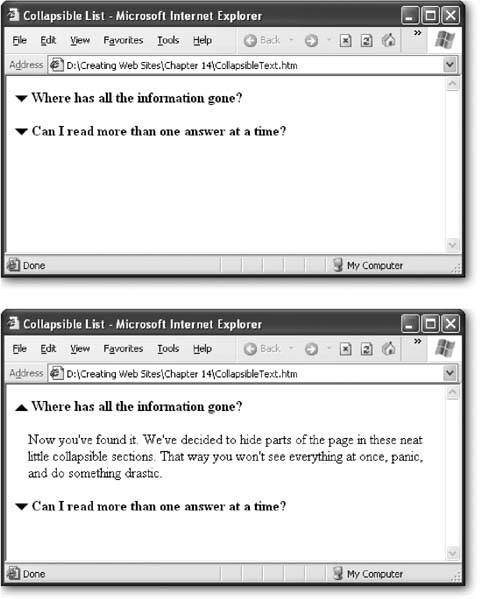
Another nifty way to use events is to create collapsible pages . The basic idea behind a collapsible page is this: If you've got a lot of information to show your viewers , but don't want them to digest it all at once, you can hide (or collapse) chunks of text behind headlines that they can then click to read the details (see Figure 14-9).
|
DHTML gives you many ways to trick the browser into hiding text to create a collapsible page, but one of the best techniques is shown in the next example. One of the advantages of this example is that it works well with old browsers (those before Internet Explorer 5). Old browsers will simply display all the content, including the information that should be hidden. The page won't be as impressive, but at least nothing will go missing.
The technique revolves around the CSS display property. When the property is set to block , an item appears in the HTML page in the normal way. But when set to none , the element completely disappears, along with everything inside it.
The first ingredient in making a collapsible page is to create the function that performs the hiding and the showing. The function requires two parameters: the name of the open/close image, and the name of the element you want to hide or show. The function actually does double duty. It checks the current state of the section, and then changes it. That means a hidden section is automatically shown and a displayed section is hidden, thanks to conditional logic. At the same time, the open /close image is changed to display a different type of arrow.
Note: This practice, where you always reverse the current state of an item, is called toggling by jargon-happy programmers.
<script type="text/javascript"> function ToggleVisibility(image, element){ // Find the image. var image = document.getElementById(image) // Find the element to hide/unhide. var element = document.getElementById(element) // Check the element's current state. if (element.style.display == "none"){ // If hidden, unhide it. element.style.display = "block" image.src = "open.png" } else { // If not hidden, hide it. element.style.display = "none" image.src = "closed.png"; } } </script> The code starts out by looking up the two objects you need, and storing them in the variables image and element . Then it gets to work. It looks at the current state of the paragraph, and makes a decision (using an if statement) about whether it needs to show the paragraph or hide it. Only one part of this conditional code runs. For example, if the image is currently hidden (the display style is none ), the function runs just these two lines and then skips to the bottom of the function and ends:
element.style.display = "block" image.src = "open.png"
On the other hand, it the image isn't hidden, this code gets a chance to prove itself instead:
element.style.display = "none" image.src = "closed.png";
To use this function, you need to add the <img> that performs the toggling into your Web page. You also need to add the HTML section that contains the hidden content. You can show or hide virtually any tag, but a good all-purpose choice is to use a <div> tag. That way, you can stuff whatever you want to hide inside the <div> tag.
Here's an example:
<p> <img id="Question1Image" src="closed.png" onClick="ToggleVisibility('Question1Image','HiddenAnswer1')"> <b>Where has all the information gone?</b> </p> <div id="HiddenAnswer1" style="display:none"> <p>Now you've found it. We've decided to hide parts of the page in these neat little collapsible sections. That way you won't see everything at once, panic, and do something drastic.</p> </div> The first part (between the <p> tags) defines the question heading, which is always visible. It contains the image and the question (in bold). The second part (in the <div> tag) is the answer, which can be alternately shown or hidden.
Notice that the <div> tag uses a style rule (display:none) to explicitly hide the section. If you want a section to start off being visible, just remove the style attribute, so the <div> tag is declared like this:
<div id="HiddenAnswer1">
Best of all, because you've put all the complicated stuff into a function, you can reuse your function quite easily to make more collapsible sections. These sections have the same structure, but have different contents:
<p> <img id="Question2Image" src="closed.png" onClick="ToggleVisibility('Question2Image','HiddenAnswer2')"> <b>Can I read more than one answer at a time?</b> </p> <div id="HiddenAnswer2" style="display:none"> <p>You can expand as many or as few sections as you want. Once you've expanded a section, just click again to collapse it back up out of sight. The only rule is that when you leave this page and come back later, everthing will be hidden all over again. That's just the way JavaScript and DHTML work.</p> </div> Notice that each <img> and <div> tag needs a unique id, or your function won't know which picture to change and which section to hide. This is all you need to run the example shown in Figure 14-9.
Optionally, you can change this page around to give it a different feel but keep the same collapsing behavior. For example, you can make the page easier to use by letting the surfer expand and collapse sections by clicking the heading text (instead of just the image). The easiest way to do this is to pop the image and the bold heading into a <div> tag, and then handle the onClick event of that <div> tag. Here's the change you need:
<div onClick="ToggleVisibility('Question1Image','HiddenAnswer1')"> <p> <img id="Question1Image" src="closed.png"> <b><u>Where has all the information gone?</u></b> </p> </div> You could even underline the heading text so it looks like a link, which lets the viewer know something will happen if it's clicked. Use style sheet formatting or the <u> tag to get your underlining.
Note: You'll see more collapsible text effects when you tackle collapsible menus in Chapter 15.
14.3.5. An Interactive Form
Some of the most powerful examples of JavaScript appear when you combine JavaScript with HTML forms. As you learned in Chapter 12 (Section 12.2.2.1), HTML forms allow you to create graphical widgets like text boxes, checkboxes, buttons, and more. Without using a client-side programming language like JavaScript or a more powerful server-side programming language, forms are quite limited. However, if you start using JavaScript and add in a dash of programming savvy, you can create pages that have their own intelligence.
For example, consider the page shown in Figure 14-10. It provides several text boxes where viewers can type in numbers , and then it performs a calculation when they click a button.
Building this example is surprisingly easy. The trickiest part is creating the function that powers the underlying calculations. This function needs several pieces of information, corresponding to the values in the three text boxes (feet, inches, and pounds ). The function also needs the name of the element where it should display the results. Here's what the function looks like to start with:
<script type="text/javascript"> function CalculateBMI(feet, inches, pounds, resultElementName) { Tip: You could create a CalculateBMI() function that doesn't take any arguments. Instead, the function could just search for all the controls on the page by name. However, using arguments is always a good idea, because it makes your code more flexible. Now you can use the CalculateBMI() function on all kinds of different pages, with or without a form.
|

The function code that follows isn't much different from what you've seen before. One trick is that it begins by using a Number() function that's hardwired into JavaScript. This function converts the text that's been typed in to numbers that can be used in calculations. If you don't take this step, you might still get the right answer (sometimes), because JavaScript can automatically convert textual strings into numbers as needed. However, there's a catchif you try to add two numbers together and JavaScript thinks they're strings, it will just join the two strings together into one piece of text (so 1+1 would get you 11). This mistake can really scramble your calculations, so it's best to always use the Number() function, like so:
inches = Number(inches) pounds = Number(pounds) feet = Number(feet)
The actual calculation isn't too interesting. It's taken straight from the definition of BMI (which you can find on the Internet).
var totalInches = (feet * 12) + inches
Finally, the result is displayed on the page:
var resultElement = document.getElementById(resultElementName) resultElement.innerText = Math.round(pounds * 703 * 10 / totalInches / totalInches) / 10 } </script>
Creating the form that uses this function is the easy part. All you need to do is create the text boxes with <input> tags, and give them names that are easy to remember. In this example, the form uses a table to make sure the text boxes line up neatly next to each other.
<form> <table> <tr> <td>Height: </td> <td><input type="text" name="feet"> feet</td> </tr> <tr> <td> </td> <td><input type="text" name="inches"> inches</td> </tr> <tr> <td>Weight: </td> <td><input type="text" name="pounds"> pounds</td> </tr> </table>
Finally, at the bottom of the form, you create a button that calls the CalculateBMI() function with the form values. To have the button make this call, you need to program your page to react to the onClick event. To look up a value in a form, you don't need the getElementById() function. Instead, you can access them by name through the this.form object, which represents the current form:
<p> <input type="BUTTON" name="calc" value="Calculate" onClick="CalculateBMI(this.form.feet.value, this.form.inches.value, this.form.pounds.value, 'result')"> </p> </form>
The final ingredient is the tag that displays the result. In this case, you want it to appear inside another paragraph, the <span> tag makes more sense than the <div> tag. (See Section 5.2.7 in Chapter 6 to review the difference.)
<p> Your BMI: <span id="result"></span> </p>
You can use all sorts of other form-related scripts. For example, you can check the information people enter for errors before allowing them to continue from one page to another. To learn more about these tricks, you'll need to take your search to the Web, as described in the next section.
| UP TO SPEED Script Categories |
| To get a handle on what types of scripts are available, look through the different Dynamic Drive categories. Here's a sampling of what you'll find: The Calendars category has scripts that produce nifty HTML that looks like a calendargreat for displaying important dates or letting surfers plan in advance. The Date & Time category has live clocks and countdowns to a specific date. The Document Effects category has page transitions and background effects (like fireworks or floating stars). The Dynamic Content category has menus that slide out, sticky notes, and scrollable panels. The Form Effects category has scripts for managing forms (see Section 14.4). You can use them to make sure forms are submitted only once, check for invalid entries, and more. The Games category has complete miniature games, like tic-tac-toe and Tetris. These games stretch the capabilities of JavaScript and DHTML as far as they can go. The Image Effects category has slideshow and image gallery scripts, along with dynamic images that change pictures when you move the mouse. The Links & Tooltips category has fancy links that flash, button tricks, and pop-up text boxes that capture your visitors' attention. The Menus & Navigation category has handy collapsible menus and navigational bars that let visitors move through your site, like the ones you'll see in Chapter 15. The Mouse and Cursor category has scripts to change the mouse pointer and add those annoying mouse trails (pictures that follow the mouse pointer wherever it goes). The Scrollers category has marquee-style scrolling text, like you might see in a news ticker. The Text Animations category has scripts that bring text to life, making it shake, fly, glow, or take on even more bizarre characteristics. The User/System Preference category has scripts that dig up information about the browser that's currently displaying your page. The Window and Frames category has scripts for a dozen different types of pop-up windows . |
EAN: N/A
Pages: 135