Section 14.2. JavaScript 101
14.2. JavaScript 101Now that you've learned a bit about JavaScript and why it exists, it's time to dive right in and start creating your first real script. 14.2.1. The <script> TagEvery script starts with a <script> block that you slot somewhere into an HTML document. Really, you have only two options:
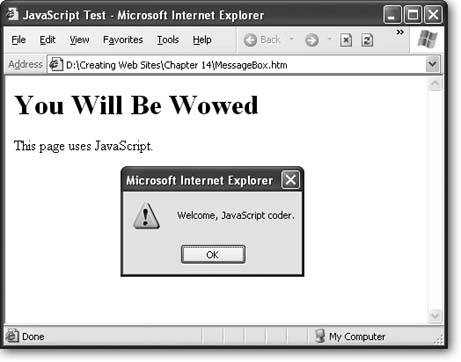
Note: You can place as many <script> blocks in a Web page as you want. A typical script block consists of a series of programming instructions. To get a handle on how these instructions work, consider the following example, which causes the browser to display a JavaScript alert box. <html> <head> <title>JavaScript Test</title> </head> <body> <h1>You Will Be Wowed</h1> <p>This page uses JavaScript.</p> <script type="text/javascript"> alert("Welcome, JavaScript coder.") </script> </body> </html> This script pops up a window with a message, as shown in Figure 14-2. When you click OK, the message disappears, and it's back to life as usual for your Web page.
You're probably wondering exactly how this script works its magic. When the browser processes the script, it runs all the code, going one line at a time. In this case, there's only one line: alert("Welcome, JavaScript coder.") This line uses the built-in JavaScript function named alert . A function is a programming routine consisting of one or more lines of code that performs a certain task. JavaScript offers many built-in functions, and you can build your own. The alert() function requires one piece of information, or an argument , in programmer-speak. In this case, that piece of information is the text you want to show in the alert box. If you were supplying an ordinary number, you could type it in as isthat is, you'd just write in the number. However, text poses a bit more of a problem, because there's no way for the browser to tell where the text starts and stops. To handle this problem in JavaScript, you must put your text inside single apostrophe quotes (') or double quotation marks ("), as in this example. Note: In programmer-speak, a distinct piece of text that's used in a program is called a string ; "a," "The friendly fox," and "Rumpelstiltskin" all qualify as strings. That's it. All this simple script does is call the alert() function. (Spend enough time around programmers and JavaScript fans, and you'll soon learn that "call" is the preferred way to describe the action of summoning a function into action.) The alert() function does the rest, popping up the correct- sized window and waiting for the surfer to click OK. Note: In order to write this script, you need to know that there's an alert() function ready for you to usea fact you can find out on one of the many JavaScript tutorial sites. Based on what you now know, you should be able to change this script in the following ways:
It's not much to keep you occupied, but it does demonstrate how easy it is to get started using and changing a simple script. 14.2.1.1. Scripts and really, really old browsersSometimes, scripts are written with the comment markers shown here: <script type="text/javascript"> <!-- alert("Welcome, JavaScript coder.") //--> </script> Placing the comment markers like this hides the script from Paleolithic browsers like Netscape 2, which don't understand scripts and are dimwitted enough to display the actual script text in the browser window. The chances of running into one of these beasties today is quite rare, so many JavaScript coders don't even bother with this extra step.
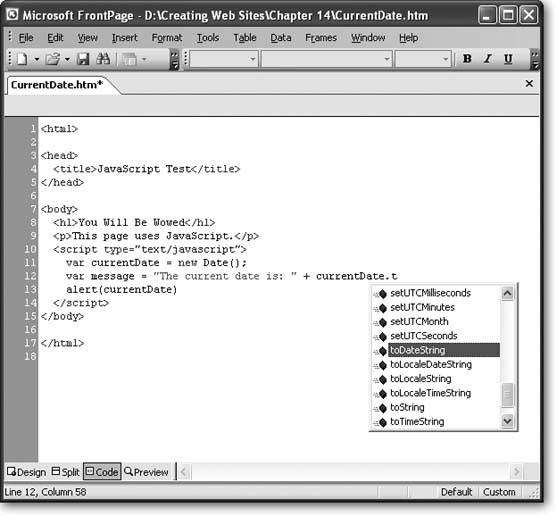
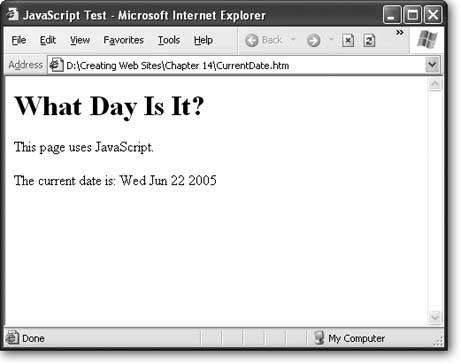
Even if you aren't expecting really old browsers to come by your Web site, you might want to use the <noscript> tag. This tag defines some alternate content that's used by browsers that understand the meaning of the <script> tag, but have JavaScript switched off. It's also used for browsers that don't support the script language you're using. For example, most non-IE browsers don't support VBScript, a scripting language based on Visual Basic. You place the <noscript> tag immediately after the <script> tag. Here's an example that shows a paragraph of text in the page when JavaScript support is lacking: <script type="text/javascript"> alert("Welcome, JavaScript coder.") </script> <noscript> <p>Welcome, non-JavaScript-enabled browser.</p> </noscript> 14.2.2. VariablesEvery programming language includes the concept of variables , which are temporary storage containers where you can keep track of important information. Variables can store numbers , objects, or pieces of text. As you'll see throughout this chapter, variables play a key role in many JavaScripts, and they're a powerful tool in any programmer's arsenal. 14.2.2.1. Declaring variablesTo create a variable in JavaScript, you use the var keyword, followed by the name of the variable. You can choose any name that makes sense to you, as long as you're consistent (and avoid spaces or special characters ). Here's an example that creates a variable named myMessage : var myMessage To put information into a variable, you use the equal sign (=), which copies the data on the right side of the equal sign into the variable on its left. Here's an example that puts some text into myMessage. myMessage = "Everybody loves variables" Remember, you need to use quotation marks whenever you've got a text string. In contrast, if you want to copy a number into a variable, you don't need quotation marks: myNumber = 27.3 Note: JavaScript variables are case-sensitive, which means a variable named myMessage isn't the same as MyMessage. If you try to use them interchangeably, you'll wind up with a scripting error (if your browser is nice) or a bizarre mistake in the page (which is usually what happens). Often, you'll want to create a variable and fill it with some useful content in the same step. JavaScript lets you do perform this maneuver by placing the equal sign immediately after the variable name when you declare it: var myMessage = "Everybody loves variables" To make matters a little confusing, JavaScript lets you use variables that you haven't declared. Doing so is considered extremely bad form and is likely to cause all sorts of problems. However, it's worth knowing that these undeclared variables are permissible, because they're the source of many an unexpected error. 14.2.2.2. Modifying variablesOne of the most useful things you can do with numeric variables is perform operations to change your data. For example, you can use arithmetic operators to perform mathematical calculations: var myNumber = (10 + 5) * 2 / 5 These calculations follow the standard order of operations (parentheses, then addition and subtraction, then multiplication and division). The result of this calculation is 6. You can also use operations to join together multiple pieces of text into one long string. In this case, it's the plus (+) operator that you use: var firstName = "Sarah" var lastName = "Smithers" var fullName = firstName + " " + lastName Now the fullName variable holds the text "Sarah Smithers". 14.2.2.3. An example with variablesAlthough you'd need to read a thick volume to learn everything there is to know about variables, you can pick up a lot from a simple example. The following script inserts the current date into the Web page. Each line of script code is numbered to make it easy to reference. <html> <head> <title>JavaScript Test</title> </head> <body> <h1>What Day Is It?</h1> <p>This page uses JavaScript.</p> <p> <script type="text/javascript"> 1 var currentDate = new Date() 2 var message = "The current date is: " 3 message = message + currentDate.toDateString() 4 document.write(message) </script> </p> </body> </html> Here's what's happening, line by line:
Scripts can get much more complex than this. For example, they can use loops to repeat a single action several times, or use conditional logic to make decisions. You'll see examples of some of these techniques in this chapter, but you won't get a blow-by-blow exploration of the JavaScript languagein fact, that would require a small book of its own. If you want to learn more, check out the box "Becoming a JavaScript Guru." 14.2.3. FunctionsSo far, you've seen simple scripts that use only a few lines of code. More realistic JavaScript scripts can take dozens of lines, and if you're not careful, they can grow into a grotesque tangle that leaves the rest of your page difficult to edit. To control the chaos, smart JavaScripters almost always use custom functions . A function is a series of code instructions that you group together and give a name. In a way, functions are sort of like miniature programs, because they can perform a series of operations. The neat thing about functions is that you only need to create them once, and then you can reuse them anywhere .
14.2.3.1. Declaring a functionTo create a JavaScript function, start by deciding what your function is going to do (like show an alert message) and then choose a suitable name (like ShowAlertBox ). As with most things in the programming world, the function name can't have any spaces or special characters. Armed with this information, you're ready to put a <script> block in the <head> section of your page. But this <script> block looks a little different from the examples you've seen so far. Here's a complete function that shows an alert box with a predefined message: <script type="text/javascript"> function ShowAlertBox() { alert("I'm a function.") } </script> To understand what's going on here, it helps to break this example down and consider it piece by piece. Every function declaration starts with the word function , which tells JavaScript what you're up to. function Next is the name of your function and then two parentheses. The parentheses can be used to get extra information to feed into your function, as you'll see on Section 14.2.3.3. function ShowAlertBox() At this point, you've finished declaring the function. All that remains is to put the code you want inside that function. To do this, you need the funny curly braces shown above. The { brace indicates the start of your function code and the } brace indicates the end. In between, you can put as many code statements as you want. One tricky part of function writing is the fact that JavaScript is notoriously loose about line breaks. That means you can create an equivalent JavaScript function that moves the curly brace down a line, and looks like this: <script type="text/javascript"> function ShowAlertBox() { alert("I'm a function.") } </script> But don't worryboth functions work exactly the same. Tip: You can put as many functions as you want in a single <script> block. Just add them one after the other.
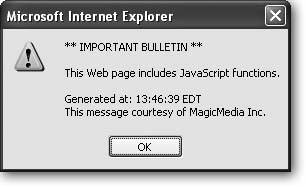
14.2.3.2. Calling a functionCreating a function is only half the battle. On their own, functions don't do anything. It's up to you to call the function somewhere else in your page to actually run the code. To call a function, you use the function name, followed by parentheses: ShowAlertBox() Note: Don't leave out the parentheses after the function name. Otherwise, the browser will assume you're trying to use a variable rather than call a function. You can call ShowAlertBox() anywhere you'd write ordinary JavaScript code. For example, here's a script that shows the alert message three times in a row to really hassle your visitors : <script type="text/javascript"> ShowAlert() ShowAlert() ShowAlert() </script> This is the same technique that, earlier, you saw used to call the alert() function. The difference is that alert() is built into JavaScript, while ShowAlertBox() is something you created yourself. Also, the alert() function requires one argument, while ShowAlertBox() doesn't use any. 14.2.3.3. Functions that receive informationThe ShowAlertBox() function is beautifully simple. You simply call it, and it displays an alert box with the built-in message. Most functions don't work this easily. That's because in many cases you need to send specific information to a function, or take the results of a function and use them in another operation. For example, imagine you want to show a welcome message with some standard information (like the current date). However, say you want to have the flexibility to change part of this message by supplying your own witty words each time you call the function. In this case, you need a way to call a function and supply a text string with your message. To solve this problem, you can create a ShowAlertBox() function that accepts a single argument. This argument represents the customized piece of information you want to incorporate into your greeting. You choose a name for it, and place it in between the parentheses after the function name, like so: function ShowAlertBox( customMessage ) { } There's no limit to how many pieces of information a function can accept. You just need to separate each argument with a comma. Here's an example with three arguments: function ShowAlertBox(messageLine1, messageLine2, messageLine3) { } The following example shows the finished ShowAlertBox() function. It accepts a single argument named customMessage, and uses it to customize the text that's shown in the alert box: <script type="text/javascript"> 1 function ShowAlertBox(customMessage) 2 { 3 // Get the date. 4 var currentDate = new Date() 5 6 // Build the full message. 7 var fullMessage = "** IMPORTANT BULLETIN **\n\n" 8 fullMessage += customMessage + "\n\n" 9 fullMessage += "Generated at: " + currentDate.toTimeString() + "\n" 10 fullMessage += "This message courtesy of MagicMedia Inc." 11 12 // Show the message. 13 alert(fullMessage) 14 } </script> Here are some helpful notes to help you wade through the code:
Using this function is easy. You just need to remember that when you call the function, you must supply the same number of arguments as you defined for the function, separating each one with a comma. In the case of ShowAlertBox(), you only need to supply a single value for the customMessage variable. Here's an example: <script type="text/javascript"> ShowAlertBox("This Web page includes JavaScript functions.") </script> Figure 14-5 shows the result of this script.
14.2.3.4. Functions that return informationArguments let you send information to a function. You can also create functions that send some information back to the script code that called them. The trick to doing this is the return command, which you should place right at the end of your function. The return command ends the function immediately, and spits out whatever information you want your function to generate. Of course, a sophisticated function can accept and return information. For example, here's a function that multiplies two numbers (supplied as arguments) and returns the result to anyone who's interested: <script type="text/javascript"> function MultiplyNumbers(numberA, numberB) { return numberA * numberB } </script> Here's how you can use the function elsewhere in your Web page: <p>The product of 3202 and 23405 is <script type="text/javascript"> var product = MultiplyNumbers(3202, 23405) document.write(product) </script> </p> This displays the following text in a paragraph on your page: The product of 3202 and 23405 is 74942810 To use a typical script from the Web, you'll need to copy one or more functions into your page. These functions are likely to look a lot more complex than what you've seen so far. However, now that you understand the basic structure of a function, you'll be able to wade through the code to get a basic understanding of what's taking place (or at least pinpoint where the action is going down). 14.2.4. External Script FilesReusing scripts inside a Web page is neat, but did you know you can share scripts between individual pages and even different Web sites? The trick is to put your script into an external file and then link to it. This procedure is similar to the external style sheet linking you learned about back in Chapter 6. For example, imagine you perfect the ShowAlertBox() routine so that it performs a complex task exactly the way you want, but it requires a couple of dozen lines of code to do so. To simplify your life, you could create a new file to store that script. Script files are always plain text files. Usually, they have the extension .js (for JavaScript). Inside the script file, you put all your code, but you don't include the <script> tags. For example, you could create a JavaScript file named ShowAlert.js and add this code to it: function ShowAlertBox() { alert("This function is in an external file.") } Now save the file, and place it in the same folder as your Web page. In your Web page, you define a script block, but you don't supply any code. Instead, you add the src attribute and indicate the script file you're linking to: <script type="text/javascript" src="ShowAlert.js" > </script> When the browser comes across this script block, it requests the ShowAlert.js file and treats it as though the code were inserted right in the page. Here's a complete HTML test page that uses the ShowAlert.js file. The ShowAlertBox() function is called by a script in the body of the of the page: <html> <head> <title>Show Alert</title> <!-- Make all the functions in the ShowAlert.js file available in this page. Notice there's no actual content here. --> <script type="text/javascript" src="ShowAlert.js"> </script> </head> <body> <!-- Test out one of the functions. --> <script type="text/javascript"> ShowAlertBox() </script> </body> </html> There's no difference in the ways that embedded and external scripts work. However, placing your scripts in separate files helps keep your Web site organized and makes it easy to reuse scripts across several pages. In fact, you can even link to JavaScript functions on another Web sitethe only difference is the src attribute in the <script> block needs to point to a full URL (like http://SuperScriptSite.com/ShowAlert.js ) instead of just a file name. Note: Using separate script files doesn't improve your security one iota. Because anyone can request your script file, a savvy Web surfer can figure out what scripts your page uses and take a look at them. So never include any code or secret details that you don't want the world to know about in a script. |
EAN: N/A
Pages: 135
- Chapter III Two Models of Online Patronage: Why Do Consumers Shop on the Internet?
- Chapter IV How Consumers Think About Interactive Aspects of Web Advertising
- Chapter X Converting Browsers to Buyers: Key Considerations in Designing Business-to-Consumer Web Sites
- Chapter XII Web Design and E-Commerce
- Chapter XVIII Web Systems Design, Litigation, and Online Consumer Behavior