Section 7.1. Understanding Images
7.1. Understanding ImagesIn order to understand how images work on the Web, you need to know two things:
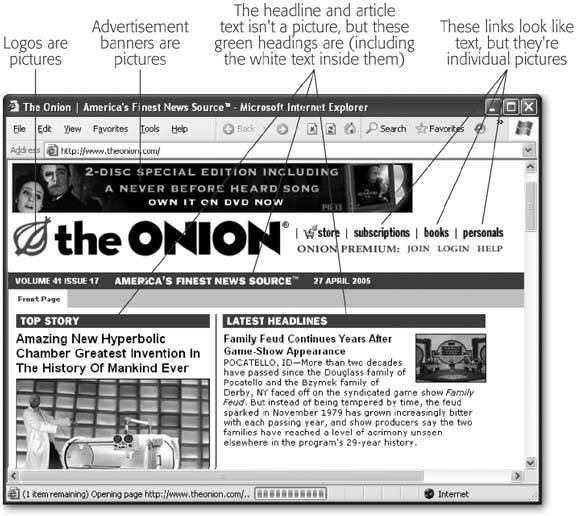
You'll use images throughout your site, even in spots where you might think ordinary text would work just fine (see Figure 7-1). Tip: If you just can't tell if a piece of content on a page is a graphic or not, try right-clicking it. If it is, browsers like Internet Explorer and Firefox will give you a Save Picture option in a drop-down menu.
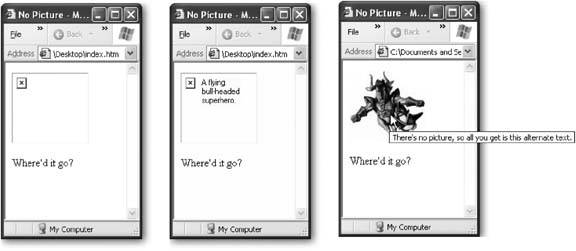
7.1.1. The <img> TagPictures appear on your page courtesy of the <img> tag, which points to the picture you want to show. For example, here's an <img> tag that shows the file named photo01.jpg : <img src="photo01.jpg"> Note: XHTML fans (see Section 2.4) add a slash character before the closing angle bracket , which indicates that <img> is a standalone tag: Pictures are inline elements (Section 5.2), which means you put them inside other block elements like paragraphs: <p><img src="photo01.jpg"></p> When the browser reads this <img> tag, it sends out a new request for the photo01.jpg file. Once the browser retrieves the file, it inserts it into the Web page wherever the <img> tag is located. If the image file is large or the Internet connection is slow, you might notice this two-stage process, because the rest of the Web page (for example, the text) may appear before the image. Note: Often, you'll want to organize your site's many files by placing your images in a separate subfolder inside the main folder that holds your Web pages. You'll learn how to do this in Chapter 8 (Section 8.1.2). Although it may seem surprising, the <img> tag is the only piece of HTML you need to show pictures. However, in order to get the result you want, you'll need to understand a few more issues, such as how to modify the size of your images, the many graphical file formats out there in Web-land, and how to align your images. 7.1.2. The alt AttributeTechnically, all <img> tags should have two attributes. You've already seen the src attribute (for source), which points to the image file. The other attribute is alt , which represents alternate text that should be displayed if the image can't be displayed. Here's an example: <img src="photo01.jpg" alt="There's no picture, so all you get is this alternate text."> The alternate text provides a short bit of text that's used instead of the graphic, when necessary. Here are some scenarios when the alt is used:
The last two reasons are the most important. Web gurus always use the alt attribute to help ensure their Web pages are accessible to screen readers and search engines. In XHTML, the alt attribute is a requirement. These days, many Web browsers have resorted to using the alternate text for a completely different purposeas a pop-up message that appears when you move the mouse over the picture (see Figure 7-2). This behavior is a little controversial , because it makes it difficult to use the alternate text the way it was designed (as replacement text for missing graphics). If you want a bit of pop-up text like the one shown in Figure 7-2, there's a better solution. You should use the title attribute, which is designed exclusively for this purpose. Here's an example: <img src="bullhero.jpg" alt="A flying bull-headed superhero." title="I'm scarier than I look." > If you specify the title attribute, it's always used for pop-up text. However, browsers differ in their behavior if you don't specify the title attribute. Internet Explorer uses the alt text instead. Firefox uses the correct approach, and doesn't show any pop-up text at all.
7.1.3. Picture SizeWhen you start thinking about the size of your images, it's important to remember that the word size has two possible meanings: the dimensions of the picture (how big it appears in the browser, or the picture dimensions ), and the actual size of the file (the number of bytes it takes to store it, or the file size ). To Web page creators , both of these factors are very important. The file size is important because it determines how long it takes to send the picture over the Internet to the browser. Large pictures can slow down a Web site significantly, especially if you're using multiple pictures in a page and the Web surfer is struggling with a slow Internet connection. If you're not careful, impatient surfers might just give up and surf somewhere else if the page is taking too long to appear. To understand file size and how you can control it, you need to understand the different file formats Web browsers use, a topic discussed in the next section. The picture dimensions are important because they determine how much screen real estate an image occupies. The dimensions of Web graphics are always measured in pixels. Each pixel is one tiny dot on a screen (see the discussion on Section 5.1.1). Fixed units like inches and centimeters aren't useful in the Web world, because you never know how large a monitor your visitor's using, and how many pixels it can cram in. Section 5.1.2 has a detailed discussion about screen size and how to design your pages to satisfy the largest number of potential viewers . Interestingly, the <img> tag gives you the ability to resize a picture with its optional height and width attributes. For example, consider this tag: <img src="photo01.jpg" width="100" height="150"> In this line of code, the picture is given a width of 100 pixels and a height of 150 pixels. If this doesn't match the real dimensions of the source picture, the picture is stretched and otherwise mangled to fit (see Figure 7-3).
Note: Approach the height and width attributes with extreme caution. Sometimes, novice Web authors use them to make thumbnails , which are small versions of large pictures. The problem is that if you use the height and width attributes to scale down a large picture, the browser still needs to download the original file, which is still just as big, byte-wise. On the other hand, if you create your thumbnails in a graphics program like Photoshop Elements, you can save them with smaller file sizes, ensuring that your pages download much speedier. Many Web page designers leave out the height and width attributes when they're adding images. However, experienced Web mavens sometimes add height and width attributes using the same dimensions as the actual picture. As odd as this sounds, there are a couple of reasons to use this technique. First, when you include these sizing attributes, the browser can quickly tell how large the picture is and it can start laying out the page. On the other hand, if you don't include the height and width attributes, the browser won't know the dimensions of the picture until it's fully downloaded, at which point it will rearrange the page. This rearrangement is potentially distracting if your Web visitor has a slow connection, and has already started reading the page. The second reason is because these attributes control how big the picture box is if the image can't be downloaded. (See for instance Figure 7-2.) If you don't use these attributes, the picture box is reduced until it's just big enough to show the error icon and any alternate text. In a complex Web page, this might mess up the alignment of other parts of your page. So should you use the height and width attributes? It's up to you, but they're probably more trouble than they're worth for the average Web site. If you use them, you'll need to make sure you update them if you change the size of your picture, which quickly gets tedious . Note: Many HTML editors, like FrontPage, automatically add the height and width attributes when you insert a picture. 7.1.4. File Formats for GraphicsBrowsers can't display every type of image. In fact, browsers are limited to a relatively few image formats, including:
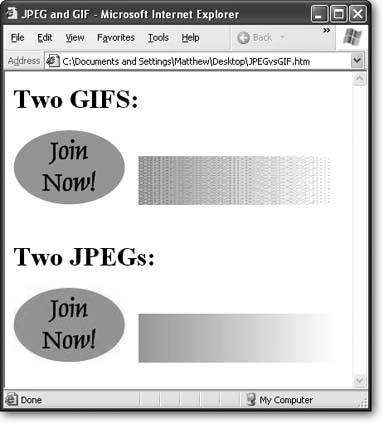
All of these formats are known as bitmap or raster graphics, because they represent pictures as a grid of dots. Vector graphics, which represent pictures with mathematically outlined shapes , aren't supported in Web pages. Raster graphics generally have much larger file sizes than vector graphics. For that reason, Web designers spend a lot of their time worrying about compression or how they can take a picture and reduce the amount of disk space it needs. Web page graphics use two types of compression: lossy , which compresses the most effectively but reduces image quality; and lossless , which preserves the same image quality but doesn't compress as much. For the full details, see the sidebar "How Compression Works in JPEG, GIF, and PNG files." Table 7-1 gives you a quick overview of the different image formats. Table 7-1. Image File Formats for the Web
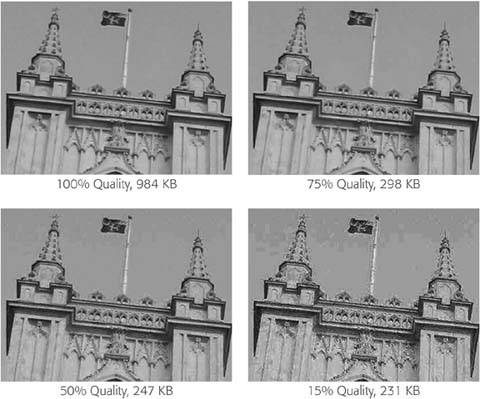
Note: Some browsers give you a few more options, but you're better off steering away from them so that you can ensure a wide range of browsers can display your pages. For example, Internet Explorer supports bitmaps (image files that end with the .bmp file name extension). Don't ever use themnot only will they confuse other browsers, they're also ridiculously large because they don't support compression. You'll probably end up using different file formats throughout your site, depending on what kind of pictures you're using; each format has its own niche (see Figure 7-4). In the following sections, you'll get some guidance that will help you decide when to use each format. 7.1.4.1. CompressionIn Web graphics, space is a key concern. You may have tons of storage space on your Web server, but larger files take more time to send across the Internet, which means more frustrating, toe-tapping seconds for your Web surfers until your page appears. To make a graphics-heavy Web site run smoothlyand these days, what Web site doesn't have lots of graphics?you need to make sure you pare down the size of your pictures. Of course it's not quite that simple. JPEG gives the best compression, but it has to throw out some detail in the process (see the box "How Compression Works in JPEG, GIF, and PNG files"). As you compress a JPEG image, you introduce various problems, which are known as compression artifacts . The most common compression artifacts you'll notice are blocky regions , halos around edges, and a general blurriness . Some pictures are more prone to showing these flaws than others. (It depends, for example, on the amount of detail.) Tip: Most graphics programs let you choose how much you compress a picture, and many even let you preview the result before you save anything.
Figure 7-5 shows the effect of different compression settings on a small section of a picture of a church . 7.1.4.2. Choosing the right image formatIt's important to learn which format to use for a given task. To help you decide, walk through the following series of questions.
7.1.5. Putting Pictures on Colored BackgroundsImage files are always stored as rectangles. This is a problem, because not all pictures are rectangular. For example, a smiley face, of course, is a circular shape. If you create a graphic with a smiley face, the image file contains the smiley face surrounded by a white rectangle.
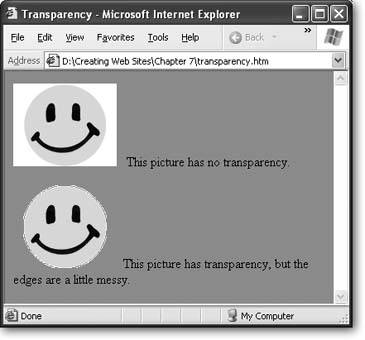
On a white background, this doesn't pose a problem. That's because the box that surrounds your smiley face blends in with the rest of the page. But if you've given your page a different background color using the background-color style property (Section 6.2.1), you'll run into the graphical clunkiness shown in Figure 7-6. Web designers came up with two solutions to this problem. One nifty idea was to use transparency, a feature supported by GIF graphics (and by PNG graphics, although not all browsers support it). The basic idea is that your graphic contains transparent pixels pixels that don't have any color at all. When the browser comes across these, it doesn't paint anything. Instead, it lets the background of the page show through. To use transparency, you define a transparent color using your graphics program. Although transparency seems like a handy way to make sure your image always has the correct background color, in practice, transparent regions rarely look good. The problem that you'll usually see is a jagged edge where the colored pixels of your picture end and the Web page background begins (see Figure 7-7).
The best solution is to use the correct background color when you create your Web graphic. In other words, when you're drawing your smiley graphic, give it the same background color as your Web page. Your graphics program can then perform the anti-aliasing to make the edges look nice. When you put the image on the page it will blend right in. The only limitation with this approach is the lack of flexibility. If you change your Web page, you need to edit all your graphics. Sadly, this is the price of creating polished Web graphics.
|

 Save As from the programs menu (although sometimes it's File
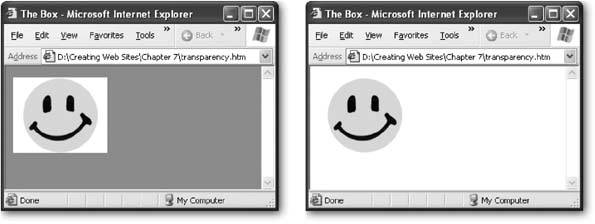
EAN: N/A
Pages: 135