Section 6.5. Borders
The last group of style sheet properties that you'll learn about in this chapter let you add borders to your Web pages (Figure 6-12). Borders are a great way to separate pieces of content. The only thing that's better than borders for organizing information are tables, which you'll learn about in Chapter 9.
|
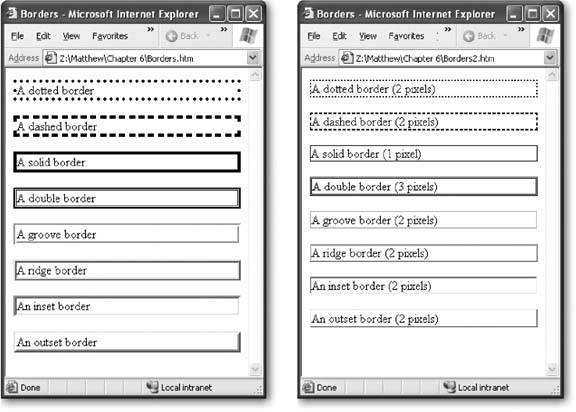
Table 6-5 lists the three key border properties.
Table 6-5. Border Properties
| Property | Description | Common Values | Oldest Supported Browsers | Can Be Inherited |
|---|---|---|---|---|
| border-width | The border width sets the thickness of the border line. Usually, you'll want to pare this down. | A pixel width. | IE 4, Netscape 4 | No |
| border-style | Browsers have eight built-in border styles. The border style determines what the border line looks like. | none dotted dashed solid double groove ridge inset outset | IE 4, Netscape 4 | No |
| border- color | The color of the border line. | A color name , hexadecimal color code, or RGB value (see Section 6.2.1.1). | IE 4, Netscape 6 | No |
6.5.1. Basic Borders
The first choice you make when creating a border is the style. Depending on the style you pick, you can add a dashed or dotted line, a groove or a ridge, or just a normal thin hairline (which often looks best). Here's a rule that creates a dashed border:
p { border-style: dashed; } To make a border look respectable, you need to reduce the border width. The standard border width is almost always too clunky . You should reduce it to one or two pixels (depending on the style):
p { border-style: dashed; border-width: 2px; } Tip: You can also use properties like border-top-style and border-left-width to set different styles, width, and colors for every side of your element. Using many properties at once can occasionally create an unusual effect, but usually you don't need to get this detailed. Instead, check out the border optimization tips in the next section.
6.5.2. Making Better Borders
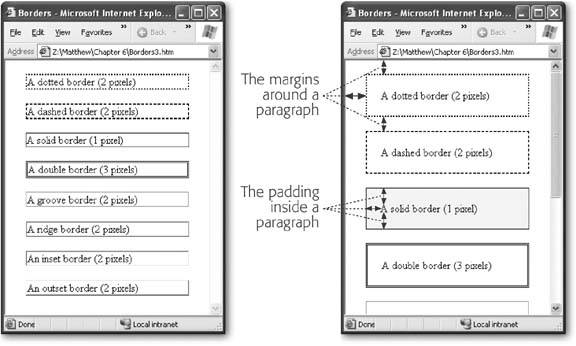
In Figure 6-12 the actual borders look fine, but they are squashed too close to the text inside the boxes formed by the borderlines, as well as by the edges of the page.
To make a border stand out, consider using the border property in conjunction with three other properties:
-
background-color (Section 6.2.1) applies a background color to your element. When used in conjunction with a border, it makes your element look like a floating box.
-
margin (Section 6.3.3.3) lets you set the spacing between your border box and the rest of the page. Increase the margin so that your boxes aren't crowded up against the rest of the content in your page or the sides of the browser window.
-
padding works like the margin property, but it sets spacing inside your element, between the invisible edges and the actual content. Increase the padding so that there's a good amount of space between the border and your text. Figure 6-13 shows the difference between margin and padding.
|
Here's an example of a paragraph that looks like a shaded box:
p { background-color: #FDF5E6; margin: 20px; padding: 20px; border-style: solid; border-width: 1px; } Figure 6-13 shows how the margin, padding , and background-color properties change an ordinary paragraph into a shaded box.
6.5.3. Using Borders to Separate Sections
In Chapter 5 (Section 5.2.4), you learned about the unremarkable <hr> tag, which gives you a quick and easy way to separate one section of text from another with a horizontal line. With style sheets, you get several more ways to create attractive separators.
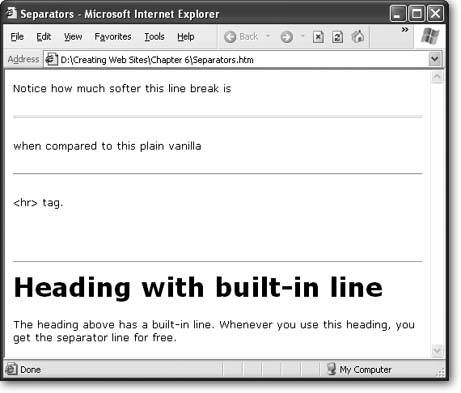
The first line of attack is to style the <hr> tag itself. You can use the width property to shrink the separator down. You supply length in terms of the percentage of a line's full length. For example, here's a half-length line that's centered on the page:
hr { width: 50%; } You can also thicken the line by using the height property and supplying a thickness in pixels. Here's a thick line:
hr { height: 5px; } For a variety of more interesting effects, you can bring borders into the mix. For example, here's a rule that heightens the horizontal line, applies the double border style, and adopts a modern light gray color:
hr { height: 3px; border-top-width: 3px; border-top-style: double; border-top-color: #D8D8D8; } This gives you a quick way to revitalize all your separators. However, if you aren't already using the <hr> tag, you don't need to start now. Another option is to bind the horizontal line to another tag, like a heading. For example, the following <h1> tag adds a grooved line at the top. The margin property sets the space between the line and previous tag, while the padding sets the space between the line and the heading text.
h1 { margin-top: 30px; margin-bottom: 20px; padding-top: 10px; border-top-width: 2px; border-top-style: groove; } Figure 6-14 shows both these examples.
|
EAN: N/A
Pages: 135
- Article 250 Grounding and Bonding
- Article 310 Conductors for General Wiring
- Article 312 Cabinets, Cutout Boxes, and Meter Socket Enclosures
- Article 348 Flexible Metal Conduit Type FMC
- Example No. D2(b) Optional Calculation for One-Family Dwelling, Air Conditioning Larger than Heating [See 220.82(A) and 220.82(C)]