4.2. Working with Your HTML Editor Once you've chosen an HTML editor, the next step is to take it for a spin. In this section, you'll learn how to create a sample HTML document and get it online, all without leaving the comfort of your editor. Software companies have spent the last decade copying features from their competitors and as a result, common tasks in FrontPage, Dreamweaver, and Nvu are startlingly similar. That means that no matter which program you use, the following sections will teach you the basics. Once you're comfortable with your editor, you can move on to the rest of the book and learn more about how HTML works.
Tip: Although future chapters won't lead you step by step through any of these HTML editors, look for sidebars and tips to point out occasional shortcuts, tricks, and techniques for your favorite editor.
UP TO SPEED
Mid-Level HTML Editors | | A few years ago, there were a number of mid-level HTML editors in hot competition. Today, most have died out. The mid-level HTML editors that remain often aren't worth the expense. Instead, your best bet is to save up for one of the two leading edge HTML editorsMacromedia Dreamweaver or Microsoft FrontPage. Of the two, FrontPage is the more affordable, while Dreamweaver is more often used by professional Web developers. You may be able to find academic (or "student and teacher") editions of both programs. These editions are scaled down but still powerful, and they have a much lower price tag. You'll need to prove you're a student or starving academic to get in on the action. One mid-level option that's actually worth considering is Macromedia HomeSite, a less powerful Web design tool that Macromedia purchased from another company to complement its line of professional Web development software. HomeSite is priced at about $100, which makes it more affordable than FrontPage or the lofty Dreamweaver. However, there's a good case to be made for sticking with the nifty (and free) Nvu editor until you're ready to move up to a more full-featured program. |
4.2.1. Starting Out Here's what you need to get started with your editor of choice: -
The first step is to launch your program by double-clicking the appropriate icon or making a quick trip to the Start menu . Your HTML editor appears. -
Some HTML editors start you off with a tip of the day (Nvu) or a start page (Dreamweaver). Close these windows to get to the main program window . You may also need to remove a few more distractions. In FrontPage, you'll see a pesky Getting Started panel on the right-hand sideclose this by clicking the X in the top-right corner. In Dreamweaver, you may want to shunt the panels out of the way (see Figure 4-5). -
Now, choose File  Open and select one of the HTML file samples you worked on in Chapter 2 (also available on the "Missing CD page at www.missingmanuals.com) . Open and select one of the HTML file samples you worked on in Chapter 2 (also available on the "Missing CD page at www.missingmanuals.com) . This step is easyopening a document in an HTML editor is exactly the same as opening a document in any other self-respecting program.
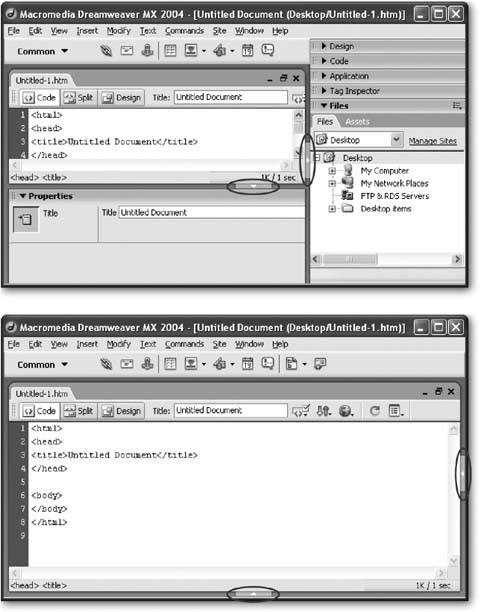
4.2.2. Multiple Views As you've already learned, there are several different ways to look at an HTML document, depending on whether you want the convenience of a word processor or the complete control of working directly with HTML code. Most HTML editors give you a choice of how you want to work, and let you switch rapidly from one view to another. To switch views, you need to find a small series of buttons, which are usually displayed just above or just below the document you're working on. Figure 4-6 helps you spot these buttons . 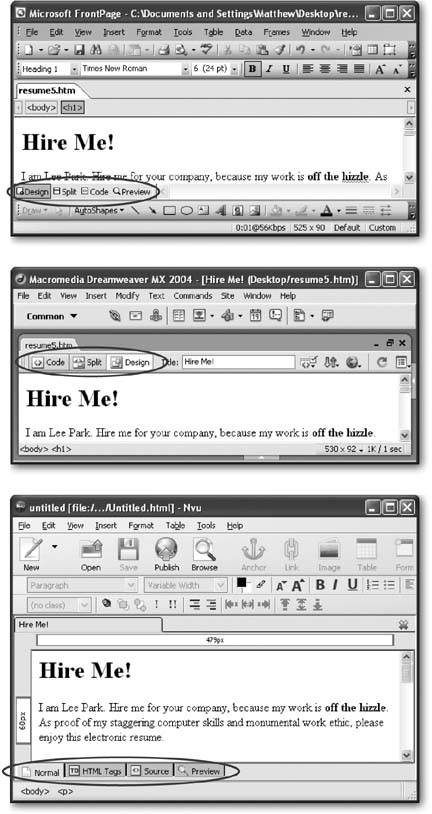 | Figure 4-6. They may give them different names or put them in a different order, but most HTML editors use similar buttons to let you switch views, including FrontPage (top), Dreamweaver (middle), and Nvu (bottom). In this example, all three windows are in the WYSIWYG design view. (See Section 4.1.1 for a description of WYSIWYG design view.) | |
Most HTML editors start you out in a WYSIWYG view that shows the formatted HTMLin other words, an approximation of what the page will look like in a Web browser. When you switch to the HTML code view, you'll see the real story the familiar text-only display of color -coded tags and text. These views are the two staples of HTML editing. However, the most useful choice just might be split view, which shows both views at once (see Figure 4-7). 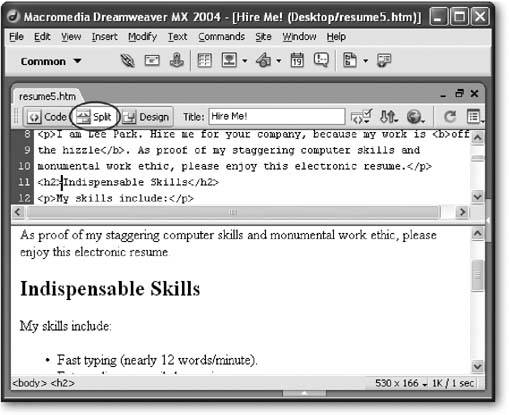 | Figure 4-7. One handy option is the split view, which splits the window into two panes. This figure shows a Dreamweaver screen after the Split button (circled) has been clicked. Most commonly, you'll use this view so you can edit the HTML tags and see a preview that's updated as you type. However, you could also work the other way, by editing the WYSYWIG preview, and seeing what HTML tags are inserted (which is a great way to learn HTML). Both Dreamweaver and FrontPage provide a split view option, but Nvu doesn't. | |
Some HTML editors also give you an interesting hybrid view that shows a WYSIWYG preview with extra tag information. In Nvu, this is the HTML Tags view, which shows a formatted preview window with the corresponding tags shown in floating yellow boxes (see Figure 4-2, bottom). You can achieve a similar look in FrontPage by choosing View Reveal Tags. 4.2.3. Creating a Web Page The best way to understand how your HTML editor works is to create a new HTML document. Use HTML view, as described above, so that you can have complete control over the HTML markup. Just enter all the tags and text content from beginning to end, just as though you were using Notepad or TextEdit (pop back to Chapter 2 for a refresher on HTML code writing basics). Along the way, you'll notice a few shortcuts. For example, when you start to type a tag in FrontPage or Dreamweaver, a drop-down menu appears with suggestions. You can choose a valid HTML tag from the list, or just keep typing. Also, when you add the start tag for a container element (like <h1> for a heading), FrontPage (or Dreamweaver) automatically inserts the end tag (like </h1>) so you won't forget it. Creating and formatting a page in WYSIWYG view is a more interesting challenge, because you need to a know where to find the various formatting options in your editor. FrontPage, Dreamweaver, and Nvu help you out by packing a fair bit of HTML smarts right into their toolbars . To add a tag in the WYSYWIG view, you first select a piece of text you want to format, and then click the appropriate toolbar button. You can then switch to the HTML tag view to verify that you got the result you expected. For example, to make text bold, select it and look for a toolbar button with the letter B. Clicking this button inserts the <b> tag just before your selection and the </b> tag just after it. Figure 4-8 shows you the most useful toolbar buttons in Nvu. 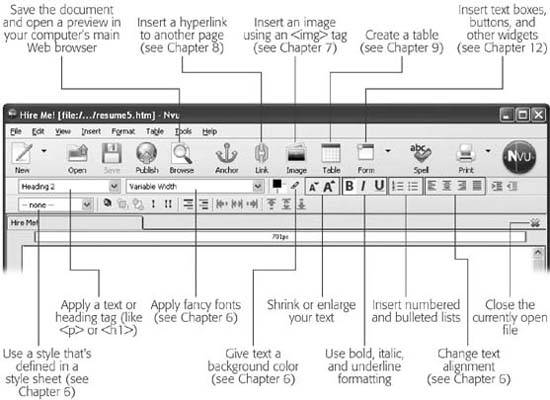 | Figure 4-8. Nvu gives you one-stop shopping for lots of HTML goodies . But remember, there's a difference between finding a feature on a toolbar and really knowing how to use it. If you want to know the tricks and traps you'll run into when using images, fonts, and tables, you'll need to keep reading. | |
Tip: It's up to you whether you want to write your Web pages in HTML view or using the WYSIWYG preview mode. The WYSIWYG view is always quicker and more convenient at first, but it can leave you with a lot of HTML to check and review, adding to future complications.
To practice your WYSIWYG editing, you can re-create one of the examples from Chapter 2 (the mini-r sum you see on Section 2.3.4 works well). But instead of entering the tags by hand, just enter the text and format it using the toolbar and menu options in your editor. Here are a few steps to get you started on this challenge: -
Start by choosing File New to create the Web page . Your editor asks you what type of file you want to create. -
In FrontPage, just click the "Blank page" link to start from scratch. In Dreamweaver, choose Basic page as your category, and HTML as the subcategory . In Nvu, choose the option "A blank document," and then click Create . A blank document appears, showing the bare HTML skeleton. If you take a look at your new document in the HTML code view, you'll see the basic <html>, <head>, and <body> tags.
Tip: Some HTML editors, like FrontPage, include all sorts of templates for quickly creating various site designs. The options in Dreamweaver aren't bad, but they're quite complex, and require styles, which are introduced in Chapter 6. The options in FrontPage are fairly limitingalthough they look nice, there isn't much room for diversity. You're best off to avoid them until you've learned enough to create your own unique designs.
-
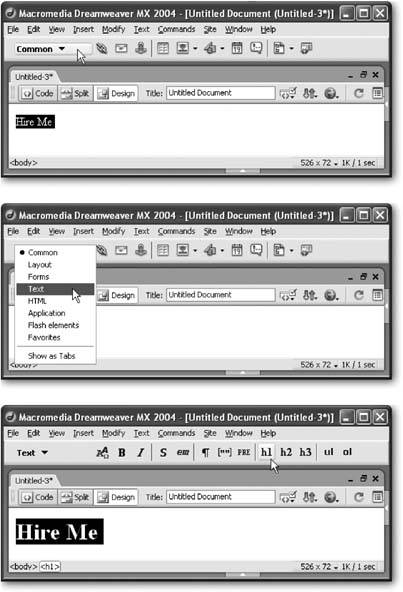
Switch to WYSIWYG design view, and type the title "Hire Me!" The text appears at regular size . -
-
Hit the Enter key to move to the next paragraph . Your typeface reverts to normal, and you can begin typing the rest of the document. The next challenge is creating the bulleted list. FrontPage, Dreamweaver, and Nvu all let you do so by using buttons on their toolbars. It's easy to lose yourself in a thicket of tags. To make it easier to orient yourself, FrontPage, Dreamweaver, and Nvu all include a quick tag selector bar at the top or bottom of your document (Figure 4-10). -
For a change of pace, try inserting a picture . Nvu provides easy access with an Image button on the toolbar. FrontPage and Dreamweaver have similar buttons, but it's easier to head straight to the menu (choose Insert Picture From File in Front Page or Insert Image in Dreamweaver).
 | Figure 4-9. The Dreamweaver toolbar is actually eight toolbars in one.
Top: To get to the toolbar you want, click the toolbar name on the left (indicated here by the arrow).
Middle: Next, choose the new toolbar you want to see. In this figure, it's the text toolbar.
Bottom: The Text toolbar has a button for applying the HTML tags for a level 1 heading (the h1 button that the arrow is pointing to in this image). | | -
When you're prompted to pick an image file, browse to the leepark.jpg sample, and select it. (You can download this image from the "Missing CD" page at www.missingmanuals.com.) The program inserts the appropriate <img> tag. Once the picture is inserted into your document, you'll really start to appreciate the benefits of the WYSIWYG view. In all of the HTML editors covered here, you can drag the edges of the picture to move or resize it. 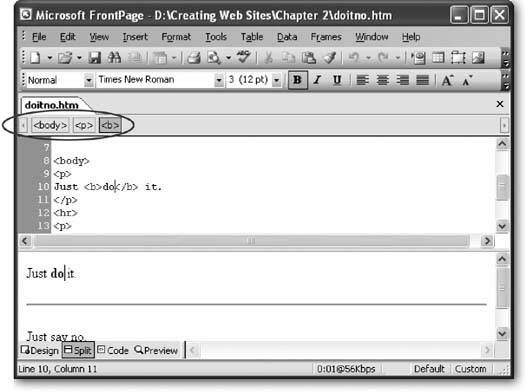 | Figure 4-10. The tag selector (circled) is handy if you're looking for a specific section of a Web page you need to edit. Once you've scrolled to the right place, double-check the tag selector to see if you're where you think you are. The tag selector lists all the tags that are in action at your current location. In this example, the cursor is positioned inside the <b> tag (for bold formatting), which itself is placed inside a <p> (paragraph) tag, which is nested inside the <body> tag that wraps the complete HTML document. You can quickly select any one of these tags by clicking it in the bar. | |
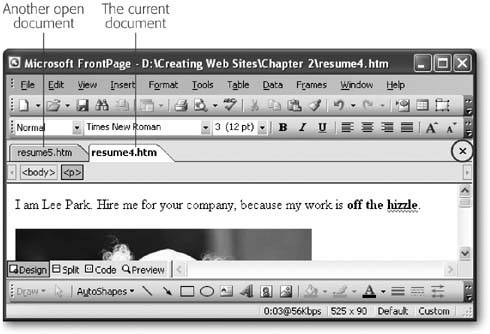
4.2.4. Managing a Web Site HTML editors aren't limited to viewing a single Web page at a time. They almost always give you the ability to look at more than one document at once. In FrontPage, Dreamweaver, and Nvu, multiple open files are represented in the same waythe program adds tabs at the top of the document window. Figure 4-11 shows an example with FrontPage. Along with the ability to edit more than one Web page at once, many HTML editors also let you manage an entire Web site.
Note: A Web site is simply a collection of one or more Web pages, along with any related files (like pictures). It's often useful to manage all these files together in an HTML editor. This way, it's easier to add links from one page to another (see Chapter 8) and keep things consistent. You also get the ability to upload all your Web pages with just a couple of clicks.
 | Figure 4-11. In FrontPage, you can use File Open to open as many documents at once as you want. Youll see one tab for each open document (in this example, there are two). To move from one document to the next, just click the appropriate tab. To close a document, click the X on the right side of the tabs. | |
4.2.4.1. Defining a site in FrontPage To create a Web site in FrontPage, follow these steps: -
Select File Open Site . The Open Site dialog box appears. It looks like an ordinary Open File dialog box, except that for one differenceit doesn't show any files. Instead, you can only see folders. -
Browse to the folder you want to open, select it, and then click Open. For example, you could use the Chapter 2 folder that's included with the downloadable samples to see all the different r sum files . A dialog box appears asking if you want to add FrontPage information to your Web site (see Figure 4-12). 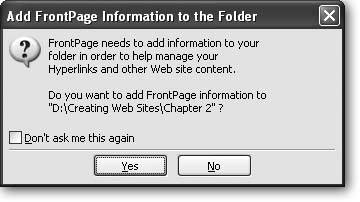 | Figure 4-12. In order to use FrontPage's Web site management features, you need to let it add specialized subfolders to your Web site folder. You can see these subfolders in Windows Explorerthey have names like _private, _vti_cnf, and _vti_pvt. FrontPage also adds a subfolder named images that you can use to store pictures you want to use in your Web site. This figure shows the dialog box that appears when you first open a new folder in FrontPage as a Web site. | | -
Click Yes to add FrontPage information . Once FrontPage adds the subfolders, a Folder List panel appears on the right site of the window with a list of all the files in your Web site (see Figure 4-13). 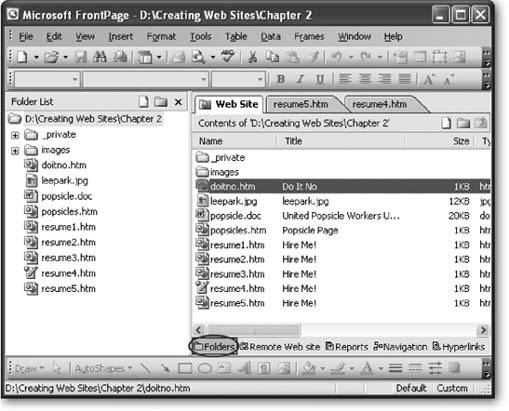 | Figure 4-13. The Folder List (the left column of this figure) makes it easy to see the contents of your Web site at a glance. To open a document, just double-click it. You can also select a file and right-click it to see additional options for renaming or deleting files. | |
4.2.4.2. Uploading a site in FrontPage One of FrontPage's most popular features is its support for updating a Web site without needing to use a separate FTP program (see Section 3.4.2 for the rundown on what FTP programs do). To take advantage of this support, you need to follow the steps described above to make sure FrontPage understands your folder is part of a complete Web site. Then, you can upload your Web site by following these steps: -
Choose File Publish Site . The first time you publish your site, a Remote Web Site Properties dialog box appears. You use this window to set your connection options, like the name of your FTP server (see Figure 4-14). 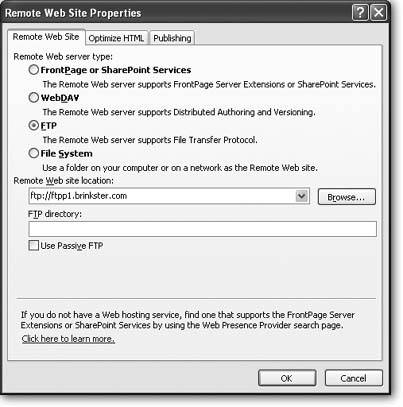 | Figure 4-14. Your Web hosting company should tell you the exact choices to make in the Remote Web Site Properties dialog box. Typically, you'll need the name of your FTP server, the directory (folder) on the server used for your Web site, and your FTP account and password. You only need to complete this step once. If you're successful, FrontPage will use this information the next time you choose to publish your Web site. | | -
Fill in the information about how you want to connect to your Web server, and then click OK . You can also set some advanced options using the Publishing tab of this dialog box. Most usefully, you can set whether FrontPage uploads only changed or new pages (which is the standard setting), or always uploads everything in the copy of the Web site stored on your PC. -
At this point, FrontPage may prompt you for a user name and password to connect to your FTP server. Enter the correct information and then click OK . FrontPage stores the user name you enter for future use, but it's up to you to remember the password and supply it each time you connect. Once you're connected, FrontPage shows a side-by-side file list that compares the contents of your Web site as stored on your PC with the contents that's located on the Web server. FREQUENTLY ASKED QUESTION
FrontPage Folders | | How can I get rid of the subfolders FrontPage adds to my Web site ? Few Web authors like it when an HTML editor adds unexpected and unwanted stuff to a Web site. Unfortunately, FrontPage doesn't give you a choice. If you use its Open Site feature, FrontPage adds several extra subfolders inside the folder where your site is stored. These folders have names like _private, _vti_cnf , and _vti_pvt . (Web trivia: The VTI acronym stands for Vermeer Technologiesthe company that originally created FrontPage and sold it to Microsoft.) These FrontPage folders have several purposes. First, they keep track of what files you've uploaded to your Web server. That makes it incredible easy to update a Web site, because FrontPage simply needs to transfer the changed files to the Web server, not the entire site. The FrontPage folders also track information about the pages and resources of your Web site, which helps with features like link checking (a nifty trick you'll learn about on Section 8.4.1). If you want to use these features, there's no way to get rid of the FrontPage subfolders. Just learn to accept themhonestly, they won't interfere with the rest of your Web site. If you're not planning to use the Web site uploading feature in FrontPage, you may not need to copy the FrontPage subfolders to your Web server. It all depends if you're using one of a small set of FrontPage-specific features that need these folders. (If you're using these features, you had better know about it already, because you'll need a Web hosting company that supports the FrontPage server extensions .) For more information, surf to Microsoft's support site at http://support.microsoft.com and search for 281532 , which is the number of the knowledge base article that describes what features require the FrontPage server extensions. If you aren't using any of these, you don't need to upload these subfolders. Finally, if you don't want to have the FrontPage folders on your Web server or on your personal computer, you can't use the Open Site feature. Instead, you can open your HTML files in FrontPage individually. This probably isn't worth the trouble, because you'll sacrifice some handy features that can help you manage a large Web site. | -
To bring your Web server up to date, select the "Local to remote" option and click the Publish Web Site button. This starts the publishing process (see Figure 4-15) . The "Remote to local" option is handy if a file on the Web server is more recent than the copy on your own computer. This might happen if you're editing the same Web site on more than one computer. The Synchronize option is like the "Remote to local" and "Local to remote" operations rolled into one. It examines each file, and makes sure any old versions on your computer or the Web server are updated. 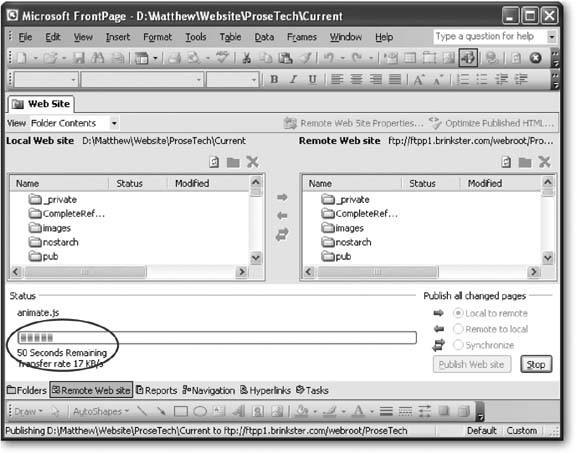 | Figure 4-15. When you publish a Web site, FrontPage scans your files and copies over ones that've been added or changed since the last time you published your Web site. A progress indicator (circled) shows you what file is currently being copied , and estimates how much longer the whole operation will take. | |
Tip: You may have trouble uploading a Web site using FrontPage if you've already copied some of the files manually using an FTP program. To fix this problem, delete the files from your Web server, and use FrontPage to transfer the whole Web site. FrontPage will then copy every file from your local Web site folder to your Web server.
4.2.4.3. Defining a site in Dreamweaver Dreamweaver gives you two different ways to work with a Web site. The simplest approach is to use the integrated file browser to look at the files in any folder on your computer (see Figure 4-16). Although using the Files panel is convenient, it's also limiting. The problem is that Dreamweaver doesn't have any way to tell what file and folders make up your Web site. In order to support Web site uploading and a few other tools, you may want to define your folder as a Web site. To do this, follow these steps: -
Click the Manage Sites link in the Files panel, or just select Site Manage Sites . The Manage Sites dialog box appears, with a list of all the Web sites you've configured so far. Initially, this list is empty.  | Figure 4-16. You can browse your file system without leaving Dreamweaver by using the Files panel. | | -
To define a new Web site, click the New button and choose Site . Dreamweaver walks you through a Site Definition wizard that asks you several questions. -
Enter a descriptive Web site name and click Next . The site name is just the name you use to keep track of your Web site. It also appears in the Files panel. -
Choose "No, I do not want to use a server technology" and then click Next . A server technology is the framework on a Web server that runs complex Web applications like database searches. Because you aren't creating a full-blown application (just ordinary HTML files), you don't need this support. -
Choose "Edit local copies directly on my machine." Some Web servers give you the ability to modify files stored on the server. However, even if you have this specialized support, it's probably better to edit your files on your local computer, and only update them on the live Web server when you're ready. This gives you several advantages. First, you won't derail your Web site if you make a minor mistake. Second, you have a valuable backup if anything happens to your Web server. And third, you have the ability to experiment with changes and different designs that may take days to finish, without affecting the live version of your Web site. -
In the "Where on your computer do you want to store your files" text box, type in the full file path for your Web site folder (usually something like C:\Creating Web Sites\ Chapter 2), and then click Next . If you aren't sure where your Web site folder is, you can click the folder icon next to the text box to browse for it. -
The next step asks how you want to connect to your Web server. Fill in your connection information, and then click Next . The option you choose depends on the support offered by your Web hosting company, but FTP is a common choice (see Figure 4-17). Depending on what option you choose, there are a number of extra settings you have to supply. 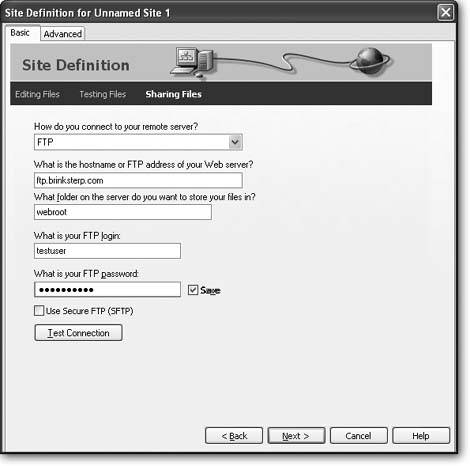 | Figure 4-17. In the "Sharing files" step of the Wizard, you choose how you want to transfer your files to the remote Web Server. Your remote server is the location where you plan to publish your Web site. Typically, this is a Web site that you'll communicate with using a communication method like FTP, but it could also be an ordinary directory on a local network. | | -
Choose "Do not allow check in and check out" and then click Next . Check in and check out features allow you to collaborate with a group of coworkers to edit different parts of a Web site simultaneously . For information about this and other advanced Dreamweaver features, check out Dreamweaver MX 2004: The Missing Manual . -
The last step summarizes the information you've entered. Click Done . You return to the Manage Sites dialog box. -
Click Done . You return to the Dreamweaver main window. 4.2.4.4. Uploading a site in Dreamweaver Once you've defined your Web site, you'll see it in the Files panel. You can then browse your remote Web server, or transfer files back and forth. Dreamweaver doesn't make things quite as intuitive as FrontPage, but it's still pretty convenient. To transfer files from your local computer to the Web server, you use an operation that Dreamweaver jargon calls a put . It works like this: -
In the Files panel, choose your Web site from the drop-down menu at the top left . -
Now, choose "Local view" from the drop-down menu at the top right . The Files panel shows a list of the files on your computer (see Figure 4-18). 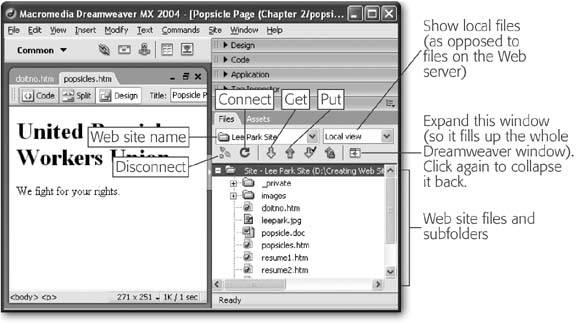 | Figure 4-18. This example shows the local view of the Lee Park site. The local view lists all the files that are in the Web site folder on your computer. Using the icons in this window, you can quickly transfer files to and from the remote Web server. | | -
Select the files you want to transfer to the Web server . You can select multiple files by holding down Ctrl while you click each file's icon. -
Once you've selected the files, click the Put arrow (a blue arrow icon pointing up), or right-click the files and then choose Put from the shortcut drop-down menu . Dreamweaver asks if you want to copy dependent files. -
Choose Yes if you want to copy linked files. For example, if you're copying a Web page that uses the <img> tag to show graphics, you should click Yes to make sure the graphics are also uploaded. If there aren't any dependent files, your choice has no effect . Dreamweaver connects to your Web server and transfers the files. To perform the reverse trick, and transfer files from your Web server to your computer, you need to use a get operation. Follow these steps: -
In the Files panel, choose your Web site from the drop-down menu at the top left . -
Next, choose "Remote view" from the drop-down menu at the top right . Dreamweaver doesn't automatically show a list of files on the Web server, because getting that list could take a little time. So you need to specifically ask Dreamweaver for an updated view of the files on your Web server, which you'll learn how to do in the next step. -
Click the refresh button, which looks like a circular arrow icon . Dreamweaver connects to the Web server, retrieves the list of files in your Web site, and displays it. -
Select the files you want to transfer to your computer . You can select multiple files by holding down Ctrl while you click each file's name. -
Once you've selected the files, click the Get arrow (a green arrow icon pointing down), or right-click the files and choose Get from the shortcut drop-down menu . Dreamweaver asks if you want to copy dependent files. -
Choose Yes if you want to copy linked files. For example, if you're copying a Web page that uses the <img> tag to show graphics, you should click Yes to make sure the graphics are also downloaded. If there aren't any dependent files, your choice has no effect . Dreamweaver connects to your Web server and copies the files to the folder on your computer that contains your Web site. |