Lesson 2: Establishing and Managing Network Accounts
As the size of a network increases, the concept of sharing to the entire network can begin to present some problems. Peer-to-peer networks, for example, sacrifice a degree of security in order to offer simplicity. But imagine the consequences of sharing the directory of your employer's accounting department (or personnel department) to the entire network and perhaps the world over an Internet connection. For these reasons, among others, large networks employ server-based networking. In a client/server environment, sharing is managed through accounts. By creating accounts and then grouping the individual accounts, a network manager has the tools necessary to provide a higher level of security.
After this lesson, you will be able to:
- Describe user and group accounts.
- Describe the process for creating user and group accounts.
- Determine the appropriate types of accounts for a given network environment.
- Create a user account and a group account.
Estimated lesson time: 45 minutes
Network Accounts
Accounts are the means by which users are given access to printer, file, and directory shares. These accounts are created and managed by the network administrator.
An account is composed of a user name and logon parameters established for that user. These parameters can include which computers can be used for access, days and times during which access is allowed, passwords, and so on. This information is entered by the administrator and stored on the network by the operating system. The network uses this account name to verify the account when the user attempts to log on.
Planning for Groups
By default, user accounts have no rights. All user accounts obtain rights through group membership. All user accounts within a group will have certain access rights and activities in common, according to the group in which they reside. By assigning permissions and rights to a group, the administrator can treat the group as a single account.
Access rights that apply to the system as a whole authorize a user to perform certain actions on the system. For example, a user, as a member of a group, might have the right to back up the system.
Groups are used to:
- Grant access to resources such as files, directories, and printers. The permissions granted to a group are automatically granted to its members.
- Give rights to perform system tasks, such as to back up and restore files or change the system time.
- Simplify communications by reducing the number of messages that need to be created and sent.
Creating Group Accounts
Networks can support hundreds of accounts. There will be occasions when the administrator needs to conduct network business with some or all of the accounts. For example, the administrator often needs to send messages to large numbers of users notifying them about an event or network policy. Or the administrator might need to identify every account that has a particular access. If 100 users need a change in their access, the administrator will need to change 100 accounts.
However, if the 100 accounts were to be placed in one group, the administrator could simply send one message to the group account, and each member of the group would automatically get the message. Permissions could be set for the group, and all the members of the group would automatically receive the permissions. Networks offer a way to gather many separate user accounts into one type of account called a group. A group is nothing more than an account that contains other accounts. The primary reason for implementing groups is the ease of administration. Groups make it possible for an administrator to manage large numbers of users as one account.
The easiest way to grant a large number of users similar permissions is to assign these permissions to a group. The users are then added to the group. The same process applies to adding users to an existing group. For example, if the administrator wanted a certain user to have administrative capabilities on the network, the administrator would make that user a member of the Administrators group.
Creating User Accounts
All networks have a utility that the administrator can use to enter new account names into the network security database. This process is sometimes referred to as "creating a user."
There are some conventions in naming both users and groups. Unless otherwise stated, a user name cannot be identical to any other user or group name in the computer (and, in the case of Windows NT, of the domain) being administered. Each network operating system has its own set of characters that can be used, but generally, the user name can contain any uppercase or lowercase alphanumeric characters. There are some standard exceptions " / \ : ; | = , + * ? < > that cannot be used in user names.
Network operating systems can also contain information such as the account user's full name, a description of the account or user, and the account password.
Entering User Information
The new user account contains information that defines a user to the network security system. This includes:
- The user name and password.
- Rights the user has for accessing the system and its resources.
- The groups to which the account belongs.
Setting User Parameters
Administrators can set a number of parameters for users. Among these are:
- Logon times To restrict hours during which users can log on.
- The home directory To give the user an area in which to store private files.
- The expiration date To limit a temporary user's access to the network.
Key User Accounts
Network operating systems are designed with certain categories of user accounts already created and that are automatically activated during installation.
The Initial Account
When a network operating system is installed, the installation program automatically creates an account with complete network authority. Some designated individual has to be able to:
- Start the network.
- Set the initial security parameters.
- Create other user accounts.
In the Microsoft networking environment, this account is called administrator. In the Novell environment, this account is known as a supervisor. And in the Linux environment, it is known as root.
The first person to log on to the network is usually the person installing the network operating system. After logging on as administrator, that person has full control over all network functions.
The Guest Account
This default account is intended for people who do not have a valid user account, but who need temporary access to the network.
Passwords
Passwords are not necessarily required by a network operating system. In situations where security is not an issue, it is possible to modify an account so that it no longer needs a password.
In most circumstances, however, passwords are required because they help ensure the security of a network environment. The first thing the administrator should do when setting up an account is to enter an initial password. This will prevent unauthorized users from logging on as administrator and creating accounts. Users should create their own unique password and should change it periodically. The account administrator can require users to do this automatically by setting a password-change time interval for the user.
Traditional guidelines exist that govern the use of passwords. All users, including the administrator, should:
- Avoid obvious passwords such as birthdates, social security numbers, or the names of spouses, children, pets, and so on.
- Memorize the password, rather than write it down and tape it to the monitor.
- Remember the password expiration date—if there is one—so that the password can be changed before it expires and the user is locked out of the system.
The administrator must be informed when a user is no longer employed by the organization or for any reason no longer entitled to be a member of the group. In this case, the administrator should disable the account.
Disabling and Deleting Accounts
Occasionally, an administrator will need to prevent an account from being active on the network. Either disabling the account or deleting the account will deactivate it.
Disabling an Account
If an account has been disabled only, it still exists in the network's account database, but no one can use that account to log on to the network. A disabled account will appear not to exist.
It is best if the administrator disables an account as soon as it has been established that the user will no longer be using that account. If it has been determined that the account will never be needed again, it can be deleted.
Deleting an Account
Deleting an account erases the user's information from the network's user-account database; the user no longer has access to the network. A user account should be deleted when:
- The user has left the organization and will no longer have an occupational reason to use the network.
- The user's employment has been terminated.
- The user has moved within the organization and no longer needs access to that network.
Administering Accounts in a Windows NT Environment
Windows NT Group Accounts
Microsoft Windows NT uses four types of group accounts, as described in the following section.
Types of Groups
Local, Global, System, and Built-In groups are used in the Windows NT network environment.
- Local Groups Implemented in each local computer's account database, local groups contain user accounts and other global groups that need to have access, rights, and permissions assigned to a resource on a local computer. Local groups cannot contain other local groups.
- Global Groups Used across an entire domain, global groups are created on a primary domain controller (PDC) in the domain in which the user accounts reside. Global groups can contain only user accounts from the domain in which the global group is created. Global groups cannot contain local groups or other global groups. Although permissions to resources can be assigned to a global group, global groups should be used only to gather domain user accounts. Members of global groups obtain resource permissions when the global group is added to a local group.
- System Groups These groups automatically organize users for system use. Administrators do not assign users to them; rather, users are either members by default or become members during network activity. Membership cannot be changed.
- Built-In Groups Offered as a feature by many network vendors, built-in groups, as the name implies, are included with the network operating system. Administrators can create accounts and groups with the appropriate permissions to perform standard tasks common to all networks, such as most administration and maintenance chores; however, vendors have saved them the trouble of creating those groups and accounts by offering built-in local or global groups that can be created during the initial installation.
Built-in groups are divided into three categories:
- Members of the administrator group have full capabilities on a computer.
- Members of the operator group have limited administrative capabilities to perform specific tasks.
- Members of other groups have capabilities to perform limited tasks.
Microsoft Windows NT Server offers the following built-in groups:
The Administrator group initially contains local and domain administrators. Members of this group can create, delete, and manage user accounts, global groups, and local groups. They can share directories and printers, grant resource permissions and rights, and install operating system files and programs.
The User and Guest groups, which are global, contain domain users who can perform tasks for which they have been given rights. They can also access resources to which they have been given permissions. User groups can be modified by administrators and account operators.
The Server Operator group, which can be modified by administrators only, can share and stop sharing resources, lock or override the lock of a server, format the server's disks, log on at servers, back up and restore servers, and shut down servers.
The Print Operator group, which can be modified by administrators only, can share, stop sharing, and manage printers. This group can also log on locally at servers and shut servers down.
Backup operators can log on locally, back up and restore servers, and shut down servers.
The Account Operator group can create, delete, and modify users, global groups, and local groups, but cannot modify administrator or server operator groups.
The Replicator group, which can be modified by Administrators, Account Operators, and Server Operators, is used in conjunction with the Directory Replicator Service.
Creating Groups in Window NT
In Microsoft Windows NT Server, the group management interface is called User Manager for Domains and is located in the Start menu. Click Programs and select the Administrative Tools (Common) area.
In User Manager, click New Local Group on the User menu. This selection presents you with a dialog box for entering the information to create a new local group, as shown in Figure 9.7.
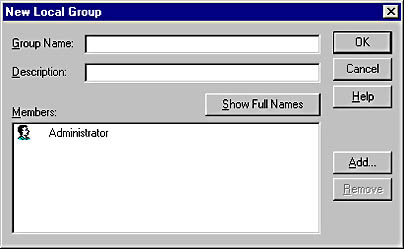
Figure 9.7 New Local Group dialog box
The Group Name field identifies the local group. A group name cannot be identical to any other group or user name of the domain or computer being administered. It can contain any uppercase or lowercase characters apart from these exceptions " / \ : ; | = + * ? < > that cannot be used in group names.
The Description field contains text describing the group or the users in the group.
The Members field displays the user names of the group members.
A newly created group account will have no members until the administrator assigns one or more existing users to the group. The administrator does this from the New Local Group dialog box by clicking Add and selecting the user account to be added.
Windows NT User Accounts
All the network management tools are consolidated in the Start menu, Programs, Administrative Tools (Common) area. As shown in Figure 9.8, the Microsoft Windows NT Server network utility for creating accounts is called the User Manager for Domains. To manage user accounts, click Start, select Programs, and click Administrative Tools (Common).
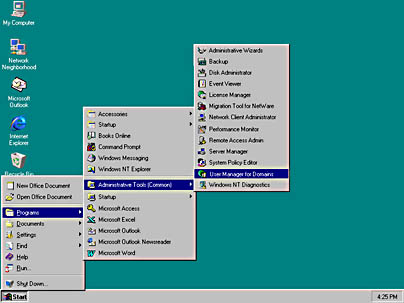
Figure 9.8 Windows NT Administrative Tools area
After you open User Manager, on the User menu, select the menu option New User as shown in Figure 9.9. A window appears for entering the information to create a new user.
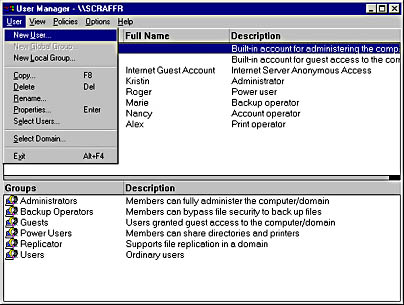
Figure 9.9 Menu showing the New User selection
Figure 9.10 shows all the essential information that the administrator needs in order to create the account.
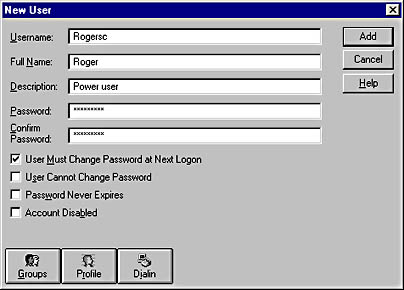
Figure 9.10 New User dialog box
Windows NT Server offers an account-copying feature. An administrator can create a template that has characteristics and parameters that are common among multiple users. To create a new account with the template characteristics, the administrator highlights the template account, selects User, Copy (F8), then enters the new user name and other identifying information (full name, description, and so on).
Profiles
An administrator will find it helpful to structure a network environment for certain users. This might be necessary, for example, to maintain a specific level of security, or to guide users who are not sufficiently familiar with computers and networks to have full access to the system.
Profiles used to configure and maintain a user's logon environment, including network connections and the appearance of the desktop, include:
- Printer connections.
- Regional settings.
- Sound settings.
- Mouse settings.
- Display settings.
- Other user-definable settings.
Profile parameters can also include special logon conditions and information about where the user can store personal files.
Microsoft Windows NT Server disables the Guest account by default after installation. The network administrator must enable the account if it will be used.
Windows NT Server uses the User Properties window in User Manager to disable users. To disable a user, double-click the name of the account, select the Account Disabled check box, and then click OK. The account is now disabled, as shown in Figure 9.11.
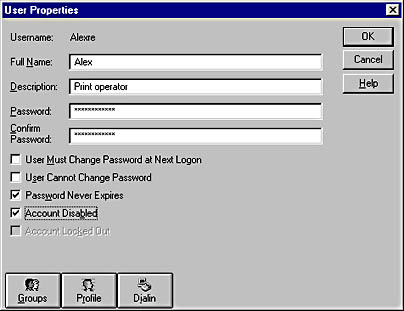
Figure 9.11 Disabling an account
Figure 9.12 shows deleting an account with User Manager.

Figure 9.12 Deleting an account
To delete an account, in User Manager, select the account to be deleted, and then press the DELETE key. A dialog box is displayed (see figure 9.12). If OK is clicked, another dialog box will be displayed asking for confirmation that the specified user account will be deleted. Clicking Yes will delete the account; clicking No will cancel the operation.
NOTE
Deleting an account permanently removes the account, along with the permissions and rights associated with it. Recreating the user account with the same name will not restore the user's rights or permissions. Each user account has a unique security identifier (SID); deleting and recreating a user will generate a new SID, not reuse the previous one. Internal processes in Windows NT refer to the account's SID rather than to the account's user or group name.
Administering Accounts in an Apple Environment
The default Apple networking environment includes two users: the person who installed the operating system and a guest. Managing a network of more than a few users is made easier by creating users and groups.
Creating Users and Groups
From the Apple Chooser select Users & Groups to open the Users & Groups Control Panel. This dialog box lists all the computer's users and groups, and allows you to create, edit, duplicate, and delete users and groups as necessary. In AppleShare, there are three categories of users:
- Owner
- User/Group
- Everyone
To create a new user, click the New User button and enter the appropriate information for this user. You will be able to supply the user's name, password, the groups to which the user will belong, and whether or not the user will be allowed to change the assigned password.
To create a new group, click the New Group button and enter the appropriate information for this group. You will be able to supply the group's name and the names of users who are to be members of the group.
Administering Accounts in a NetWare Environment
The basis of NetWare security and accounts is NetWare Directory Services (NDS). NDS is a hierarchically organized database.
Security is provided at three levels.
- Accounts This level includes user names, passwords, workstation time, and other restrictions.
- Trustee rights This level control directories and files a user can access. These rights include creating, reading, erasing, or writing to the files.
- Directory and file attributes This level determines what actions users can perform in the file or directory. These actions include sharing, deleting, copying, viewing, or editing.
NetWare uses several naming conventions. Names used must be unique, must include no spaces, and must be made up of fewer than 64 case-insensitive alphanumeric characters. (Case-insensitive characters are characters, such as numbers, that cannot appear in both lower- and uppercase forms.)
Setting up and Managing Users and Groups
Before you can create, delete, or manage users and groups, you must log on to the network at a workstation or server with administrative privileges. Once logged on, you can launch the Novell Easy Administration Tool (NEAT) to begin managing users and groups. To do so, double-click the NEAT icon. A view of the directory tree in the left frame of the user interface shows all the network objects and their relationships to each other. In the right frame are the properties of any object selected.
To create a network account for a new user from the NEAT New menu, select User or click Add a New User on the toolbar. This will open a dialog box in which you can enter the required information, including the user's full name, the login name, and the home directory.
Click the next button to go to the next page and add this user to a group. After the user is added, click the next button to go to the next page to enter the password information. If this is left blank, no password will be required by the user to log on. To create additional users, check the Create another user check box before selecting the Finish button.
To delete a user, from the directory view in the NEAT menu, select the User object. Then, from the Edit menu, select Delete selected item and click Yes.
WARNING
If you delete a user who has relationships with another object, and that object relies on the user who is being deleted, you may encounter problems.
Managing Groups is similar to managing users. From the NEAT menu, select Add a New Group. This will launch the New Group wizard. Be sure to follow the naming conventions when assigning a group name. After the group is created, you can select the group and add users.
NOTE
You can add only users that appear in the directory.
Editing User or Group Properties
Viewing or editing the properties of any object is easy. Open the NEAT administration tool and select the object's icon from the directory in the frame on the left. In the frame on the right are the property sheets for the object. The properties for the object are organized into tabs. User properties are in five tabs (General, Groups, Applications, Security, and Login Script ). Groups properties are organized into three tabs (Users, Security, and Applications ).
Administering Accounts in a UNIX Environment
Most UNIX configuration information is stored in text files that are read as needed. These text files can be edited manually to add users and groups and to set their permissions. Because the different versions of UNIX vary in the details of how they are managed, the names and locations of these files are not consistent from one manufacturer to another. The same holds true for Linux distributions, in which system directory and file locations can be quite different. A graphic interface often spares the administrator from having to know these differences, because user and group parameters can be set from interactive dialog boxes.
UNIX Users and Groups
The initial account, the administrative user, is usually named root. The other name to remember is nobody. Default UNIX groups can include root, bin, daemon, tty, disk, lp, mail, news, dialout, trusted, modem, users, and so on.
The open-source UNIX incarnation known as Linux creates a number of accounts. Which accounts are created depends on the base operating system and the software installed. The administrative user, root, is always created. Additional default accounts are used for tasks not otherwise thought of as meriting accounts at all. These include processes such as file transfer protocol (ftp) and lp (printers).

Exercise 9.2: Case Study Problem
For this exercise we will return to the same 20-employee company that was the subject of Exercise 9.1 in Lesson 1. Your job is to design user and group accounts for the 10-computer server-based network. To do this, you should determine what kinds of groups are appropriate to the company and its work. You will also need to establish a password policy and a personnel policy that takes into account what will happen when an employee departs from the company.
After you have established the account policies, create the appropriate user and group accounts and set whatever restrictions will be necessary for each of the groups. These should include the days and hours during which groups can log on to the network. Assign printing rights to the groups as needed and, finally, add the users to the appropriate groups.
Answers
Lesson Summary
The following points summarize the main elements of this lesson.
- Using a server-based network provides additional security by assigning each user an account with the appropriate rights and permissions.
- User accounts are composed of a user name, logon password, and any logon parameters established for that user.
- User accounts can be created or changed only by someone with administrative rights.
- An administrator can use profiles to configure and maintain a user's logon environment.
- Profiles include printer connections, regional settings, sound settings, mouse settings, display settings, and any other user-definable settings.
- In networks with large numbers of users, it is simplest for an administrator to create groups and assign users to groups. Because users receive the rights and permissions of the group rather than as individuals, the administrator is not required to create them on an individual basis.
- The four types of groups designated by Microsoft Windows NT are local groups, global groups, system groups, and built-in groups.
- Built-in groups include administrators, operator groups, and others.
- NetWare provides security and accounts through NDS (NetWare Directory Services).
- In NetWare, all resources, including users, are objects. An administrator can assign rights and permission to objects.
EAN: 2147483647
Pages: 106