Lesson 4: Automating Installations
The previously discussed installation methods required that someone be physically present to respond to system prompts during installation. That is not a convenient situation when multiple systems are being installed.
This lesson presents methods that will help you to automate Windows 2000 Professional installations. When you must install Windows 2000 Professional on computers with varying configurations, scripting provides automation with increased flexibility. You will learn how the improved Setup Manager makes it easy to create the Unattend.txt files that are necessary for scripted installations.
After this lesson, you will be able to
- Automate installations of Windows 2000 Professional by using the Windows 2000 Setup Manager wizard
- Apply application update packs while upgrading previous versions of Windows
Estimated lesson time: 45 minutes
Automating Installations by Using the Windows 2000 Setup Manager
The computers in most networks are not identical, but they still have many similarities. You can use installation scripts to specify the variations in the hardware configurations of the computers that are to be installed with Windows 2000 Professional.
One of the most significant improvements in Windows 2000 Professional is the ease and flexibility of scripting installations. The new Windows 2000 Setup Manager wizard allows you to quickly create a script for a customized installation of Windows 2000 Professional. Knowing how to use Setup Manager enables you to perform customized installations on workstations and servers that meet the specific hardware and network requirements of your organization.
You can create or modify an answer file by using Setup Manager (see Figure 1.6). Although you can still use Unattend.txt files created with a simple text editor, such as Notepad, using Setup Manager will reduce errors in syntax. You can copy Setup Manager to your hard disk by extracting the files in the Deploy.cab file located on your Windows 2000 Professional CD-ROM in the Support\Tools folder. To extract the files, double-click the .CAB file to display the files, select the files you want to extract, right-click the files, and then click Extract on the menu that appears.
NOTE
For detailed steps on how to install Setup Manager, see the next Practice, "Installing the Windows 2000 Professional Installation Deployment Tools," in this chapter.
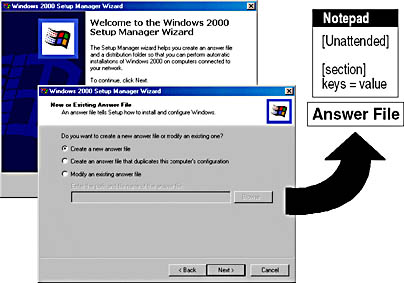
Figure 1.6 Windows Setup Manager
Setup Manager does the following:
- Provides a graphical interface with which you can create and modify answer files and UDFs
- Allows you to specify computer-specific or user-specific information
- Allows you to include application setup scripts in the answer file
- Creates the distribution folder that you use for the installation files
When you start Setup Manager, you will be presented with the following three options:
- Create A New Answer File
- Create An Answer File That Duplicates This Computer's Configuration
- Modify An Existing Answer File
If you select the Create A New Answer File option, you then need to choose the type of answer file you want to create. Setup Manager can create the following types of answer files:
- Windows 2000 Professional unattended installation
- Sysprep installation
- Remote Installation Services (RIS)
NOTE
Remote Installation Services will be discussed in Lesson 6 of this chapter, "Performing Remote Installations."
The remaining options in the Setup Manager wizard allow you to specify the level of user interaction with the Setup program and to enter all the information required to complete Setup.

Practice: Installing the Windows 2000 Professional Installation Deployment Tools
In this practice, you extract the Windows 2000 Professional installation deployment tools from the Windows 2000 Professional CD-ROM you used to install Windows 2000 Professional. You then use System Manager to create an unattended setup script.
Exercise 1: Extracting the Windows 2000 Professional Installation Deployment Tools
In this exercise, you extract the Windows 2000 Professional installation deployment tools from the CD-ROM you used to install Windows 2000 Professional and copy them to your hard disk.
- Log on as Administrator and insert the Windows 2000 Professional CD-ROM in the CD-ROM drive.
- Start Windows Explorer and create the folder Deploy in the root folder of drive C: (or in the root folder of your system drive).
The Deploy folder will be used to store the files extracted from the Deploy.cab file on the Windows 2000 Professional CD-ROM.
- Double-click the Deploy file in the Support\Tools folder on drive D.
NOTE
If D isn't the correct drive letter for your CD-ROM drive, replace the D in these instructions with the letter representing your CD-ROM drive.Windows 2000 Professional displays the contents of the Deploy.cab file.
- Select all of the files listed in the Deploy.cab file.
TIP
To select all the files in the Deploy.cab file, hold down the Ctrl key, and then click each of the files listed. If your file icons are listed in one column, you can also select the files by clicking the first file in the list, holding down the Shift key, and then clicking the last file in the list. - Right-click any of the selected files and click Extract on the menu that appears.
The Browse For Folder dialog box appears.
- Select the Deploy folder on drive C (or your system drive, if it is a drive other than C), and then click OK.
The Copying dialog box appears briefly as the files are extracted and copied to the Deploy folder.
- In Windows Explorer, click the Deploy folder to view its contents.
You should see the seven files from the Deploy.cab file listed. These files have been extracted from the .CAB file and are now ready to use.
- Double-click Readme.txt.
- Take a moment to view the topics covered in the Readme.txt file, and then close Notepad.
Exercise 2: Using Setup Manager to Create an Unattended Setup Script
In this exercise, you use the Windows 2000 Setup Manager to create an unattended setup script. At the same time, the Setup Manager wizard creates a distribution folder and a .UDF file.
To create an unattended setup script using the Setup Manager wizard
- In Windows Explorer, double-click the Setupmgr.exe file.
The Windows 2000 Setup Manager wizard appears.
- Click Next.
The New Or Existing Answer File page appears.
- Ensure that the Create A New Answer File option is selected, and then click Next.
The Product To Install page appears. Notice that you have three choices: Windows 2000 Unattended Installation, Sysprep Install, and Remote Installation Services.
- Ensure that Windows 2000 Unattended Installation is selected, and then Click Next.
The Platform page appears. Notice you have two choices: Windows 2000 Professional or Windows 2000 Server.
- Ensure that Windows 2000 Professional is selected, and then click Next.
The User Interaction Level page appears. Notice that you have five choices:
- Provide Defaults. The answers you provide in the answer file are the default answers that the user sees. The user can accept the default answers or change any of the answers supplied by the script.
- Fully Automated. The installation is fully automated. The user doesn't have the chance to review or change the answers supplied by the script.
- Hide Pages. The answers provided by the script are supplied during the installation. Any page for which the script supplies all answers is hidden from the user so that the user can't review or change the answers supplied by the script.
- Read Only. The script provides the answers, and the user can view the answers on any page that is not hidden, but the user can't change the answers.
- GUI Attended. The Text-mode portion of the installation is automated, but the user must supply the answers for the GUI-mode (or Graphics-mode) portion of the installation.
- Select Fully Automated, and then click Next.
The License Agreement page appears.
NOTE
If you had chosen any option other than Fully Automated, this page would not have displayed. - Click I Accept The Terms Of The License Agreement, and then click Next.
The Customize The Software page appears.
- Enter your name in the Name box and your organization in the Organization box, and then Click Next.
The Computer Names page appears. Notice that you have three choices:
- Type in a series of names to be used during the various iterations of the script.
- Provide the name of a text file to import that has one computer name per line listed. (Setup imports and uses these names as the computer names in the various iterations of the script.)
- Select Automatically Generate Computer Names Based On Organization Name to allow the system to automatically generate the computer names to be used.
- Type PRO2 and then click Add. Repeat this step to add PRO3 and PRO4 to the list of names.
Notice that the names PRO2, PRO3, and PRO4 appear in the Computers To Be Installed box.
- Click Next.
The Administrator Password page appears. Notice that you have two choices: Prompt The User For An Administrator Password and Use The Following Administrator Password (127 Characters Maximum).
NOTE
On the User Interaction Level page, you selected Fully Automated, so the Prompt The User For An Administrator Password option is not available.Notice that you can also have the administrator log on automatically, and you can set the number of times you want the administrator to log on automatically when the computer is restarted.
- Ensure that Use The Following Administrator Password (127 Characters Maximum) is selected, and type password in the Password box and the Confirm Password box. Then click Next.
The Display Settings page appears. Notice that you can adjust the Colors, Screen Area, and Refresh Frequency settings for the display. You can also choose Custom to create your own settings rather than picking from the selections listed under each of the three fields.
- Click Next to accept the default settings.
The Network Settings page appears. Notice that you can choose Typical Settings—which installs TCP/IP, enables DHCP, and installs the Client For Microsoft Networks protocol for each destination computer—or you can choose Custom Settings.
- Select Custom Settings, and then click Next.
The Number Of Network Adapters page appears.
- Ensure that the default option, One Network Adapter, is selected and then click Next.
The Networking Components page appears. Notice that the Client For Microsoft Networks, File And Printer Sharing For Microsoft Networks, and Internet Protocol (TCP/IP) components are installed by default.
- Select Internet Protocol (TCP/IP), and then click Properties.
The General tab of the Internet Protocol (TCP/IP) Properties dialog box appears. Notice that it is identical to configuring TCP/IP through Network and Dial-up Connections.
- Click Cancel, and then click Next to accept the default settings for networking components.
The Workgroup Or Domain page appears.
- Click Next to accept the default option, Workgroup, and the workgroup name WORKGROUP.
The Time Zone page appears.
- Select the appropriate time zone, and then click Next.
The Additional Settings page appears.
- Ensure that the default option, Yes, Edit The Additional Settings is selected, and then click Next.
The Telephony page appears.
- Select the appropriate setting for What Country/Region Are You In?
- Type the appropriate numbers for What Area (Or City) Code Are You In?
- Type the appropriate number(s) for If You Dial A Number To Access An Outside Line, What Is It?
- Select the appropriate setting for The Phone System At This Location Uses, and then click Next.
The Regional Settings page appears. The default selection is Use The Default Regional Settings For The Windows Version You Are Installing.
- Click Next to accept the default.
The Languages page appears; it allows you to add support for additional languages.
- Click Next to accept the default.
The Browser And Shell Settings page appears. Notice that you can choose from the following three settings: Use Default Internet Explorer Settings, Use An Autoconfiguration Script Created By The Internet Explorer Administration Kit To Configure Your Browser, and Individually Specify Proxy And Default Home Page Settings.
- Click Next to accept the default option, Use Default Internet Explorer Settings.
The Installation Folder page appears. Notice that you can select from three choices: A Folder Named Winnt, A Uniquely Named Folder Generated By Setup, and This Folder.
- Select This Folder, and in the This Folder box, type W2000Pro and then click Next.
The Install Printers page appears.
- Click Next to continue without having the script install any network printers.
The Run Once page appears. This page allows you to configure Windows to run one or more commands the first time a user logs on.
- Click Next to continue without having the script run any additional commands.
The Distribution Folder page appears. This page allows you to have the Setup Manager wizard create a distribution folder on your computer or network with the required installation files. You can add additional files to this distribution folder.
NOTE
If you were upgrading systems to Windows 2000 Professional, you could add any application update packs to the distribution folder and enter the commands to apply the update packs to the application as part of the upgrade. - Ensure that the default option, Yes, Create Or Modify A Distribution Folder, is selected, and then click Next.
NOTE
The other selection is No, This Answer File Will Be Used To Install From A CD. If you are going to be doing a large number of installations, you don't want to try to simultaneously install the operating system on multiple computers from a CD-ROM. You should create one or more distribution folders.The Distribution Folder Name page appears.
- Click Next to accept the default option, Create A New Distribution Folder.
The Additional Mass Storage Drivers page appears.
- Click Next to continue without adding any additional drivers.
The Hardware Abstraction Layer page appears. This page allows you to replace the default hardware abstraction layer (HAL).
- Click Next to use the default HAL.
The Additional Commands page appears. This page allows you to specify additional commands to be run at the end of the unattended setup.
- Click Next to continue without running any additional commands.
The OEM Branding page appears. This page allows you to customize Windows Setup by adding your customer OEM branding. You can specify both a logo bitmap and a background bitmap.
- Click Next to continue without specifying any OEM branding.
The Additional Files Or Folders page appears. This page allows you to specify additional files or folders to be copied to the destination computers.
- Click Next to continue without specifying any additional files or folders to copy.
The Answer File Name page appears.
- Type the path C:\Deploy\Unattend.txt in the Location And File Name box, and then click Next.
The Location Of Setup Files page appears. The files can be copied from the CD-ROM or you can specify a network location.
- Click Next to accept the default option, Copy The Files From CD.
The Copying Files page appears while the Setup Manager wizard copies the distribution files. This will take a few minutes. An indicator shows you the progress of the copy operation.
The Completing The Windows 2000 Setup Manager wizard appears.
- Click Finish.
Notice that three new files were created in C:\Deploy: They are Unattend.bat, Unattend.txt, and Unattend.udf. Notice also that a C:\Win2000dist folder was also created and shared.
To verify the existence of the distribution files
- Click C:\Win2000dist to view the distribution files.
- Close Windows Explorer.
Lesson Summary
In this lesson, you learned that the Windows 2000 Professional Setup Manager wizard makes it easy to create the Unattend.txt files that are necessary for scripted installations. Setup Manager provides an easy-to-use graphical interface with which you can create and modify answer files and UDFs.
You also learned that before you can use the Setup Manager wizard, you must copy the Windows 2000 Professional deployment tools, including Setup Manager, by extracting the files located in the Deploy.cab file on the Windows 2000 Professional CD-ROM. The Setup Manager wizard makes it easy to specify computer-specific or user-specific information, and to include application setup scripts in the answer file. The Setup Manager wizard also creates the distribution folder that you use for the installation files.
EAN: N/A
Pages: 244