Lesson 1: Exploring Microsoft Internet Information Services 5.0 Features
Windows 2000 Server includes an updated version of IIS (version 5.0). IIS runs as an enterprise service within Windows 2000 and uses other services provided by Windows 2000, such as security and Active Directory directory service. IIS 5.0 improves the Web server's reliability, performance, management, security, and application services. Many of these improvements result from the way IIS 5.0 incorporates new operating system features in Windows 2000. This lesson provides an overview of IIS 5.0 and explains how to install IIS and configure a Web environment.
After this lesson, you will be able to
- Install IIS 5.0 and configure a Web environment
Estimated lesson time: 60 minutes
Introduction to Microsoft IIS 5.0
While IIS 4.0 focused on security, administration, programmability, and support for Internet standards, IIS 5.0 builds on these capabilities to deliver the type of Web sites required in an increasingly intranet- and Internet-centric business environment. In particular, IIS 5.0 has been improved in the following four areas: reliability and performance, management, security, and application environment.
Reliability and Performance
IIS 5.0 performs better and is more reliable than previous versions for a number of reasons. Internally, the speed of the IIS 5.0 engine has been increased through coding refinements. The new Reliable Restart feature lets system administrators quickly restart the server. Beyond these inherent capabilities, this version also introduces features you can use to improve the speed and reliability of Web sites.
One of the more significant improvements in IIS 5.0 is the addition of application protection through support for pooled, out-of-process applications. To better control resource consumption, new throttling features (based on the new job object feature of Windows 2000) make it easier for administrators to allocate the amount of central processing unit (CPU) bandwidth available to processes, as well as the amount of network bandwidth available to sites. In addition, the new Socket Pooling feature allows multiple sites sharing a port also to share a set of sockets.
Application Protection
Most operating systems view a process as a unit of work in a system. Services and applications are processes that run in memory areas allocated by the operating system to each process. In IIS 5.0, application protection refers to the way in which the operating system guards each application process from other processes in memory. In earlier versions of IIS, all Internet Server application programming interface (ISAPI) applications (including Active Server Pages [ASP] technology) shared the resources and memory of the IIS server process. Although this provided fast performance, unstable components could cause the IIS server to hang or crash, which made it more difficult to develop and debug new components. In addition, in-process components could not be unloaded unless the server was restarted—which meant that modifying existing components would affect all sites that shared the same IIS server, whether they were directly affected by the upgrade or not.
As a first step toward addressing these issues, IIS 4.0 allowed applications to run either in the same IIS server process (Inetinfo.exe) or out-of-process, that is in a process separate from the IIS server process. The DLLHost.exe acts as a surrogate application to the IIS server process to manage each out-of-process application. Out-of-process applications are run separately from one another which is memory intensive and less efficient than running in-process. In IIS 5.0, there is a third option: applications can be run in a pooled process separate from the IIS server process. This approach allows related applications to be run together without adversely affecting the IIS server process. These three options provide varying levels of protection, each of which impacts performance. Greater isolation comes at the cost of slower performance.
Reliable Restart
In the event of a system failure, it is clearly important to be able to get IIS back to an operational state as quickly as possible. In the past, rebooting was an acceptable, although not optimal, way to restart IIS. To reliably restart IIS, an administrator needed to start up four separate services after every stoppage and was required to have specialized knowledge, such as which services to start and in what order. To avoid this, Windows 2000 includes IIS Reliable Restart, which is a faster, easier, more flexible one-step restart process.
Socket Pooling
IIS 5.0 increases performance by also being able to optimize access to your Web site. A socket is a protocol identifier for a particular node on a network. The socket consists of a node address and a port number that identifies the service. For example, port 80 on an Internet node represents the World Wide Web HTTP service on a Web server.
In IIS 4.0, each Web site is bound to a different IP address, which means that each site has its own socket that is not shared with sites bound to other IP addresses. Each sockets is created when the site starts, and consumes significant nonpaged random access memory (RAM). This memory consumption limits the number of sites bound to IP addresses that can be created on a single machine.
For IIS 5.0, this process has been modified so that sites bound to different IP addresses but sharing the same port number can share the same set of sockets. The end result is that more sites can be bound to an IP address on the same computer than in IIS 4.0. In IIS 5.0, these shared sockets are used flexibly among all of the started sites, thus reducing resource consumption.
Multisite Hosting
To improve the scalability of IIS, Windows 2000 Server supports the capability of hosting multiple Web sites on a single server. This can save the time and money for a company that wants to host different sites for different departments, or for an ISP hosting multiple sites for different customers.
The key to hosting multiple sites on a single server is being able to distinguish between them. This can be done in several ways, each using the Web site's identification. Each Web site has a unique, three-part identity it uses to receive and to respond to requests: a port number, an IP address, and a host header name. With IIS 5.0, companies can host multiple Web sites on a single server by using one of three techniques: assigning different ports, assigning different IP addresses, or assigning different host header names. Each Web site can share two out of three unique characteristics and still be identified as a unique site.
NOTE
IIS 4.0 also allows you to host multiple Web sites on a single server.
Process Throttling
If you run multiple Web sites that primarily use Hypertext Markup Language (HTML) pages on one computer, or if you have other applications running on the same computer as your Web server, you can limit how much processor time a Web site's applications are permitted to use. This can help ensure that processor time is available to other Web sites or applications unrelated to IIS.
Bandwidth Throttling
If the network or Internet connection used by your Web server is also used by other services such as e-mail or news, you may want to limit the bandwidth used by your Web server in order to free up bandwidth for other services. Bandwidth Throttling is an improved feature in IIS 5.0 that allows administrators to regulate the amount of server bandwidth each site uses by throttling the available bandwidth for the net card. For example, this allows an ISP to guarantee a predetermined amount of bandwidth to each site.
NOTE
IIS 4.0 allows you to throttle bandwidth on a per-Web site basis.
Management
A core design goal for IIS 5.0 was to make the Web server easier for managers to use. For example, some administrators found IIS 4.0 difficult to install. With IIS 5.0, the installation process is built right into Windows 2000 Server Setup. In addition, to make it easier to configure security settings, there are three new security wizards. This release also includes improved command-line administration scripts as well as additional built-in management scripts.
Setup and Upgrade Integration
The setup process for IIS 5.0 is integrated with Windows 2000 Server setup, and IIS 5.0 installs by default as a Windows component of Windows 2000 Server. In the Windows Components wizard, it is listed as Internet Information Services (IIS). During operating system setup, a wizard helps you either to install a new copy of IIS 5.0 or to upgrade an older version.
IIS creates a default Web site, an Administration Web site, and a Default SMTP Virtual Server when you install Windows 2000 Server. You can add or remove IIS or select additional components, such as the Network News Transfer Protocol (NNTP) Service, by using the Add/Remove Programs application in Control Panel. Then from Add/Remove Programs, start the Windows Components wizard, and then click the Details button of the IIS component.
Centralized Administration
IIS 5.0 is managed by using the Internet Information Services snap-in (Figure 23.1), which is integrated with other administrative functions of Windows 2000. (In previous releases this tool was called Internet Service Manager.) You can access the Internet Information Services snap-in through the Internet Information Services snap-in, which is located in the Administrative Tools program group. The Internet Information Services snap-in is also located in the Computer Management snap-in under Services and Applications.
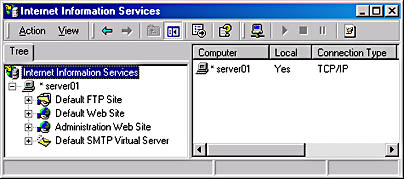
Figure 23.1 Internet Information Services snap-in
The browser-based administrative tool, Internet Services Manager (HTML), is no longer available in the Administrative Tools program group, but it is still available to let you remotely administer IIS over an Hypertext Transfer Protocol (HTTP) or HTTPS (secure HTTP)connection, depending on how you have the Administration Web site configured for security. You can run Internet Services Manager (HTML) by selecting the Administration Web Site node in the console tree of the Internet Information Services snap-in and then clicking Browse from the Action menu. Or you can access it directly by specifying the server name, the TCP port number assigned to the site, and the administration Web site address as shown in the Address field in Figure 23.2.
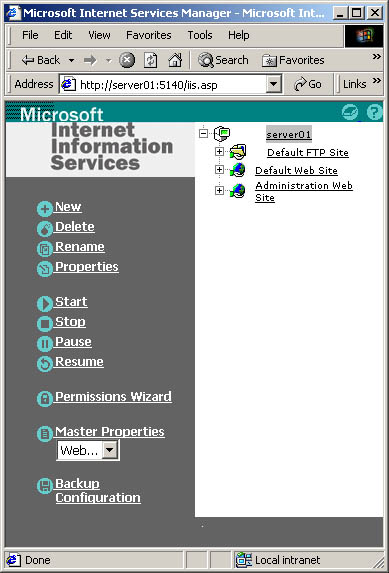
Figure 23.2 Administering IIS on Server01 from a remote computer
NOTE
The TCP port number assigned to the administration site is randomly selected and is between 2,000 and 9,999. View the Administration Web site Properties dialog box under the Web Site tab to determine or change the port number assigned to the site.
Browsers other than Microsoft Internet Explorer can be used to access the administration Web site, but basic authentication must be enabled if the browser does not support NT LAN Manager (NTLM) authentication and you don't want to enable anonymous access. In addition, you can use Terminal Services to remotely administer IIS by using the Internet Information Services snap-in.
Delegated Administration
To help distribute the workload of administrative tasks, administrators can add administration accounts to the Operators group. Members of the Operators group have limited administration privileges on Web sites. For example, an Internet Service Provider (ISP) that hosts sites for a number of different companies can assign delegates from each company as the operators for each company's Web site. Operators can administer properties that affect only their respective sites. They do not have access to properties that affect IIS, the Windows server computer hosting IIS, or the network. This lets an IT or ISP administrator who hosts multiple Web sites on a single server delegate the day-to-day management of the Web site without giving up total administrative control.
Process Accounting
Process Accounting (sometimes referred to as CPU Usage Logging, CPU Accounting, or Job Object Accounting) is a new feature in IIS 5.0 that lets administrators monitor and log how Web sites use CPU resources on the server. Processes Accounting adds fields to the W3C Extended log file to record information about how Web sites use CPU resources on the server. ISPs can use this information to determine which sites are using disproportionately high CPU resources or that may have malfunctioning scripts or Common Gateway Interface (CGI) processes. IT managers can use this information to charge back the cost of hosting a Web site or application to the appropriate division within a company or to determine how to adjust process throttling to control resource utilization.
To enable process accounting on a site using the Internet Information Services snap-in, open the site's property page and from the properties of the W3C Extended Log File Format, choose the Extended Properties tab. In the Internet Service Manager (HTML), follow the same navigation and then choose the Extended Properties link. Figure 23.3 shows the Extended Logging Properties dialog box and the Extended Logging Options Web page.
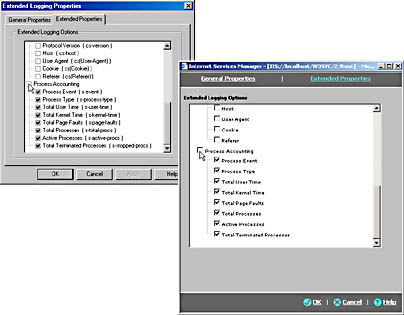
Figure 23.3 Enabling process accounting through the Extended Logging Properties dialog box or through the Extended Logging Options Web page
Improved Command-Line Administration Scripts
IIS 5.0 ships with scripts that can be executed from the command line to automate the management of common Web server tasks. These scripts are located in the \Inetpub\Scripts folder. Administration scripts automate some of the most common administrative tasks. You can use them to create and control Web sites, applications, directories, and more. Administrators can also create custom scripts that automate the management of IIS. Windows Script Host (WSH) is used to run the .vbs administration scripts included in IIS 5.0.
Backing Up and Restoring IIS
The Internet Information Services snap-in includes options that allow you to back up and restore your IIS configuration so that you can save the IIS 5.0 metabase settings to make it easy to return to a safe, known state. By using this method, you can back up and restore your Web server configuration, but not your content files or those settings that remain in the registry.
To back up and restore your Web server configuration, select the IIS computer in Internet Information Services snap-in, and then select the Backup/Restore Configuration option from the Action menu. The Configuration Backup/Restore dialog box that appears (Figure 23.4) allows you to create a backup, restore a backup, or delete a backup that has already been created.
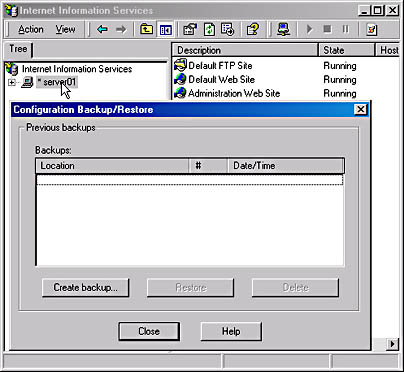
Figure 23.4 Accessing the Configuration Backup/Restore dialog box for Server01
Custom Error Messages
When a user attempts to connect to a Web site and an HTTP error occurs, a generic message is sent back to the client browser with a brief description of what happened during the attempt to establish a connection. With IIS 5.0, as with IIS 4.0, you can send other, more informative error messages to clients that encounter an ASP or HTML error on your site. You can use the custom error messages that IIS 5.0 provides or create you own.
In IIS 5.0, the custom error messages are stored in %systemroot%\Help\iisHelp\common folder. In IIS 4.0 custom error messages are stored in the %systemroot%\Help\common folder. The prefix of the custom error message file is the name of the error, and the extension is .htm. If the error message contains a period, such as error 403.3, the corresponding custom message file name contains a hyphen, for example, 403-3.htm.
Support for FrontPage Server Extensions
Windows 2000 Server allows administrators to use FrontPage Web authoring and management features to deploy and manage Web sites. With FrontPage Server Extensions, administrators can view and manage a Web site in a graphical interface. In addition, authors can create, edit, and post Web pages to IIS remotely. The FrontPage Server Extensions snap-in allows you to administer the FrontPage Server Extensions and FrontPage—extended Web sites.
Unlike previous versions of IIS, FrontPage Web is enabled by default. You can access the FrontPage Extensions snap-in from the Server Extensions Administrator Microsoft Management Console (MMC) or from the Internet Information Services snap-in. The following two setup features in the FrontPage Server Extensions snap-in are important for initially configuring and checking the extensions:
- Configuring an existing Web server to use the server extensions. Once a Web site is configured to use server extensions, Web applications that depend on server extensions, like FrontPage, can operate against the Web site.
- Checking server extension security. This feature allows you to check the security of any Web site or a single Web site running Server Extensions.
In the Internet Information Services snap-in, configuring an existing Web server for server extensions is accomplished by selecting a Web site and then, from the Action menu, pointing to New and clicking the Server Extensions Web option. To check server extension security of all Web sites, choose Internet Information Services in the console tree, and then from the Action menu, point to All Tasks and click Check Server Extensions. To check server extensions on a single site, select the site from the console tree, and follow the same navigation procedure as you did to check all sites.
Web Distributed Authoring and Versioning
The Web is a great medium for publishing documents, but until now it hasn't been easy for organizations to use the Internet to let users collaborate on documents. That's because while it is easy to read documents stored on a Web site, it has not been easy for users to make changes to those documents. To address this need, IIS 5.0 has added full support for Web Distributed Authoring and Versioning (WebDAV).
By setting up a WebDAV directory on your Web server, you can let users share documents over the Internet or an intranet. WebDAV in IIS 5.0 takes advantage of the security and file access features provided by Windows 2000, so you can lock and unlock resources to let multiple people read a file, while only one person at a time can modify the file. WebDAV is discussed in more detail in Lesson 2, "Administering A Web Environment."
Distributed File System
IIS 5.0 makes use of the Windows 2000 distributed file system (Dfs). Dfs is a means for uniting files on different computers into a single namespace. Dfs lets system administrators build a single, hierarchical view of multiple file servers and file server shares on the network, making it easier for users to access and manage files that are physically distributed across a network. With Dfs, you can make files that are distributed across multiple servers appear to users as if they reside in one place on the network. Users no longer need to know and specify the actual physical location of files in order to access them.
HTTP Compression
HTTP compression allows faster transmission of pages between a Web server and compression-enabled clients. This is useful in situations where bandwidth is limited. Depending on the content you're hosting, your storage space, and the connection speed of your typical Web site visitor, HTTP compression can provide faster transmission of pages between your Web server and compression-enabled browsers.
In the Internet Information Services snap-in, HTTP Compression is enabled from the master properties of the Internet Information Services node. On the Internet Information Services Properties dialog box, click the Edit button for the WWW Service and then choose the Service tab (Figure 23.5).

Figure 23.5 WWW Service Master Properties for Server01 as seen from the Internet Information Services snap-in
From the Internet Information Service (HTML) home page, click the Service option under Master Properties. View the service properties and configure compression (Figure 23.6).

Figure 23.6 WWW Service Master Properties for Server01 as seen from Internet Services Manager (HTML) page
FTP and FTP Restart
The File Transfer Protocol (FTP) service, an industry-standard protocol used to publish information to a Web server, is integrated into Windows 2000 Server. In IIS 5.0, the FTP Restart protocol is also supported by Windows 2000 Server. It provides a faster and smoother way to download information from the Internet. If an interruption occurs during data transfer from an FTP site, the download can continue where it left off, without the entire file having to be downloaded again.
NOTE
This feature is available only to FTP clients that support the FTP restart function. The FTP client initiates the REST command to connect and continue a failed download.
Security
Security features, which are an important area of improvement in IIS 5.0, take advantage of the Internet-standard security features that are fully integrated with Windows 2000.
Security Standards
The security protocols supported in IIS 5.0 are described in the following table.
Table 23.1 Security Standards
| Security | Protocol description |
|---|---|
| Fortezza | Support for the U.S. government security standard called Fortezza is new in IIS 5.0. Fortezza satisfies the Defense Message System security architecture with a cryptographic mechanism that provides message confidentiality, integrity, authentication, non-repudiation, and access control to messages, components, and systems. These features are implemented both with server and browser software and with PC-Card card hardware. |
| Secure Sockets Layer (SSL) 3.0 | SSL security protocols are used widely by Internet browsers and servers for authentication, message integrity, and confidentiality. You can configure your Web server's SSL security features to verify the integrity of your content, verify the identity of users, and encrypt network transmissions. SSL relies upon certificates. Microsoft Certificate Services can be used to issue certificates. |
| Transport Layer Security (TLS) | TLS is based on SSL. It provides for cryptographic user authentication and provides a way for independent programmers to write TLS-enabled code that can exchange crypto graphic information with another process without a programmer needing to be familiar with another programmer's code. In addition, TLS is intended to provide a framework that can be used by new public key and bulk encryption methods as they emerge. TLS also focuses on improving performance by reducing network traffic and providing an optional session caching scheme that can reduce the number of connections that need to be established from scratch. |
| PKCS #7 | This protocol describes the format of encrypted data such as digital signatures or digital envelopes. Both of these are involved in the certificate features of IIS. |
| PKCS #10 | This protocol describes the format of requests for certificates that are submitted to certification authorities. |
| Basic Authentication | Basic Authentication is a part of the HTTP 1.0 specification. It sends passwords over networks in Base64-encoded format. The Basic Authentication method is a widely used, industry- standard method for collecting user name and password information. The advantage of Basic Authentication is that it is part of the HTTP specification, and is supported by most browsers. The disadvantage is that Web browsers using Basic Authentication transmit passwords in an unencrypted form. By monitoring communications on your network, someone could easily intercept and decipher these passwords by using publicly available tools. Therefore, Basic Authentication is not recommended unless you are confident that the connection between the user and your Web server is secure, with a direct cable connection, a dedicated line, or a secure intranet. |
| Digest authentication | A new feature of IIS 5.0, Digest Authentication offers the same features as Basic Authentication but involves a different method for transmitting the authentication credentials. The authentication credentials pass through a one-way process, often referred to as hashing. The result of this process is called a hash, or message digest, and the original text cannot be deciphered from the hash. The server generates additional information that is added to the password before hashing so no one can capture the password hash and use it to impersonate the true client. This is a shared secret password methodology. This a clear advantage over Basic Authentication, in which the password can be intercepted and used by an unauthorized person. Digest Authentication is structured to be usable across proxy servers and other firewall applications and is available to WebDAV. Because Digest Authentication is a new HTTP 1.1 feature, not all browsers support it. If a non-compliant browser makes a request on a server that requires Digest Authentication, the server will reject the request and send the client an error message. Digest Authentication is supported only for Windows 2000 domains, and Internet Explorer version 5 or later is one of the few browsers that supports this feature. |
| Integrated Windows Authentication | This authentication method provides NTLM (Windows NT Challenge/Response) authentication for older versions of Internet Explorer 3.0 that use it to cryptographically authenticate with IIS. Integrated Windows Authentication also provides Web sites and new versions of Internet Explorer with Kerberos v5 authentication. Integrated Windows Authentication is only used if Anonymous access is disabled or denied as a result of NTFS permissions restrictions. Integrated Windows Authentication is not supported over Proxy server connections. |
Security Mechanisms
IIS 5.0 uses five basic security mechanisms: authentication, certificates, access control, encryption, and auditing.
Authentication
Authentication allows you to confirm the identity of anyone requesting access to your Web sites. IIS supports the following types of authentication for HTTP and FTP services:
- Anonymous FTP and HTTP authentication
- Basic FTP and HTTP authentication
- Anonymous FTP and HTTP authentication
- Digest authentication for Windows 2000 Domains and browsers supporting this HTTP 1.1 authentication method
- Integrated Windows authentication (HTTP only)
Certificates
To complete the authentication process, you need a mechanism for verifying user identities. Certificates are digital identification documents that allow both servers and clients to authenticate each other. They are required for the server and client's browser to set up an SSL connection over which encrypted information can be sent. Server certificates usually contain information about your company and the organization that issued the certificate. Client certificates usually contain identifying information about the user and the organization that issued the certificate.
Access Control
After verifying the identity of a user, you'll want to control their access to resources on your server. IIS 5.0 uses two layers of access control: Web permissions and NTFS permissions. Web permissions apply to all HTTP clients and define access to server resources. NTFS permissions define what level of access individual user accounts have to folders and files on the server.
Encryption
Once you've controlled access to information, you need to protect that information as it passes over the Internet. Encryption scrambles the information before it is sent, and decryption unscrambles it after it is received. You can let users exchange private information, such as credit card numbers or phone numbers, with your server in a secure way by using encryption The foundation for this encryption is the SSL 3.0 protocol and the emerging Transport Layer Security (TLS) 1.0 protocol, which provides a secure way of establishing an encrypted communication link with users. SSL confirms the authenticity of your Web site and, optionally, the identity of users accessing restricted Web sites.
Auditing
The last step to ensuring security is to regularly monitor your site's usage. Administrators can use security auditing techniques to monitor a broad range of user and Web server security activity. Auditing consists of creating auditing policies for directory and file access or server events and monitoring the security logs to detect any access attempts by unauthorized persons.
Security Wizards
To make it simpler to establish and maintain security settings, IIS 5.0 includes three new security task wizards: the Web Server Certificate wizard, the Permissions wizard, and the Certificate Trust Lists wizard.
The Certificate wizard simplifies certificate administration tasks, such as creating certificate requests and managing the certificate life cycle. The Web Server Certificate wizard is started from the Server Certificate button on the properties of a Web site in the Internet Information Services snap-in.
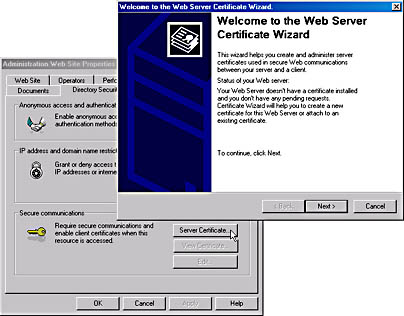
Figure 23.7 Starting the Web Server Certificate wizard on the Properties page of the Administration Web site
NOTE
Using Internet Information Services (HTML) to create a Web server certificate is similar to using the Internet Information Services snap-in; however, there is no HTML-based wizard to walk you through the configuration process.
SSL security is an increasingly common requirement for Web sites that provide e-commerce and access to sensitive business information. The new wizard makes it easy to set up SSL-enabled Web sites on a Windows 2000 Server computer. In addition, this wizard makes it easier to establish and maintain SSL encryption and client certificate authentication.
The Permissions wizard walks administrators through the tasks of setting up permissions and authenticated access on an IIS Web site, making it much easier to set up and manage a Web site that requires authenticated access to its content.
The Permissions wizard is started from the Internet Information Services snap-in. Select either a Web site or FTP site. From the Action menu, point to All Tasks and then click Permissions wizard. Figure 23.8 shows the Permissions Wizard screen started from the Internet Information Services snap-in.
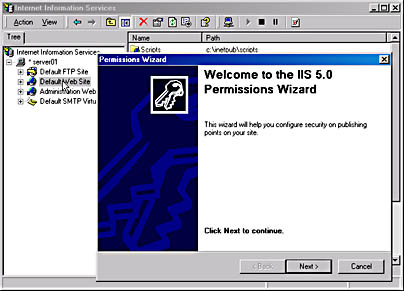
Figure 23.8 Permissions Wizard screen for the Default Web site
The Permissions wizard can also be started from Internet Services Manager (HTML) by selecting a Web or FTP site from the home page and then clicking the Permissions Wizard link in the left frame of the home page, as shown in Figure 23.9.
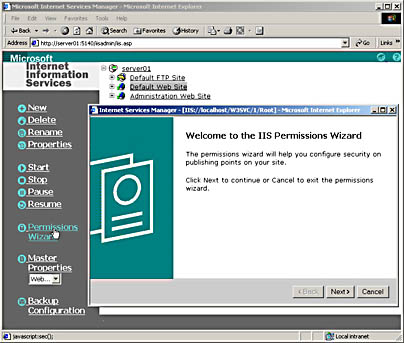
Figure 23.9 HTML-based Permissions Wizard screen for the Default Web site
The Permissions wizard provides two top-level options:
- Inherited security settings applied to the parent site or virtual directory
- Security settings based on a template
Two templates are available for configuring security: the Public Web Site template and the Secure Web Site template. The Public Web Site template applies security settings that are cross-browser compatible and provide access to the site regardless of whether the user has a Windows 2000 account for the network being accessed. The Secure Web Site template applies security settings that only users with Windows 2000 user accounts can access.
The Certificate Trust List wizard allows administrators to configure certificate trust lists (CTLs). A CTL is a list of trusted certification authorities (CAs) for a particular directory. CTLs are especially useful for ISPs that have several Web sites on their server and who need to have a different list of approved CAs for each site. CTLs are available only at the Web site level and are not available for FTP sites.
After a Server Certificate is configured for the site, the Certificate Trust List wizard is run from the properties of a Web site in the Internet Information Services snap-in. On the Directory Security tab of the Properties dialog box, click the Edit button under Secure Communications to display the Secure Communications dialog box. From this dialog box, select the Enable certificate trust list check box and then click New. The Certificate Trust List wizard appears (Figure 23.10).

Figure 23.10 Navigating to the Certificate Trust List wizard after enabling CTL
You can also enable and configure CTL from the Internet Service Manager (HTML), but there is no corresponding HTML-based wizard. Also, you cannot edit the certificates through the HTML interface, but you can edit the certificates from the Internet Information Services snap-in.
Application Environment
IIS 5.0 includes performance enhancements that make it easier to develop Web-enabled applications. The ASP technology within IIS, combined with the data access and component services within Windows 2000 Server, provide a well-rounded application environment.
With this release, enhanced flow control and error handling, Windows Script Host Components, and other improvements make ASP easier to use for script writers and Web application developers. In addition, features such as scriptless ASP, ASP self-tuning, and performance-enhanced objects, as well as improvements within the Windows 2000 operating system, can increase the speed of ASP applications.
ASP is a server-side scripting environment that you can use to create and run dynamic, interactive Web server applications. With ASP, you can combine HTML pages, script commands, and Component Object Model (COM) components to create interactive Web pages or Web-based applications that are easy to deploy and modify. There are a number of new ASP features in IIS 5.0, such as new flow control capabilities and error handling features that make it easier to write and control the behavior of Web applications. Other new features, such as scriptless ASP processing, improve the performance of ASP pages.
Component Services
IIS 5.0 and the Component Services (COM+) included in Windows 2000 Server work together to form a basic architecture for building Web applications. In IIS version 4.0, Microsoft Transaction Server (MTS) provided transaction support. In IIS 5.0 and Windows 2000, Component Services provides all the transaction support of MTS, in addition to a number of other component development and deployment features. IIS uses the functionality provided by Component Services to perform the following tasks:
- Isolate applications into distinct processes
- Manage communication between Component Object Model (COM) components (including the ASP built-in objects)
- Coordinate transaction processing for transactional ASP applications
Active Directory Directory Service
Active Directory directory service in Windows 2000 Server is used to store and manage information about networked resources. By providing a centralized store for essential information, Active Directory simplifies network management, makes it easier for users to find resources, and makes it easier for developers to write applications.
Microsoft Active Directory Service Interfaces (ADSI) is a COM-based directory service model that allows client applications that are ADSI-compliant to access a wide variety of distinct directory protocols, including Active Directory service, LDAP, and NDS, while using a single, standard set of interfaces. ADSI shields the client application from the implementation and operational details of the underlying data store or protocol.
IIS stores most Internet site configuration information in the IIS metabase. IIS exposes a low-level DCOM interface that allows applications to gain access to and manipulate the metabase. To make it easy to access the metabase, IIS also includes an ADSI provider that provides most of the functionality provided by the DCOM interface, and exposes it to any ADSI-compliant client applications.
Installing IIS 5.0
Internet Information Services 5.0 is a component of the Windows 2000 operating system. Installation and removal of IIS is accomplished in one of three ways: when installing or upgrading Windows 2000, by using the Add/Remove Programs utility in Control Panel, or by using an unattended.txt file during an unattended installation.
When performing a clean installation of Windows 2000 Server, IIS is installed by default. You can remove IIS or select IIS components to be added or removed by using the Add/Remove Programs utility.
When you upgrade from a previous version of Windows 95, Windows 98, or Windows NT to Windows 2000, Setup attempts to detect previous version of IIS, Peer Web Services, or Personal Web Server. If one of these programs is detected, IIS 5.0 is installed. You cannot prevent an upgrade to IIS 5.0 if a previous version of IIS, Peer Web Services, or Personal Web Server is detected. However, IIS 5.0 will not be installed if these existing services are not detected.
When installing IIS 5.0, either as an upgrade or as a clean install, Setup verifies that the TCP/IP protocol suite is installed. If Setup does not find TCP/IP installed, it automatically installs the protocol suite and configures it to use DHCP.
During the IIS installation, the Default Web site, Administration Web site, Default SMTP Virtual Server, and Default FTP site are created. Managing the Web sites and the FTP site are discussed in more detail in Lesson 2, "Administering a Web Environment."
NOTE
The Default SMTP Virtual Server is beyond the scope of this training kit. SMTP provides e-mail message delivery support to intranet- and Internet-enabled applications.
Setting Up a Web Environment
Whether your site is on an intranet or the Internet, the principles of providing content are the same. You place your Web files in folders on your server so that users can establish an HTTP connection and view your files with a Web browser. But beyond simply storing files on your server, you must manage how your site is deployed and, more importantly, how your site evolves.
Getting Started
You should set up your Web sites by indicating which folders contain the documents that you want to publish. The Web server cannot publish documents that are not within these specified folders. So, the first step in deploying a Web site should be to determine how you want your files organized. You then use the Internet Information Services snap-in, or the Internet Services Manager (HTML) interface to identify which folders (called directories in the snap-in and HTML interface) are part of the site.
If you want to get started right away without having to create a special folder structure, and your files are all located on the same hard disk of the computer running IIS, you can publish your documents immediately by copying your Web files into the default home folder. Intranet users can then access these files by using any of the following URLs:
- http://<computer_name/file_name>
- http://<FQDN/file_name>
- http://<IP_address/file_name>
Where computer_name, FQDN, and IP_address identify the Web server.
NOTE
In the following section, the words folder and folders are replaced by the words directory and directories because the latter are used in the IIS interface.
Defining Home Directories
Each Web site and FTP site must have one home directory. The home directory is the central location for your published pages. It contains a home page (typically named index.htm, index.html, default.asp, default.htm, or default.html) that welcomes Web browser users and contains links to other pages in your site. More than one default document can be specified for a single site. IIS displays the first default document it finds. The home directory is mapped to your site's domain name or to your server name. For example, if your site's Internet domain name is www.microsoft.com and your home directory is C:\Website\Microsoft, browsers use the URL http://www.microsoft.com to access files in your home directory. On an intranet, if your server name is AcctServer, browsers can use the URL http://acctserver to access files in your home directory.
A default home directory is created when you install IIS and when you create a new Web site. If you are setting up both a Web site and an FTP site on the same computer, you must specify a different home directory for each service (WWW and FTP). The default home directory for the WWW service is \InetPub\Wwwroot. The default home directory for the FTP service is \InetPub\Ftproot. You can choose a different directory as your home directory.
You can use the Internet Information Services snap-in to change the home directory. Select a Web site or FTP site and open its Properties dialog box. Click the Home Directory tab, and then specify where your home directory is located (Figure 23.11).
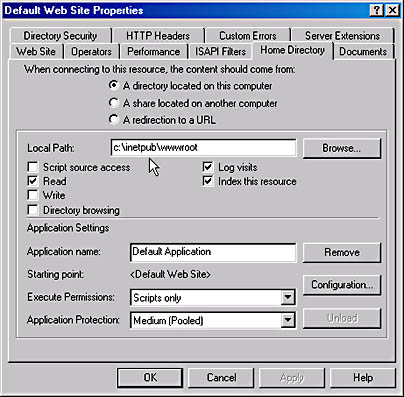
Figure 23.11 Home Directory tab of the Default Web Site Properties dialog box
If you select a directory on a network share, you may need to type a user name and password to access the resource. It is recommend that you use the IUSR_computername account. If you use an account that has administration permissions on the server, clients can gain access to server operations. This seriously jeopardizes the security of your network.
Notice that the home directory can reside on the computer running IIS, on a share, or can be redirected to a URL hosted by another Web site. The share option provides transparent support for Dfs.
Creating Virtual Directories
You can create a virtual directory to publish from a directory not contained within your home directory. A virtual directory is one that is not contained in the home directory but appears to client browsers as though it were.
A virtual directory has an alias, a name that Web browsers use to access that directory. Because an alias is usually shorter than the path name of the directory, it is more convenient for users to type. An alias also is more secure; users do not know where your files are physically located on the server and cannot use that information to modify your files. Aliases also make it easier for you to move directories in your site. Rather than change the URL for the directory, you can simply change the mapping between the alias and the physical location of the directory.
For a simple Web site, you may not need to add virtual directories. You can instead place all of your files in the site's home directory. If you have a complex site or want to specify different URLs for different parts of your site, you can add virtual directories as needed.
The Internet Information Services snap-in or the Internet Services Manger (HTML) allows you to create a virtual directory. In the Internet Information Services snap-in, select the Web site or FTP site to which you want to add a virtual directory. From the Action menu, click New and then click Virtual Directory. The Virtual Directory Creation wizard walks you through the process of creating a virtual directory (Figure 23.12).
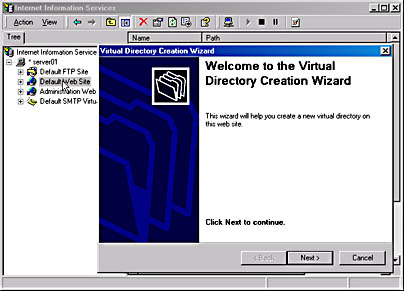
Figure 23.12 Creating a virtual directory for the Default Web site using the Virtual Directory Creation wizard
In Internet Services Manager (HTML), the same link used to create a new site is also used to publish your content to a virtual directory or a directory. After selecting a site in Internet Services Manager (HTML) and clicking New link in the left frame, the IIS New Site wizard appears. On the next screen in the wizard, you select the Virtual Directory radio button to publish a new virtual directory.
Reroute Requests with Redirects
When a browser requests a page on your Web site, the Web server locates the page identified by the URL and returns it to the browser. When you move a page on your Web site, you can't always correct all of the links that refer to the old URL of the page. To make sure that browsers can find the page at the new URL, you instruct the Web server to give the browser the new URL. The browser uses the new URL to request the page again. This process is called redirecting a browser request or redirecting to another URL. Redirecting a request for a page is similar to using a forwarding address with a postal service. The forwarding address ensures that letters and packages addressed to your original residence are delivered to your new residence.
Redirecting a URL is useful when you are updating your Web site and want to make a portion of the site temporarily unavailable, or when you have changed the name of a virtual directory and want links to files in the original virtual directory to access the same files in the new virtual directory.
You can use the Internet Information Services snap-in to redirect requests to a Web site, a virtual directory, or another directory. Select the Web site, virtual directory, or directory and open its Properties dialog box. For a Web site, use the Home Directory tab; for a virtual directory, use the Virtual Directory tab; for a directory, use the Directory tab. Select the A Redirection To A URL option, and type the URL of the destination in the Redirect To text box.
Other Tools
It is often useful to dynamically alter Web content after the content has been requested but before it is returned to the browser. IIS includes two features that provide this functionality: server-side includes (SSI) and the ASP scripting environment.
Using SSI, you can carry out a whole host of Web site management activities from adding dynamic time-stamping to running a special shell command each time a file is requested. SSI commands, called directives, are added to Web pages at design time. When a page is requested, the Web server parses out all the directives it finds in a Web page and then executes them. A commonly used SSI directive inserts, or includes the contents of a file into a Web page. For example, if you are required to continually update a Web page advertisement, you could use SSI to include the advertisement's HTML source into the Web page. To update the advertisement, you need only modify the file containing advertisement's HTML source. You do not have to know a scripting language to use SSI; simply follow the correct directive syntax.
ASP is a server-side scripting environment that you can use to dynamically alter Web content. Although ASP is primarily designed for Web application development, it has many features that can be used to make Web sites easier to manage. For example, with ASP you can track users visiting a Web site, or you can customize Web content based on browser capabilities. However, unlike SSI, ASP requires you to use a scripting language such as VBScript or JScript.
Using ASP to Manage Web Site Content
Windows 2000 includes Microsoft ASP, a server-side scripting environment that you can use to automate and centralize many of your Web site management tasks.
Scripting
A script is a series of instructions and commands that you can use to programmatically alter the content of your Web pages. If you have ever visited an online store that enabled you to search for items and check product availability, then undoubtedly you have encountered some type of script.
There are two kinds of scripting: client-side and server-side. Client-side scripts run on the Web browser and are embedded in a Web page between HTML <SCRIPT> and </SCRIPT> tags. If you view the HTML source for a highly dynamic Web page, you will most likely discover a client-side script.
Server-side scripts run exclusively on the Web server and are most often used to modify Web pages before they are delivered to the browser. Server-side scripts can instruct the Web server to perform an action such as process user input or log how often a user visits your Web site. You can think of server-side scripts as affecting how the Web server assembles a Web page before it's sent to the browser. Server-side scripts can greatly facilitate your management of Web content by processing data and automatically updating Web pages.
ASP Overview
Just as you might write a custom macro to automate repetitive spreadsheet or word processing tasks, you can create a server-side script to automatically perform difficult or repetitious Web management tasks. Imagine that you need to update a Web site consisting of several dozen pages containing identical formatting information (bylines, company logos, copyright information, and so on). Normally, such work is time consuming and requires that you update (and test) each page manually. However, you can use ASP to automate such work.
ASP is a powerful, server-side scripting environment that you can use to write scripts with only a standard text editor, such as Notepad. For example, using ASP you could create a central file that contains information common to all of the pages of a Web site. While designing the Web site, you could add a one-line script command to each page that inserts the contents of the central file. Whenever you need to update your site's navigation menu, for example, you need only update the central file; changes would automatically appear the next time a user reloads and views the Web content.
ASP uses delimiters to differentiate script commands from regular text and HTML. Specifically, <% and %> delimiters enclose script commands that are to be executed by the server, as opposed to < and > delimiters used by HTML to denote tags that are to be parsed by a Web browser.
The following example script illustrates how ASP works:
<% author = "Max" department = "Quality Assurance" %> This page was updated <B>today</B>, by <%= author %> from the <%= department %> Department.
When viewed in a Web browser, a page containing this script appears as follows:
This page was updated today, by Max from the Quality Assurance Department.
However, a user viewing the source for this page from a Web browser would see only the following text and HTML:
This page was updated <B>today</B>, by Max from the Quality Assurance Department.
The script runs on the server (that is, commands within the <% and %> delimiters are executed on the server) and returns only HTML to a user's browser.
At a minimum, all ASP files must have an .ASP extension and contain script commands written in a scripting language such as Microsoft Visual Basic Scripting Edition (VBScript) or Microsoft JScript. If you are new to scripting and need to learn the fundamentals, visit the Microsoft Windows Script Technologies Web site at http://msdn.microsoft.com/scripting/.

Practice: Accessing the Administration Web Site
In this practice you use the Internet Information Services snap-in to configure the Administration Web site. You configure access to this sensitive area of the Web server. You then run Internet Service Manager (HTML) to test access capability to the site. Complete this practice on Server01.
Exercise 1: Configuring the Administration Web Site with the Internet Information Services Snap-in
In this exercise you use the Internet Informations Services snap-in to configure the Administration Web site.
- Log on to Server01 as Administrator with a password of password.
- Click the Start button, point to Programs, point to Administrative Tools, and then click Internet Services Manager.
The Internet Information Services snap-in appears.
- In the console tree, expand * server01.
Four containers appears under * server01: Default FTP site, Default Web site, Administration Web site, and Default SMTP Virtual Server.
- In the console tree, expand Administration Web site.
Notice that two virtual directories, IISAdmin and IISHelp, appear.
- In the console tree, click on Administration Web site.
- Click the Action menu, and then click Properties.
The Administration Web Site Properties dialog box appears.
- With the Web Site tab active, record the TCP Port value appearing in the TCP Port text box.
Answer
This random value between 2000-9999 is referred to in this exercise as a variable with a name of tcp_port.
- Under the Enable Logging check box, verify that W3C Extended Log File Format is selected, and then click the Properties button.
The Extended Logging Properties dialog box appears. Notice that the log file is stored in the %WinDir%\System32\LogFiles, which is equivalent to %SystemRoot%\System32\LogFiles.
- Click the Extended Properties tab.
- Scroll down to the bottom of the Extended Logging Options box and then select the Process Accounting check box.
- Click OK to close the Extended Logging Properties dialog box.
The Administration Web Site Properties dialog box appears.
- Click the Directory Security tab.
- In the Anonymous Access And Authentication Control region of the screen, click the Edit button.
The Authentication Methods dialog box appears.
Notice that Anonymous access is not available to the Administration Web site, Basic authentication is not enabled, and that Integrated Windows authentication is enabled.
This configuration means that a browser client connecting to the Administration Web site must be able to authenticate using either secure NTLM or Kerberos authentication. The type of Integrated Windows authentication method used is browser dependent.
- Select the Digest Authentication For Windows Domain Servers check box.
An IIS WWW Configuration message box appears and explains that only Windows 2000 domain accounts can be used and that passwords will be stored as encrypted clear text.
- Click Yes.
This provides additional security in your Windows 2000 domain. You will only be using Windows 2000 domain user accounts to access the Administration Web site.
- Click OK to close the Authentication Methods dialog box.
The Administration Web Site Properties dialog box appears.
- In the IP Address And Domain Name Restrictions region of the screen, click the Edit button.
The IP Address and Domain Name Restrictions dialog box appears.
Notice that the Denied Access radio button is selected and that only the local loopback address, 127.0.0.1 is granted access to this area.
- Click the Granted Access radio button so that you can access the Administration Web site from any computer in your training network.
For additional security, consider adding specific IP addresses, a scope of IP addresses, or computers within a specific domain that can access the Administration Web site. This last option is resource intensive and not recommended for most implementations of IIS 5.0.
- Click OK.
- Click OK to close the Administration Web Site Properties dialog box.
The Inheritance Overrides dialog box appears and explains that the Child node, IISAdmin, defines the value of "Authentication Methods." You will override the currently configured value in favor of the value you configured for the Administration Web Site node.
- In the Child Nodes box, click IISAdmin and then click OK.
The Inheritance Overrides dialog box appears again for the IISHelp Child node.
- Click IISHelp and click OK.
- Close Internet Information Services snap-in.
Exercise 2: Accessing the Administration Web Site from Internet Service Manager (HTML)
In this exercise you attempt to access the Administration Web site with the new settings you configured in the previous exercise.
NOTE
The tcp_port variable in this exercise must be replaced with the value you obtained from the previous exercise.
- On Server01, click the Start button and then click Run.
The Run dialog box appears.
- In the Open text box, type http://server01:<tcp_port> and then click OK.
Internet Explorer starts and a Microsoft Internet Explorer text box appears and explains that you are not running a secure connection for Web-based administration.
This means that while authentication information between the browser and the Administration Web site is secure, data transmission after the connection is established is not secure.
- Click OK.
Internet Explorer shows the Internet Services Manager (HTML) interface.
- Explore the three Web sites appearing in the main window of the interface. Use the links in the left frame to explore the features discussed in this lesson.
- Close Internet Explorer.
Exercise 3: Configuring SSL Access to the Administration Web Site
In this exercise, you apply the SSL protocol to the Administration Web site to establish secure communications when operating on this site. To do this, you issue your own server certificate using Server01 and Certificate Services.
NOTE
You should have installed Certificate Services when completing Chapter 15, "Managing Certificate Services." If you did not, you need to install these services before attempting this exercise.
- On Server01, open Internet Services Manager.
The Internet Information Services snap-in appears.
- In the console tree, expand * server01.
- Click on the Administration Web site.
- Click the Action menu, and then click Properties.
The Administration Web Site Properties dialog box appears.
- Click the Directory Security tab.
- In the Secure communications region of the screen, click Server Certificate.
The Welcome to the Web Server Certificate wizard appears.
- Read the information on this screen, and then click Next.
The IIS Certificate wizard appears.
- Confirm that the Create A New Certificate radio button is selected, and then click Next.
The Delayed or Immediate Request screen appears.
- Click the Send The Request Immediately To An Online Certification Authority radio button, and then click Next.
The Name and Security Settings screen appears.
Notice that the default name given to this certificate is Administration Web site and that the bit length is set to 512 bits.
- Click Next.
The Organization Information screen appears.
- In the Organization drop-down list box, type Microsoft Corporation and in the Organizational Unit drop-down list box, type Microsoft Press.
- Click Next.
The Your Site's Common Name screen appears.
- In the Common Name text box, type server01.microsoft.com. and then click next.
The Geographical Information screen appears.
- Do not change the value in the Country/Region drop-down list box.
- In the State/Province drop-down list box, type Washington and in the City/Locality drop-down list box, type Redmond.
- Click Next.
The Choose a Certification Authority screen appears and server01.microsoft.com\Enterprise CA appears in the Certification Authorities drop-down list box.
- Click Next.
The Certificate Request Submission screen appears.
- Read through the summary information on this screen and then click Next.
After a few moments, the Completing the Web Server Certificate Wizard screen appears.
- Click Finish.
The Administration Web Site Properties dialog box appears. Notice that under the Secure communications region of the screen, the View Certificate and Edit buttons are now available.
- In the Secure communications region of the screen, click the Edit button.
The Secure Communications dialog box appears.
- Click the Require Secure Channel (SSL) check box.
- Verify that the Ignore Client Certificates radio button is selected, and then Click OK.
The Administration Web Site Properties dialog box appears.
- Click the Web Site tab.
- In the SSL Port field, type 5000.
- Click OK.
- Close the Internet Information Services snap-in.
Exercise 4: Testing Access to the Secured Administration Web Site
In this exercise you test access to the Administration Web site now that a server certificate and SSL has been configured for the site.
- On Server01, click the Start button, and then click Run.
The Run dialog box appears.
- In the Open text box, type http://server01:<tcp_port> and then click OK.
The tcp_port variable in this exercise must be replaced with the value you obtained in Exercise 1.
Internet Explorer starts and a message appears, explaining that the page must be viewed over a secure channel.
- In the Internet Explorer Address drop-down list box, type https://server01.microsoft.com:5000 and then click Go. The 5000 value is the SSL_port value you typed on the Web Site tab.
A Security Alert message box appears stating that you are about to view information over a secure connection.
- Click the In The Future Do Not Show This Warning check box and then click OK.
The Enter Network Password dialog box appears.
- In the User Name text box, type Administrator, in the Password text box, type password, and in the Domain text box, type microsoft.
- Select the Save This Password In Your Password List check box, and then click OK.
The Internet Services Manager (HTML) interface appears. Notice that there is a lock icon on the bottom right corner of the status bar.
- Place the mouse pointer on top of the lock icon.
Notice that a tip states: "SSL secured (56 Bit)." 128-bit encryption is available from the Secure Communications dialog box for the properties of the site. In the previous exercise, you configured SSL for the connection but you did not require 128-bit encryption.
- Double-click the lock icon.
The Certificate dialog box appears.
- Review the information under the tabs of the Certificate dialog box.
From the Certificate dialog box you can run the Certificate Import wizard to copy certificate information from the local computer to a certificate store.
- Click OK.
- Close the Internet Services Manager (HTML) interface.
Lesson Summary
In this lesson you learned that IIS 5.0 introduces improvements in reliability and performance, management, security, and application environment. IIS also introduces features you can use to improve the speed and reliability of Web sites, such as the addition of application protection through support for pooled, out-of-process applications. In addition, IIS 5.0 makes the Web server easier for managers to use. For example, the installation process is built right into Windows 2000 Server Setup. And, to make it easier to configure security settings, there are three new security wizards. Security features are an important area of improvement in IIS 5.0, which takes advantage of the Internet-standard security features that are fully integrated with Windows 2000. IIS 5.0 also adds performance enhancements to make it easier to debug and deploy Web-enabled applications.
You also learned that installation and removal of IIS is accomplished in one of three ways: when installing or upgrading Windows 2000, by using the Add/Remove Programs utility in Control Panel, or by using an unattended.txt file during an unattended installation. When IIS is installed, a Default Web site, Administration Web site and Default SMTP Virtual Server are created. You should set up your Web sites by indicating which directories contain the documents that you want to publish. Each Web or FTP site must have one home directory. To publish from any directory not contained within your home directory, you can create a virtual directory. Windows 2000 includes Microsoft ASP, a server-side scripting environment that you can use to automate and centralize many of your Web site management tasks.
EAN: N/A
Pages: 244
- Challenging the Unpredictable: Changeable Order Management Systems
- The Second Wave ERP Market: An Australian Viewpoint
- Intrinsic and Contextual Data Quality: The Effect of Media and Personal Involvement
- Healthcare Information: From Administrative to Practice Databases
- A Hybrid Clustering Technique to Improve Patient Data Quality