Lesson 2: Assessing TCPIP Services
This lesson examines the WINS and DHCP services in Windows NT to plan for TCP/IP-based services in the Windows 2000 environment.
After this lesson, you will be able to
- Assess the TCP/IP requirements for the Windows 2000 migration.
- Examine DHCP server statistics and parameters.
- Identify whether WINS will be required in the Windows 2000 environment.
Estimated lesson time: 70 minutes
When planning to use Active Directory, you must understand the Transmission Control Protocol/Internet Protocol (TCP/IP) suite of protocols. TCP/IP protocols and services such as DHCP, DNS, and WINS allow users to access and use the network. During an in-place upgrade, these services should be running in parallel on another system while your server is being upgraded. If a pristine restructure is to take place, you'll need to avoid any IP address overlap and have enough IP addresses available for the parallel systems.
Windows 2000 sites are configured on the assumption of well-connected areas, which depends on how you subnet TCP/IP. Therefore, wherever possible, do not split a subnet across a slow WAN link.
You can assess your TCP/IP topology in a variety of ways:
- Obtain a port scanner. A port scanner will be able to tell you everything about the host name and TCP/IP address of all systems providing they're all running during the scan.
- Use management software. In addition to giving you an analysis of network traffic, systems management software such as SMS 2.0 can take an inventory of IP addresses and their respective host names.
- Examine DHCP and DNS servers. Your existing DHCP servers can tell you the lease period, the host name, and the associated IP address of bootstrap protocol (BOOTP) clients. The DNS servers will give you information about hosts with static IP addresses, such as servers.
Assessing the DHCP Service
Windows NT 4.0 DHCP services can work with any Microsoft Windows clients configured for dynamic IP address assignments. These clients include Windows 2000, Windows NT, Windows Millennium Edition (Me), Windows 9.x, and Windows 3.x systems. Before migrating a DHCP server, ensure that sufficient alternative DHCP systems exist that can renew and lease IP addresses to clients. If you don't take this step, clients might be unable to connect to the network while the DHCP server is being migrated.
To create an alternative DHCP service, you need to determine the number of clients, the lease period, the subnets being serviced, and any scope options being assigned, such as WINS address, WINS Node type, DNS address, and default gateways. You can gather this information from DHCP Manager or from the Dhcpcmd.exe utility in the Microsoft Windows NT Server Resource Kit.
However you migrate to the Windows 2000 DHCP service, you'll need to define a member of the Enterprise Admins group who will authorize the server in Active Directory; otherwise, the DHCP server will be unable to work. This is an intentional safeguard designed to prevent rogue or unauthorized DHCP servers from assigning unapproved or potentially catastrophic TCP/IP addresses.
Examining WINS and NetBIOS Services
NetBIOS (Network Basic Input/Output System) is a legacy protocol responsible for naming computers and domains across a network. It was originally designed about 1984 when PC networks consisted of only two or three machines sharing perhaps a 10-MB hard disk. For one computer to locate another computer or network service, the computer would make a broadcast for a NetBIOS name. One of the great leaps for Microsoft Windows 2000 is to make the operating system independent of NetBIOS. However, many of your legacy clients and applications might still depend on NetBIOS. Assessing NetBIOS services still in use in your enterprise and removing those not needed can substantially reduce your network traffic.
Windows NT's solution to reduce NetBIOS broadcasts is the Windows Internet Naming Service (WINS). This service resolves computer names to their IP addresses. If WINS can also be removed from the network, the burden on the network will be further reduced. Some indications of whether or not to retain WINS include the following:
- If clients require connectivity with one another, you might not be able to remove WINS.
- If you are using Microsoft BackOffice 4.5 components or NetBIOS-dependent applications, WINS is required for these to function properly.
You need to ascertain whether losing a WINS server will significantly affect business operations. If it will have an impact on business then you might need to schedule the WINS migration in a relatively quiet period of the business. Assess your WINS services for the following:
- Dependencies such as push-pull replication partners, in which two WINS servers are in constant communication with each other. If these exist turn off the push-pull replication prior to migrating a WINS server.
- The effect of losing a WINS server while it's being migrated. For example, if clients are configured for H-node name resolution (name lookup followed by a broadcast if the name lookup fails), broadcast traffic might increase.
Practice: Evaluating TCP/IP Services

This practice contains two exercises that allow you to investigate DHCP and WINS. In order to complete them, you will first have to install both DHCP and WINS. Once installed, you will configure a DHCP client and test connectivity with the server. You will also gather information about the DHCP service's performance and investigate whether your network is carrying NETBIOS and WINS traffic.
Exercise 1: Installing and Configuring Windows NT DHCP
In this practice, you'll look at the various components of your DHCP server. To do this, you must first install the DHCP service.
To install the DHCP service on a Windows NT Server primary domain controller
- Log on to MIGKIT1 as Administrator with the password secret.
- Right-click Network Neighborhood and select Properties.
- Click the Services tab and click the Add button.
- Select Microsoft DHCP Server from the Network Service list, and then click OK.
The location of your Windows NT Server installation files is requested.
- If the installation source is the original CD, insert the CD and then click Continue.
- If a message box appears, read the message and then click OK.
The DHCP service will install.
- Close the Network dialog box.
- Restart the system when prompted.
IMPORTANT
After restarting the system, reinstall your current service pack so that the DHCP service files will be up-to-date. To do this, as you were instructed in "Getting Started", double-click the Sp5i386.exe file in the Tools folder to run the Service Pack 5 installation program.
Once the DHCP service and the service pack have been installed, you will need to configure DHCP.
To configure the DHCP service
- From the Start menu, select Programs, Administrative Tools, and then click DHCP Manager.
The DHCP Manager screen appears.
- Double-click the Local Machine icon in the left pane.
- Open the Scope menu and click Create.
The Create Scope dialog box will appear.
- Use Figure 4.3 as a guide to fill in your Create Scope dialog box with the same values:
- Start Address: 192.168.0.50
- End Address: 192.168.0.109
- Subnet Mask: 255.255.255.0
- Exclusion Range Start Address: 192.168.0.100
- Exclusion Range End Address: 192.168.0.105
- Lease Duration: Limited to 3 hours
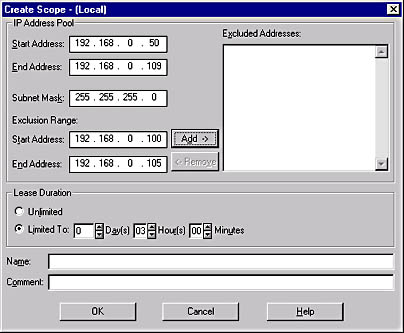
Figure 4.3 Create Scope dialog box
- Click the Add button next to the Exclusion Range to add the values to the Excluded Addresses box, and then click OK.
A dialog box appears, asking whether you want to activate the scope you just created.
- Click No for now.
To create extra settings to assign to clients when they log on
- Select Scope from the DHCP Options menu.
- From the DHCP Options: Scope dialog box, select Router in the Unused Options box and click the Add button to move it to the Active Options box, as shown in Figure 4.4.
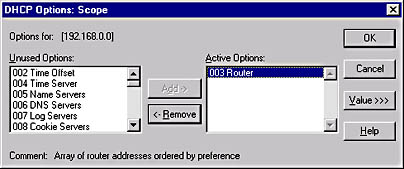
Figure 4.4 DHCP Options: Scope dialog box
- With Router selected in the Active Options box, click the Value button, and then, when the Edit Array button appears, click Edit Array.
- When the IP Address Array Editor dialog box appears as shown in Figure 4.5, enter a dummy address of 192.168.0.243 in the New IP Address field, and then click Add.
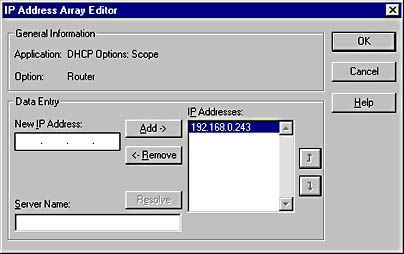
Figure 4.5 IP Address Array Editor dialog box
- Click OK to return to the DHCP Options: Scope dialog box.
- Now add DNS Servers to the Active Options box, and then click Edit Array again.
- This time, enter a New IP Address of 192.168.0.100, click Add, and then click OK.
- Now select WINS/NBNS Servers from the Inactive Options box and click Add.
A warning dialog box appears.
- After reading the warning, click OK.
- Click Edit Array again, and enter the previous IP address, 192.168.0.100. Click Add, and then click OK.
- Finally add WINS/NBT Node Type to the Active Options box.
A byte field appears in the lower portion of the dialog box.
- Enter 0x8 in the byte field for H-node (which uses WINS before broadcast for name resolution). Click OK.
- If a dialog box appears asking whether you'd like to activate the new scope now, click Yes. If the dialog box doesn't appear, select Activate from the Scope menu.
Your final DHCP screen should match the one shown in Figure 4.6.
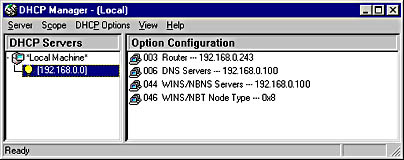
Figure 4.6 DHCP Manager with a scope defined and activated
NOTE
If the right pane doesn't update but remains blank, you might need to close and re-open DHCP Manager to force it to refresh.
Finally a DHCP client is required. Use MIGKIT2 for the DHCP client in these exercises, but remember it's not recommended that you use a BDC as a DHCP client in a company or other working environment.
To configure the DHCP client
- Log on to MIGKIT2 as Administrator with the password secret.
- From your desktop, right-click Network Neighborhood and select Properties.
- From the Protocols tab, select the TCP/IP protocol and click the Properties button.
- When the Microsoft TCP/IP Properties dialog box appears, select Obtain An IP Address From A DHCP Server, and then click OK.
- If a message box appears, click OK to indicate that you want to continue and enable DHCP.
- Click OK to close each dialog box and, if prompted to reboot, click OK once more.
- Once the system has rebooted (if necessary), open the command prompt and type ipconfig /all.
If everything has been installed correctly, you should see that DHCP is enabled and an IP address has been assigned to the client computer.
In the next procedure, the Dhcpcmd utility, included with the Microsoft Windows NT Server Resource Kit, is used to obtain statistics about your DHCP service. The structure of the Dhcpcmd command is: Dhcpcmd server_IP_address command [command options]. Perform these steps from MIGKIT1.
To use the Dhcpcmd command-line utility
- From DHCP Manager, click Active Leases on the Scope menu.
You should now see a client. Notice how no facility exists to print or obtain reports on your DHCP server's statistics.
- Open a command prompt and change to the C:\Tools folder.
- Type the following commands from the C:\Tools folder:
dhcpcmd 192.168.0.100 serverconfig dhcpcmd 192.168.0.100 mibcounts
What results did you get?
- Now type the following commands:
dhcpcmd 192.168.0.100 enumclients 192.168.0.0 _h >dhcprpt.txt
- Use Notepad to open and read the file you just created.
- What information does the Dhcprpt.txt file contain?
- Run the utility again, but replace the –h parameter with –v:
dhcpcmd 192.168.0.100 enumclients 192.168.0.0 -v >dhcprpt.txt
- What does the Dhcprpt.txt file show now?
Answers
The Dhcpcmd utility is useful for providing reports on the current state of the DHCP service and its clients, and it has three more command-line options that aren't covered here. The main reason for assessing your DHCP services is to help ascertain the following:
- How many clients are using a particular DHCP server.
- Whether a consolidation of the DHCP servers is possible prior to migration.
- The IP address ranges and DHCP options that need to be assigned to the Windows 2000 DHCP services. Be careful here because you shouldn't assign the same address range if the Windows NT and the Windows 2000 DHCP services are likely to be online on the production network at the same time.
NOTE
Chapter 12, "Business Continuity," will show some techniques to keep your DHCP services fixed until the DHCP service migration has been completed.
Exercise 2: Assessing the Network for WINS and NetBIOS Traffic
In this exercise, you install WINS and then assess your network for WINS and NetBIOS traffic.
To install WINS
- Log on to MIGKIT1 as the Administrator.
- Right-click Network Neighborhood and select Properties.
- Click the Protocols tab, select the TCP/IP protocol, and then click Properties.
- Click on the WINS Address tab and, in the Primary WINS Server box, type 192.168.0.100. Click OK.
- Click the Services tab and then click the Add button.
- In the Network Service list, find the Windows Internet Name Service option. Select it and click OK.
- When prompted, type or confirm the location of your Windows NT Server installation files.
- If the installation source is the original CD, insert the CD and then click Continue.
- Close the Network dialog box when the installation is complete.
You will be prompted to restart the system.
- Restart the system.
IMPORTANT
After restarting the system, reinstall your current service pack so that the WINS service files will be up-to-date.
To assess the WINS and NetBIOS traffic on your network
- Log on to MIGKIT1 as Administrator.
- From the Start menu, choose Programs, Administrative Tools, and then click Performance Monitor.
- Click the Add Counter toolbar button (the plus sign) to open the Add To Chart dialog box shown in Figure 4.7.
- In the Object box, select WINS Server.
- Select the three counters shown highlighted in the Counter list box. Select them by holding down the Ctrl key while clicking on each. Then click the Add button, followed by the Done button.
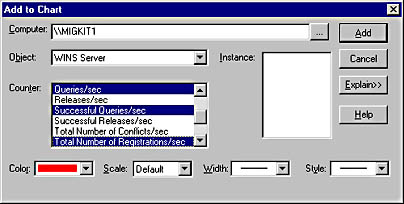
Figure 4.7 Add To Chart dialog box with three counters selected
- Start MIGKIT2 while watching the Performance Monitor. If MIGKIT2 is already started, you can log off and then log on, or you can restart the system.
Notice how a small blip appears in the graph as MIGKIT2 starts. This means that the WINS service is running.
Table 4.1 describes the three Performance Monitor counters and how they can be used to determine whether NetBIOS is required.
Table 4.1 Performance Monitor Counters Useful for Evaluating NetBIOS Requirements
| Counter | Definition | Interpretation |
|---|---|---|
| Queries/sec | The rate at which WINS receives NetBIOS queries | Any value greater than zero means that a client is using the WINS service to resolve NetBIOS names. If this value is comparatively low, locate the systems requiring WINS and see whether they can use DNS or another method for NetBIOS name resolution. |
| Successful queries/sec | The rate at which the WINS server successfully matches a NetBIOS name to an IP address | If this value is zero and the Queries/sec value is zero, consider removing WINS because no name resolution is taking place via WINS. Also perform further investigation on NetBIOS. You might also be able to remove NetBIOS provided that no NetBIOS resolution is taking place via broadcasts or an LMHOSTS file. If the Queries/sec value is high and the Successful queries/sec value is low or zero, a problem might exist with the WINS service. |
| Total number of registrations/sec | The total number of registrations received by the WINS server per second | If this value is zero, no clients are making use of the WINS service and you can eliminate the WINS service in the new Windows 2000 infrastructure. |
As an alternative to using Performance Monitor, you can check the number of WINS registrations by accessing the WINS Manager from the Administrative Tools folder and viewing the number of registrations and successfully resolved queries, as show in Figure 4.8.
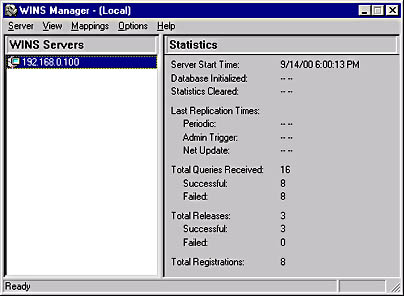
Figure 4.8 Viewing the activity of the WINS service in WINS Manager
Lesson Summary
In this lesson, you learned to plan to maintain backup DHCP services during the migration project. You set up and analyzed a DHCP server and created a report to help you plan migrating the service later. You studied how to maintain your WINS service during a migration. Finally you checked for NetBIOS network traffic to see whether you can safely remove such NetBIOS services as WINS and thereby improve network performance.
EAN: 2147483647
Pages: 126