Installation and Deployment
IDS installation includes several steps. If the chosen IDS is an exclusively software solution (for example, RealSecure Network Sensor or Nessus), the process is made up of two steps:
-
Installation and customization of the operating system
-
IDS software installation
If the IDS takes the form of a combination of specialized hardware and software (for example, Cisco IDS 4200 or RealSecure for Nokia), these steps are unnecessary. Since both the operating system and the IDS are pre-installed by the manufacturer or vendor, you can immediately move on to customizing.
Network-integrated systems (such as the Cisco Catalyst 6500 IDS Module, or Cisco Integrated Software) are somewhat different: With a hardware solution, it is necessary to customize the Catalyst 6500 module and its operating system, whereas, with a software solution, modification of the OS settings is unnecessary.
The following steps are required to configure the OS in Windows NT [ISS1-98]. Note that these steps are mainly required for network-level IDSs, since, for higher-level systems, the host's pre-existing configuration must be used. It should be emphasized that the steps described below are also applicable to other operating systems.
-
Windows NT installation according to the system requirements of the IDS
-
Installation of all required updates (service packs, hotfixes, or patches).
-
OS optimization (including the system registry, startup files, services, daemons, etc.).
-
Configuration of the network interfaces, such as unbinding all protocols (including IP) from the network adapter "listening" for network traffic. This enables the implementation of stealth mode (Fig. 11.5). The second adapter, responsible for communication with the management console, needs only to support the protocol used for this communication (usually TCP or UDP). However, some systems, such as Enterprise Security Manager, are capable of using IPX/SPX, or even DECnet. All "unnecessary" protocols (WINS, IPX, etc.) must be disabled. If the network sensor has only one network adapter, stealth mode can not be implemented since the sensor will be unable to maintain external communications. When installing a network-level security scanner, additional network adapter configuration is unnecessary.
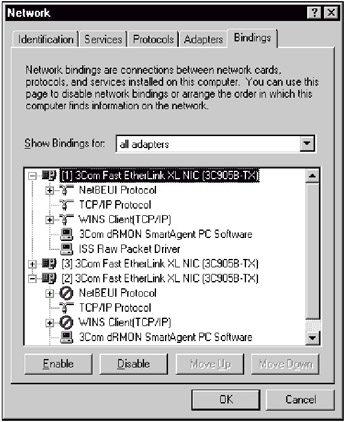
Fig. 11.5. Stealth mode implementation -
To protect the host on which the network sensor is installed, only those network protocols, ports, and services used by the IDS need to be enabled. All the other network services on that host must be disabled by selecting Control Panel | Network | TCP/IP | Properties | Advanced | TCP/IP Security (Fig. 11.6). (These steps should be followed for each network adapter installed on the host.)
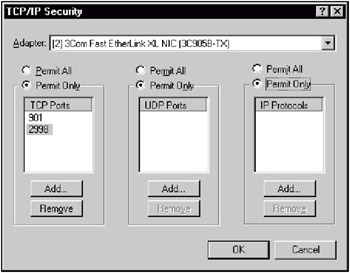
Fig. 11.6. Disabling unneeded ports and protocols (in RealSecure Network Sensor) -
By default, Windows NT installation has the following active services:
-
Alerter
-
ClipBook Server
-
Computer Browser
-
Directory Replicator
-
Event Log
-
Messenger
-
Net Logon
-
Network DDE
-
Network DDE DSDM
-
NT LM Security Support Provider
-
Remote Procedure Call (RPC) Locator
-
Remote Procedure Call (RPC) Service
-
Schedule
-
Server
-
Spooler
-
UPS
-
Workstation
In addition to the built-in components, the Services dialog might contain other services already installed on the host. As a rule, all these services can be disabled. The need for specific services depends on the method of remote control over the host on which the network sensor has been installed. The IDS might only require Event Log — needed for controlling system log files, and Schedule — responsible for scheduling processes, services, and other programs. (Schedule, for example, can be used to start the IDS automatically.) UPS service will be needed if the host is protected by an Uninteruptible Power Supply (UPS).
-
-
Windows NT security can be significantly strengthened by deleting unnecessary accounts and by the appropriate management of administrative accounts (for the local host and the IDS). Moreover, the system registry can be modified to protect logon and logoff procedures and control access from the network to the information stored on the host. If the host on which the IDS is located is managed by the IT department, and IDS-related permission is assigned to the IS department, their accounts must be separated.
-
Normally, users can shut down Windows NT without logging on to the operating system by selecting the Shutdown option from the Logon dialog. This option must be disabled by modifying the ShutdownWithoutLogon registry value, under the following registry key: HKEY_LOCAL_MACHINE\SOFTWARE\Microsoft\WindowsNT\CurrentVersion\Winlogon.
-
By default, Windows NT caches the logon information of users who logon to the system, which simplifies user access to other computers on the network and speeds up the authentication process. However, the host on which the network sensor is installed is usually a dedicated host. (It often has neither a keyboard nor a monitor.) In this case, the function is redundant and must be disabled by editing the CachedLogonsCount registry value, under HKEY_LOCAL_MACHINE\Software\Microsoft\WindowsNT\CurrentVersion\Winlogon.
-
The next step limits the possibility of establishing anonymous connections to the host containing the network sensor by editing the RestrictAnonymous parameter under HKEY_LOCAL_MACHINE\SYSTEM\System\CurrentControlSet\Control\LSA.
-
The next step is to customize access to IDS files and directories, as well as to OS files and directories. In particular, resource sharing must be disabled.
-
Finally, to increase security, system auditing should be enabled.
-
If the IDS host uses special operating modes (RAID, backup network adapters, cluster configuration, etc.), all these components must be properly configured before IDS installation.
-
Other OS components (including network drivers, streamer drivers, etc.) should also be configured if necessary.
Before IDS software installation, it is advisable to make a backup copy of the software on the same media (for example, CD-ROM) to enable easy access to all distribution software (both OS and IDS), as well as to all updates. It is also advisable to document all the steps performed in installing the operating system. In addition, it is necessary to perform an integrity check on the OS files so that, should anything go wrong, it will be easy to understand what happened, and for what reason. These steps should be taken before beginning the IDS installation.
It is best to install the necessary software and hardware before beginning installation of the IDS on the chosen host, in order to enable a check of the presence of all the required components. Should a component be missing, it can be purchased before deploying the IDS. This step also allows identification of the difficulties and possible problems that may be encountered during installation and deployment. This is especially true for the so-called OEM versions of operating systems (usually Microsoft's) into which manufacturers — Compaq, Hewlett Packard, etc. — introduce modifications. These modifications can result in installation problems or even incompatibility.
Technical experts — from the vendor's technical-support service or from a consulting company — should be consulted if your personal experience with the particular hardware or software is limited. All activities in this direction and all advice received should be documented, increasing your relevant knowledge and making it easily accessible. Additionally, documenting any recommendations made by the consultant will provide proof in case those recommendations happen to be incorrect.
Some general recommendations should be made before describing an IDS installation. Although each IDS has specific features, there are some characteristics that are common to all of them. The time required for IDS installation and deployment — especially in large geographically distributed networks — should be noted and documented. If the IDS includes only one or two network sensors, this parameter is not of vital importance. However, if the system includes dozens or even hundreds of sensors, this parameter becomes crucial: If it takes one hour to install one sensor then — if deployment is done manually — it will take 100 hours to install 100 sensors. (Note that neither OS installation and configuration, nor the time needed to visit remote sites, are taken into account here.) Clearly, this approach is slow and inefficient.
Remote sites where an IDS is necessary very often lack qualified personnel capable of performing the IDS installation. In this case, it would be good to simplify and automate the installation process. Therefore, you will have to provide the list of default options, automatic installation procedures, and so on. (The RealSecure IDS, for example provides such capabilities via the AutoRecord mechanism. Using this, the administrator can create an installation script to record what is done during the installation of the first sensor. Then, using AutoInstall, it is possible to reproduce the same actions for other sensors in automatic mode [ISS1-00].)
If a security appliance — a specialized combination of software and hardware — has been chosen, then the whole installation process is straightforward: It need only be unpacked, connected to the system, and switched on. The operating system and sensor components must be pre-installed and preconfigured by the vendor. The administrator needs only to change some IDS settings from the central management console, according to the security policy and data processing technology adopted at the remote site.
After configuration, it is advisable to create a backup copy of the whole IDS, including the OS. Having a backup copy means that the system can quickly be restored to its original state if necessary. After creating the backup copy, the recovery process should be tested to make sure that the backup is usable and the restored IDS operates correctly. Symantec's Norton Ghost is one example of the wide variety of disk cloning utilities available.
Although the vendor's advertising slogans may suggest otherwise, IDS installation is not particularly straightforward (this is true for any security tool). On the contrary, each product is unique, and has its own specific installation and deployment features. Therefore, before beginning installation, reading all the supplied documentation — or at least the Readme file — is highly recommended, in order to avoid any problems.
For example, I once encountered just such an awkward situation. After deploying the RealSecure IDS, a customer noticed that no connection between the network sensors and the management console could be established, and wrote quite a long message requiring the vendor to correct this situation immediately. After investigation, it became clear that the customer's personnel had studied the installation instructions with insufficient care and, therefore, had performed the installation incorrectly, without exchanging authentication keys, without which communication between sensor and console is impossible. And another example: a client firm contacts the vendor by telephone, declaring that their IT personnel can not install the Internet Scanner system on a computer running Windows NT Server. This security scanner's system requirements, however, state that it requires Windows NT Workstation. The clients are surprised to be asked if they have consulted the Readme file: "Why should we? Everything was so obvious …”"
EAN: 2147483647
Pages: 152