| To author in the RealMedia format, you'll need to use the RealProducer tool or a third-party application that supports the RealMedia plug-in. You'll learn how to use RealProducer (on Windows and Macintosh), Sonic Foundry's Sound Forge (Windows), and Bias's Peak (Macintosh). Sound Forge and Peak are both shipped with the RealMedia plug-in. RealProducer RealNetworks' Authoring Tool RealNetworks has its own innate encoding tool, RealProducer, to author RealMedia streams. RealProducer enables you to author both live and on-demand RealMedia streams through a consistent interface on both Windows and Macintosh platforms. One advantage to using RealProducer is that you're assured of having the latest underlying codecs. Third-party applications typically take a little while to catch up. You're going to use RealProducer to encode a song with vocals for delivery to a target audience of listeners who have connections ranging from dial-up (56Kbps) to broadband (DSL 384Kbps). (Refer to Chapter 2, "Preparing Yourself," to learn how to create an AIFF or WAV file.) Because this is an on-demand file, you get to upload and stream it from a RealServer. (See the section called "Creating a Server," later in this chapter, and Chapter 7, "Serving Your Audio.") STEP-BY-STEP: Using RealProducer to Author an On-Demand RealMedia File   -
Launch RealProducer on your Windows or Macintosh computer. RealProducer offers two options: -
The default is to use the Recording Assistant, which walks you through a series of simple steps to choose the source file and set up your encoding preferences. A series of dialog boxes prompts each step for encoding options. -
More advanced users can manually set all of their options. To prevent the Recording Assistant from starting every time RealProducer is launched, check the "Don't show this when RealProducer starts" check box in the Recording Assistant's first screen. This book uses the Recording Assistant. The Recording Assistant includes short descriptions for each step of the encoding process and a Help button for more detailed information. A Back button is also available to return to previous windows. The Recording Assistant automatically starts when RealProducer is launched (see Figure 3.1). Advanced users will notice an option not to show the Recording Assistant when they start the program. Figure 3.1. RealProducer's Recording Assistant offers you three choices to create a RealMedia file. 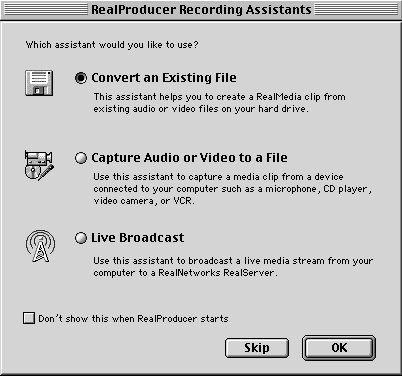 The first page of the Recording Assistant asks which of three Recording Assistants you would like to use: Convert an Existing File, Capture Audio or Video to a File, or Live Broadcast. -
Because you're creating a RealMedia encoded file from an uncompressed digital music (WAV or AIFF) file in your computer, choose Convert an Existing File and click OK. Recording Assistant now prompts you for the location of that source audio file. -
Click the Browse button in the Record from File screen of Recording Assistant to locate the file you want to encode. After you have found the file, click Next. This takes you to the RealMedia Clip Information screen (see Figure 3.2). Fill out the title, author, copyright, description, and keyword attributes for this soon-to-be-encoded file. (For more information on RealMedia Clip Information, see RealMedia Stream Attributes above.) Figure 3.2. Enter your stream's media attributes into RealProducer's Clip Information window. 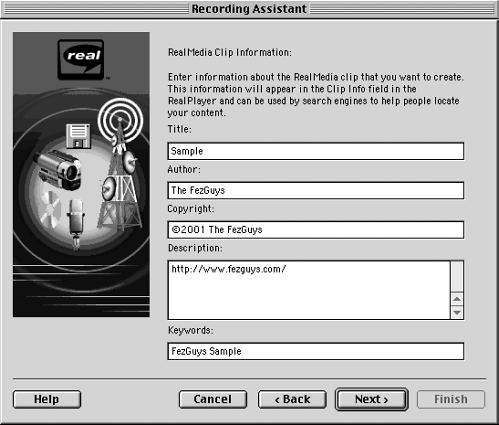 -
After filling in the file information, click Next. Recording Assistant moves along to File Type (see Figure 3.3), where you can choose either SureStream or Single Rate. Because you're streaming your on-demand files from a RealServer, select SureStream. If you prefer to create a single bit rate-encoded file (or use HTTP/progressive streaming see Chapter 1), you can choose Single Rate. After choosing, click Next. Figure 3.3. Choose SureStream or Single Rate for your file type. 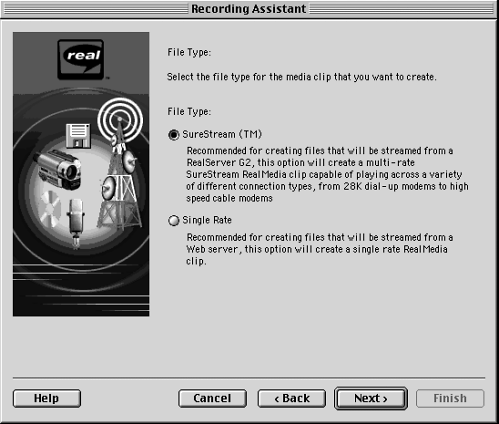 -
The Target Audience window appears (see Figure 3.4). For more information on RealMedia target audience, see RealMedia Stream Attributes above. Eight connectivity speed choices (RealProducer Basic users will only be able to select two) are arrayed in ascending order, from 28K dial-up modem to 512K DSL/cable modem. Because you expect your listening audience to have connectivity in the broad range (a purely arbitrary choice, but still a safe bet) from 56K modem to 384K DSL, check all boxes except 28K modem and 512K DSL/cable modem. After choosing your target audience, click Next. Figure 3.4. Choose as many audiences as desired from the Target Audience window. 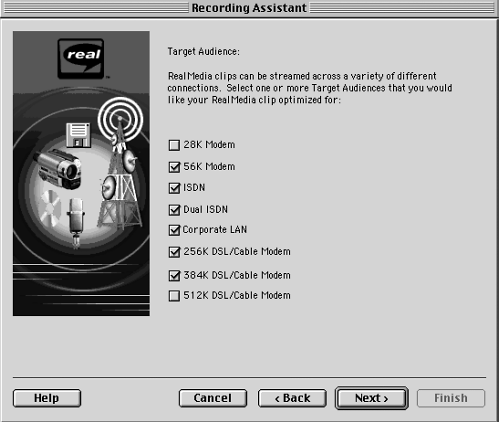 NOTE RealProducer Basic users will only be able to select two settings from this window. Given the same expected audience as the preceding scenario, Basic users should select the low end (56K) and the high end (384K) of your expected user connectivity. -
The Audio Format window (see Figure 3.5) appears. RealProducer chooses an appropriate codec to encode your audio based on one of four choices: Voice Only, Voice with Background Music, Music, and Stereo Music. Figure 3.5. Choose your number of channels in RealProducer's Audio Format window. 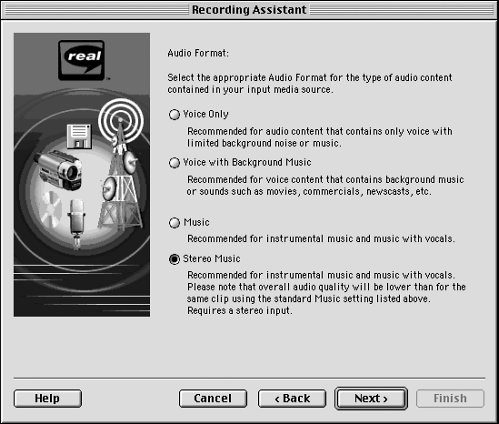 Because you're encoding a stereo file of music and will be encoding it up to high enough bit rate levels to take advantage of 384K broadband connectivity, choose Stereo Music. If you're only encoding at 56K or below, you could save space (and do your part to ease network traffic) by encoding your file in mono. After making your choice, click Next. NOTE Stereo Music cannot be chosen if your source file is mono. RealProducer automatically selects the codec and bit rate settings, based on your Audio Format setting combined with your target audience selection. -
The Output File window in the RealProducer Recording Assistant will try to guess a suitable filename and location for saving your encoded file. If you want to use a different name, simply click Save As… and enter your info. Click Next. -
Finally, you arrive at the Prepare to Record window, a summary of your chosen settings so far. If all is in order, click Finish. At this point, you are returned to the main screen of RealProducer with all of your chosen settings selected. You are ready to encode. NOTE Now might be a good time to take a quick look at other less common (but useful) preferences in RealProducer. Within RealProducer, go to Options, Preferences and choose the General tab for RealMedia File Properties options (see Figure 3.6). Make your selection for the Allow Download, Allow Recording, File Should Not Be Indexed by Search Engines, and Audience Rating boxes based on your needs (see RealMedia Stream Attributes above for full descriptions). After you have finished, click OK out of the Preferences box. Figure 3.6. Configure RealProducer's General Preferences based on your needs. 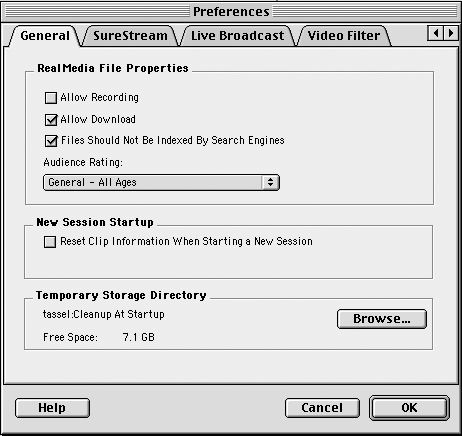 -
If you're satisfied that you're ready to author a RealMedia on-demand file, click the Start button (Figure 3.7) to begin encoding. A progress bar shows the status of the encoding process, and two vertical light bars (which can be turned off from View, Show Audio Meter) show your audio levels. As seen in Figure 3.8, if you want to know more about the encoding process, select View, Statistics (Mac shortcut:  +E) to show extended information including computer performance, time remaining until the completion of the encoding process, and the different bit rates that are being encoded. This is particularly helpful for SureStream encoded files as you can observe the bit rates that users on different bandwidths will be receiving. +E) to show extended information including computer performance, time remaining until the completion of the encoding process, and the different bit rates that are being encoded. This is particularly helpful for SureStream encoded files as you can observe the bit rates that users on different bandwidths will be receiving. Figure 3.7. Press the RealProducer's Start button to begin encoding your file. 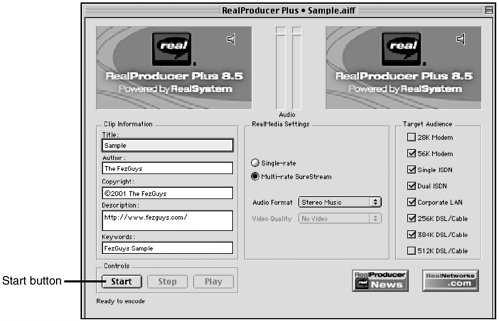 Figure 3.8. RealProducer's Statistics window updates information about the encoding process and output file in real-time. 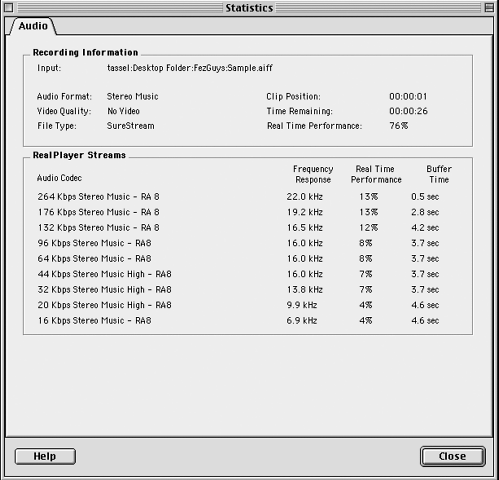 -
When the file is complete, a Processing Complete window appears showing the input and output file location and the duration of the file. More extensive statistics can be viewed here as well. When you're finished perusing this data, click Close. To preview your newly encoded RealMedia on-demand streaming file, click the Play button, which launches your RealPlayer (see Figure 3.9). Because you're playing back the file from a "local" setting (your computer), RealPlayer plays back at the highest bit rate at which the file was encoded regardless of the value set in RealPlayer's Connection Speed preference. If you're playing back your files from a local setting, you aren't necessarily hearing the encoded file under real-world conditions. Nonetheless, you now have a RealMedia encoded file on your computer ready to upload to a RealServer (see "Creating a Server" later in this chapter). Figure 3.9. Test playback of your encoded file using RealPlayer. 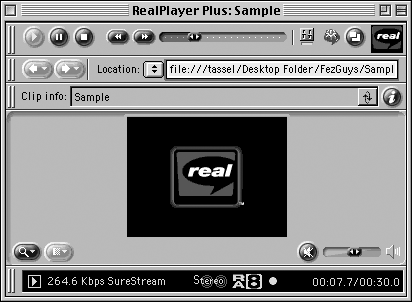 NOTE If you don't have a copy of the RealPlayer yet, go online to download your free copy from www.realnetworks.com.
Using Sound Forge for Windows Sonic Foundry's Sound Forge is a popular Windows-only waveform editor. It can open and save to many different file formats, including RealMedia. Available at www.sonicfoundry.com, Sound Forge comes in two flavors: full or "streamlined." This book uses the full version, Sound Forge 5.0. NOTE A typical Sound Forge installation includes the codecs that are required to do a Save As to the RealMedia format. If you see RealMedia listed as an option in your Sound Forge Save As file types, then all is well. If, however, you don't see RealMedia listed as an option in your Save As file types, first check your installation documentation. Previous versions of Sound Forge might have different RealNetworks format options available in the Save As dialog box. If you're running a version of Sound Forge prior to v5.0, you might need to select RealNetworks G2 instead. If you're given a choice between multiple RealNetworks options (RealMedia and RealNetworks G2), select RealNetworks G2, as it's the most recent release of the two.
STEP-BY-STEP: Using Sound Forge to Author an On-Demand RealMedia File  -
Launch Sound Forge on your Windows computer. -
Select File, Open (Ctrl+O) to locate your source WAV file and select Open. See Chapter 2, " Preparing Yourself," to find out how to create a WAV file. You'll see the waveform of your chosen file displayed in the main Sound Forge window. FezGuys' Tip  It's a good idea to play the file to make sure it's the one you intend to encode. Sometimes multiple versions of a file have similar names. |
-
Go to File, Save As and select the correct RealNetworks type as your Save As file type (see Figure 3.10). In Sound Forge v5.0, select RealMedia. Figure 3.10. Select RealMedia from Sound Forge's Save As file type options. 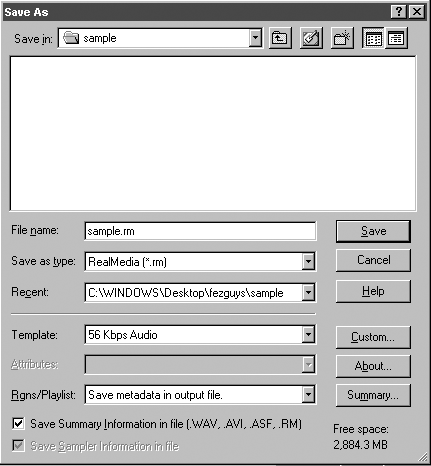 NOTE Sound Forge does a good job of guessing where you would like to save your encoded on-demand file and defaults to saving that file in the same directory as your source audio WAV file, changing the .wav file extension to the RealMedia default of .rm. Change as you see fit. -
After you select the Save As type, a new option appears in your Save As pop-up for choosing the template with which to encode your clip. This is roughly equivalent to RealProducer's Target Audience setting. (For more information on target audiences and other RealMedia settings, see RealMedia Stream Attributes, above). Because you'll encode for 56K modem users first, select 56Kbps Audio. -
Click the Custom button to set various encoding options (see RealMedia Stream Attributes earlier in this chapter), including author, title, and description for the encoded file. -
From the Custom pop-up window, select Encoding Settings from the subpanel of different tabs at the bottom of the window (Figure 3.11). Figure 3.11. Select your preferred Sound Forge RealMedia encoding settings. 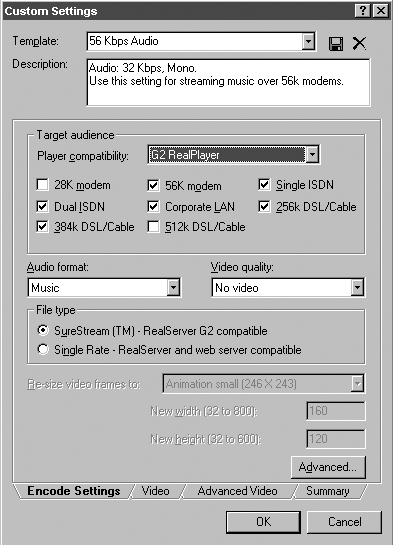 -
Target Audience Player Compatibility allows authoring of RealMedia encoded files compatible to previous versions of the RealPlayer. For this example, choose G2 RealPlayer to take advantage of SureStream technology. -
Next, choose from the list of target audiences. You've already selected 56K modem, and that's reflected in this window. Select 384K DSL/Cable Modem and everything in between that and 56K as additional target audiences. -
Choose SureStream for your file type. -
Click the Summary tab and set your Media Clip (title, author, and so on) information (see Figure 3.12). Figure 3.12. Set your media attributes and other RealMedia custom settings within Sound Forge. 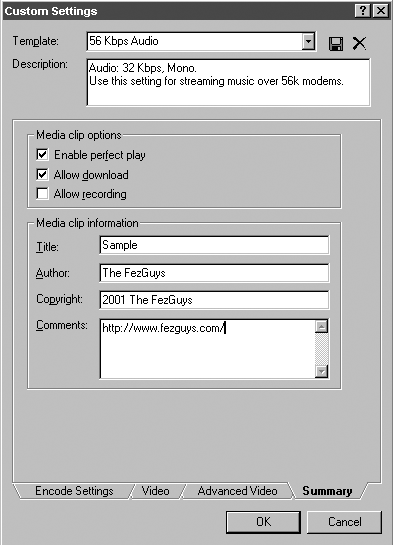 FezGuys' Tip  Older versions of Sound Forge might also have a few additional options that aren't mentioned here. You can safely leave these in their default settings. Also you don't need to check Automatically Generate RAM File. This book covers metafiles (including RAM files) in Chapter 7, " Serving Your Audio." |
-
Click OK to accept your settings and close the Custom Settings window. -
Click Save. Sound Forge begins encoding your WAV file into a RealMedia on-demand streaming file. During the process, a status bar zips across the bottom-left part of the screen listing the percentage of the file that is encoded and providing a Stop button in case you want to cancel the process. -
When the encoding is finished, a dialog box pops up telling you the name of your encoded file and prompting you to play it using the Associated Player in this case, RealPlayer. Click Yes and make sure everything sounds all right. NOTE Because files are played back from a local setting (your computer), RealPlayer plays back at the highest bit rate at which the file was encoded regardless of the setting preference for the connection speed set on the local copy of RealPlayer. That means you won't necessarily hear the encoded file under real-world conditions.
You now have a RealMedia encoded file on your computer ready to be uploaded to any RealServer into which you can hack (just kidding about the hacking part). This chapter covers the RealServer setup a little later. Using Peak for Macintosh Bias Inc.'s Peak is a popular Macintosh-only waveform editor. It can open and save to many different file formats, including RealMedia. It is available at www.bias-inc.com and comes in four flavors, including the affordably priced LE version. This book uses the full TDM version, Peak 2.62. NOTE A typical Peak installation includes the codecs required to do a Save As to the RealMedia format. If you see RealAudio 5.0 listed as an option in your Peak Save As file types, then all is well. If you don't see RealAudio 5.0 listed as an option in your Save As file types, check your installation media and documentation.
STEP-BY-STEP: Using Peak to Author an On-Demand RealMedia File  -
Launch Peak on your Macintosh computer and go to File, Open ( +O) to open your AIFF source file. You'll see the waveform of your chosen file displayed. +O) to open your AIFF source file. You'll see the waveform of your chosen file displayed. FezGuys' Tip  It's a good idea to play the file to make sure it's the one you intend to encode. Sometimes multiple versions of a file have similar names. |
-
Go to File, Save As (Shift+ +S) and, as seen in Figure 3.13, select RealAudio 5.0 for your file type. The RealAudio Encoder dialog box pops up (see Figure 3.14). (Click the Options button on the Peak Save As dialog box to reopen the RealAudio dialog box at any time.) +S) and, as seen in Figure 3.13, select RealAudio 5.0 for your file type. The RealAudio Encoder dialog box pops up (see Figure 3.14). (Click the Options button on the Peak Save As dialog box to reopen the RealAudio dialog box at any time.) Figure 3.13. Select RealAudio 5.0 in Peak's Save As file type option list. 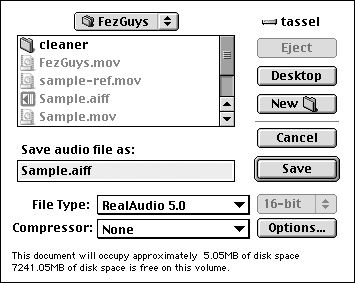 Figure 3.14. Set your RealAudio encoder settings from within Peak. 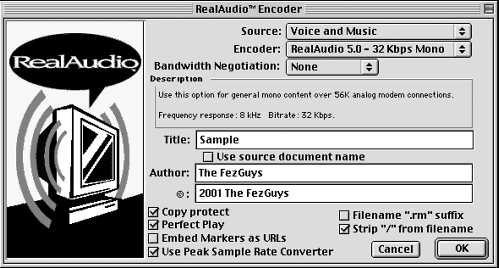 NOTE Peak's RealAudio plug-in doesn't support the most recent version of the codecs used in RealProducer 8.5, and it doesn't have the ability to save RealAudio files using SureStream technology. It's not a crushing blow: Peak's RealMedia support just isn't full featured in the way that RealProducer is. -
From the three Source options (Voice, Music, and Voice and Music) choose Music; you're encoding an on-demand file for 56Kbps dial-up modem users. -
In the Encoder pull-down menu, select RealAudio 5.0 32Kbps Mono. (Choosing Mono improves the audio quality and 32Kbps ensures the file will be compatible with 56Kbps modem users.) -
Fill out the Title, Author, and Copyright media attributes. -
Leave the Bandwidth Negotiation check box option unchecked. -
Unless you want to set the encoded file's title to be the same as the source audio filename, leave Use Source Document Name unchecked and fill in your own name. Otherwise, check this option. (This item is generally a time-saver for batch encoding.) -
For information about Copy Protect and Perfect Play, see RealMedia Stream Attributes earlier in this chapter. -
For Embed Markers as URLs, leave unchecked. (This is an advanced authoring option that this book doesn't use.) -
For Use Peak Sample Rate Converter, leave this box checked. (Peak's sample rate converter is higher quality than the standard RealAudio encoder tool.) -
Check the Filename .rm Suffix box if you're not good about remembering to place the .rm suffix at the end of RealAudio-encoded on-demand files. Checking this box automatically adds the .rm suffix to your encoded file's name, whether you've already added it or not. FezGuys' Tip  It's a good idea to use the correct file suffix on all your files. Not only is it informative, but when transferring files between different operating systems, it's typically required. |
-
Check the box Strip / From Filename. Unlike Windows or Unix, the Macintosh OS allows / in a filename. Having a / in your encoded filenames makes your files incompatible with Unix- or Windows-based server computers (and those are the only operating systems on which the RealServer runs). -
After the information is filled out correctly, click OK in the encoding box to close the RealAudio Encoder window (see Figure 3.14). -
Choose a destination folder for your encoded files and an appropriate filename. -
Click Save in the Peak Save As dialog box. The encoding begins. The progress is marked by the scrolling horizontal bar and a counter detailing the seconds until completion. Check your encoded file using your local RealPlayer. (The free RealPlayer download is available at www.real.com.) NOTE Because files are played back from a local setting (your computer), RealPlayer plays back at the highest bit rate at which the file was encoded regardless of the setting preference for the connection speed set on your local copy of RealPlayer. That means you won't necessarily hear the encoded file under real-world conditions.
You now have a RealMedia encoded file on your computer ready to be uploaded to any RealServer you can steal space on (just kidding). We'll get to the RealServer setup a little later in this chapter. |


