Section 1.9. Client-Side Programming
1.9. Client-Side ProgrammingTo invoke operations on the service, the client first needs to import the service contract to the client's native representation. If the client uses WCF, the common way of invoking operations is to use a proxy. The proxy is a CLR class that exposes a single CLR interface representing the service contract. Note that if the service supports several contracts (over at least as many endpoints), the client needs a proxy per contract type. The proxy provides the same operations as service's contract, but also has additional methods for managing the proxy life cycle and the connection to the service. The proxy completely encapsulates every aspect of the service: its location, its implementation technology and runtime platform, and the communication transport. 1.9.1. Generating the ProxyYou can use Visual Studio 2005 to import the service metadata and generate a proxy. If the service is self-hosted, first launch the service and then select Add Service Reference... from the client project's context menu. If the service is hosted in IIS or the WAS, there is no need to pre-launch the service. Interestingly enough, if the service is self-hosted in another project in the same solution as the client project, you can launch the host in Visual Studio 2005 and still add the reference, because unlike most project settings, this option is not disabled during a debug session (see Figure 1-9). Figure 1-9. Generate a proxy using Visual Studio 2005 This brings up the Add Service Reference dialog box, where you need to supply the base address of the service (or a base address and a MEX URI) and the namespace to contain the proxy. Instead of Visual Studio 2005, you can use the SvcUtil.exe command-line utility. You need to provide SvcUtil with the HTTP-GET address or the metadata exchange endpoint address and, optionally, with a proxy filename. The default proxy filename is output.cs but you can also use the /out switch to indicate a different name. For example, if you're hosting the service MyService in IIS or the WAS, and have enabled metadata public sharing over HTTP-GET, simply run this command line: SvcUtil http://localhost/MyService/MyService.svc /out:Proxy.cs When you are hosting in IIS and selecting a port other than port 80 (such as port 81), you must provide that port number as part of the base address: SvcUtil http://localhost:81/MyService/MyService.svc /out:Proxy.cs With self-hosting, assuming the self-hosted service enabled metadata publishing over HTTP-GET, registers these base addresses and exposes the matching metadata exchange endpoints with a relative address of MEX: http://localhost:8002/ net.tcp://localhost:8003 net.pipe://localhost/MyPipe After launching the host, you can use the following commands to generate the proxy: SvcUtil http://localhost:8002/MEX /out:Proxy.cs SvcUtil http://localhost:8002/ /out:Proxy.cs SvcUtil net.tcp://localhost:8003/MEX /out:Proxy.cs SvcUtil net.pipe://localhost/MyPipe/MEX /out:Proxy.cs
For this service definition: [ServiceContract(Namespace = "MyNamespace")] interface IMyContract { [OperationContract] void MyMethod( ); } class MyService : IMyContract { public void MyMethod( ) {...} } SvcUtil generates the proxy shown in Example 1-15. You can safely remove the settings of Action and ReplyAction in most cases, since the default of using the method name is good enough. Example 1-15. Client proxy file
The most glaring aspect of the proxy class is that it has no reference to the service-implementing class, only to the contract exposed by the service. You can use the proxy in conjunction with a client-side config file that provides the address and the binding, or you can use it without a config file. Note that each proxy instance points at exactly one endpoint. The endpoint to interact with is provided to the proxy at construction time. As I mentioned previously, if the service-side contract does not provide a namespace, it will implicitly use the http://tempuri.org namespace. 1.9.2. Administrative Client ConfigurationThe client needs to know where the service is located and use the same binding as the service, and, of course, import the service contract definition. In essence, this is exactly the same information captured in the service's endpoint. To reflect that, the client config file contains information about the target endpoints and even uses the same endpoint configuration schema as the host. Example 1-16 shows the client configuration file required to interact with a service whose host is configured according to Example 1-6. Example 1-16. Client config file
The client config file may list as many endpoints as the services it deals with support, and the client may use any one of them. Example 1-17 shows the client config file matching the host config file of Example 1-7. Note that each endpoint in the client config file has a unique name. Example 1-17. Client config file with multiple target endpoints
1.9.2.1. Binding configurationYou can customize the client-side standard bindings to match the service binding in a manner identical to the service configuration, as shown in Example 1-18. Example 1-18. Client-side binding configuration
1.9.2.2. Generating the client config fileBy default, SvcUtil also auto-generates a client-side config file called output.config. You can specify a config filename using the /config switch: SvcUtil http://localhost:8002/MyService/ /out:Proxy.cs /config:App.Config And you can suppress generating the config file using the /noconfig switch: SvcUtil http://localhost:8002/MyService/ /out:Proxy.cs /noconfig I recommend never letting SvcUtil generate the config file. The reason is that it generates fully articulated binding sections that often just state the default values, which tends to clutter the config file. 1.9.2.3. In-proc configurationWith in-proc hosting, the client config file is also the service host config file, and the same file contains both service and client entries, as shown in Example 1-19. Example 1-19. In-proc hosting config file
Note the use of the named pipe binding for in-proc hosting. 1.9.2.4. The SvcConfigEditorWCF provides a config file editor called SvcConfigEditor.exe that can edit both host and client configuration files (see Figure 1-10). You can also launch the editor from within Visual Studio by right-clicking on the configuration file (both the client and the host files) and selecting Edit WCF Configuration. Figure 1-10. SvcConfigEditor is used to edit both host and client config files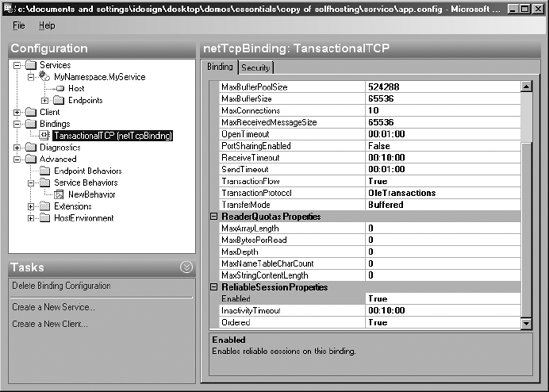 I have mixed feelings about SvcConfigEditor. On the one hand, it edits the config files nicely and it saves developers the need to know the configuration schema. On the other hand, it does not save the need to thoroughly understand WCF configuration, and for the most part, the light editing done in a config file is faster by hand than editing using Visual Studio 2005. 1.9.3. Creating and Using the ProxyThe proxy class derives from the class ClientBase<T>, defined as: public abstract class ClientBase<T> : ICommunicationObject,IDisposable { protected ClientBase(string endpointName); protected ClientBase(Binding binding,EndpointAddress remoteAddress); public void Open( ); public void Close( ); protected T Channel {get;} //Additional members } ClientBase<T> accepts a single generic type parameter identifying the service contract that this proxy encapsulates. The Channel property of ClientBase<T> is of the type of that type parameter. The generated subclass of ClientBase<T> simply delegates to Channel the method call (see Example 1-15). To use the proxy, the client first needs to instantiate a proxy object and to provide the constructor with endpoint information: either the endpoint section name from the config file, or the endpoint address and binding objects if you're not using a config file. The client can then use the proxy methods to call the service, and when the client is done, the client needs to close the proxy instance. For example, given the same definitions as in Examples 1-15 and 1-16, the client constructs the proxy, identifying the endpoint to use from the config file; invokes the method; and closes the proxy: MyContractClient proxy = new MyContractClient("MyEndpoint"); proxy.MyMethod( ); proxy.Close( ); If only one endpoint is defined in the client config file for the type of contract the proxy is using, then the client can omit the endpoint name from the proxy's constructor: MyContractClient proxy = new MyContractClient( ); proxy.MyMethod( ); proxy.Close( ); However, if multiple endpoints are available for the same contract type then the proxy throws an exception. 1.9.3.1. Closing the proxyIt is a recommended best practice to always close the proxy when the client is done using it. You will see in Chapter 4 why the client needs to close the proxy in certain cases, because closing the proxy terminates the session with the service and closes the connection. Alternatively, you can use the Dispose( ) method of the proxy to close it. The advantage of the Dispose( ) method is that you can use the using statement to call it even in the face of exceptions: using(MyContractClient proxy = new MyContractClient( )) { proxy.MyMethod( ); } If the client is declaring the contract directly instead of the concrete proxy class, the client can either query for the presence of IDisposable: IMyContract proxy = new MyContractClient( )); proxy.MyMethod( ); IDisposable disposable = proxy as IDisposable; if(disposable != null) { disposable.Dispose( ); } or collapse the query inside the using statement: IMyContract proxy = new MyContractClient( ); using(proxy as IDisposable) { proxy.MyMethod( ); } 1.9.3.2. Call timeoutEach call made by a WCF client must complete within a configurable timeout. If for whatever reason the call duration exceeds the timeout, the call is aborted and the client gets a TimeoutException. The exact value of the timeout is a property of the binding, where the default timeout is one minute. To provide a different timeout, set the SendTimeout property of the abstract Binding base class: public abstract class Binding : ... { public TimeSpan SendTimeout {get;set;} //More members } For example, when using the WSHttpBinding: <client> <endpoint ... binding = "wsHttpBinding" bindingConfiguration = "LongTimeout" ... /> </client> <bindings> <wsHttpBinding> <binding name = "LongTimeout" sendTimeout = "00:05:00"/> </wsHttpBinding> </bindings> 1.9.4. Programmatic Client ConfigurationInstead of relying on a config file, the client can programmatically construct address and binding objects matching the service endpoint and provide them to the proxy constructor. There is no need to provide the contract, since that was provided in the form of the generic type parameter of the proxy. To represent the address, the client needs to instantiate an EndpointAddress class, defined as: public class EndpointAddress { public EndpointAddress(string uri); //More members } Example 1-20 demonstrates this technique, showing the code equivalent to Example 1-16 targeting the service in Example 1-9. Example 1-20. Programmatic client configuration
Similar to using a binding section in a config file, the client can programmatically configure the binding properties: WSHttpBinding wsBinding = new WSHttpBinding( ); wsBinding.SendTimeout = TimeSpan.FromMinutes(5); wsBinding.TransactionFlow = true; EndpointAddress endpointAddress = new EndpointAddress("http://localhost:8000/MyService/"); MyContractClient proxy = new MyContractClient(wsBinding,endpointAddress); proxy.MyMethod( ); proxy.Close( ); Again, note the use of the concrete subclass of Binding in order to access binding-specific properties such as the transaction flow. |
