| To make sure that the tasks described in every time card are the most accurate they can be, the records must be modifiable. The Task Update page allows any selected record to be changed and resaved. In addition, to avoid cluttering the data source with obsolete records, you can also use the Task Update page to delete the current time card record. Because Dreamweaver does not support multiple record commands, such as update and delete on the same page, a little bit of hand-coding and code manipulation is required. Step 1: Implement Task Update Design As with other record update applications, the Task Update layout consists primarily of a series of form elements bound to dynamic data. With this page, you'll be able to modify the time card's date, description, number of hours, and job code. Two form buttons one to complete the update and one to remove the record are also needed. In the server model of your choice, create a dynamic page.  In the TimeCards folder, locate the folder for your server model and open the task_update page from there. In the TimeCards folder, locate the folder for your server model and open the task_update page from there.
Add a table to the content region of your page to contain the form elements for the application. From the Snippets panel, drag the Recipes > TimeCards > Wireframes > Update Time Card - Wireframe snippet into the Content editable region. Insert the form and, within it, a two-column table. The table should include text fields and labels for a date, a task description, the number of hours, as well as list for job types. In addition, two form buttons are required: one for processing the update and one for deleting the record. Place your cursor in the row below the words UPDATE TIME CARD and insert the Recipes > TimeCards > Forms > Update Time Card - Form snippet. Save the file [r6-13].
Figure r6-13. 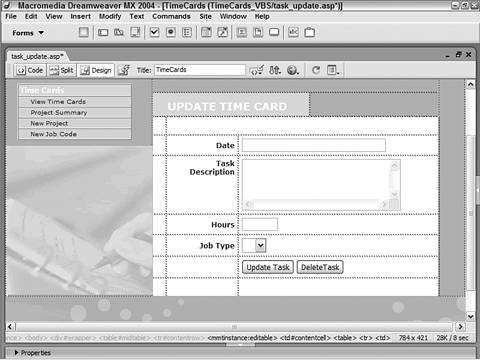
Step 2: Add Database Components Two recordsets are put to use in the Task Update recipe. One is drawn from the JobTypes table and is used to populate the list of job codes, with the current record's job code initially selected. The other recordset conveys the rest of the time card information and is filtered by the ID parameter contained in the originating link. Both recordsets are straightforward enough to require only the simple recordset dialog. Note This recordset is the same as the one used in the Add Job Type recipe. Feel free to copy the recordset from that page and paste it into the Bindings panel for this page.
Let's create the recordset to populate the job code list first: From the Bindings panel, choose Add (+) and select Recordset (Query). In the simple Recordset dialog, enter an appropriate name. Enter JobTypes in the Name field. Select the desired data source connection. Choose Recipes from the Connection (Data Source) list. Choose the needed table. From the Tables list, select JobTypes (jobtypes for PHP). Set the Columns option to Selected and choose only the necessary fields. Press Shift and select JobTypeID and JobType from the Columns list. Make sure the Filter is set to None. Keep the Sort option set to None and click OK to close the dialog. Save the page after the recordset is inserted.
Next we'll construct the TimeCard recordset: From the Bindings panel, choose Add (+) and select Recordset (Query). In the simple Recordset dialog, enter an appropriate name. Enter TimeCard in the Name field. Select the desired data source connection. Choose Recipes from the Connection (Data Source) list. Choose the needed table. From the Tables list, select TimeCard (timecard for PHP). Leave the Columns option set to All. In the Filter area of the Recordset dialog, set the four Filter list elements like this: 
Keep the Sort option set to None and click OK to close the dialog. Save the page after the recordset is inserted.
Step 3: Data Binding Process The data from our two recordsets is ready to be applied in two different steps. First we'll drag the data fields from the TimeCard recordset into the appropriate form elements. Next we'll bind data fields from the JobCode recordset to create the JobCode list values and labels. This page also uses a hidden form element to make sure that the ProjectID is properly passed upon completion of the delete operation. ColdFusion and PHP users will have to add another hidden form element for the update operation. Let's start by binding the proper data fields to the text fields: From the Bindings panel, expand the TimeCard recordset. Place the data fields on the page in their proper places. Drag CardDate onto the TaskDate text field. Drag CardDescription onto the TaskDescription text area. Drag CardHours onto the TaskHours text field.
Now that your fields are in place, let's apply a format to the date element. Select the TaskDate text field. ASP and ColdFusion users: In the selected entry of the Bindings panel, select the drop-down list under the Format column and choose Date/Time > 1/17/00. When you're done, save the page.
We're now ready to set up the Job Code list: Select the ProjectJobCode list element. From the Property inspector, select Dynamic. In the Dynamic List/Menu dialog, select the JobTypes recordset from the Options From Recordset list. In the Values field, choose JobTypeID. In the Labels field, select JobType. Leave the Select Value Equal To Field blank. Click OK to close the Dynamic List/Menu dialog.
Now we'll add a hidden form element needed to redirect the page after the update is completed. From the Form category of the Insert bar, drag the Hidden Form element next to JobType list. In the Property inspector, give the element a name. Enter ProjectID in the name field of the Property inspector. Select the lightning bolt symbol to open the Dynamic Data dialog. Expand the TimeCard recordset and choose CardProject. Click OK when you're done to close the dialog and insert the code into the Value field.
ColdFusion and PHP users will also need to add another hidden form element for the update server behavior to work properly. From the Form category of the Insert bar, drag the Hidden Form element next to newly added hidden element. In the Property inspector, give the element a name. Enter ID in the name field of the Property inspector. In the Property inspector, select the lightning bolt symbol to open the Dynamic Data dialog. Expand the TimeCard recordset and choose CardID. Click OK when you're done to close the dialog and insert the code into the Value field.
Step 4: Add Update Record Server Behavior With all the data in its proper place, it's time to add the server-side logic that will store the modified record. The standard Dreamweaver server behavior Update Record is perfect for the job. There is one minor variation to filling out the dialog, however. Rather than specifying just a file to display after the operation is correct, we need to pass an argument as well. The argument consists of the ID parameter for the current record. For ASP From the Server Behaviors panel, choose Add (+) and select Update Record. In the Update Record dialog, select the desired data source connection. Choose Recipes from the Connection list. Choose the table containing the data you are updating. From the Table to Update list, choose TimeCard. Choose the recordset from which to get data source fields. From the Select Record From field, choose TimeCard. Set the primary key for the recordset. From the Unique Key Column list, choose CardID and make sure the Numeric option is selected. Select the file you'd like to appear when the update is complete. For the After Updating, Go To field, enter the following path and argument: task_detail.asp?MM_recordID")) + " Choose the form on the page from which to get the values. From the Get Values From list, choose EditTimeCard. In the Form Elements area, set the form elements to their corresponding data source fields. Set the TaskDate form element to update the CardDate data source field as Date MS Access. Set the TaskDescription form element to update the CardDescription data source field as Text. Set the TaskHours form element to update the CardHours data source field as Numeric. Set the ProjectJobCode form element to update the CardJobTypeID data source field as Numeric. Set the ProjectID form element to <ignore>.
The ProjectID form element is only used for the Delete operation. Make sure your entries are correct and then click OK to close.
For ColdFusion and PHP From the Server Behaviors panel, choose Add (+) and select Insert Record. In the Insert Record dialog, choose the current form. Select EditTimeCard from the Submit Values From list. Select your data source from the list. Choose Recipes from the Data Source list. Enter your username and password, if needed. Select the table in the data source to insert into from the list. Choose TimeCard (timecard for PHP) from the Insert Into Table list. Set the data source fields to their corresponding form elements. As the Primary Key, CardID selects the record using FORM.ID as a Numeric type in ColdFusion and Integer in PHP. Set CardDate to get its value from the FORM.TaskDate form element as Date MS Access in ColdFusion and Date in PHP. Set CardDescription to get its value from the FORM.TaskDescription form element as Text. Set CardHours to get its value from the FORM.TaskHours form element as Numeric in ColdFusion and Integer in PHP. Set CardJobTypeID to get its value from the FORM.ProjectJobCode form element as Numeric in ColdFusion and Integer in PHP. Set CardProject to not get a value.
Enter the path to the file you want displayed after the record is updated.  In the After Inserting, Go To field, enter the following path and argument: In the After Inserting, Go To field, enter the following path and argument:
task_detail.cfm?ID=#Form.ID#  In the After Inserting, Go To field, enter the following path and argument: In the After Inserting, Go To field, enter the following path and argument:
task_detail.php?ID"]." Check your entries to verify that they are correct and, if so, click OK.
Step 5: Add Delete Command for Survey Question Our final phase of operations for this recipe involves adding delete functionality to the page. Three distinct aspects are needed to accomplish this: First, a delete command is added to the page; this procedure will be explained in this step. Next, the code for the delete command must be moved to the top of the page. Finally, the delete command code must be wrapped in additional code that ensures that it only executes when the Delete button is pressed and that the proper page displays after the operation is complete. The code manipulation will be described in the step following this one. For ASP From the Bindings panel, choose Command. In the Command dialog, enter an appropriate name. Enter DeleteTask in the Name field. Choose the data source. From the Connections list, select Recipes. Set the type of command. From the Type list, choose Delete. Leave the Return Recordset Named options blank. In the SQL area, enter the following code:
| DELETE FROM TimeCard WHERE CardID = IDParam |
In the Variable area, choose Add (+) to add a new SQL variable. Enter the name of the variable. In the Name column, enter IDParam. Insert the run-time value. In the Run-Time value column, enter Request.Form("MM_recordId"). Click OK to insert the command. Save your page. Note You should refrain from testing the delete command until the remaining recipe steps are complete.
For ColdFusion From the Bindings panel, choose Recordset (Query). In the Advanced Recordset dialog, enter an appropriate name. Enter DeleteTask in the Name field. Choose the data source. From the Data Source list, select Recipes. Enter the username and password, if required. In the SQL area, enter the following code:
| DELETE FROM TimeCard WHERE CardID = #Form.ID# |
Click OK to insert the command.
Note Again, refrain from testing the delete command until the remaining steps in the recipe are complete.
For PHP To compensate for PHP's lack of support for commands, a custom code block triggered by a conditional statement is used. This is the final step needed for this page. In Code view, place your cursor before the opening <html> and insert the following code: From the Snippets panel, insert the Recipes > TimeCards > CustomCode_PHP > Task Update Delete Record snippet.
| [View full width] <?php if ((isset($_POST['Delete'])) &&  ($_POST['Delete']=="DeleteTask")) { mysql_select_db($database_Recipes_PHP, $Recipes); $sql = "DELETE FROM timecard WHERE Cardreport_hoursbreakdown.php?0" width="14" height="9" align="left" src="/books/2/711/1/html/2/files/ccc.gif" alt="graphics/ccc.gif"> $_POST['ProjectID']; header("Location: $url"); } ?> ($_POST['Delete']=="DeleteTask")) { mysql_select_db($database_Recipes_PHP, $Recipes); $sql = "DELETE FROM timecard WHERE Cardreport_hoursbreakdown.php?0" width="14" height="9" align="left" src="/books/2/711/1/html/2/files/ccc.gif" alt="graphics/ccc.gif"> $_POST['ProjectID']; header("Location: $url"); } ?> |
Save your page.
Your PHP page is now ready for testing. Step 6: Move and Make Conditional Delete Code As noted previously, ASP and ColdFusion users now need to move the delete command code and make sure it activates only when it is supposed to. Moving the code is a simple cut-and-paste operation. Making the code conditional involves wrapping it with an if-then statement; the conditional code also handles the redirection of the page after the delete operation. Note The following step is for ASP and ColdFusion users only.
From the Server Behaviors panel, choose the Delete Task command. Switch to Code view. The following Delete Task command code should be highlighted. 
| [View full width] <% set DeleteTask = Server.CreateObject("ADODB.Command") DeleteTask.ActiveConnection = MM_Recipes_STRING DeleteTask.CommandText = "DELETE FROM TimeCard WHERE CardID = " + Replace(DeleteTask__IDParam, "'", "''") + " " DeleteTask.CommandType = 1 DeleteTask.CommandTimeout = 0 DeleteTask.Prepared = true DeleteTask.Execute() %> | 
| [View full width] <% var DeleteTask = Server.CreateObject("ADODB.Command"); DeleteTask.ActiveConnection = MM_Recipes_STRING; DeleteTask.CommandText = "DELETE FROM TimeCard WHERE CardID = "+ DeleteTask__IDParam.replace(/'/g, "''") + ""; DeleteTask.CommandType = 1; DeleteTask.CommandTimeout = 0; DeleteTask.Prepared = true; DeleteTask.Execute(); %> |
| <cfquery name="DeleteTask" datasource="Recipes"> DELETE FROM TimeCard WHERE CardID=#FORM.ID# </cfquery> |
Cut the code by choosing Ctrl-X (Command-X) or Edit > Cut. Place the cursor at the top of the page. ASP users should place the cursor just after the Connection definition. Paste the code by choosing Ctrl-V (Command-V) or Edit > Paste.
Now we're ready to make the code conditional: Select the just-inserted code. Wrap it with the following code to make it conditional and to add a redirect. From the Snippets panel, open the Recipes > TimeCards > Custom Code folder for your server model and insert the If Statement - Delete Operation snippet. Before:
| <% if (cStr(Request("DeleteTask")) <> "") then %> |
After: <% Response.Redirect("report_hoursbreakdown.asp?ProjectID")) end if %> Before:
| <% if (String(Request("DeleteTask"))!="undefined") { %> |
After: <% Response.Redirect("report_hoursbreakdown.asp?ProjectID")); } %> Before:
| <cfif isDefined("FORM.DeleteTask")> |
After: <cflocation url="report_hoursbreakdown.cfm?ID=#Form.ProjectID#"> </cfif> When you're done, save and test the page.
|