| A survey can and should go through many iterations before it's ready for public consumption. In our application, when you select the Launch icon from the Survey Manager page, you're provided with a fully formed URL for the survey as well as an opportunity to make additional edits or test the survey. If you're satisfied, a click of the button pushes the survey live which, in essence, means that the survey is ready to accept and record responses. Although most of this recipe is straightforward, there are two elements you might not have seen before. The URL for the selected survey is dynamically generated using server variables to gather the domain name as well as the file path. The other concept introduced is a dynamic form button: The final button on the page changes text and action based on the state of a particular data field. Step 1: Implement Launch Survey Design The Launch Survey layout combines both dynamic text elements and form buttons. Rather than enclose the entire Content area in a form, we'll restrict the form so that it encloses only the button areas. Although there is no real functional difference the buttons would work in either format this approach separates basic functionality and allows the page to be designed in stages with no reimplementation or loss of work. Create a page for the Survey Manager recipe, either from a template or from the File > New dialog.  In the SurveyBuilder folder, locate the folder for your server model and open the launch_survey page there. In the SurveyBuilder folder, locate the folder for your server model and open the launch_survey page there.
In the Content area of your page, create a header for the page a placeholder to display the dynamic elements and buttons. From the Snippets panel, drag the Recipes > SurveyBuilder > Wireframes > Launch Survey Wireframe snippet into the Content editable region. In the structured data area, add labels for the survey URL, title, and number of questions. Below the labels, insert three form buttons (one for Preview, Edit, and Close Survey/Make Live).  Place your cursor in the row below the words LAUNCH SURVEY and insert the Recipes > SurveyBuilder > Forms > ASP Launch Survey Form snippet. Place your cursor in the row below the words LAUNCH SURVEY and insert the Recipes > SurveyBuilder > Forms > ASP Launch Survey Form snippet.
 Place your cursor in the row below the words LAUNCH SURVEY and insert the Recipes > SurveyBuilder > Forms > ASP Launch Survey Form snippet. Place your cursor in the row below the words LAUNCH SURVEY and insert the Recipes > SurveyBuilder > Forms > ASP Launch Survey Form snippet.
 Place your cursor in the row below the words LAUNCH SURVEY and insert the Recipes > SurveyBuilder > Forms > CFML Launch Survey Form snippet. Place your cursor in the row below the words LAUNCH SURVEY and insert the Recipes > SurveyBuilder > Forms > CFML Launch Survey Form snippet.
 Place your cursor in the row below the words LAUNCH SURVEY and insert the Recipes > SurveyBuilder > Forms PHP Launch Survey Form snippet. Place your cursor in the row below the words LAUNCH SURVEY and insert the Recipes > SurveyBuilder > Forms PHP Launch Survey Form snippet.
Save the page [r5-12].
Figure r5-12. 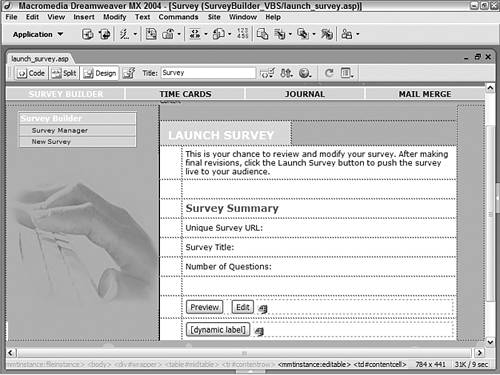
Step 2: Adding Database Components A data view, SurveyStats, is used to make information from two tables, SurveyQuestions and Surveys, available for our page. The view returns standard fields such as SurveyID, SurveyName, and SurveyLive, as well as the total number of questions for a given survey. Because SurveyStats is developed as a view, it's easy to apply it in Dreamweaver for ASP and ColdFusion; it's a little more work in PHP, but it's still quite doable. For ASP and ColdFusion From the Bindings panel, choose Add (+) and select Recordset (Query) from the list. In the simple Recordset dialog, enter an appropriate name for the recordset. Enter SurveyStats in the Name field. Choose your data source. From the Connections (Data Source) list, select Recipes. Choose the prebuilt view. Select SurveyLaunchStats from the Table list. Leave Columns set to All. In the Filter area of the Recordset dialog, set the four Filter list elements like this: 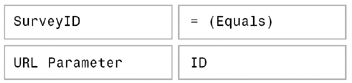
Leave Sort set to None and click OK to close the dialog. Save the page.
For PHP | | As a preliminary step, from the Snippets panel, use the Copy Snippet command to copy the Recipes > Survey Builder > SQL > Launch Survey RS - PHP SQL Statement snippet to the Clipboard. |
From the Bindings panel, choose Add (+) and select Recordset from the list. In the Recordset dialog, choose Advanced. Enter an appropriate name for the recordset. Enter SurveyStats in the Name field. Select the desired data source. Choose Recipes from the Connections list. In the SQL area, enter the following code: Press Ctrl-V (Command-V) to paste the copied snippet into the SQL area. SELECT surveys.SurveyID, Count(surveyquestions.QuestionID) AS CountOfQuestionID, surveys.SurveyName, surveys.SurveyLive FROM surveyquestions RIGHT JOIN surveys ON surveyquestions.QuestionSurvey = surveys.SurveyID GROUP BY surveys.SurveyID, surveys.SurveyName, surveys.SurveyLive HAVING surveys.SurveyID = IDParam In the Variables section, choose Add (+) to create a new variable. Enter the name for the variable. In the Name column, enter IDParam. Enter a default value for the variable. In the Default Value column, enter 1. Enter a run-time value for the variable. In the Run-Time Value column, enter $_GET['ID']. Click OK to close the dialog and insert the recordset.
Step 3: Creating a Fully Qualified Unique URL When someone is invited to participate in a survey, whether by e-mail or a section of a Web page, a direct link is generally provided. Because the survey is generated dynamically, the URL must not only reference a particular domain and file path, but it also must pass the proper parameter. Although it's possible to hand-code this URL, it's much better to have your application create it for you. By putting the burden on the application, you'll be sure to get the proper parameter. All that's left for you to do is copy the generated URL and paste it in the appropriate location. The code required to generate the domain and file path parts of the URL depends on a server-side function generally known as server variables; ColdFusion refers to these as CGI variables. Server variables are useful for getting information about the current server, the client, and the file being served. For our purposes, we'll need two server variables: SERVER_NAME and SCRIPT_NAME. The SERVER_NAME variable holds the current domain and SCRIPT_NAME holds the file path. A little string manipulation is necessary to extract just the file path from the SCRIPT_NAME variable. Note In some situations, this technique of building up the URL string will not work due to a firewall or proxy mask. Should you encounter this problem, the best solution is to hard-code all of the URL except for the query string. Use the final fragment of the code supplied in the following step to generate the query string.
Place your cursor where you would like the URL to appear. Put the cursor next to the Unique Survey URL label. Enter Code view and insert this code: From the Snippets panel, open the Recipes > SurveyBuilder > Custom Code folder for your server model and insert the Fully Qualified - Unique URL snippet.
| [View full width] <a href="http://<%=Request.ServerVariables("SERVER_NAME")%> <%=Left(Request.ServerVariables("SCRIPT_NAME"),inStrRev  (Request.ServerVariables("SCRIPT_NAME"),"/")-1)%>/survey.asp?ID =<%=(SurveyStats.Fields.Item("SurveyID").Value)%>">http://< %=Request.ServerVariables("SERVER_NAME")%> <%=Left(Request.ServerVariables("SCRIPT_NAME"),inStrRev (Request.ServerVariables("SCRIPT_NAME"),"/")-1)%>/survey.asp?ID =<%=(SurveyStats.Fields.Item("SurveyID").Value)%> </a> (Request.ServerVariables("SCRIPT_NAME"),"/")-1)%>/survey.asp?ID =<%=(SurveyStats.Fields.Item("SurveyID").Value)%>">http://< %=Request.ServerVariables("SERVER_NAME")%> <%=Left(Request.ServerVariables("SCRIPT_NAME"),inStrRev (Request.ServerVariables("SCRIPT_NAME"),"/")-1)%>/survey.asp?ID =<%=(SurveyStats.Fields.Item("SurveyID").Value)%> </a> |
| [View full width] <a href="http://<%=Request.ServerVariables("SERVER_NAME")%> <%=String(Request.ServerVariables("SCRIPT_Name")).substring (0,String(Request.ServerVariables("SCRIPT_Name")).lastIndexOf ("/"))%>/survey.asp? ID=<%=(SurveyStats.Fields.Item("SurveyID").Value)%>">http://< %=Request.ServerVariables("SERVER_NAME")%> <%=String(Request.ServerVariables("SCRIPT_Name")).substring (0,String(Request.ServerVariables("SCRIPT_Name")).lastIndexOf ("/"))%>/survey.asp? ID=<%=(SurveyStats.Fields.Item("SurveyID").Value)%> </a> |
| [View full width] <a href="http://<cfoutput>#CGI.SERVER_NAME##Left(CGI .SCRIPT_NAME,Len(CGI.SCRIPT_NAME)- Find("/",Reverse(CGI.SCRIPT_NAME)))#/survey .asp?ID=#SurveyStats.SurveyID#/survey.asp?ID=#SurveyStats .SurveyID#"> http://#CGI.SERVER_NAME##Left(CGI.SCRIPT_NAME,Len(CGI .SCRIPT_NAME)- Find("/",Reverse(CGI.SCRIPT_NAME)))#/survey .asp?ID=#SurveyStats.SurveyID#</cfoutput> </a> |
| [View full width] <a href="http://<?php echo $_SERVER['SERVER_NAME']. dirname ($_SERVER['SCRIPT_NAME']); ?>/survey.php?ID=<?php echo $SurveyStats['SurveyID']; ?>">http://<?php echo$_SERVER['SERVER_NAME'] . dirname ($_SERVER['SCRIPT_NAME']); ?>/survey.php?ID=<?php echo $SurveyStats['SurveyID']; ?> </a> |
Return to Design view [r5-13].
Figure r5-13. 
Step 4: Data Binding Process There are only two dynamic text elements included in the Launch Survey page and both can be dragged into place from the Bindings panel. From the Bindings panel, expand the SurveyStats recordset. Place the dynamic text elements in their proper place on the page. Drag SurveyName next to the Survey Title label. Drag CountOfQuestionID next to the Number of Questions label [r5-14].
Figure r5-14. 
Save the page.
Step 5: Working with the Edit Button Of the three form buttons on the page, two require additional setup. The first, Preview, triggers the action of the form, which opens the proper survey page in preview mode. The second button, Edit, opens the Edit Survey page. To accomplish this action, a Dreamweaver behavior is used in conjunction with a dynamically generated parameter, as you'll see in this step. The next step in the recipe handles the final button. There are two parts to this step. First we'll add the JavaScript behavior, and then we'll insert a hidden form field to hold the required value. Select the Edit form button. From the Behaviors panel, choose Add (+) and select Go to URL from the list. In the Go to URL dialog, choose Browse. In the Select File dialog, choose Parameters. In the Parameters dialog, enter a variable name. Enter ID in the Name column. Enter a value for the new variable. In the Value column, select the lightning bolt symbol to open the Dynamic Data dialog. From there, choose SurveyID from the SurveyStats recordset and click OK to close the Dynamic Data dialog. Click OK to close the Parameters dialog. Choose a file to pass the parameter to. Select the edit_survey file for your server model. Click OK to close the dialog and add the link.
Now, let's add a hidden form field to contain the Survey ID value. Select the hidden form element named ID. In the Property inspector, select the lightning bolt symbol to open the Dynamic Data dialog. Choose the Survey Key field. From the SurveyStats recordset, choose SurveyID. Click OK to close the Dynamic Data dialog.
Step 6: Working with the Launch Button The text seen on the Launch button is written dynamically when the page loads. The button label will display either Close Survey or Make Live, depending on the state of the SurveyLive field for the survey. When the survey is live and SurveyLive is true the button says Close Survey. When the Survey is closed, with SurveyLive set to false, the button displays Make Live. The button's action toggles between the two states. The key to this effect is the SurveyLive data field. A hidden form element stores the current value on the page and alters it whenever the Launch button is selected. To keep track of the SurveyLive state properly, an Update Record server behavior is used. First, let's make the label dynamic. Select the Launch button. The Launch button initially displays [dynamic label]. Enter Code view and remove the placeholder label text from the value attribute. Change value = "[dynamic label]" to value = removing the quotation marks as well. Insert the following code: From the Snippets panel, open the Recipes > SurveyBuilder > Custom Code folder for your server model and insert the Launch Button - Dynamic Label snippet.
| [View full width] <%if (SurveyStats.Fields("SurveyLive").value) then Response.Write("Close Survey") else Response.Write("Make Live")%> |
| <%=(SurveyStats.Fields("SurveyLive").value) ?"Close Survey":"Make Live"%> |
| <cfoutput><cfif (SurveyStats.SurveyLive NEQ 0)>Close Survey <cfelse>Make Live</cfif></cfoutput> |
| <?php echo ($row_SurveyStats['SurveyLive']) ?"Close Survey":"Make Live"; ?> |
Switch to Design view [r5-15].
Figure r5-15. 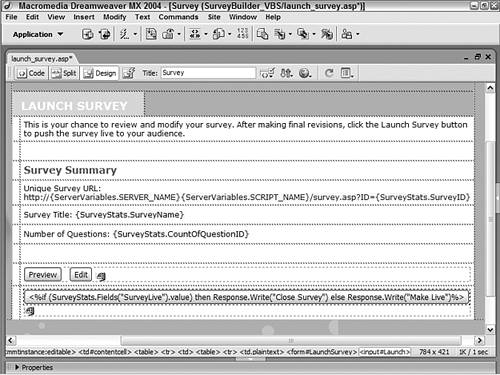
You'll see the inserted code represented as the button label; the unwanted code will, of course, disappear at run-time leaving only a label reading Close Survey or Make Live. Next, we'll adjust the hidden form element to also contain a dynamic value one based on the SurveyLive data value. Select the SurveyLive hidden form element. In Code view, replace the value (including the quotation marks) with this code: From the Snippets panel, open the Recipes > SurveyBuilder > Custom Code folder for your server model and insert the Launch Hidden Element - Dynamic Value snippet.
| [View full width] <%if (SurveyStats.Fields("SurveyLive").value) then Response .Write("0") else Response.Write("1") end if%> |
| <%=(SurveyStats.Fields("SurveyLive").value)?0:1%> |
| [View full width] <cfoutput><cfif (SurveyStats.SurveyLive NEQ 0)>0 <cfelse>1< /cfif></cfoutput> |
| <?php echo ($row_SurveyStats['SurveyLive'])?0:1; ?> |
Return to Design view. An additional series of steps is required for ColdFusion and PHP developers. Select the hidden form element, ID. From the Property inspector, choose the lightning bolt symbol to open the Dynamic Data dialog. Choose SurveyID from the SurveyStats recordset.
The final phase is to insert an Update Record server behavior to record the change in the SurveyLive field. For ASP From the Server Behaviors panel, choose Add (+) Update Record. In the Update Record dialog, select the desired data source connection. Choose Recipes from the Connection list. Choose the table that contains the data you are updating. From the Table to Update list, choose Surveys. Choose the recordset from which to get data source fields. From the Select Record From field, choose SurveyStats. Set the primary key for the recordset. From the Unique Key Column list, choose SurveyID and make sure the Numeric option is selected. Select the file you would like to appear when the update is complete. For the After Updating, Go To field, select the survey_manager.asp page. Choose the form on the page from which to get the values. From the Get Values From list, choose LaunchSurvey. In the Form Elements area, set the form element to its corresponding data source field. Set the SurveyLive form element to update the SurveyLive data source field as Numeric. Make sure your entries are correct and then click OK to close.
For ColdFusion and PHP From the Server Behaviors panel, choose Add (+) and select Update Record. In the Update Record dialog, choose the current form. Select LaunchSurvey from the Submit Values From list. Select your data source from the list. Choose Recipes from the Data Source list. Enter your username and password, if needed. Select the table in the data source to insert into from the list. Choose Surveys (surveys for PHP) from the Insert into Table list. Set the data source field to its corresponding form element. Set SurveyID to the FORM.ID form element as Numeric, with the Primary Key option selected. In the After Inserting, Go To field, enter the path to the file you want displayed after the record is updated. Choose Browse and select the survey_manager.cfm or survey_manger.php file, as appropriate. Check your entries to verify they are correct and, if they are, click OK.
|