| Our electronic version of the old In/Out Dashboard gives an immediate visual clue as to the whereabouts of any employee. Instead of pushpins in a chart behind a secretary's desk, we use bullet symbols in a multicolumn table, available from anywhere on the intranet. The example shows seven possible status locations. These columns are, of course, completely customizable. Each employee's name acts as a link to change the status. An announcement section is included at the bottom of the in/out board. For an announcement to be shown, it must not be dated in the future and it must be cleared for posting by an administrator. The announcements are sorted in descending date order, so the newest are displayed on top. Step 1: Implement Dashboard Design The basic Dashboard page consists of two main display areas: one for the Dashboard itself and one for the announcements section. Create a basic dynamic page, either by hand or derived from a template.  In the InOutBoard folder, locate the folder for your server model and open the dashboard page found there. In the InOutBoard folder, locate the folder for your server model and open the dashboard page found there.
Add a table to the Content region of your page to contain the interface elements for the application. From the Snippets panel, drag the Recipes > InOutBoard > Wireframes > InOut Dashboard - Wireframe snippet into the Content editable region. Within the table, nest another HTML table to display the In/Out Dashboard results. The list should have a column for the employee name as well as one for each status you want to display; our example table has room for seven such fields. Make sure your table has a border of at least 1 pixel to separate the various status fields and employees. Place your cursor in the first row below the words IN/OUT DASHBOARD and insert the Recipes > InOutBoard > ContentTables > InOut Dashboard - Content Table snippet. Below the table with the In/Out Dashboard display, add another to hold the current announcements. This table only needs two columns: one for the date and another for the announcement. Place your cursor in the bottom row of the wireframe and insert the Recipes > InOutBoard > ContentTables > Announcements - Content Table snippet [r4-1].
Figure r4-1. 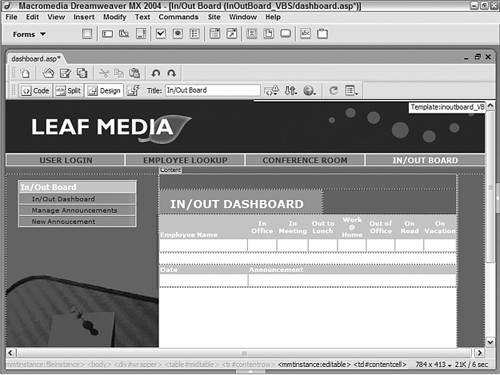
Note By using the same color for the border as the background color of the header row, you can displays lines where they're vital in the employee rows and keep them out of the areas where they would distract, such as the header area.
Step 2: Add Database Components (Part 1) With two different display areas, you might expect that we'd need two different recordsets, and you'd be right. The first recordset contains information that will be used to fill out the In/Out Dashboard area with each employee's name and their status. The second recordset gathers all the data for the announcements area. Each recordset is somewhat involved and worthy of a bit of explanation. Let's start by adding the recordset for the announcement section because the process is similar for all server models. What distinguishes this recordset is the WHERE clause of the SQL statement. To ensure that an announcement is not displayed before it is supposed to be, a two-part WHERE clause is used. In ASP and ColdFusion, the WHERE clause is as follows: WHERE AnnouncementDate <= Date() AND AnnouncementDisplayed <> 0 For PHP/MySQL, the same functionality is achieved like this: WHERE AnnouncementDate <= CURDATE() AND AnnouncementDisplayed!=0 The first half of the statement ensures that the announcement date is less than or equal to today (as returned by the Date() or CurDate() function), and the second half checks to see whether the AnnouncementDisplayed field which is a boolean field controlled on the Manage Announcements page is not equal to false. You should note that the date functions are related to the databases Access and MySQL; other data sources might require a different syntax. Here are the steps for building the Announcement recordset: | | To prepare for this step, copy the snippet to the clipboard by first navigating to the Recipes > InOutBoard > SQL folder. Then right-click (Control-click) on either the Dashboard Announcement RS or the Dashboard Announcement RS PHP snippet and choose Copy Snippet. |
From the Bindings panel, choose Add (+) and select Recordset (Query). Switch to the advanced view and enter an appropriate name for the recordset [r4-2].
Figure r4-2. 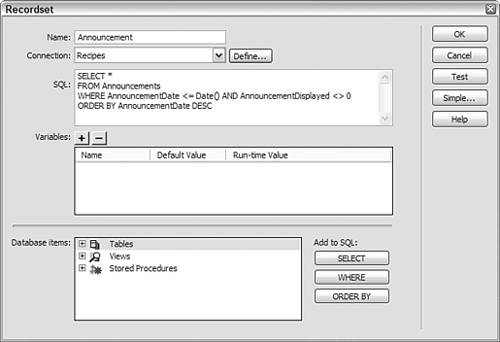
Enter Announcement in the Name field. Select the connection (data source) for the recordset. Choose Recipes from the Connections (Data Source) list. In the SQL area, enter the following code: Press Ctrl-V (Command-V) to paste the copied snippet into the SQL area. Verify your code and click OK to close the dialog. Save the page.
Step 3: Add Database Components (Part 2) The second recordset required by the Dashboard page is used to populate the main in/out board interface. For ASP and ColdFusion At the heart of the In/Out Dashboard recordset for ASP and ColdFusion is an Access view that combines three tables: Employees, Dashboard, and Status. To obtain a listing of all the employees even those who might not have been assigned a status yet you use particular kinds of SQL JOINs: the RIGHT JOIN and the LEFT JOIN. You'll remember that an INNER JOIN returns only matching results between two tables. A RIGHT JOIN returns all the records found in the table on the right side of the SQL clause. (That is, FROM Dashboard RIGHT JOIN Employees would return all the Employees records.) Similarly, a LEFT JOIN returns all those records in the table to the left of the keywords. To make the SQL statement that comprises the view a bit more readable, I've separated the main clauses: [View full width] SELECT [Dashboard].[DashboardID], [Employees].[EmployeeFirst], [Employees].[EmployeeLast],  [Employees].[EmployeeID], [Status].[StatusID], [Status].[StatusName] FROM (Dashboard RIGHT JOIN Employees ON [Dashboard].[DashboardEmployee]=[Employees] .[EmployeeID]) LEFT JOIN Status ON [Dashboard].[DashboardStatus]=[Status].[StatusID] WHERE Dashboard.DashboardID = (SELECT TOP 1 DashBoardID FROM Dashboard AS DB2 WHERE DashboardEmployee = Employees.EmployeeID ORDER BY DashboardID DESC) OR (SELECT TOP 1 DashBoardID FROM Dashboard AS DB2 WHERE DashboardEmployee = Employees.EmployeeID ORDER BY DashboardID DESC) IS NULL ORDER BY [EmployeeLast] & ' ' & [EmployeeFirst]; [Employees].[EmployeeID], [Status].[StatusID], [Status].[StatusName] FROM (Dashboard RIGHT JOIN Employees ON [Dashboard].[DashboardEmployee]=[Employees] .[EmployeeID]) LEFT JOIN Status ON [Dashboard].[DashboardStatus]=[Status].[StatusID] WHERE Dashboard.DashboardID = (SELECT TOP 1 DashBoardID FROM Dashboard AS DB2 WHERE DashboardEmployee = Employees.EmployeeID ORDER BY DashboardID DESC) OR (SELECT TOP 1 DashBoardID FROM Dashboard AS DB2 WHERE DashboardEmployee = Employees.EmployeeID ORDER BY DashboardID DESC) IS NULL ORDER BY [EmployeeLast] & ' ' & [EmployeeFirst];
Note To accommodate the different dialogs for the various server models, the steps are presented separately here and when necessary throughout this recipe.
Because the SQL statement is a prebuilt view and Macromedia Dreamweaver treats views as tables you can insert all this complexity with point-and-click simplicity. From the Bindings panel, choose Add (+) and select Recordset. In the simple view of the Recordset dialog, enter an appropriate name. Enter Dashboard in the Name field. Select a connection (data source) to use. Choose Recipes from the Connections (Data Source) list. Choose the table or view to work with. Select EmployeeDashboard from the Table list. Leave both the Filter and Sort options unchanged, and click OK to close the dialog.
Note The Table list is not totally alphabetical. Dreamweaver presents the tables first in the list and then the views.
For PHP PHP users need to take a more circuitous route to build the needed recordset because MySQL does not support views. (If you've built the other applications in this book in order, you've seen a similar technique used before in the EmployeeLookup recipe.) To simulate the use of views, data from a table employeedashboard is initially flushed to make sure we start with a clean slate. Then that table is filled with data derived from the employees and dashboard tables, thus creating a view-like structure. The newly filled table is then referenced by this SQL statement: [View full width] SELECT DISTINCT employeedashboard.* FROM employeedashboard, employeedashboard employeedashboard2 WHERE employeedashboard.DashboardID > employeedashboard2.DashboardID OR employeedashboard .DashboardID IS NULL GROUP BY employeedashboard.EmployeeID ORDER BY employeedashboard.EmployeeLast, employeedashboard.EmployeeFirst
Because of the way that Dreamweaver inserts code, we'll first add a new recordset using the preceding SQL and then put in the custom code needed to populate the dashboardemployee table. | | Rather than enter the complex SQL statement by hand, open the Snippets panel and use the Copy Snippet command to copy it from the Recipes > InOutBoard > SQL > Dashboard - Dashboard RS PHP SQL Statement snippet. |
From the Bindings panel, choose Add (+) and select Recordset from the list. If necessary, switch to the advanced Recordset dialog. Enter an appropriate name for the recordset. Enter Dashboard in the Name field. Choose a proper connection from the list. Select Recipes from the Connections list. In the SQL field, insert the following code: Press Ctrl-V (Command-V) to paste the code copied from the snippet into the SQL area: [View full width] SELECT DISTINCT employeedashboard.* FROM employeedashboard, employeedashboard employeedashboard2 WHERE employeedashboard.DashboardID > employeedashboard2.DashboardID OR employeedashboard .DashboardID IS NULL GROUP BY employeedashboard.EmployeeID ORDER BY employeedashboard.EmployeeLast, employeedashboard.EmployeeFirst
Click OK to close the dialog and insert the recordset. Save the page.
Now that Dreamweaver has inserted our recordset code, we're ready to add the custom code that initially clears data from the dashboardemployee table and then refills it with the current values. In Code view, place your cursor after the code that starts <?php require_once near the top of the page and make a new line. Insert the following code: From the Snippets panel, insert the Recipes > InOutBoard > CustomCode_PHP > Dashboard - Temporary Table snippet. [View full width] <?php // Temporary Table population mysql_select_db($database_Recipes_PHP, $Recipes); // Delete current contents of employeedashboards table $tempSQL = "DELETE FROM employeedashboard"; $tempRES = mysql_query($tempSQL,$Recipes); $tempSQL = "INSERT INTO employeedashboard SELECT dashboard.DashboardID, employees .EmployeeFirst, employees.EmployeeLast, employees.EmployeeID, status.StatusID, status .StatusName AS StatusName FROM (dashboard RIGHT JOIN employees ON dashboard .DashboardEmployee=employees.EmployeeID) LEFT JOIN status ON dashboard.StatusID=status .StatusID ORDER BY employees.EmployeeLast, employees.EmployeeFirst"; $tempRES = mysql_query($tempSQL,$Recipes); ?>
Save your page.
Step 4: Data Binding Process for Dashboard The first aspect of this step should seem fairly familiar as we drag dynamic data for the employee's name into the first column. However, the balance of the step requires a bit of hand-coding to insert values for each of the status columns. In each column, we'll insert code to display a bullet character if the employee's status ID matches that column. For example, if an employee is in the office the first column his status ID is set to 1 and a bullet is displayed in the first column. Anyone in a meeting (the second column) has a status ID of 2, and the bullet is displayed in the second column, and so on. Only one value is changed for each snippet of code placed in a different column. Let's take care of the dynamic text for the employee name first: From the Bindings panel, expand the Dashboard recordset. Drag the EmployeeFirst data source field onto the row under the Employee Name column. Press the right arrow key to move away from the selection and add a non-breaking space by pressing Ctrl-Shift spacebar (Command-Shift spacebar). Select the EmployeeLast data source field and choose Insert; if you're feeling extremely dexterous, you can try dragging the data source field into position.
Now let's add the code necessary for displaying the bullet character. Place your cursor in the row underneath the first status column and add the following code: From the Snippets panel, open the Recipes > InOutBoard > Custom Code folder for your server model and insert the In Office Status - Dynamic Text snippet. 
| <% if (Dashboard.Fields.Item("StatusID").Value = 1) then Response.Write("<strong>•</strong>") else Response.Write(" ") end if%> | 
| [View full width] <%=(Dashboard.Fields.Item("StatusID").Value == 1)?"<strong>• </strong>":" "%> | 
| #IIf(Dashboard.StatusID EQ 1, "'<strong>•</strong>'", "' '")# | 
| <?php echo ($row_Dashboard['StatusID'] == 1)?"<strong>• </strong>":" "; ?> |
Repeat step 1 for each status column, incrementing the value in the code by one for each column (snippets are provided for those following the recipe). For example, in the second column, the number 1 would change to 2, like this:
| <% if (Dashboard.Fields.Item("StatusID").Value = 2) then [Response.Write("<strong>•</strong>") else Response.Write(" ") end if%> |
| [View full width] <%=(Dashboard.Fields.Item("StatusID").Value == 2)?"<strong>• </strong>":" "%> |
| [View full width] #IIf(Dashboard.StatusID EQ 2, "'<strong>•</strong>'", "' '")# |
| <?php echo ($row_Dashboard['StatusID'] == 2)?"<strong>• </strong>":" "; ?> |
Drag the corresponding snippet into its proper column: Drag the In Meeting Status - Dynamic Text snippet to the In Meeting column. Drag the Out to Lunch Status - Dynamic Text snippet to the Out to Lunch column. Drag the Work at Home Status - Dynamic Text snippet to the Work @ Home column. Drag the Out of Office Status - Dynamic Text snippet to the Out of Office column. Drag the On Road Status - Dynamic Text snippet to the On Road column. Drag the On Vacation Status - Dynamic Text snippet to the On Vacation column.
When you're done, you should see an entire row of symbols for server-side code that is, if you have Invisible Elements enabled. ColdFusion users see the code or code indicator ({text}) [r4-3].
Figure r4-3. 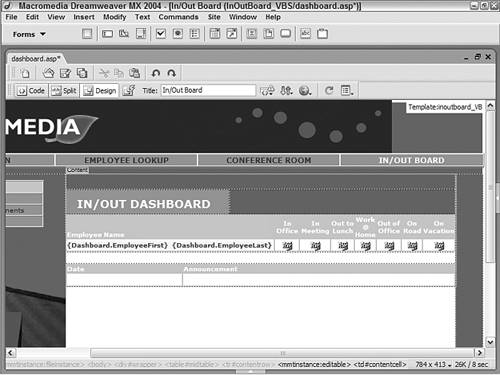
Make sure all the columns have an incrementing value in the code. If, during testing, two columns show a bullet at the same time, the values are duplicates.
Creating Custom Server Behaviors Rather than hand-code the display bullet routine seven times, Dreamweaver offers another methodology custom server behaviors and a tool for creating them: the Server Behavior Builder. Because this code is used repeatedly with different parameters, it's a prime candidate for a custom server behavior. Let's walk through the process: Copy the code snippet you want to insert into your server behavior. To create a server behavior that would show the column bullet, copy the In Office Status - Dynamic Text snippet for your server model. From the Server Behaviors panel, choose Add (+) and select New Server Behavior. In the New Server Behavior dialog, select your server model and language from the Document Type list and give the custom server behavior a meaningful name unique to other server behaviors, such as Show Column Bullet. The name you enter appears in the Server Behaviors panel. If this is to be a totally new server behavior, leave the Copy Existing Server Behavior option unchecked. The Copy Existing Server Behavior option allows you to build on other custom server behaviors. After you click OK, the main Server Behavior Builder interface appears [r4-4].
Figure r4-4. 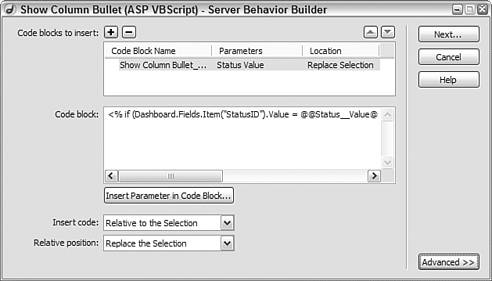
In the Server Behavior Builder dialog, select Add (+) to create a new code block. Accept the default name or enter a custom one in the Create a New Code Block dialog, and click OK to close the pop-up dialog. In the Code Block area, select the placeholder text and paste your copied code. If you were to stop now, the code would just go in as is without parameters and would, in essence, be a code snippet. Let's add a parameter next. In the code you just pasted, select the value you want to turn into a parameter and then choose Insert Parameter in Code Block. Select the number value (1, 2, 3, and so on) in the code that was previously incremented. Enter a label for the parameter in the Insert Parameter in Code Block dialog and click OK to close the pop-up dialog. This label appears in the Custom Server Behavior dialog and should indicate a direction to the user, such as Status__Value. Note: A double underscore is used in the label name. The underscores maintain the name as a single string in the code, and the Server Behavior Builder displays the double underscores as a space. From the Insert Code list, choose where you want the code to go. Because we want the code to go into the current cursor position, select Relative to the Selection from the list. From the Relative Position list, choose where the code should go more specifically. Select Replace the Selection from the list. Make sure all your choices are correct and click Next. With the code to be inserted complete, all that's left to do is to specify what type of parameters are expected in the Generate Behavior Dialog Box dialog. In the Generate Behavior Dialog Box dialog, select the parameter, and from the drop-down list under the Display As column, choose the most appropriate form control for that parameter. From the Display As list, select Numeric Text Field. Click OK to create the custom server behavior.
If you've already inserted the code, you'll see that Dreamweaver identifies that code as a server behavior now and lists all the code blocks in the Server Behaviors panel with the parameters in parentheses. |
Step 5: Link to Employee Update Page Although the code is in place to show the current status of each employee, we need a way to change that status. In this step, we create a link from the employee's name to an update status page. Select the text or graphic you want to use as a link. Select Dashboard.EmployeeFirst and then Shift-select Dashboard.EmployeeLast. From the Property inspector, choose Browse for File, which is the folder icon next to the Link field. In the Select File dialog, choose the file you want to handle the update. Choose update_status. Select Parameters from the Select File dialog. In the Parameters dialog, enter ID under the Value column. Under the Value column, select the lightning symbol to open the Dynamic Data dialog, and then choose EmployeeID. Click OK to close the Dynamic Data, Parameters, and Select File dialogs. Save the page.
Step 6: Data Binding Process for Announcements Let's flesh out the announcement section a bit. We need to add two dynamic text elements: one for the date and one for the announcement. From the Bindings panel, expand the Announcements recordset. Drag the data source fields into their proper positions on the page. Drag the data source field AnnouncementDate to the row under the Date column. Drag the data source field AnnouncementText to the row under the Announcement column. Save your page.
Step 7: Add Repeat Regions The final step on this page is to add two Repeat Region server behaviors, one for each of the dynamic data rows. Let's work with the in/out board section first. Place the cursor in any of the table cells containing the dynamic data in the Dashboard table. From the Tag Selector, select the <tr> tag, located to the left of the current <td> tag. From the Server Behaviors panel, choose Add (+) and select Repeat Region from the list. In the Repeat Region dialog, make sure the Dashboard recordset is selected. Choose the All Records option and click OK to close the dialog. Now let's do the same thing for the Announcements section. Select either of the dynamic data elements in the second row of the Announcements table. Choose the <tr> tag from the Tag Selector. From the Server Behaviors panel, choose Add (+) and select Repeat Region from the list. In the Repeat Region dialog, make sure the Announcements recordset is selected. Again, choose the All Records option and click OK to close the dialog. Save the page.
Enter into Live Data view to see a list of all the employees, including those with and without a current status [r4-5]. In the next section, we'll create an update status page so that we can modify the status for any employee.
Figure r4-5. 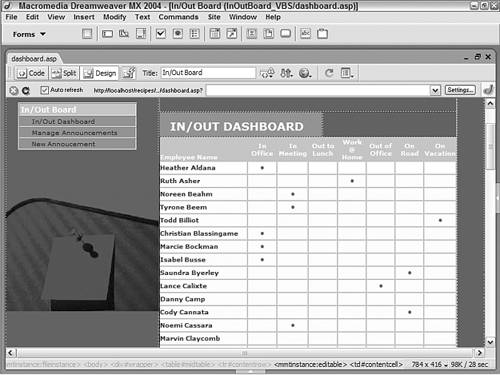
Recipe Variations: Employee Records As currently designed, the Dashboard page shows all the employees. If your organization is fairly large, you might want to show only a few employees at a time. You can do this by changing the Repeat Region server behavior to anything other than All Records and adding recordset navigation controls as demonstrated in the Employee Results page in Recipe 2, "Employee Lookup." Another variation would be to limit the employees by department. One way to do this would be to include a list element tied to the department recordset and filter the Dashboard recordset based on the list selection. When a different department is selected, the page is resubmitted to the server and the new filter is applied. A similar technique was used in the New Job page in Recipe 2. |
|