| As you can imagine, an ongoing journal can build up a lot of entries very quickly. The archive feature of our recipe is designed to keep the journal manageable, showing entries from only the most current period initially, but making past periods whether it's a day, week, or month accessible. The Archive page closely resembles the Journal page, with one important difference: A drop-down list displays all the periods in which journal entries have been posted. For example, if a journal is set to archive monthly and entries were posted in July and September but not August, only July and September are listed. When the user chooses a particular period, those entries are retrieved and displayed on the same page in the view journal format used throughout the application. From a coding perspective, the archive manipulation is by far the most complex and interesting aspect of the page. In addition to the two recordsets previously used (Journal and Entries), a third recordset TimePeriods examines the full list of entries and separates them by their different periods. Achieving this functionality will require some custom variables to set the specific periods as well as a bit of client-side JavaScript to trigger the recordset update. Step 1: Implement Journal Archive Design As noted, this page closely resembles the Journal page. The layout calls for a top section providing details about the current journal and a bottom section displaying a repeated region filled with the applicable entries. The key in fact, the only form element in this page is a list; JavaScript is used to submit the form, thus avoiding the unnecessary addition of a form button. Create a page for the View Journal recipe, either from a template or from the File > New dialog.  In the Journal folder, locate the folder for your server model and open the archive page there. In the Journal folder, locate the folder for your server model and open the archive page there.
In the content area of your page, create a header for the page and an area to hold both the general journal information and the specific entries. From the Snippets panel, drag the Recipes > Journal > Wireframes > Journal Archive - Wireframe snippet into the Content editable region. Add labels and table cells to hold the journal information (name, owner, and description) as well as a form element for the time periods and, below that, a two-row, two-column table for the journal entries. Place your cursor in the first row below the words VIEW JOURNAL ARCHIVES and insert the Recipes > Journal > Forms > Journal Archive Info - Form snippet. Place your cursor in the bottom row of the wireframe and insert the Recipes > Journal > ContentTables > View Journal - Content Table snippet.
Save the page [r7-15].
Figure r7-15. 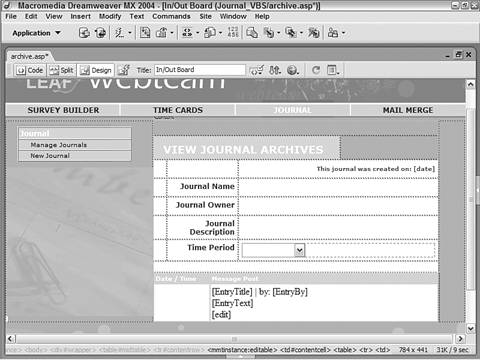
Step 2: Add Database Components: Part 1 Of the recordsets required for the Archive page, ASP and ColdFusion users will recognize the first two as being used in previous pages in this application. PHP coders will find their recordset setup to be a bit more elaborate to better handle the archive date manipulation functionality. In this step, we'll initially create the Journal and Entries recordsets. A bit later in the recipe, we'll create the TimePeriods recordset to work with the drop-down list as a filter for the Entries recordset. For ASP and ColdFusion From the Bindings panel, choose Add (+) and select Recordset. In the dialog's simple view, enter an appropriate name for the recordset. Enter Journal in the Name field. Choose a connection (data source) to use. Select Recipes from the Connection list. Choose the table in the data source to work with. Select Journals from the Table list. Leave the Columns option set to All. In the Filter area of the Recordset dialog, set the four Filter list elements like this: 
Leave the Sort option set to None and click OK to close the dialog.
Now, we'll insert the Entries recordset from which we'll gather the journal entries for display at the bottom of the page. From the Bindings panel, choose Add (+) and select Recordset. In the dialog's simple view, enter an appropriate name for the recordset. Enter Entries in the Name field. Choose a connection (data source) to use. Select Recipes from the Connection list. Choose the table in the data source to work with. Select JournalEntries from the Table list. Leave the Columns option set to All. In the Filter area of the Recordset dialog, set the four Filter list elements like this: 
Leave the Sort option set to None and click OK to close the dialog.
For PHP | | If you're following our recipe, before you begin this step, copy the SQL code from the provided snippet. Right-click (Control-click) on Recipes > Journal > SQL > Journal RS SQL - PHP and select Copy Snippet from the context menu. |
From the Bindings panel, choose Add (+) and select Recordset (Query) from the list. In the Recordset dialog, choose Advanced. Enter an appropriate name for the recordset. Enter Journal in the Name field. Select the desired data source. Choose Recipes from the Connections list. In the SQL area, enter the following code: Paste the copied code in the SQL area by pressing Ctrl-V (Command-V). [View full width] SELECT unix_timestamp(JournalDate) AS JournalTimeStamp, JournalID, JournalTitle,  JournalOwner, JournalDescription, JournalArchive FROM journals WHERE JournalID = IDParam JournalOwner, JournalDescription, JournalArchive FROM journals WHERE JournalID = IDParam
The unix_timestamp() function is used to turn the JournalDate field from datetime format so that it can be easily manipulated into different formats using the PHP date() command. Now we'll add a variable, one for each of the session variables. In the Variables section, choose Add (+) and enter the following details in the Add Parameter dialog:  Click OK to close the dialog and insert the recordset.
Let's follow much the same process to create the Entries recordset: | | In preparation, you'll need to copy the SQL code from the provided snippet. Right-click (Control-click) on Recipes > Journal > SQL > Entries RS SQL - PHP and select Copy Snippet from the context menu. |
From the Bindings panel, choose Add (+) and select Recordset (Query) from the list. In the Recordset dialog, choose Advanced. Enter an appropriate name for the recordset. Enter Entries in the Name field. Select the desired data source. Choose Recipes from the Connections list. In the SQL area, enter the following code: Paste the copied code in the SQL area by pressing Ctrl-V (Command-V). [View full width] SELECT EntryID, EntryJournal, EntryBy, EntryTitle, EntryText, unix_timestamp(EntryDate) AS EntryDateTimeStamp FROM JournalEntries WHERE EntryJournal = IDParam ArchiveWhere
The ArchiveWhere variable will be coded later in the recipe, but we still need to set it up as well as IDParam. In the Variables section, choose Add (+) and enter the following details in the Add Parameter dialog:  Click OK to close the Add Parameter dialog and then choose Add (+) and enter the following details for the second variable:  The semicolon used as the default value for the ArchiveWhere variable ensures that the PHP code will end properly regardless of the variable value. Click OK to close the dialog and insert the recordset. Save your page.
Step 3: Add Database Components: Part 2 The final recordset for the Archive page requires a bit more finesse than the others used here and includes a technique not seen in any of the other applications in this book. The TimePeriods recordset contains a set of periods drawn from a given journal that contain entries. What makes this recordset special is that the period itself (day, week, or month) varies according to the archive period specified for the journal. Thus, one of the actual fields returned by the SQL statement is set up as a variable. Here's the ASP version of the SQL: SELECT DISTINCT (PeriodField) AS Period, ArchPeriod AS IncludeDate FROM JournalArchiveDates WHERE EntryJournal = IDParam ORDER BY ArchPeriod DESC Placing (PeriodField) in parentheses designates it as a variable. Later in the recipe, we'll include some custom code for setting the variable properly. Now, we can start by inserting the recordset. Note As noted, this step is only required for ASP and ColdFusion.
For ASP | | In preparation, you'll need to copy the SQL code from the provided snippet. Right-click (Control-click) on the Recipes > Journal > SQL > TimePeriods RS ASP snippet and select Copy Snippet from the context menu. |
From the Bindings panel, choose Add (+) and select Recordset (Query) from the list. In the advanced view of the Recordset dialog, enter an appropriate name for the recordset. Enter TimePeriods in the Name field. Select the desired data source. Choose Recipes from the Connections list. In the SQL area, enter the following code: Paste the copied code in the SQL area by pressing Ctrl-V (Command-V). SELECT DISTINCT (PeriodField) AS Period, ArchPeriod AS IncludeDate FROM JournalArchiveDates WHERE EntryJournal = IDParam ORDER BY ArchPeriod DESC
We'll need to declare three variables seen in the SQL: IDParam, PeriodField, and ArchPeriod. In the Variable area, choose Add (+) to declare the first variable. Enter the name for the variable. In the Name column, enter IDParam. Enter a default value for the variable. In the Default Value column, enter 1. Enter a run-time value for the variable. In the Run-time Value column, enter Journal.Fields("JournalID").value. In the Variable area, choose Add (+) again to declare the second variable. Enter the name for the variable. In the Name column, enter PeriodField. Enter a default value for the variable. In the Default Value column, enter Month. Enter a run-time value for the variable. In the Run-time Value column, enter PeriodColumn. In the Variable area, choose Add (+) one more time to declare the last variable. Enter the name for the variable. In the Name column, enter ArchPeriod. Enter a default value for the variable. In the Default Value column, enter Date3. Enter a run-time value for the variable. In the Run-time Value column, enter ArchPeriod. Click OK to close the dialog and then save your page.
For ColdFusion Unfortunately, the ColdFusion implementation in Dreamweaver MX 2004 isn't properly set up to handle SQL queries with dynamic variables. If you attempt to enter the needed SQL in the recordset dialog, an error is displayed. To work around this issue, we'll drop our recordset code and <cfparam> tags in by hand. The TimePeriods recordset must be placed after the Journal recordset and before the Entries one for all the pieces to work properly together. From the Server Behaviors panel, select the Entries recordset. Switch to Code view and move the cursor before the selected recordset. Insert the following code: From the Snippets panel, insert the Recipes > Journal > CustomCode_CF > TimePeriods RS snippet. SELECT DISTINCT (#PeriodColumn#) AS Period, #ArchPeriod# AS IncludeDate FROM JournalArchiveDates WHERE EntryJournal = #IDparam# ORDER BY #ArchPeriod# DESC Place the cursor near the top of the page after the other <cfparam> statements and insert the following code: From the Snippets panel, insert the Recipes > Journal > CustomCode_CF > TimePeriods RS - SQL Parameters snippet. <cfparam name="PeriodColumn" default="Month"> <cfparam name="ArchPeriod" default="Date1"> <cfparam name="IDparam" default="#Form.ID#"> Save your page.
Note You'll need to hold off on testing the page until it is complete for the variables to work properly.
For PHP | | If you're following our recipe, before you begin this step, copy the SQL code from the provided snippet. Right-click (Control-click) on Recipes > Journal > SQL > TimePeriods RS - PHP and select Copy Snippet from the context menu. |
From the Bindings panel, choose Add (+) and select Recordset (Query) from the list. In the Recordset dialog, choose Advanced. Enter an appropriate name for the recordset. Enter TimePeriods in the Name field. Select the desired data source. Choose Recipes from the Connections list. In the SQL area, enter the following code: Paste the copied code in the SQL area by pressing Ctrl-V (Command-V). [View full width] SELECT EntryID, EntryJournal, EntryBy, EntryTitle, EntryText, unix_timestamp(EntryDate) AS EntryDateTimeStamp FROM JournalEntries WHERE EntryJournal = IDParam ORDER BY unix_timestamp(EntryDate) ASC
The unix_timestamp() function is used to turn the JournalDate field from datetime format so that it can be easily manipulated into different formats using the PHP date() command. Now we'll add a variable for the session variables. In the Variables section, choose Add (+) and enter the following details in the Add Parameter dialog:  Click OK to close the dialog and insert the recordset. Save your page when you're ready.
Step 4: Data Binding Process Now that our recordsets are defined, we can integrate the data into the page. From the Bindings panel, expand the Journal recordset. Place the data source fields onto the page in their respective areas:
| Drag JournalTitle in the cell next to the Journal Name label. | | | Drag JournalOwner in the cell next to the Journal Owner label. | | | Drag JournalDescription in the cell next to the Journal Description label. |   
| Select the term [date] in the placeholder text at the top of the content area and drag JournalDate from the Bindings panel onto the selection. | 
| Delete the selection and insert the Recipes > Journal > CustomCode_PHP > Journal Archive Insert Journal Date snippet, which contains the following code: |
| <?php echo date("m/d/Y",$row_Journal['JournalTimeStamp']); ?> |
Save the page.
Now, let's add the data fields from the Entries recordset. From the Bindings panel, expand the Entries recordset. Place the data source fields onto the page in their respective areas: |
| Select the term [EntryTitle] in the placeholder text at the top of the content area and drag EntryTitle from the Bindings panel onto the selection. | | | Select the term [EntryBy] in the placeholder text at the top of the content area and drag EntryBy from the Bindings panel onto the selection. | | | Select the term [EntryText] in the placeholder text at the top of the content area and drag EntryText from the Bindings panel onto the selection. |
| Drag EntryDate in the cell below the Date / Time label. |
| Insert the Recipes > Journal > CustomCode_PHP > Journal Archive Insert Entry Date snippet, which contains the following code: |
| [View full width] <?php echo date("m/d/Y h:i A" ,$row_Entries['EntryDateTimeStamp']); ?> |
Save the page [r7-16].
Figure r7-16. 
As we've done in other pages in this application, we'll now create a link for editing a listed entry. Select the text or image you want to serve as the link. Choose the text [edit] below the Journal Description label. Select the folder symbol next to the Link field in the Property inspector. The Select File dialog opens. Choose Parameters at the bottom of the dialog. In the Name column of the Parameters dialog, enter the variable name. Enter ID in the Name column. In the Value column, enter the dynamic value of the current survey's ID. Select the lightning bolt next to the Value column and, from the Dynamic Data dialog, choose JournalID from the Journal recordset. When you're done, click OK once to close the Dynamic Data dialog. Choose Add (+) to insert another parameter. Enter a name for the entry ID variable in the Name column. Enter EditID in the Name column. Insert the following code in the Value column:
| <=%Request("ID")%> |
| <=%Request("ID")%> |
| <cfoutput>#Request.ID#</cfoutput> |
| <?php echo $_GET['ID']; ?> |
In the Select File dialog, select the file that will be used to edit the survey information. Choose journal_editor in the Journal folder for your server model. When you're done, click OK to insert the link. Save your page before continuing.
Step 5: Bind Data to List The TimePeriod list element plays a key role in the Archive page. Initially, the page displays the last period for which a journal's entries are available and that the list element should reflect. Our list uses a static element with the label Current Period in combination with data from the TimePeriod recordset, which provides all the other items in the list. Because of the way PHP is used to work with dates, a slightly different procedure is used in that server model. Much of the functionality of our approach is built into the form element through custom code. For ASP and ColdFusion Select the TimePeriod form element. From the Property inspector, choose Dynamic. In the Dynamic List/Menu dialog, choose Add (+) in the Static Options area to add a new list item. Delete the value placeholder and enter Current Period in the Label column. By entering an empty static value, this ensures that the more recent archive timespan the current period, in other words is the first entry available in the list. From the Options from Recordset list, choose TimePeriods. Select IncludeDate from the Values list. Select Period from the Labels list. In the Set Value Equal To field, enter the following code:
| <%= Request("TimePeriod") %> |
| <%= String(new Date(Request("TimePeriod"))) %> |
| <%= String(new Date(Request("TimePeriod"))) %> |
Save your page.
For PHP We'll be replacing the entire list/menu with some custom code to manipulate the dates in PHP in a way not possible with MySQL. To complete this action, we'll need to make sure that the form calls the same page with new parameters when the menu is changed. Select the TimePeriod list element and switch to Code view. Insert the following code between the <select></select> tag pair: From the Snippets panel, insert the Recipes > Journal > CustomCode_PHP > Journal Archive Time Period Menu snippet. <?php foreach($dataArray as $temp){ $tempArray = explode("*",$temp); if($tempArray[1] == $_POST['TimePeriod']){ echo "<option value='" . $tempArray[1] . "' selected>" .$tempArray[0] . "</option>"; } else { echo "<option value='" . $tempArray[1] . "'>" .$tempArray[0] . "</option>"; } } ?> In Design view, select the form tag from the Tag Selector. In the Property inspector, enter the following code in the Action field:
| archive.php?ID=<?php echo $_GET['ID']; ?> |
Save your page.
Step 6: Add Repeat Region The Repeat Region server behavior is used to show all the entries in the selected period of the current journal. Select any of the dynamic data fields in the entries content area. From the Tag Selector, choose the table row tag. Select the <tr> tag from the Tag Selector. From the Server Behaviors panel, choose Add (+) and select Repeat Region. In the Repeat Region dialog, choose the desired recordset. Choose Entries from the Recordset list. Set the Show option to display however many records you want. Choose Show All Records. Click OK when you're done and save your page.
Step 7: Move TimePeriods Recordset The TimePeriods recordset relies on values derived from the Journal recordset and, in turn, passes other values onto the Entries recordset. To fully carry out its functions, the TimePeriod recordset needs to be moved from its current location and placed after the Journal recordset and before the Entries recordset. From the Server Behaviors panel, select the TimePeriods recordset. In Code view, extend the selection to include the three associated parameters and cut it. The selected code should include:
| [View full width] <% Dim TimePeriods__IDParam TimePeriods__IDParam = "10" If (Journal.Fields("JournalID").value <> "") Then TimePeriods__IDParam = Journal.Fields("JournalID").value End If %> <% Dim TimePeriods__PeriodField TimePeriods__PeriodField = "Month" If (PeriodColumn <> "") Then TimePeriods__PeriodField = PeriodColumn End If %> <% Dim TimePeriods__ArchPeriod TimePeriods__ArchPeriod = "Date3" If (ArchPeriod <> "") Then TimePeriods__ArchPeriod = ArchPeriod End If %> <% Dim TimePeriods Dim TimePeriods_numRows Set TimePeriods = Server.CreateObject("ADODB.Recordset") TimePeriods.ActiveConnection = MM_Recipes_VB_STRING TimePeriods.Source = "SELECT DISTINCT (" + Replace (TimePeriods__PeriodField, "'", "''") + ") AS Period, " + Replace(TimePeriods__ArchPeriod, "'", "''") + " AS IncludeDate FROM JournalArchiveDates WHERE EntryJournal = " + Replace(TimePeriods__IDParam, "'", "''") + " ORDER BY " + Replace(TimePeriods__ArchPeriod, "'", "''") + " DESC" TimePeriods.CursorType = 0 TimePeriods.CursorLocation = 2 TimePeriods.LockType = 1 TimePeriods.Open() TimePeriods_numRows = 0 %> |
| [View full width] <% var TimePeriods__IDParam = "10"; if (String(Journal.Fields("JournalID").value) != "undefined" && String(Journal.Fields("JournalID").value) != "") { TimePeriods__IDParam = String(Journal.Fields("JournalID") .value); } %> <% var TimePeriods__PeriodField = "Month"; if (String(PeriodColumn) != "undefined" && String(PeriodColumn) != "") { TimePeriods__PeriodField = String(PeriodColumn); } %> <% var TimePeriods__ArchPeriod = "Date3"; if (String(ArchPeriod) != "undefined" && String(ArchPeriod) != "") { TimePeriods__ArchPeriod = String(ArchPeriod); } %> <% var TimePeriods = Server.CreateObject("ADODB.Recordset"); TimePeriods.ActiveConnection = MM_Recipes_STRING; TimePeriods.Source = "SELECT DISTINCT ("+ TimePeriods__PeriodField.replace(/'/g, "''") + ") AS Period, "+ TimePeriods__ArchPeriod.replace(/'/g, "''") + " AS IncludeDate FROM JournalArchiveDates WHERE EntryJournal = "+ TimePeriods__IDParam.replace(/'/g, "''") + " ORDER BY "+ TimePeriods__ArchPeriod.replace(/'/g, "''") + " DESC"; TimePeriods.CursorType = 0; TimePeriods.CursorLocation = 2; TimePeriods.LockType = 1; TimePeriods.Open(); var TimePeriods_numRows = 0; %> |
| [View full width] <cfquery name="TimePeriods" datasource="Recipes"> SELECT DISTINCT (#PeriodColumn#) AS Period, #ArchPeriod# AS IncludeDate FROM JournalArchiveDates WHERE EntryJournal = #IDparam# ORDER BY #ArchPeriod# DESC </cfquery> |
| [View full width] $IDParam_Archive = "1"; if (isset($_GET['ID'])) { $IDParam_Archive = (get_magic_quotes_gpc()) ? $_GET['ID'] : addslashes($_GET['ID']); } mysql_select_db($database_Recipes, $Recipes); $query_Archive = sprintf("SELECT EntryID, EntryJournal, EntryBy, EntryTitle, EntryText, unix_timestamp(EntryDate) AS EntryDateTimeStamp FROM JournalEntries WHERE EntryJournal = %s ORDER BY unix_timestamp(EntryDate) ASC ", $IDParam_Archive); $Archive = mysql_query($query_Archive, $Recipes) or die (mysql_error()); $row_Archive = mysql_fetch_assoc($Archive); $totalRows_Archive = mysql_num_rows($Archive); |
Place the cursor below the Journal recordset and press Ctrl-V (Command-V) to paste in the cut code. Be sure to save your page before continuing.
Step 8: Establish Variables With the TimePeriods recordset in the proper location, we can now place the necessary custom code. ASP and ColdFusion need only declare and define two variables (ArchPeriod and PeriodColumn) to be used. PHP, on the other hand, has a bit more to do to enable the date manipulation required. In Code view, place the cursor above the just-moved TimePeriods recordset (and below the Journal recordset) and insert the following code: From the Snippets panel, open the Recipes > Journal > Custom Code folder for your server model and insert the TimePeriod RS - Variable Declarations snippet.
| [View full width] <% Dim ArchPeriod, PeriodColumn ArchPeriod = "Date" & Journal.Fields("JournalArchive").value PeriodColumn = "Month" if (Journal.Fields("JournalArchive").value=1) then PeriodColumn = "Day" if (Journal.Fields("JournalArchive").value=2) then PeriodColumn = "Week" %> |
| <% var ArchPeriod = "Date"+Journal.Fields("JournalArchive").value; var PeriodColumn = "Month"; if (Journal.Fields("JournalArchive").value==1) PeriodColumn = "Day"; if (Journal.Fields("JournalArchive").value==2) PeriodColumn = "Week"; %> |
| <cfset ArchPeriod = "Date" & Journal.JournalArchive> <cfset PeriodColumn = "Month"> <cfif (Journal.JournalArchive EQ "1")> <cfset PeriodColumn = "Day"> </cfif> <cfif (Journal.JournalArchive EQ "2")> <cfset PeriodColumn = "Week"> </cfif> |
From the Snippets panel, insert the Recipes > Journal > Custom Code_PHP > TimePeriod Code snippet: [View full width] $dataArray = ""; for($i=0;$i<$totalRows_Archive - 1;$i++){ $date = $row_Archive['EntryDateTimeStamp']; $day = date("d",$date); $month = date("m",$date); $year = date("Y",$date); if($row_Journal['JournalArchive'] == 1){ $label = date("D M d Y",$date); $startDate = mktime(0,0,0,$month,$day,$year); $endDate = mktime(23,59,59,$month,$day,$year); $value = "1/" . $startDate . "/" . $endDate; } if($row_Journal['JournalArchive'] == 2){ $startDay = date("w",$date); $startWeek = mktime(0,0,0,$month,$day - $startDay,$year); $endWeek = mktime(0,0,0,$month,$day - $startDay + 7,$year); $label = date("d/m",$startWeek) . "-" . date("d/m",$endWeek). " " . date("Y",$endWeek); $value = "2/" . $startWeek . "/" . $endWeek; } if($row_Journal['JournalArchive'] == 3){ $daysInMonth = date("t",$date); $startMonth = mktime(0,0,0,$month,1,$year); $endMonth = mktime(0,0,0,$month,$daysInMonth,$year); $label = date("F Y", $startMonth); $value = "3/" . $startMonth . "/" . date("Y-m-d",$endMonth); } $temp = $label . "*" . $value; if($i == 0){ $dataArray[] = $temp; } else { if(!in_array($temp,$dataArray)){ $dataArray[] = $temp; } } $row_Archive = mysql_fetch_assoc($Archive); } if(strlen($_POST['TimePeriod']) > 0){ $tempArray = explode("/",$_POST['TimePeriod']); $ArchiveWhere = " AND unix_timestamp(EntryDate) < " . $tempArray[2]. " AND unix_timestamp(EntryDate) > " . $tempArray[1]; }
Save your page.
PHP users can skip the following step and proceed to the final one, Step 10. Step 9: Add Custom SQL Clause It's time to insert the custom WHERE clause, which adds an additional filter to the Entries recordset and effectively displays only the entries of the selected archive period. The necessary custom code is applied in two steps: first, a separate code block is added that puts the proper values into the ArchiveWhere variable. Then a code line is inserted into the Entries recordset to integrate the ArchiveWhere filter. Note This step is not necessary for PHP developers as the functionality added here was integrated into the custom code added in the last step.
In Code view, place the cursor before the SQL parameters associated with the Entries recordset and insert the following code: From the Snippets panel, open the Recipes > Journal > Custom Code folder for your server model and insert the Entries RS - ArchiveWhere snippet.
| [View full width] <% Dim ArchiveWhere ArchiveWhere = " AND EntryDate >= Date()" if (Journal.Fields("JournalArchive").value = 2) then ArchiveWhere = " AND EntryDate >= Date()-7 AND DatePart('ww' ,EntryDate) = DatePart('ww',Date())" if (Journal.Fields("JournalArchive").value = 3) then ArchiveWhere = " AND EntryDate >= Date()-31 AND DatePart('m' ,EntryDate) = DatePart('m',Date())" %> <% if (cStr(Request("TimePeriod"))<>"") then ArchiveWhere = " AND EntryDate >= #" & cStr(Request ("TimePeriod")) & "# AND EntryDate < #" & cStr(Request ("TimePeriod")) & "# + 1" if (Journal.Fields("JournalArchive").value = 2) then ArchiveWhere = " AND EntryDate >= #"+cStr(Request ("TimePeriod")) & "# AND EntryDate < #" & cStr(Request ("TimePeriod")) & "# + 7" if (Journal.Fields("JournalArchive").value = 3) then ArchiveWhere = " AND EntryDate >= #"+cStr(Request ("TimePeriod")) & "# AND EntryDate < #" & cStr(Request ("TimePeriod")) & "# + 31 AND DatePart('m',EntryDate) = DatePart ('m',#"+String(Request("TimePeriod"))+"#)" end if %> |
| [View full width] <% var ArchiveWhere = " AND EntryDate >= Date()"; if (Journal.Fields("JournalArchive").value == 2) ArchiveWhere = " AND EntryDate >= Date()-7 AND DatePart('ww' ,EntryDate) = DatePart('ww',Date())"; if (Journal.Fields("JournalArchive").value == 3) ArchiveWhere = " AND EntryDate >= Date()-31 AND DatePart('m' ,EntryDate) = DatePart('m',Date())"; %> <% if (String(Request("TimePeriod"))!="undefined") { var ArchiveWhere = " AND EntryDate >= #"+ String(Request ("TimePeriod"))+"# AND EntryDate < #"+ String(Request ("TimePeriod"))+"# + 1"; if (Journal.Fields("JournalArchive").value == 2) ArchiveWhere = " AND EntryDate >= #"+String(Request ("TimePeriod"))+ "# AND EntryDate < #"+String(Request ("TimePeriod"))+"# + 7"; if (Journal.Fields("JournalArchive").value == 3) ArchiveWhere = " AND EntryDate >= #"+String(Request ("TimePeriod"))+ "# AND EntryDate < #"+String(Request ("TimePeriod"))+"# + 31 AND DatePart('m',EntryDate) = DatePart('m',#"+String(Request("TimePeriod"))+"#)"; } %> |
| [View full width] <cfset ArchiveWhere = " AND EntryDate >= Date()"> <cfif (Journal.JournalArchive EQ 2)> <cfset ArchiveWhere = " AND EntryDate >= Date()-7 AND DatePart('ww',EntryDate) = DatePart('ww',Date())"> </cfif> <cfif (Journal.JournalArchive EQ 2)> <cfset ArchiveWhere = " AND EntryDate >= Date()-31 AND DatePart('m',EntryDate) = DatePart('m',Date())"> </cfif> <cfif isDefined("Form.TimePeriod") > <cfset ArchiveWhere = " AND EntryDate >= ##" & Form .TimePeriod & "## AND EntryDate < ##" & Form.TimePeriod & "## + 1"> <cfif (Journal.JournalArchive EQ 2)> <cfset ArchiveWhere = " AND EntryDate >= ##" & Form .TimePeriod & "## AND EntryDate < ##" & Form.TimePeriod & "## + 7"> </cfif> <cfif (Journal.JournalArchive EQ 3)> <cfset ArchiveWhere = " AND EntryDate >= ##" & Form .TimePeriod & "## AND EntryDate < ##" & Form.TimePeriod & "## + 31 AND DatePart('m',EntryDate) = DatePart('m',##"+Form .TimePeriod+"##)"> </cfif> </cfif> |
Save your page.
The second half of this code adjustment is to append the ArchiveWhere variable, just programmed, to the proper place in the Entries recordset. Locate the Entries recordset in Code view and place the cursor in the appropriate place to add the following code. From the Recipes > Journal > CustomCode folder for your server model, insert the Entries RS Append ArchiveWhere snippet. Place the cursor on a new line after the SQL declaration and add: Entries.Source = Entries.Source & ArchiveWhere & "ORDER BY EntryID DESC". Place the cursor on a new line after the SQL declaration and add: Entries.Source += ArchiveWhere + "ORDER BY EntryID DESC". Place the cursor at the end of the SQL declaration and add: #ArchiveWhere# Order By EntryID DESC. Save your page when you're done.
Step 10: Activate List with JavaScript The final step on the Archive page is to activate the Time Period drop-down list. With a bit of JavaScript and a standard Dreamweaver behavior, we'll be able to submit the form containing the list whenever the user makes a different selection from the list. After the form is submitted, a new Entries recordset is created, and the journal entries for the requested archive period are displayed. In Design view, select the TimePeriod list form element. From the Behaviors panel, choose Add (+) and select Call JavaScript from the list. In the Call JavaScript dialog field, enter code to submit the current form: In the JavaScript field, enter document.ChangeTimePeriod.submit(). Click OK to apply the behavior and save your page.
This page, and the entire application, are now complete and ready for testing and deployment. When browsing the Archive page, select the TimePeriod list to view different archives. Use the Journal navigation to visit the Journal Manager and then select view under the Archive column to inspect the archives of a different journal [r7-17].
Figure r7-17. 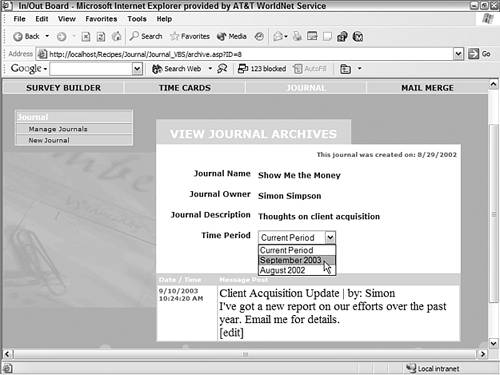
|