| As the workgroup shifts from one project to another, the journal becomes an important tool for past as well as ongoing communication. Several journals could evolve out of one project from individuals or subgroups, or a workgroup might want to check how a similar situation was regarded in journals for previous projects. Regardless of the reason, it's undeniably handy to have a central point from which journals can be viewed, new entries can be published, archived journals can be read, and current entries can be removed. The Manage Journal page is designed to fill all those requirements. The data source engine behind the Manage Journal page is very straightforward: Only a simple recordset connection to a single data table, Journals, is needed. Most of the page's features come from connecting to a related page and passing a record-identifying parameter. Only aspects of the delete function require hand-coding of any sort. Rather than deleting one journal at a time, this page demonstrates how to mark any number of records for deletion and then remove them all with a single operation. Note Although Manage Journal is listed in this chapter as an administrator recipe, it could easily fit in the user category. Just as administrators might want to view and manage the various journals from various individuals, it's entirely likely that individuals could own or participate in multiple journals.
Step 1: Implement Manage Journals Design Like most pages where the focus is on managing dynamic applications, the primary design element on the Manage Journals page is a table with a repeating row. In the row, you'll find basic identifiersthe journal name and owneras well as links for performing related functions, such as viewing or editing the journal entries. We've included a less common option here, the delete checkbox, to make journal cleanup as effortless as possible. 1. | In the server model of your choice, create a dynamic page.
 In the Journal folder, locate the folder for your server model and open the manage_journals page from there. In the Journal folder, locate the folder for your server model and open the manage_journals page from there.
| 2. | Add a table to the content region of your page to contain the interface elements for the application.
From the Snippets panel, drag the Recipes > Journal > Wireframes > Manage Journals - Wireframe snippet into the Content editable region.
| 3. | Insert the form and a table with two rows and six columns. The top row should have the following labels: Journal Name, Journal Owner, Journal, Publish, Archive, and Delete. A checkbox form element should be placed under the Delete column, and the form should also include a form button labeled Delete.
Place your cursor in the row below the words MANAGE JOURNALS and insert the Recipes > Journal > Forms > Manage Journals - Form snippet [r6-1].
r6-1. 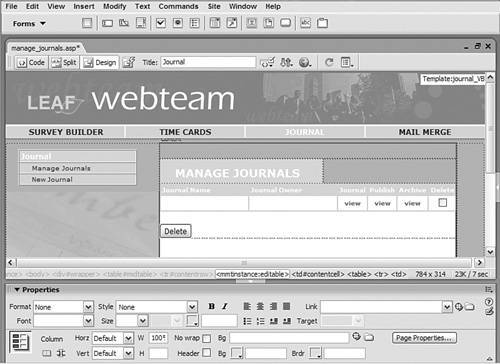
| 4. | Save the file.
|
Avoiding Unexpected User Error One of the true skills of an application designer is anticipatingand avoidingerrors caused by inappropriate user actions. In this recipe, for example, a server-side error is generated if the user selects none of the delete checkboxes but clicks the Delete button. To sidestep this issue, one course is to initially disable the Delete button by adding the parameter disabled to the button code so that it reads: [View full width] <input name="Delete" type="submit" value="Delete"  disabled> disabled>
The second part of this solution is to enable the Delete button if any of the corresponding checkboxes are selected. You'd accomplish this goal using JavaScript code to reset the attribute of the Delete button and enable the button. The JavaScript coding for this can be tricky, but luckily there's a ready-made solution at hand: WA Validation Toolkit from WebAssist. One of the advanced features this Dreamweaver extension offers is the Enable/Disable Form Elements behavior. Apply this behavior to each of the checkboxes with the trigger form element set to Entire page and the Delete button set to be enabled. To handle a secondary unexpected user errorchecking and then clearing the Delete checkbox prior to clicking Deleteyou'll need to make sure that the Delete button is disabled again. Applying a Required/Not Blank/Enabled validation to the checkboxes, also available in the WA Validation Toolkit, does the trick. |
Step 2: Add Database Components The recordset used on this page is one of the simplest varieties. All the data comes from a single data table, Journals, and it is not filtered or sorted in any way. We basically want to get all the journal information on the page so the user can interact with it. 1. | From the Bindings panel, choose Add (+) and select Recordset (Query).
| 2. | In the simple Recordset dialog, enter an appropriate name.
Enter Journal in the Name field.
| 3. | Select the data source connection.
Choose Recipes from the Connection (Data Source) list.
| 4. | Choose the needed table.
From the Tables list, select Journals (journals for PHP).
| 5. | Leave the Columns option set to All.
| 6. | Make sure the Filter is set to None.
| 7. | Keep the Sort option set to None and click OK to close the dialog.
| 8. | Save the page after the recordset is inserted.
|
Step 3: Data Binding Process Only two data fields are needed on the pagethe journal name and the journal owner. The journal owner field is added to offset the possibility that journals could have similar names. 1. | From the Bindings panel, expand the Journal recordset.
| 2. | Place the data fields on the page in their proper places.
Drag JournalTitle into the cell below the Journal Name label.
Drag JournalOwner into the cell below the Journal Owner label.
| 3. | When you're done, save the page [r6-2].
r6-2. 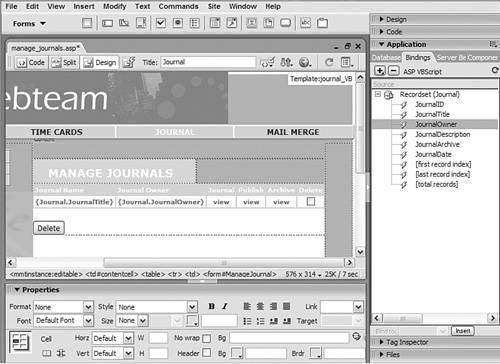
|
Step 4: Add Links to Manage Journals Page One of the main purposes of the Manage Journals page is to act as a gateway to associated pages. Through this page, you can edit the journal entry itself, view information on any listed journal, add an entry to that journal, or display the entries of the journal in an archive format. This interaction is all accomplished in the same mannera page is linked to with an identifying parameter passed in the URL. In each case, the unique data field JournalID is referenced and used to filter the resulting recordset. Let's start by creating a link to edit the selected journal: 1. | Select the text or image you want to link to the journal application.
Choose the Journal.JournalTitle data field below the Journal Name label.
| 2. | Click the folder icon next to the Link field in the Property inspector.
The Select File dialog opens.
| 3. | Make sure the dialog is set to Select File Name From File System.
| 4. | Choose Parameters at the bottom of the dialog.
| 5. | In the Name column of the Parameters dialog, enter the variable name.
Enter ID in the Name column.
| 6. | In the Value column, enter the dynamic value of the current survey's ID.
Click the lightning bolt icon next to the Value column and, from the Dynamic Data dialog, choose JournalID. When you're done, click OK once to close the Dynamic Data dialog, and again to close the Parameters dialog.
| 7. | In the Select File dialog, select the file that will be used to edit the survey information.
Choose edit_journal in the Journal folder for your server model.
| 8. | When you're done, click OK to insert the link.
|
Now we add a link to view the journal and its associated entries: 1. | Select the text or image you want to link to the journal application.
Choose the word view below the Journal label.
| 2. | Click the folder icon next to the Link field in the Property inspector.
The Select File dialog opens.
| 3. | Make sure the dialog is set to Select File Name From File System.
| 4. | Choose Parameters at the bottom of the dialog.
| 5. | In the Name column of the Parameters dialog, enter the variable name.
Enter ID in the Name column.
| 6. | In the Value column, enter the dynamic value of the current survey's ID.
Click the lightning bolt icon next to the Value column and, from the Dynamic Data dialog, choose JournalID. When you're done, click OK once to close the Dynamic Data dialog, and again to close the Parameters dialog.
| 7. | In the Select File dialog, select the file that will be used to edit the survey information.
Choose journal in the Journal folder for your server model.
| 8. | When you're done, click OK to insert the link.
|
Next we'll create a link so that new entries can be created for a particular journal. 1. | Select the text or image you want to link to the journal application.
Choose the word view below the Publish label.
| 2. | Click the folder icon next to the Link field in the Property inspector.
The Select File dialog opens.
| 3. | Make sure the dialog is set to Select File Name From File System.
| 4. | Choose Parameters at the bottom of the dialog.
| 5. | In the Name column of the Parameters dialog, enter the variable name.
Enter ID in the Name column.
| 6. | In the Value column, enter the dynamic value of the current survey's ID.
Click the lightning bolt icon next to the Value column and, from the Dynamic Data dialog, choose JournalID. When you're done, click OK once to close the Dynamic Data dialog, and again to close the Parameters dialog.
| 7. | In the Select File dialog, select the file that will be used to edit the survey information.
Choose journal_publisher in the Journal folder for your server model.
| 8. | When you're done, click OK to insert the link.
|
Finally, let's link to the archive page that offers access to the full range of entries for a journal. 1. | Select the text or image you want to link to the journal application.
Choose the word view below the Archive label.
| 2. | Click the folder icon next to the Link field in the Property inspector.
The Select File dialog opens.
| 3. | Make sure the dialog is set to Select File Name From File System.
| 4. | Choose Parameters at the bottom of the dialog.
| 5. | In the Name column of the Parameters dialog, enter the variable name.
Enter ID in the Name column.
| 6. | In the Value column, enter the dynamic value of the current survey's ID.
Click the lightning bolt icon next to the Value column and, from the Dynamic Data dialog, choose JournalID. When you're done, click OK once to close the Dynamic Data dialog, and again to close the Parameters dialog.
| 7. | In the Select File dialog, select the file that will be used to edit the survey information.
Choose archive in the Journal folder for your server model.
| 8. | When you're done, click OK to insert the link.
|
Step 5: Adding Repeat Region The Repeat Region server behavior is put to work here to display all the existing journals along with the appropriate links and delete options. You'll notice that the checkbox is included in the Repeat Region; a special technique, discussed in the next step, is needed to identify the individually selected elements. 1. | Select any of the dynamic data fields.
| 2. | From the Tag Selector, choose the table row tag.
Select the <tr> tag from the Tag Selector.
| 3. | From the Server Behaviors panel, choose Add (+) and select Repeat Region.
| 4. | In the Repeat Region dialog, choose the recordset.
Choose Journal from the Recordset list.
| 5. | Set the Show option to display the number of records you want.
Choose Show All Records.
| 6. | Click OK when you're done [r6-3].
r6-3. 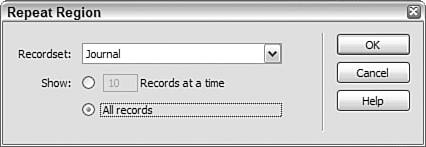
|
Naturally, if you are working with a great number of journals, you should consider limiting the number of visible records in the Repeat Region and add recordset navigation controls, as was done in Recipe 2, "Employee Lookup." Step 6: Create the Delete Function The delete function is the most complex aspect of the Manage Journals page. If we were deleting a single record, the standard Delete Record server behavior could be used, but because we are setting up the page to remove as many journals as selected, some custom steps are required. In all, four phases are needed: Make each checkbox unique. Add a delete record command. Adjust the position of the command. Make the command conditional on the Delete button being chosen.
We start by setting the checkbox value to a unique number, the JournalID. Because the checkbox is within the Repeat Region, all our checkboxes will have the same name. In such a situation, the values of the checkboxes are combined into a comma-separated list for ASP and ColdFusion; PHP follows the HTTP specifications more closely and uses an array (which will require one small step to name the checkbox properly). By using the JournalID as the value, our application will later be able to quickly identify which journals have been marked for deletion. 1. | Locate the checkbox placed under the Delete column.
| 2. | From the Bindings panel, expand the Journal recordset and drag JournalID onto the checkbox.
|
Macromedia Dreamweaver places the code for the selected data field into the checkbox's value attribute. PHP developers must alter the name of the checkbox for the array to function properly: 
| In the Property inspector, change the name from DeleteJournal to DeleteJournal[], appending the opening and closing square brackets that indicate an array to the form element's name. |
The second phase of this step is to insert a command to perform the delete operation for all the selected journals. SQL delete commands are applied to a specific recordset. The command added here dynamically builds the recordset to include only those journals with a selected Delete checkbox. This same technique is very flexible and can be applied to many different situations. For ASP Before you begin this step, you'll need to copy the SQL code from the appropriate snippet by opening the Recipes > Journal > Custom Code folder for your server model and right-clicking the Delete Journal - SQL Parameter snippet; then, from the context menu, choosing Copy Snippet. 1. | From the Bindings panel, choose Command.
| 2. | In the Command dialog, enter an appropriate name.
Enter DeleteCheck in the Name field.
| 3. | Choose the data source.
From the Connections list, choose Recipes.
| 4. | Set the type of command.
From the Type list, choose Delete.
| 5. | Leave the Return Recordset Named options blank.
| 6. | In the SQL area, enter the following code:
| DELETE FROM Journals WHERE JournalID = Delete_IDs
|
| 7. | In the Variable area, choose Add (+) to add a new SQL variable.
| 8. | Enter the name of the variable.
In the Name column, enter Delete_IDs.
| 9. | Insert the following code in the Run-time Value column.
Paste the copied SQL code into the SQL area by choosing Ctrl-V (Command-V).
Note ASP and ColdFusion users should refrain from testing the delete command until the remaining steps in this section are complete. 
| [View full width] Replace(Request("DeleteJournal"),", ","OR JournalID = ")
|

| [View full width] String(Request("DeleteJournal")).replace(/, /g," OR JournalID = ")
|
|
Click OK to insert the command. For ColdFusion Before you begin this step, place your cursor in any text on the page. Then, from the Snippets panel, right-click (Control-click) Recipes > Journal > Custom Code_CFML > Delete Journal - Command snippet, and then, from the context menu, choosing Copy Snippet. 1. | From the Bindings panel, choose Recordset (Query).
| 2. | In the Advanced Recordset dialog, enter an appropriate name.
Enter DeleteCheck in the Name field.
| 3. | Choose the data source.
From the Data Source list, select Recipes.
| 4. | Enter the user name and password, if required.
| 5. | In the SQL area, enter the following code:
In the SQL area, paste in the copied code snippet by choosing Ctrl-V (Command-V).

| DELETE FROM Journals WHERE JournalID = #Deleted_IDs#
|
The Deleted_IDs variable will be defined in a later step.
| 6. | Click OK to insert the command.
|
For PHP If you've worked on other recipes in this book that delete records, you're probably familiar with the code that PHP requires. Additionally, the form must be given an action conforming to the current page to properly execute the delete function. Although the custom code and the form modification are necessary, the good news is that no additional manipulation is needed; after this step is completed, the PHP page is done. 1. | In Code view, place the cursor near the top of the page after the line that begins <?php require_once and insert the following code:
From the Snippets panel, insert the Recipes > Journal > CustomCode_PHP > Manage Journals - Delete Records snippet.
| [View full width] <?php // Delete Journals if (isset($_POST['Delete']) && isset ($_POST['DeleteJournal'])) { $delArr = $_POST['DeleteJournal']; for ($k=0; $k < count($delArr); $k++) { $sql = "DELETE FROM journals WHERE JournalID = " . $delArr[$k]; mysql_select_db($database_Recipes, $Recipes); @mysql_query($sql,$Recipes); } header("Location: manage_journals.php"); } ?>
|
| 2. | Switch to Design view and select the form from the Tag Selector.
| 3. | In the Property inspector, choose the folder icon to open Select File dialog and select the current page, manage_journals.php.
| 4. | When you're done, save the page.
|
This page is now complete and can be tested with the sample data included in the book's files by switching to Live Data view. To insert your own data, you'll need to begin work on the next recipe, Add New Journal. Step 7: Complete the Delete Function (For ASP and ColdFusion Users) The next step in constructing the delete operation is to move the inserted code to the top of the file. 1. | Switch to Code view.
| 2. | In the Server Behaviors panel, choose the DeleteCheck command.
The command is selected in the code.
| 3. | The selected code should look like this (ASP users need to select the SQL parameter as well):
| <cfquery name="DeleteCheck" datasource="Recipes"> DELETE FROM Journals WHERE JournalID = #Deleted_IDs# </cfquery>
|
| 4. | Cut the code by choosing Edit > Cut or by pressing Ctrl-X (Command-X).
| 5. | Place the cursor near the top of the page below the data source connection code, and paste the code by choosing Edit > Paste or pressing Ctrl-V (Command-V).
| 6. | Save the page.
|
For ColdFusion ColdFusion users will need to complete an additional step to define the Deleted_IDs variable. 1. | In Code view, place the cursor above the DeleteCheck query.
| 2. | Insert the following code:
From the Snippets panel, insert Recipes > Journal > CustomCode_CFML > DeleteCheck CFQuery - Custom WHERE clause.
| [View full width] <cfif isDefined("Form.DeleteJournal")> <cfset Deleted_IDs=ListChangeDelims(Form .DeleteJournal," OR JournalID = ",", ")> <cfelse> <cfset Deleted_IDs=0> </cfif>
|
| 3. | Save the page.
|
For ASP The final step necessaryonly for ASPto complete the delete function is to make the code conditional. This is done by wrapping the existing delete command with an if-then statement that checks to see whether the Delete form button has been selected and, if so, executes the command. After the records are deleted, the current page is redisplayed. 1. | In Code view, locate and select the IDParam SQL parameter declaration and the DeleteCheck command near the top of the page.
| 2. | Insert the following code:
From the Snippets panel, open the Recipes > Journal > Custom Code folder for your server model and insert the If Statement - Delete Operation snippet.
| Before: | | | <% if (cStr(Request("Delete"))<>"" AND cStr(Request("DeleteJournal"))<>"") then %>
|
| After: | | | <% Response.Redirect("manage_journals.asp") end if %>
|
| Before: | | | [View full width] <% if (String(Request("Delete"))!="undefined" && String(Request("DeleteJournal"))!="undefined") { %>
|
| After: | | | <% Response.Redirect("manage_journals.asp") } %>
|
| 3. | Save the page.
|
The page is ready for testing, and the recipe data source includes sample data for viewing. |