| Each time card record represents a single job or task undertaken and completed by an employee. (The terms task detail and time card are used interchangeably in this recipe.) On the previous page, we included a link to a detail page so that the administrator could see all the information on a chosen time card. Now we'll build that page. In addition to the data entered in the original time cardsuch as the employee name, the job code, and the hoursa calculated field displays the number of weeks into the project. Finally, the Task Detail page will also contain a link to update the information in the record. Step 1: Implement Task Detail Design The Task Detail page needs to display basic information about the time card while remaining flexible. Most of the data pulled from the recordset will be displayed on a single line, such as the employee name and job code. However, one fieldthe task descriptioncould run several sentences or more. The layout design, like the nested table used in the snippet, must be capable of expanding to handle the additional content. 1. | In the server model of your choice, create a dynamic page.
 In the TimeCards folder, locate the folder for your server model and open the task_detail page from there. In the TimeCards folder, locate the folder for your server model and open the task_detail page from there.
| 2. | Add a table to the content region of your page to hold the labels and dynamic elements.
From the Snippets panel, drag the Recipes > TimeCards > Wireframes > Time Card Details - Wireframe snippet into the Content editable region.
| 3. | Insert a two-column table in which the right-justified first column is for the labels (Time Card Employee, Time Card Date, Task Description, Hours, Job Code, and Project Week) and the left-justified second column is for the dynamic data.
Place your cursor in the bottom row of the just-added snippet and insert the Recipes > TimeCards > ContentTables > Time Card Details - Content Table snippet.
| 4. | Save the file [r5-11].
r5-11. 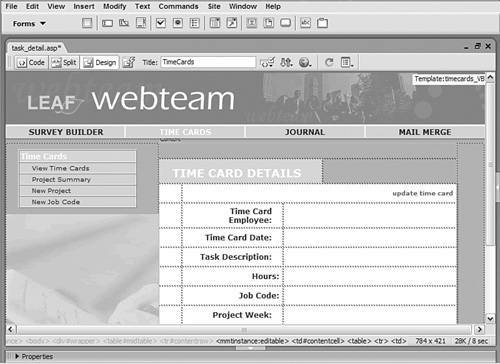
|
Step 2: Add Database Components The recordset for this page is restricted to details for a single time cardthe card chosen in the Hours Breakdown page. We'll use the value assigned to the URL parameter ID to filter the HoursBreakdown SQL query and thus create the recordset. As with other pages in the recipe, PHP users will need to add some custom code to the top of the page to simulate the queries and views. 1. | From the Bindings panel, choose Add (+) and select Recordset (Query).
| 2. | In the simple Recordset dialog, enter an appropriate name.
Enter CardDetails in the Name field.
| 3. | Select the data source connection.
Choose Recipes from the Connection (Data Source) list.
| 4. | Choose the needed table.
From the Tables list, select HoursBreakdown (hoursbreakdown for PHP).
| 5. | Leave the Columns option set to All.
| 6. | In the Filter area of the Recordset dialog, set the four Filter list elements like this:
CardID | = (Equals) | URL Parameter | ID |
| 7. | Keep the Sort option set to None and click OK to close the dialog.
| 8. | Save the page when you're done.
|
PHP users need to do the following: 1. | In Code view, place your cursor near the top of the page, after the line that begins <?php require_once, and insert the following code:
From the Snippets panel, insert the Recipes > TimeCards > CustomCode_PHP > Report Hoursbreakdown - Temporary Table snippet.

| [View full width] <?php // ProjectTimeCards Temporary Table mysql_select_db($database_Recipes, $Recipes); $sql = "DELETE FROM projecttimecards"; @mysql_query($sql,$Recipes); $sql = "INSERT INTO projecttimecards SELECT  projects.*, timecard.*,jobtypes.JobCode FROM projects, jobtypes LEFT JOIN timecard ON projects.ProjectID=timecard.CardProject WHERE timecard.CardJobTypeID = jobtypes.JobTypeID ORDER BY ProjectID"; @mysql_query($sql,$Recipes); // Hours Breakdown Temporary Table $sql = "DELETE FROM hoursbreakdown"; @mysql_query($sql,$Recipes); $sql = "INSERT INTO hoursbreakdown SELECT projecttimecards.ProjectID, projecttimecards.ProjectName, projecttimecards .ProjectManager, projecttimecards.ProjectHours, jobtypes.JobRate*projecttimecards.CardHours AS BillableAmount, ROUND((TO_DAYS(projecttimecards.ProjectDate) - TO_DAYS(projecttimecards.CardDate))/7) AS WeeksIn, projecttimecards.CardID,projecttimecards.CardDate, projecttimecards.CardDescription, projecttimecards .CardEmployee, projecttimecards.CardLogged, projecttimecards .CardJobTypeID, jobtypes.JobCode, SUM(timecard.CardHours) AS TotalHoursIn, projecttimecards.CardHours, projecttimecards .CardHours AS HoursIn, projecttimecards.CardProject, CONCAT('$',FORMAT (jobtypes.JobRate,2)) AS JobRate FROM projecttimecards LEFT JOIN jobtypes ON projecttimecards.CardJobTypeID = jobtypes .JobTypeID INNER JOIN timecard ON timecard.CardProject = projecttimecards .ProjectID GROUP BY projecttimecards.ProjectID, projecttimecards .ProjectName, projecttimecards.ProjectManager, projecttimecards .ProjectHours, projecttimecards.CardDate, projecttimecards .CardDescription, projecttimecards.CardEmployee, projecttimecards .CardLogged, projecttimecards.CardJobTypeID, projecttimecards .CardHours, projecttimecards.CardProject, projecttimecards .CardID, WeeksIn, jobtypes.JobRate HAVING BillableAmount IS NOT NULL ORDER BY projecttimecards.CardID DESC"; @mysql_query($sql,$Recipes); ?> projects.*, timecard.*,jobtypes.JobCode FROM projects, jobtypes LEFT JOIN timecard ON projects.ProjectID=timecard.CardProject WHERE timecard.CardJobTypeID = jobtypes.JobTypeID ORDER BY ProjectID"; @mysql_query($sql,$Recipes); // Hours Breakdown Temporary Table $sql = "DELETE FROM hoursbreakdown"; @mysql_query($sql,$Recipes); $sql = "INSERT INTO hoursbreakdown SELECT projecttimecards.ProjectID, projecttimecards.ProjectName, projecttimecards .ProjectManager, projecttimecards.ProjectHours, jobtypes.JobRate*projecttimecards.CardHours AS BillableAmount, ROUND((TO_DAYS(projecttimecards.ProjectDate) - TO_DAYS(projecttimecards.CardDate))/7) AS WeeksIn, projecttimecards.CardID,projecttimecards.CardDate, projecttimecards.CardDescription, projecttimecards .CardEmployee, projecttimecards.CardLogged, projecttimecards .CardJobTypeID, jobtypes.JobCode, SUM(timecard.CardHours) AS TotalHoursIn, projecttimecards.CardHours, projecttimecards .CardHours AS HoursIn, projecttimecards.CardProject, CONCAT('$',FORMAT (jobtypes.JobRate,2)) AS JobRate FROM projecttimecards LEFT JOIN jobtypes ON projecttimecards.CardJobTypeID = jobtypes .JobTypeID INNER JOIN timecard ON timecard.CardProject = projecttimecards .ProjectID GROUP BY projecttimecards.ProjectID, projecttimecards .ProjectName, projecttimecards.ProjectManager, projecttimecards .ProjectHours, projecttimecards.CardDate, projecttimecards .CardDescription, projecttimecards.CardEmployee, projecttimecards .CardLogged, projecttimecards.CardJobTypeID, projecttimecards .CardHours, projecttimecards.CardProject, projecttimecards .CardID, WeeksIn, jobtypes.JobRate HAVING BillableAmount IS NOT NULL ORDER BY projecttimecards.CardID DESC"; @mysql_query($sql,$Recipes); ?>
|
| 2. | Save the page after the code is inserted.
|
Step 3: Data Binding Process All six of the dynamic data elements required for this page can be dragged directly from the Bindings panel. While most are entries that were inserted into the record when the time card was created, one of the fieldsWeeksInis calculated by the HoursBreakdown SQL query to show how many weeks have elapsed since the time card was created . 1. | From the Bindings panel, expand the CardDetails recordset.
| 2. | Place the data fields on the page in their proper places.
| Drag CardEmployee into the cell next to the Time Card Employee label. | | | Drag CardDate into the cell next to the Time Card Date label. | | | Drag CardDescription into the cell next to the Task Description label. | | | Drag CardHours into the cell next to the Hours label. | | | Drag JobCode into the cell next to the Job Code label. | | | Drag WeeksIn into the cell next to the Project Week label. |
| 3. | When you're done, save the page [r5-12].
r5-12. 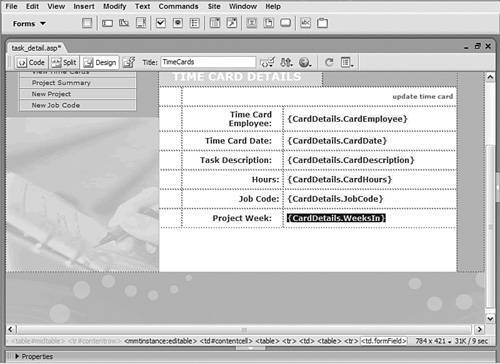
|
Step 4: Link to Time Card Update Page The final step for the Task Detail page is to add a link and parameter for modifying the current record. The Task Update page, described in the next recipe, will handle the update, but it needs a parameterthe Card IDto make sure it's modifying the correct record. 1. | Select the text or image you want to link to the detail page.
Choose update time card in the heading of the content table.
| 2. | Click the folder icon next to the Link field in the Property inspector.
The Select File dialog opens.
| 3. | Make sure the dialog is set to Select File Name From File System.
| 4. | Choose Parameters at the bottom of the dialog.
| 5. | In the Name column of the Parameters dialog, enter the variable name.
Enter ID in the Name column.
| 6. | In the Value column, enter the dynamic value of the current project's ID.
Click the lightning bolt icon in the Value column and, from the Dynamic Data dialog, expand the CardDetails recordset and choose CardID. When you're done, click OK once to close the Dynamic Data dialog, and again to close the Parameters dialog.
| 7. | In the Select File dialog, select the file that will be used to display the details of hours logged.
Choose task_update in the TimeCards folder for your server model.
| 8. | When you're done, click OK to insert the link.
|
|