Working with Flash MX
| Macromedia's decision to discontinue support of Generator in Flash MX is a significant blow to the further exploitation of the Flash Object architecture in Dreamweaver. However, communication between Dreamweaver and Flash is by no means dead. In fact, with Dreamweaver MX and Flash MX, a more robust data exchange is now possible. In addition to the basic functionality that permits round-trip editing of Flash movies from Dreamweaver, there are numerous ways to pass information between the two programs. Three of these methods will be examined in the remainder of this chapter:
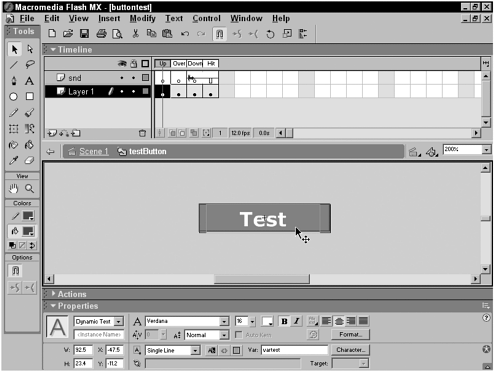
Communication between HTML and other web pages and Flash movies is a particularly vibrant field. Given Macromedia's recent emphasis on developing rich Internet applications, it's a safe bet that techniques for cross-application communication between Dreamweaver and Flash will continue to grow. Passing FlashVarsAlthough the FlashVars syntax was introduced in Flash MX, the concept has been available for several versions of the program. Basically, a FlashVars parameter passes a name /value pair to a corresponding variable in Flash. In earlier versions of Flash, this was done by appending an argument string to the src attribute, like this: <embed src="navbtn.swf?name=BigCo"> Although this technique still works in Flash MX, the preferred syntax is to use the FlashVars parameter: <embed src="navbtn.swf" flashvars="name=BigCo"> To be available on the widest range of browsers, the Flash movie should be inserted into the Web page using both the <object> and <embed> tags. In the <object> tag, the FlashVars attribute is enclosed in a <param> statement. A more complete version of our example would read like this: You can pass multiple name/value pairs to Flash by joining each pair with an ampersand: <param name="FlashVars" value="name=BigCo&onSale=yes"> To include special characters , the name/value pairs must be URL encoded. For example, my name in quotes would read %22Joseph%20Lowery%22 because %22 is the URL encoded value for a quotation mark and %20 is the encoded value for a space. The plus sign also can represent single spaces. TIP Dreamweaver's Property inspector is a handy tool for URL encoding complex text strings. However, you must be sure that your Preferences are set correctly. In the Code Rewriting category of Preferences, you'll see two entries under Special Characters. For this technique, you want to select the first one (Encode Special Characters in URLs Using %) and deselect the second one (Encode <, >, &, and " in Attribute Values Using %). With your Preferences set correctly, enter the string to be encoded in the Link field of the Text Property inspector while you're in Design view. Doing so creates a dummy link that you can remove later. Then switch to Code view and copy the URL encoded value from the href attribute of the <a> tag and paste it into the proper <param> statement. Be sure to delete the dummy link. On the Flash side, the implementation of FlashVars has a few restrictions. First, all variables affected by the FlashVars statement must be in the root timeline. Variables used in symbols, including buttons , are loaded before the Flash movie begins playing; therefore, they fall comfortably into this category. Second, the amount of data that can be passed is limited to 64K. Let's walk through the creation and implementation of a navigation button using the FlashVars technique that emulates Dreamweaver's Flash Buttons. The initial phase begins in Flash:
In Dreamweaver, insert the newly created Flash movie by dragging the movie from the Flash category of the Assets panel onto the page. The bulk of the code is entered automatically for youall that's left are the FlashVar statements. The easiest way to enter the FlashVar statements is to select the Flash movie and choose Parameters from the Property inspector. Then, under the Parameter column, enter FlashVars . Press Tab and then, under the Value column, enter the name/value pairs corresponding to the label variable and the conditional variable. Be sure to URL encode your entry. In my example, the FlashVars values are vartext=BigCo&showSymbol=yes . Entering values through the Parameter dialog box both creates <param> statements for the <object> tag and inserts the FlashVars attribute and its value into the <embed> tag. Using LoadVariables in FlashThe FlashVars technique is a decent small-scale solution, but for larger data transfers, there is a better way: the LoadVars object, which is new in Flash MX but a direct descendent of the LoadVariables action. LoadVars is similar to FlashVars in that they both rely on URL encoded name/value pairs, but the similarity between the two ends there. With LoadVars , variables no longer need to be in the root timeline. Furthermore, the restrictive 64K limit on data does not apply. The most important difference, however, is that unlike FlashVars , the LoadVars object can both receive and send data from a web application. With the advantage of two-way communication, designers can couple a Flash-designed front end with a Dreamweaver-coded backend. After a LoadVars object is created in Flash, a variety of methods are available for it. To create an instance of a LoadVars object, use this ActionScript syntax: formData = new LoadVars(); After an object is created, you can attach properties to it. The properties can either be strings or values from Flash input fields: formData.theNumber = "1"; formData.theName = namefield.text; If the variables are empty, it's a good idea to initialize the variables, like this: formData.theGuess = ""; Although the LoadVars object opens the lanes of communication, it's not instantaneous; the data transfer of name/value pairs takes time. To ensure that the transfer is complete before the data is used, the onLoad event handler invokes a separate functionknown generally as a callback function if the data is handled successfully: replyData.onLoad = playAnswer; In this example, the playAnswer() function is executed as soon as the onLoad event for the LoadVars object, replyData , is successful. The function called by the onLoad event accepts a Boolean argument, so make sure that the data transfer was successful. Test for a successful transfer like this: function playAnswer(success) { if(success) { //play mp3 } else { //alert user to error } } As noted earlier, data can either be loaded into or sent from Flash. In fact, there is single method that combines both types of communication: formData.sendAndLoad(submitURL,replyData,"POST"); In this code snippet, one instance of the LoadVar object formData is being sent while another replyData acts as a receptacle for data being received. The sendAndLoad method (as well as the corresponding single-operation send and load methods) takes three arguments:
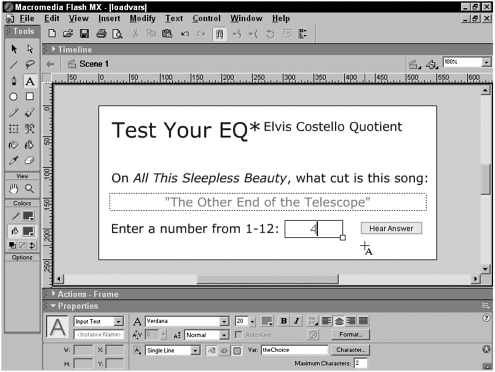
To illustrate the use of the LoadVars object, I've created a pseudo-quiz that tests the player's knowledge of Elvis Costello trivia. If the player gets the answer right (sending the guess from a Flash user interface to the Dreamweaver-coded application), an MP3 clip filename is sent from the application to Flash to be played . In the Flash user interface (see Figure 8.4), one dynamic text field is used with the variable name of theChoice . Figure 8.4. This Flash application uses two instances of the LoadVars object: one for sending data and one for receiving it. The ActionScript code is fairly succinct and is shown in Listing 8-1 in its entirety: Listing 8-1 LoadVars_ex.fla (08_loadvars_ex.fla)With the Flash side of our LoadVars application complete, it's time to move over to Dreamweaver. The dynamic page called by the LoadVars objectin our example, it was http://localhost/loadvars_ex.asp is all server-side code and not a bit of HTML. You can, if you prefer, completely hand-code this page. In the following description, I'm going to use Dreamweaver to handle the connection and recordset basics. The basic responsibility of a server-side page used in a LoadVars technique is to receive any variables passed by Flash, use those variables to process a server-side function, and then pass the results back to Flash. In the example, my server-side page gets the value entered by the user representing the guess made in the trivia game, compares that value to a retrieved recordset, and then returns a corresponding filename, which is used to play an MP3 tune in Flash. Let's see how it works. NOTE To view the completed code, see Listing 8-2 at the end of this section. If you'd like to use Dreamweaver to create the basic page and recordset for you, do this:
When you're finished, you'll have a page with only server-side code, ready for Flash connectivity. In my example application, all the code necessary to receive the variable from Flash, process it, and return it is contained in one code block. I'm using ASP VBScript. To get the Flash-passed variable, I use a Request object: theGuess = Request("theGuess") Then I loop through an array of information from my recordset looking for a match. When a corresponding entry is found, the loop is broken and I have an index value, stored in pos , to use: For i = 0 to UBound(theArray,2) If cStr(theArray(1,i)) = theGuess Then pos = i Exit For End If Next Finally, we're ready to send the URL-encoded name/value pairs back to Flash. Again, the exact code will vary according to your server model, but here is how it's done in ASP VBScript: returnToFlash = "mpfilename=" & Server.URLEncode(theArray(2,pos)) & "&songtitle=" & Server.URLEncode(theArray(0,pos)) Response.Write(returnToFlash) In this example, I'm sending back two name value pairs: mpfilename and songtitle . The first will be used to play the MP3 file, whereas the second will display the name of the song. Here's the entire custom ASP code block: Listing 8-2 LoadVars_ex.asp (08_loadvars_ex.asp) <%@LANGUAGE="VBSCRIPT" CODEPAGE="1252"%> <!--#include file="../Connections/connCostello.asp" --> <% Dim rsBeauty Dim rsBeauty_numRows Set rsBeauty = Server.CreateObject("ADODB.Recordset") rsBeauty.ActiveConnection = MM_connCostello_STRING rsBeauty.Source = "SELECT * FROM cds ORDER BY cutnumber ASC" rsBeauty.CursorType = 0 rsBeauty.CursorLocation = 2 rsBeauty.LockType = 1 rsBeauty.Open() rsBeauty_numRows = 0 %> <% Dim theArray, i, theAnswer, theGuess theArray = rsBeauty.GetRows theGuess = Request.Form("theGuess") For i = 0 to UBound(theArray,2) If cStr(theArray(1,i)) = theGuess Then pos = i Exit For End If Next returnToFlash = "mpfilename=" & Server.URLEncode(theArray(2,pos)) & "&songtitle=" & Server.URLEncode(theArray(0,pos)) Response.Write(returnToFlash) %> <% rsBeauty.Close() Set rsBeauty = Nothing %> NOTE If you're passing more than just a couple of strings from the server to Flash or if the processing is fairly time intensive , consider adding a Now processing type message to the Flash movie to be displayed when the LoadVars object functions are working. Flash RemotingWhen Macromedia introduced Studio MX, it unleashed a powerhouse of connectivity with a tool called Flash Remoting. Flash Remoting enables direct connection between a rich clientFlashand a server-side component. Instead of being restricted to passing URL-encoded strings as with FlashVars and LoadVars , Flash Remoting permits virtually any kind of data object to be transferred: booleans, dates, arrays, and many more, including recordsets and queries. Flash Remoting is built into ColdFusion MX and JRun 4 and is available as an add-on for .NET and Java servers; to use it fully, you also need to install the Macromedia Flash Remoting Components, which add several APIs to Flash MX. The Macromedia Flash Remoting Components are available from the Macromedia site at www.macromedia.com/software/flash/flashremoting/. The ColdFusion configuration for Flash Remoting, used throughout this section, is extremely robust and, remarkably, it's fairly straightforward to implement. Here's an overview of the process:
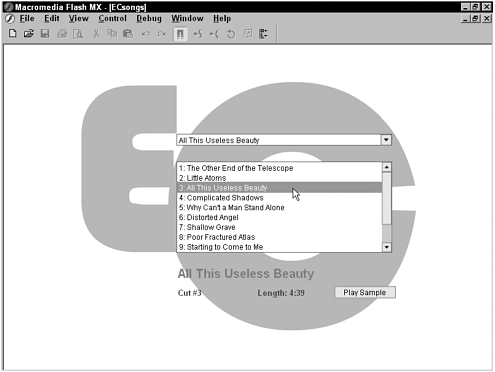
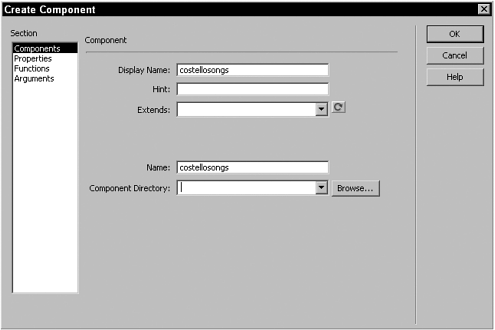
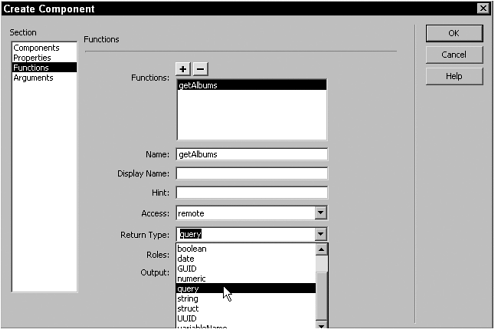
In the example that follows a Flash movie that displays details about specific songs found on user-selected CDsyou'll see how to actualize each of these steps. Coding a ColdFusion ComponentOne of the key factors contributing to the ease of use is the reliance on ColdFusion Components (CFCs). A CFC is a separate file stored on the ColdFusion server that contains processing functions. The functions in a CFC can be called either from a local ColdFusion application or a remote one. If the CFC is set to act as a remote type, it becomes a web service and is accessible to other applications, including Flash. A web service is a function or application that other applications can use. Dreamweaver provides an interface and structure for coding and implementing ColdFusion Components. Here's the basic CFC format for a local function: The structure is fairly straightforward. The <cfcomponent> tags surround one or more <cffunction> blocks. Within each uniquely named <cffunction> , the type of access is specifiedgenerally public or remote , although a <cffunction> can be private as welland the type of data to be returned. The <cfargument> is used to detail parameters that are passed to the function; a function can have as many <cfargument> tags as necessary. After the arguments are specified, the code representing the actual work of the function is presented. In my simple example, a single tag is used, <cfset myResult="foo"> . However, in real applications, the coding is much more involved. The CFC function is completed with the <cfreturn> tag, which passes a data object back to the calling application. To illustrate how ColdFusion Components work with Flash Remoting, I constructed a small application to display details about specific Elvis Costello songs, shown in Figure 8.5. Figure 8.5. Flash Remoting is used in this application to retrieve data objects from a ColdFusion data source. In the Flash movie, a list of albums is given in a drop-down list; the list is pulled from a data source query, which is contained in my CFC. After an album has been selected, the full list of songs on that album is displayed. Again, the song list is supplied by a CFC query. When a song title is chosen, details about that song, retrieved from a final CFC query, are displayed. In total, the CFC used for this application has three different functions, each triggered by different Flash events. NOTE To view the completed code, see listings 8-3 and 8-4 at the end of this section. As noted earlier, there are two basic routes to creating CFC: completely by hand or by combining the output of a Dreamweaver command, Create Component, with hand-coding . If you'd prefer to do it all by scratch, choose File > New and select Dynamic > ColdFusion Component as the page type. Dreamweaver creates a page with the basic code given in the beginning of this section. It's up to you to modify the page to build the specific functions needed. When you're ready, save the file in the ColdFusion web root. Dreamweaver automatically appends the .cfc extension. The disadvantage of the hand-coding approach is that you end up replacing much of the placeholder codein essence, doing twice the work. When you start with code generated by Dreamweaver's Create Component dialog box, although a few more steps are involved, your precise structurecomplete with function names , arguments, and return statementsis prepared. Here's how it is done:
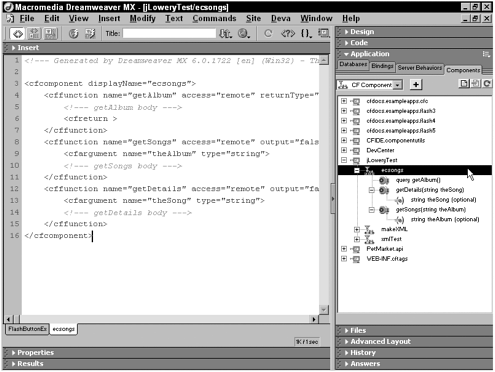
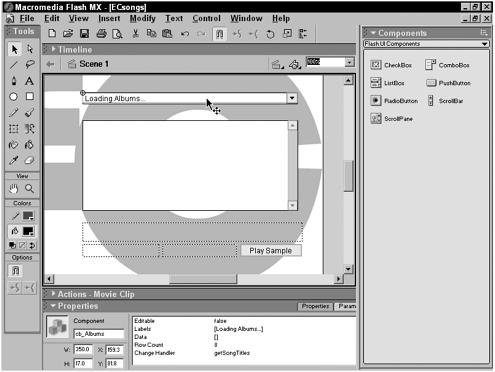
NOTE To simplify the creation of the CFC, I intentionally skipped over many of the available features of the Create Component dialog box. For details on all the options, choose Help > Using ColdFusion and then select the Building ColdFusion Components section. For the example, I created three functions, two of which used arguments, and all of which returned queries. The code generated by Dreamweaver looked like this: There are two key items to note: First, Dreamweaver inserts a comment where the code functionality needs to go for each function. Second, although the <cfreturn> statement is included, no value or variable is specified. The first function in the CFC example is called getAlbums , and its purpose is to gather a distinct list of albums from a data source and return them to Flash. To accomplish this, a <cfquery> statement is added and the results are returned, like the bold portion of the following code: <cffunction name="getAlbums" access="remote" returnType="query" output="false"> <cfquery name="q_albums" datasource="costello"> SELECT Distinct(album) FROM cds WHERE album is not NULL Order by album </cfquery> <cfreturn q_albums> </cffunction> The second function, getSongTitles , uses the passed argument, album, to control the SQL statement in a <cfquery> : <cffunction name="getSongTitles" displayName="getSongTitles" access="remote" returnType="query"> <cfargument name="thisAlbum" type="string" required="true"> <cfquery name="q_songs" datasource="costello"> SELECT songtitle,album,cutnumber FROM cds WHERE album = '#TRIM(thisAlbum)#' ORDER by cutnumber </cfquery> <cfreturn q_songs> </cffunction> The final function, getSongDetails , works in a similar fashion to getSongTitles , although rather than the value representing the album, a similar value representing the song title (based on a user selection in Flash) is passed to the function: <cffunction name="getSongDetails" access="remote" returnType="query" output="false"> <cfargument name="thisSong" type="string" required="true"> <cfquery name="q_songdetails" datasource="costello"> SELECT * FROM cds WHERE songtitle = '#thisSong#' </cfquery> <cfreturn q_songDetails> </cffunction> The Component panel represents one of the coolest features of Dreamweaver integration of CFCs. After the CFC is stored, you'll see it listed under its folder in the tree of the Component panel. As you drill down into the component, you'll see that each of the functions is exposedand even specific argumentsas shown in Figure 8.8; this facility is known as introspection . If you were invoking the CFC functions from another Dreamweaver-created page, the introspected functions could be dragged right onto the page. However, because we are connecting through Flash, the process is slightly different, as you'll see in the next section. Figure 8.8. ColdFusion Components are self documenting and can be introspected easily in Dreamweaver. Connecting to the Flash GatewayWith the ColdFusion Component constructed, the server side of a Flash Remoting application is finished and we can turn our attention to crafting the necessary Flash elements. The first step in such an application is generally to construct the user interface. Flash MX simplifies the process through the availability of Flash UI Components. The sample application, shown in Figure 8.9, uses a combo box, a list box, a push button, and numerous dynamic text fieldsall created with drag-and-drop ease in Flash. Figure 8.9. This Flash Remoting application user interface employs several Flash UI Components and dynamic text fields. The ActionScript for the application is generally placed on its own layer in the first frame of the movie. To use Flash Remoting functionality, you'll need to include several external ActionScript files: #include "NetServices.as" #include "NetDebug.as" #include "DataGlue.as" These three files are installed as part of the Flash Remoting Components. Flash automatically recognizes their locationyou don't have to specify additional paths. Only the NetServices.as file is required; however, the NetDebug.as file is helpful during the initial testing to make sure that all the connections are trouble free. In this case, DataGlue.as simplifies the displaying of recordset data in a list box. After the files are included, we're ready to open the Flash Remoting Gateway. Regardless of how many times the service is used, the gateway needs to be opened only once. Consequently, this type of code is often used as a container: if (isGatewayOpen == null) { isGatewayOpen = true; } The function is executed only if a flag has not been set. The actual opening of the gateway is handled in code like this: NetServices.setDefaultGatewayUrl("http://127.0.0.1:8500/flashservices/gateway"); gatewayConnnection = NetServices.createGatewayConnection(); The HTTP address designates a standalone ColdFusion server installed on a localhost; the port number, 8500, is the default ColdFusion port. The flash- services/gateway address is a logical path and not a physical one. The actual connection to the Flash Remoting Gateway is handled by the NetServices.createGatewayConnection() call. The next step is to create a Flash service object referring to the ColdFusion Components file, costellosongs.cfc : songService = gatewayConnnection.getService("beyond.fremoting.costellosongs", this); Note that the path to CFC, which is stored in folders within the ColdFusion web root, is designated with periods instead of slashes . Calling CFCs and Displaying ResponsesThe final element in the initialization routine for the example is to call the first function in the service: songService.getAlbums(); In this situation, a call to one of the CFC functions is required to populate a form elementa drop-down liston the interface. The calls to the other functions take place in response to user actions and are contained in separate ActionScript functions: As you can see, the second and third functions pass a user selection as an argument. In the case of the getSongTitles() function, the argument passes the album selected by the user, and with getSongDetails , the argument indicates the specific song that is selected. You'll recall that, in all cases in the example, the CFC returns query objects. Let's look now at how Flash receives data from the CFC. Corresponding to each Flash function that calls a CFC function is another function to gather the result, known as a responder . These responders use the same function name as the calling function with a _Result appended and an argument specified; therefore, the responder for getAlbums() is getAlbums_Result(result) . Generally, the responder function is also responsible for displaying the data in the Flash movie in some fashion, like this: The query object returned from the CFC getAlbums function is used by a method of Flash's combo box component, setDataProvider() , to populate the specified combo box instance. The other two lines in the function dynamically add a generic entry and set the selection to that entry. The getSongTitles_Result() function illustrates another technique to integrate returned data: function getSongTitles_Result(result) { DataGlue.bindFormatStrings(lb_Songs, result, "#cutnumber#: #songtitle#", "#songtitle#"); } The DataGlue.bindFormatStrings() function takes four arguments in this syntax: DataGlue.bindFormatStrings( dataConsumer , dataProvider , labelString , dataString ) where:
TIP The DataGlue API includes one other useful method, bindFormatFunction , which formats the data through a user-defined function. The syntax for the function is this: DataGlue.bindFormat Function(dataConsumer, dataProvider, formatFunction) The formatFunction referenced should return the results in this format: return {label: theLabel,data:theData}; The final method for displaying data results in our Flash Remoting example populates dynamic text fields rather than list or combo boxes. This flexible approach allows you to combine data with static text as well as data from separate fields. Here is how it is used in the example: To set a dynamic text fieldor any other variableto data returned via Flash Remoting, use this syntax: theVariable = dataProvider . items[0] . fieldname ; where:
In our example, the variables used were all assigned to dynamic text fields on the first frame, and the text fields were formatted with different font sizes, colors, and styles. This powerful type of data manipulation is really only possible because the ColdFusion Component, built in Dreamweaver, is able to pass entire recordsets to the Flash movie. Listing 8-3 costellosongs.cfc (08_costellosongs.cfc)<!--- Generated by Dreamweaver MX 6.0.1722 (Win32) - Wed Jun 26 17:16:26 GMT-0400 (Eastern Daylight Time) 2002 ---> <cfcomponent displayName="costellosongs" hint="Elvis Costello Songs"> //gets a list of all the albums in data source <cffunction name="getAlbums" access="remote" returnType="query"> <cfquery name="q_albums" datasource="costello" username="margot"> SELECT Distinct(album) FROM cds WHERE album is not NULL Order by album </cfquery> <cfreturn q_albums> </cffunction> //gets a list of all the song titles given a particular album <cffunction name="getSongTitles" displayName="getSongTitles" access="remote" returnType="query"> <cfargument name="album" type="string" required="true"> <cfquery name="q_songs" datasource="costello" username="margot"> SELECT songtitle,album,cutnumber FROM cds WHERE album = '#TRIM(album)#' ORDER by cutnumber </cfquery> <cfreturn q_songs> </cffunction> //gets details for the selected song <cffunction name="getSongDetails" access="remote" returnType="query" output="false"> <cfargument name="thisSong" type="string" required="true"> <cfquery name="q_songdetails" datasource="costello" username="margot"> SELECT * FROM cds WHERE songtitle = '#thisSong#' </cfquery> <cfreturn q_songDetails> </cffunction> </cfcomponent> Listing 8-4 ecsongs.fla (08_ecsongs.fla) #include "NetServices.as" #include "NetDebug.as" #include "DataGlue.as" if (isGatewayOpen == null) { // do this code only once isGatewayOpen = true; NetServices.setDefaultGatewayUrl("http://127.0.0.1:8500/flashservices/gateway"); gatewayConnnection = NetServices.createGatewayConnection(); songService = gatewayConnnection.getService ("beyond.fremoting.costellosongs", this); songService.getAlbums(); trace } function getSongTitles() { if (cb_Albums.getSelectedIndex() > 0) { songService.getSongTitles(cb_albums.getSelectedItem()); } } function getSongDetails() { songService.getSongDetails(lb_Songs.getValue()); } //Responders function getAlbums_Result(result) { // This function will be invoked by the server when it has finished processing cb_Albums.setDataProvider(result); cb_Albums.addItemAt(0, "Select an album", "NONE"); cb_Albums.setSelectedIndex(0); } function getSongTitles_Result(result) { DataGlue.BindFormatStrings(lb_Songs, result, "#cutnumber#: #songtitle#", "#songtitle#"); } function getSongDetails_Result(result) { _root.theSong=result.items[0].songtitle; _root.theCut="Cut #" + result.items[0].cutnumber; _root.theLength="Length: " + result.items[0].cutlength; } |
EAN: N/A
Pages: 87
