Setting Up Custom Pages
| You can use two approaches to set up custom pages ”one using Dreamweaver templates and the other using document types. The first method is the easiest to implement; it can be used both for standard templates in which certain areas of the page are locked and for fully editable pages, which include custom <meta> tags or comments. Following is the procedure for setting up custom pages by using a Dreamweaver template:
Although this technique is workable , it is less than ideal. The designer must remember where the template is located; templates are site specific, and it would be burdensome for the administrator to establish the custom page in every site on an ongoing basis. Moreover, the designer must keep an eye on the Update Page When Template Changes check box, especially if he is creating both standard templates and detached templates. This technique is perhaps best used for projects that are restricted to a small number of sites. TIP If a standard template is created by mistake, choose Modify > Templates > Detach from Template. The second method of creating a new custom base page is more involved, but it's an overall pervasive solution. Although it might not be obvious, the list of documents shown in the New Document dialog box is extensible. You can add both static and dynamic custom pages ”in regular or template format ” to the dialog box. After these pages are integrated into Dreamweaver, the designer just chooses the custom document type from the list. For a complete integration of a new document type, several areas must be addressed:
Adding a New Document TypeSeveral files found in Dreamweaver's Configuration/DocumentTypes folder control what appears in the New Document dialog box. The MMDocumentTypes.xml file describes the standard Dreamweaver documents shown in the dialog box. Although it's possible to customize this document, you shouldn't. Custom document types are best added by including a separate XML file following the same syntax as MMDocumentTypes.xml in the DocumentTypes folder. The MMDocumentTypes.xml file consists of a series of <documenttype> tags, one for each kind of file. Here, for example, is the entry for a basic HTML page: <documenttype id="HTML" internaltype="HTML" winfileextension= "htm,html,shtml,shtm,stm,lasso,xhtml" macfileextension= "html,htm,shtml,shtm,lasso,xhtml" file="Default.html"> <title> <MMString:loadString id="mmdocumenttypes_0" /> </title> <description> <MMString:loadString id="mmdocumenttypes_1" /> </description> </documenttype> The attributes within the <documenttype> tag define how the entry will appear within the New Document dialog box:
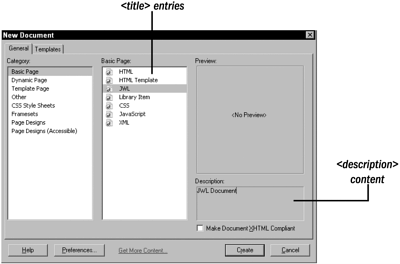
Two tags are within the <documenttype> tag: <title> and <description> . Both contain text strings (or references to text strings) that are used in the New Documents dialog box display. The content in the <title> tag displays in the category-specific list, whereas the <description> appears in the Description area (see Figure 1.1). Figure 1.1. Information defined in the Document Type XML file is shown in the New Document dialog box. Macromedia uses references to text entries within an external file (Configuration/Strings/documenttypes.xml) for localization purposes: <title> <MMString:loadString id="mmdocumenttypes_0" /> </title> <description> <MMString:loadString id="mmdocumenttypes_1" /> </description> Custom document types can use plain text, like this: <TITLE> JWL </TITLE> <description> JWL Document </description> As noted earlier, it's a better idea to define any custom document types in a separate XML file rather than to modify MMDocumentTypes.xml. To be most effective, the custom document type should be implemented at the administrator, not individual, user level. In that situation, if a new version of Dreamweaver were installed, any modified version of MMDocumentTypes.xml would be replaced . Moreover, there is no real need to alter the original file; Dreamweaver automatically reads any XML file stored in the DocumentTypes folder, incorporating the additions into the New Document dialog box. The custom XML file must follow the structure of the MMDocumentTypes.xml file with an opening XML declaration identifying the Macromedia XML namespace, followed by a <documenttypes> tag, which encloses one or more <documenttype> tags: Storing the PrototypeThe page prototype ”which could be either a static page or a Dreamweaver template ”should include everything to be repeated in every file. Both code in the <head> (such as <meta> tags or other custom tags necessary to work with the CMS) and common elements in the <body> (such as a copyright line) should be included. When completed, save the file in the Configuration\DocumentTypes\NewDocuments folder. Although you're under no obligation to comply , the convention is to name the file Default combined with the needed file extension ( Default.jwl) . Integrating the Document ExtensionsThe initial two steps ”creating the document type XML file and storing the prototype ”took care of making a new custom document. To open that document easily in Dreamweaver for editing, you need to perform two more steps. The first step allows custom extensions to appear in any of the Open or Select dialog boxes. To accomplish this, you need to modify the Extensions.txt file. This file is located in the root of the Configuration folder and can be edited directly in Dreamweaver. When you open the Extension.txt file, you'll see a number of entries like this: HTM,HTML,HTA,HTC:HTML Documents SHTM,SHTML,STM,SSI,INC:Server-Side Includes JS:JavaScript Documents Custom entries follow this format of extensions: description . For example, if I wanted to insert an entry for the JWL documents that use the .jwl extension, I would include this line: JWL:JWL Documents The order of entries in the file is the same as the order in the dialog box. You can insert custom entries anywhere in the list. Assigning the EditorThe final step to integrate a custom CMS file type into the Dreamweaver workflow is to make sure the file type is editable by Dreamweaver. You can accomplish this in two ways:
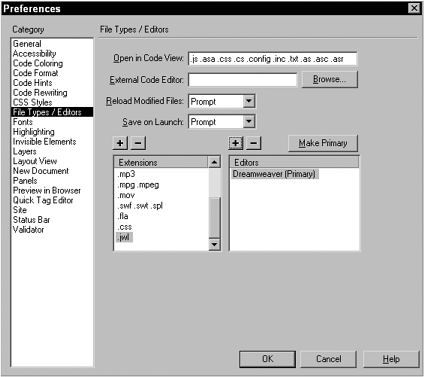
After you have completed either of these chores, double-click on any document with the custom extension in the Site panel to open that file in Dreamweaver for editing. TIP One file type can have more than one editor. Be sure to make Dreamweaver the primary editor if you want to be able to double-click on the file to open it. Otherwise, to open a custom file in the Site panel, right-click on the filename and choose Open With > Dreamweaver. |
EAN: N/A
Pages: 87

