Recipe 12.1. Building a Presentation Using the Built-in Template
ProblemYou want to create a presentation in Flash using a built-in template. SolutionOpen a new Flash document based on one of the presentation templates, modify the assets and timeline, and export. DiscussionFlash ships with four presentation templates with which you can create your own presentations. The templates provide the same functionality with the predefined ActionScript code. Essentially, the presentation that you export will pause on the first frame. The user can then navigate between the presentation's frames using the back and forward buttons on the stage or by using the right and left arrow keys on the keyboard. The benefit of the template is that you don't have to know any Action-Script to be able to create a simple presentation in relatively little time. But be aware that using the template does not allow for many bells and whistles. You can open a new Flash document based on a template by choosing File After you've opened a new document from a presentation template, you can see that it contains five frames. The movie will pause on the first frame when first run, and it will pause on each of the subsequent frames as you navigate through them using the buttons or the keyboard right and left arrows. Although there are several layers within the document, you need only keep the topmost layer labeled Actions. That layer contains all the ActionScript code that makes the application work when you export the movie. The other layers contain the artwork that you are likely to want to replace anyway. So you can feel free to delete all the layers but the Actions layer.
If you want to have a background that appears consistently behind the contents of each frame in your presentation, create a layer and then place the background artwork on the first and only keyframe in that layer. You may then want to lock the background layer so that you don't accidentally make changes to it later. Then create a layer for the contents that should change from frame to frame. Make sure that the new contents layer appears above the layer for the background. Create a new keyframe in the contents layer for each frame of your presentation, and place the corresponding artwork on the stage. Figure 12-1 shows an example of what your timeline might look like. You may notice from the figure that you do not need to add any extra keyframes or actions to the Actions layer, even if you add frames to the timeline beyond the default six frames. Figure 12-1. An example of a modified timeline from a Flash document based on a presentation template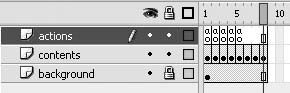 The preceding describes how to create a presentation that you can navigate using the keyboard's right and left arrow keys. However, with just a slight addition, you can add button-based navigation as well. All you need to do is add another layer to your timeline and place two button instances on the stage at the first (and only) keyframe in that layer. You don't need to assign any ActionScript to the buttons, but you do need to give them specific instance names. Place an instance of your back button symbol on the stage and, using the Property inspector, give it an instance name of backBtn. Do the same for your forward button symbol, and use the Property inspector to give it an instance name of forwardBtn. The specific instance names are important, because the ActionScript code in the template uses those instance names and assigns the necessary code to the corresponding buttons. Should you want to make the frames of your presentation a little livelier, you can, of course, add movie clip content to the keyframes on your content layer. Remember that movie clips can play back their timelines independently of the timeline in which the instances are placed. That means that even if you place an instance of a movie clip on a keyframe for which your presentation will be paused, the movie clip's timeline will play. This technique allows you to create animations within each frame of your presentation if you want. Also keep in mind that movie clips will loop their playback. You can use very simple ActionScript to stop the playback when the end of the movie clip's timeline has been reached. See Recipe 10.2 for more details on how to do that. See AlsoRecipe 10.2 |
 New or by pressing Ctrl-N or Command-N to bring up the New Document/New From Template dialog box. The dialog box has two tabsGeneral and Templates. Choosing the Templates tab reveals categories of built-in templates. You should choose the Presentation category, and you will see that there are four built-in presentation templates. Each only differs from the others by the design elements. Because you'll likely be choosing to use your own design, which template you choose is mostly irrelevant. Selecting the template and clicking OK opens a new Flash document already containing the template's content.
EAN: 2147483647
Pages: 336