Flylib.com

Books Software


Change Menu Colors


Change Menu Colors

Task #3

  Difficulty Level 2  

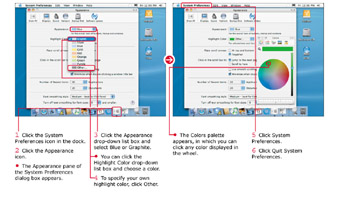
There are two colorful decisions that you have to make when customizing the look of your Panther desktop: You can set the Appearance color , which determines the coloring used in controls such as drop-down list boxes and buttons , and the Highlight color, which governs the color used when you highlight text in applications such as Word and Safari.

click to expand

Besides the aesthetic improvement to your desktop, customizing these colors may help some visually impaired Mac users recognize highlighted text and application or operating system controls more easily than they would with the default colors.

If you have switched to Panther’s reversed White on Black text option — using the settings in the Universal Access pane in System Preferences — these menu colors will naturally be disabled. The White on Black option is provided for those Mac users who have connected assistive devices, or Mac users who have trouble seeing the standard black on a white screen.


Switch Video Resolutions

Task #4

  Difficulty Level 2  

Mac OS X can use a number of different video resolutions, depending on the combination of the graphics card and monitor that you are using. You may want to switch to a higher resolution when you need to work on a large-format document — such as a super- sized digital photograph or a detailed PowerPoint slide. Many Mac users prefer a lower video resolution for playing games and general readability.

click to expand

Did You Know? 

If you enable the Show Displays in Menu Bar check box in the Displays pane of the System Preferences dialog box, you can also click the Monitor icon in the menu bar at the top of the Mac OS X desktop; a menu appears with the most common video resolutions, and you can switch immediately to another resolution by clicking the resolution that you want. If you need to make a change to the display settings in System Preferences, you can also open the Displays pane from this menu.


Use Font Smoothing

Task #5

  Difficulty Level 2  

Font smoothing is a feature designed to improve the appearance and readability of the text displayed on your monitor — whether that text is displayed within an application or on the Panther desktop. Mac OS X can reduce the jagged edges surrounding the text, making it look sharper.

click to expand

You can specify the maximum size for font smoothing, as well as choose the smoothing style to best fit the type of monitor that you are using (and your eyesight!).

Did You Know? 

You cannot turn off font smoothing altogether, but you can reduce the effects to as little as possible. This may be a good idea if you are working with an older monitor, or you would rather not spend the processing time. (The display speed of your Mac slows down slightly if you use font smoothing.) Set the smoothing style to Light and turn off smoothing for font sizes 12 and smaller.


Configure the clock

Task #6

  Difficulty Level 1  

click to expand

How could something as simple as a clock be so important? Try going without the correct time for an entire day! Apple recognizes the value of a good timepiece, and this is reflected in Mac OS X — where you can easily customize the appearance, behavior, and location of the desktop clock in the Date & Time pane of System Preferences.

click to expand

Panther provides a time announcement feature that I highly recommend. Enable the Announce the Time check box and specify the time period that you want; I find that this automated announcement helps me keep track of passing time while I work.

If you are traveling with your Mac notebook, you will probably need to change the time zone often. Panther makes this easy: Just select the closest city to your current location in the Time Zone pane, which is also a part of the Date & Time pane.

Panther enables you to switch to an international format for your clock’s date and time — but because all international formats are handled from the International pane in System Preferences, you will find a convenient Open International button to take you to the proper settings.

Did You Know? 

If your Mac has an Internet connection, you can configure Panther’s clock to automatically update the time from an Internet time server. To do so, in the Date & Time pane, click the Set Date & Time Automatically check box to enable it. You can then click the check box’s drop-down list box to select an Apple Internet time server.