Reverse Engineering, No Source Code Required
|
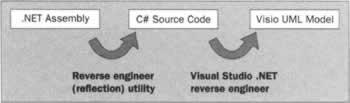
Visual Studio .NET allows you to reverse-engineer the source code for any project into a Visio for Enterprise Architects UML model. That's great if you have the source code available, but what if you don't? - and what if you're using a third-party library assembly and you'd like a representation of those third-party classes in your model? Taking this to its logical conclusion, wouldn't you like a UML representation of the .NET Framework classes themselves; simply to learn more about the framework or as the basis of your design models? In this section we'll discuss the idea of reverse engineering from a compiled .NET assembly, with no source code required. In doing so we'll bring the functionality of the Visual Studio .NET and Visio for Enterprise Architects combination closer to that provided by other modeling tools.
Reverse engineering from a compiled assembly will be a two-stage process:
Running the RE.NET Lite Reverse EngineerIn the next section I'll take you through the source code for the RE.NET Lite software and I'll explain how it works. In this section I'll show you how to use it so that you can find out what it does before looking at the internals, or you may even skip the source code discussion altogether.
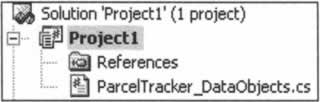
The software we look at here is a command-line utility, ReverseEngineer.exe, whose complete source can be found in the download code. To run it you first need to launch a Visual Studio .NET command window by choosing the Windows option Start | All Programs | Microsoft Visual Studio .NET | Visual Studio .NET Tools | Visual Studio .NET Command Prompt. At the command prompt type the command ReverseEngineer followed by the name of an assembly DLL (without the DLL extension), and redirect the output to a file with a .cs extension. As an example we'll reverse engineer one of the assemblies from the ParcelTracker solution. With the DLL - ParcelTracker_DataObjects.dll - copied into the same directory as the ReverseEngineer program, we would enter the following from the command line:
ReverseEngineer ParcelTracker_Dataobjects > ParcelTracker_Dataobjects.cs This command takes the assembly ParcelTracker_DataObjects.dll as input for reverse engineering, and redirects the results to a C# source file called ParcelTracker_DataObjects.cs.
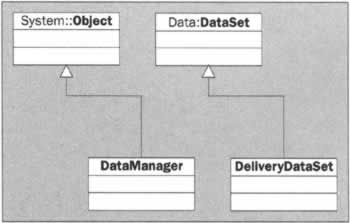
The resulting C# source file contains definitions for the DataManager and DeliveryDataSet classes that are located in that assembly. Here we've formatted the output for easier reading:
namespace ParcelTracker_DataObjects { public class DataManager : System.Object {} } namespace ParcelTracker_DataObjects { public class DeliveryDataSet : System.Data.DataSet , System.ComponentModel.IComponent, System.IDisposable, System.IServiceProvider, System.ComponentModel.IListSource, System.Xml.Serialization.IXmlSerializable, System.ComponentModel.ISupportInitialize, System.Runtime.Serialization.ISerializable {} } You might be intrigued by the multiple definitions of the same namespace in the code, one for each separate class. That does not adversely affect the next stage of the process, and it made the utility much easier to write. The next stage is to load the source file into a Visual Studio .NET project and reverse engineer it as you would any other C# source code. The steps are:
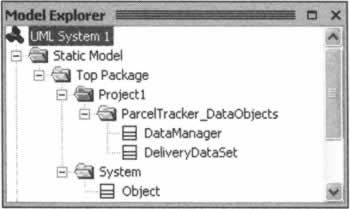
At this point the contents of the Solution Explorer will look something like this: Now choose Project | Visio UML | Reverse Engineer as described earlier in this chapter and you will be rewarded with a Visio model containing classes and interfaces from the assembly DLL plus any referenced classes from other namespaces. You were probably expecting to see more of the .NET Framework classes in the Model Explorer, weren't you? The System.Object is there, but what about the System.Data.Dataset class from which the DeliveryDataSet inherits in our reverse-engineered source code?
Including the Required Assembly ReferencesThe earlier statement "...you will be rewarded with a Visio model containing classes and interfaces from the assembly DLL plus any referenced classes from other namespaces" deserves a closer look here. The fact is that when we included the reverse engineered source file in a new C# project we did not take the extra step of actually referencing the required assemblies, which means that the resulting model in Visio is incomplete and - in fact - the project compilation will fail with messages of the form:
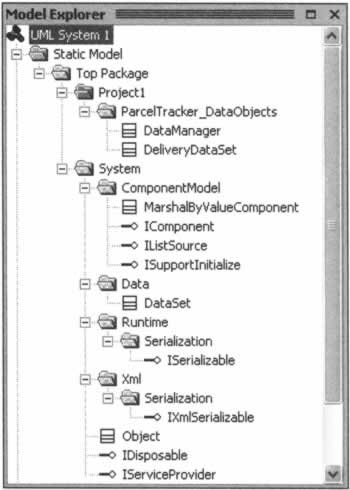
By referencing the required assemblies in the project (see below) we can compile the solution in Visual Studio .NET and build a fully populated UML model in Visio.
Here is the final model structure comprising the two classes from the ParcelTracker_Dataobjects project and the referenced classes from the other assemblies: Dragging some of those classes onto a Static Structure Diagram serves to prove that the model contains the appropriate inheritance relationships.
Creating a .NET Framework Base ModelYou can reverse engineer any .NET assembly regardless of the origin, whether home grown or supplied by a third party. Although C# is used as an intermediate source code, this technique is not limited to assemblies that were implemented originally in the C# language. It works just as well for assemblies that were authored using any of the .NET languages. With that in mind, you could easily use this technique to reverse engineer the .NET library assemblies themselves. But why is that so valuable? Well, if you've ever used another UML modeling tool you'll know that these often come provided with base framework models for each of the languages that they support. Rational Rose comes supplied with UML representations of the Java API classes, and now Rational XDE includes UML representations of the .NET framework classes. Visio for Enterprise Architects includes no such model of the .NET Framework classes, which to me seems something of an oversight. After all, many of the classes that compose your design model will inherit from the framework classes.
RE.NET Lite InternalsNow that we've seen the RE.NET Lite utility in action let's look at how it actually works. Well, it wouldn't work at all without a .NET feature called Reflection. Reflection allows you to write programs that can load .NET assemblies dynamically and investigate the contents of those assemblies at run time. Investigating the contents means discovering what types (classes and interfaces) are included in the assembly, what other types they are related to (such as through inheritance), and what attributes, operations, and properties are defined for those types.
The source code for the RE.NET Lite assembly reverse engineering utility, listed next, has been kept as simple as possible to get you started with reflection purely in the context of reverse engineering into UML. If you'd like to dig deeper into reflection after reviewing this code you can refer to an article Introducing .NET Regular Expressions with C# at http://www.csharptoday.com/content.asp?id=1812, or take a look in Professional C# 2nd Edition, Wrox Press (ISBN 1-86100-704-3). All of the code for this utility can be found within the file ReverseEngineer.cs, which is included in the download. In this first part we're referencing the System.Reflection namespace, which provides access to the .NET reflection features, and we're defining a class - named ClassDefinition - that will hold the details of each type that we encounter in an assembly.
// ********************************************** // ** RE.NET Lite Assembly Reverse Engineering ** // ** Produce by Tony Loton / LOTONtech Ltd. ** // ** for Wrox Press, September ©2002. ** // ********************************************** using System; using System.Reflection; namespace reverse { // ** This structure represents a Class or Interface // ** defined within the target assembly. public class ClassDefinition { public String name=""; public bool interfaceFlag=false; public String visibility=""; public bool abstractFlag=false; public String superClass=""; public String interfaces=""; } public class ReverseEngineer { The Main () method is the entry point for this utility and is where we make use of reflection.
// ** The main method is invoked from the Visual Studio NET // ** command prompt with a command like: // ** C:> ReverseEngineer System.Data > System.Data.cs public static void Main(String[] args) { // ** We can specify more than one assembly in the command, // ** So step through each of them. foreach (String assemblyName in args) { The next line of code loads an assembly from the Global Assembly Cache or the local directory thanks to a call to the static method Assembly.LoadWithPartialName(). As an alternative to this method you can load any assembly DLL by passing its full path, rather than the actual assembly name, to the Assembly.LoadFrom() method.
Assembly sourceAssembly = Assembly.LoadWithPartialName( assemblyName); if (sourceAssembly==null) return; // ** Get the Types (classes and interfaces) from the assembly // ** and step through them. Next, we get a collection of the types contained within the assembly and step through them one by one, ignoring some of the .NET internal types that we won't be interested in.
Type[] types=sourceAssembly.GetTypes(); foreach (Type thisType in types) { ClassDefinition classDefinition=new ClassDefinition(); // ** Ignore Types with the following names. if (thisType.Name.Equals("AssemblyRef") || thisType.Name.Equals("ExternDll") || thisType.Name.Equals("ThisAssembly")) If this type is an interface we discover the interface name and its visibility, both of which are stored in a ClassDefinition instance:
if (thisType.IsInterface) { // ** We have found an Interface type. classDefinition.name=""+thisType; classDefinition.interfaceFlag=true; // ** Is it public visibility? if (thisType.IsPublic) classDefinition.visibility="public"; else classDefinition.visibility=""; } If this type is a class we discover the class name, the name of any super-class, and any abstract modifier for the class. We also use the GetInterfaces() method to return the interfaces implemented by the class. All of the information we discover is stored in a ClassDefinition instance.
else if (thisType.IsClass) { // ** We have found a Class type. classDefinition.name=""+thisType; classDefinition.superClass=""+thisType.BaseType; // ** Is it abstract? if (thisType.IsAbstract) classDefinition.abstractFlag=true; else classDefinition.abstractFlag=false; // ** Is it public visibility? if (thisType.IsPublic) classDefinition.visibility="public"; else classDefinition.visibility=""; // ** Find out which interfaces this class implements. Type[] interfaces = thisType.GetInterfaces(); int interfaceCount=0; foreach (Type thisInterface in interfaces) { if (interfaceCount!=0) classDefinition.interfaces =classDefinition.interfaces+", "; classDefinition.interfaces =classDefinition.interfaces+thisInterface; interfaceCount++; } } Regardless of what type we've just investigated - interface or class - we'll have the details of that type within a ClassDefintion. To print out that class (or interface) definition as C# source code we'll call a separate method called printSource().
// ** Print the C# source code for this class definition. printSource(classDefinition); } } } We're using the C# language as a bridge between the assembly contents and the Visual Studio .NET reverse engineering feature. The following method will print out any class or interface definition as C# source code.
// ** This method writes out a class or interface definition // ** as C# source code. public static void printSource(ClassDefinition classDefinition) { // ** If the class name contains any unwanted characters or // ** is of zero length then return. int nameLength=classDefinition.name.Length; if (nameLength<=0) return; if (classDefinition.name.IndexOf("+")>=0) return; if (classDefinition.name.IndexOf(">")>=0) return; if (classDefinition.name.IndexOf("<")>=0) return; At this point we're sure we have a class or interface with a valid name that will compile. We need to separate the namespace from the fully qualified class name and write it out as code:
// ** Extract the namespace from the full class name. int lastDotPos=classDefinition.name.LastIndexOf("."); String nameSpace=""; if (lastDotPos>0) { nameSpace = classDefinition.name.Substring(0,lastDotPos); classDefinition.name=classDefinition.name.Substring( lastDotPos+1, nameLength-lastDotPos-1) ; } // ** Write out the namespace source code. if (nameSpace.Length>0) { System.Console.WriteLine("namespace "+nameSpace); System.Console.WriteLine("{"); } Next, we begin the reconstruction of the class definition - we first write out its visibility, whether it's an interface or a class, and then the class name:
// ** Write out the class visibility. System.Console.Write(" "+classDefinition.visibility+" "); // ** Write out the "class" or "interface" keyword. if (classDefinition.interfaceFlag) System.Console.Write("interface "); else System.Console.Write("class "); // ** Write out the class name. System.Console.Write(classDefinition.name+" "); Next we add the name of the class that our class inherits from (if any), followed by the list of interfaces it implements:
bool firstInheritance=true; // ** Write out the superclass name if there is one, // ** and set the firstInheritance flag. if (classDefinition.superClass.Length>0) { System.Console.Write(": "+classDefinition.superClass+" "); firstInheritance=false; } // ** Write out the names of any implemented interfaces. if (classDefinition.interfaces.Length>0) { if (firstInheritance) System.Console.Write(": "); else System.Console.Write(", ") ; System.Console.Write(classDefinition.interfaces+" "); } Finally, we write out a blank class body, and finish off the display of the namespace with a closing curly brace.
// ** Write out a blank class body. System.Console.WriteLine("{}"); if (nameSpace.Length>0) System.Console.WriteLine("\n}"); } } } If you decide to adapt the code above for your own purposes you can recompile it by issuing the following command from the Visual Studio .NET Command Prompt.
>csc ReverseEngineer.cs As a reminder, you can run the utility against the DLL you wish to reverse engineer, say the supplied ParcelTracker_Dataobjects.dll assembly, by issuing the following command:
>ReverseEngineer ParcelTracker_DataObjects > ParcelTracker Dataobjects.cs
RE.NET Lite LimitationsThe output from this version of the utility is useful as it stands, as a way to get basic representations of assembly classes - including the .NET Framework classes - into a Visio model; simply to visualize the assembly contents, or to inherit from those classes and interfaces. Using the supplied source code as a basis you could devise an even better reverse engineering utility that makes use of reflection down to the level of methods, fields and properties. In addition to inheriting from the reverse engineered classes, you could call the methods on those classes as part of your design-level use case realizations as shown here: If you don't want to do the hard work yourself, you can find an enhanced version of the RE.NET utility - which addresses these limitations - at http://www.lotontech.com/visualmodeling.
| |||||||||||||||||||||||||||||||||||


EAN: N/A
Pages: 85